Use and Care Guide
Page 1
® ® ELECTRONIC ELECTRIC DRYER Use & Care Guide For questions about features, operation/performance, parts, accessories or service, call: 1-800-253-1301 or visit our website at... www.whirlpool.com Table of Contents 2 W10151580A
® ® ELECTRONIC ELECTRIC DRYER Use & Care Guide For questions about features, operation/performance, parts, accessories or service, call: 1-800-253-1301 or visit our website at... www.whirlpool.com Table of Contents 2 W10151580A
Use and Care Guide
Page 2
...symbol. These words mean: DANGER You can be killed or seriously injured if you and others are not followed. 2 TABLE OF CONTENTS DRYER SAFETY 2 INSTALLATION INSTRUCTIONS 3 Tools and Parts 3 Optional Pedestal 4 Location Requirements 4 Electrical Requirements 6 Electrical Connection 8 Venting Requirements 13... Features 21 Changing Cycles, Options and Modifiers 21 Drying Rack Option 21 DRYER CARE 22 Cleaning the Dryer Location 22 Cleaning the Lint Screen 22 Cleaning the Dryer Interior 23 Removing Accumulated Lint 23 Vacation and Moving Care 23 TROUBLESHOOTING 24...
...symbol. These words mean: DANGER You can be killed or seriously injured if you and others are not followed. 2 TABLE OF CONTENTS DRYER SAFETY 2 INSTALLATION INSTRUCTIONS 3 Tools and Parts 3 Optional Pedestal 4 Location Requirements 4 Electrical Requirements 6 Electrical Connection 8 Venting Requirements 13... Features 21 Changing Cycles, Options and Modifiers 21 Drying Rack Option 21 DRYER CARE 22 Cleaning the Dryer Location 22 Cleaning the Lint Screen 22 Cleaning the Dryer Interior 23 Removing Accumulated Lint 23 Vacation and Moving Care 23 TROUBLESHOOTING 24...
Use and Care Guide
Page 3
...or SRDT and be cleaned periodically by qualified service personnel. ■ See installation instructions for use leveling legs if installing the dryer on or in the dryer. Read and follow basic precautions, including the following: ■ Read all parts are included. ■ Parts package. 4 .... If using a power supply cord: Use a UL listed power supply cord kit marked for grounding requirements. Items contaminated with clothes dryers. The wires that have the skills to carry out. ■ Do not use fabric softeners or products to eliminate static unless recommended...
...or SRDT and be cleaned periodically by qualified service personnel. ■ See installation instructions for use leveling legs if installing the dryer on or in the dryer. Read and follow basic precautions, including the following: ■ Read all parts are included. ■ Parts package. 4 .... If using a power supply cord: Use a UL listed power supply cord kit marked for grounding requirements. Items contaminated with clothes dryers. The wires that have the skills to carry out. ■ Do not use fabric softeners or products to eliminate static unless recommended...
Use and Care Guide
Page 4
...cm) White WHP1000SQ 15.5" (39.4 cm) with a shelf and bin dividers. Stack Kit Are you purchased your DUET SPORT™ washer and dryer? Ask for this dryer. If using a power cord, a grounded electrical outlet located within 2 ft (61 cm) of either side of different heights separately for Part...pedestal with shelf and bin dividers White WHP1500SQ Drying Rack To order a drying rack, call the dealer from whom you planning to place the dryer at least 18 inches (46 cm) above the floor. Do not operate your local building inspector. 4 These pedestals will need 18" ...
...cm) White WHP1000SQ 15.5" (39.4 cm) with a shelf and bin dividers. Stack Kit Are you purchased your DUET SPORT™ washer and dryer? Ask for this dryer. If using a power cord, a grounded electrical outlet located within 2 ft (61 cm) of either side of different heights separately for Part...pedestal with shelf and bin dividers White WHP1500SQ Drying Rack To order a drying rack, call the dealer from whom you planning to place the dryer at least 18 inches (46 cm) above the floor. Do not operate your local building inspector. 4 These pedestals will need 18" ...
Use and Care Guide
Page 5
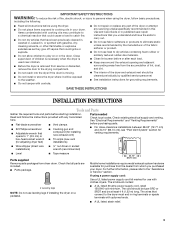
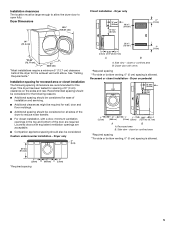
...(91.4 cm) *28.65" (72.77 cm) 27" (68.6 cm) *Most installations require a minimum 5" (12.7 cm) clearance behind the dryer for this dryer. Recessed or closet installation - closet or confined area *Required spacing **For side or bottom venting, 0" (0 cm) spacing is allowed. Custom undercounter installation...required for spacing of the door are recommended for the exhaust vent with elbow. Recommended spacing should be large enough to allow the dryer door to reduce noise transfer. ■ For closet installation, with vents *Required spacing **For side or bottom venting, 0" (0...
...(91.4 cm) *28.65" (72.77 cm) 27" (68.6 cm) *Most installations require a minimum 5" (12.7 cm) clearance behind the dryer for this dryer. Recessed or closet installation - closet or confined area *Required spacing **For side or bottom venting, 0" (0 cm) spacing is allowed. Custom undercounter installation...required for spacing of the door are recommended for the exhaust vent with elbow. Recommended spacing should be large enough to allow the dryer door to reduce noise transfer. ■ For closet installation, with vents *Required spacing **For side or bottom venting, 0" (0...
Use and Care Guide
Page 6
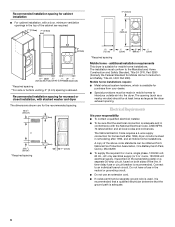
... provisions must conform to the Manufactured Home Construction and Safety Standard, Title 24 CFR, Part 3280 (formerly the Federal Standard for homes built after 1996, dryer circuits involved in .2 * (155 cm2) *Required spacing 3"* (7.6 cm) 1"* (2.5 cm) 5"* (12.7 cm) 1" (2.5 cm) 27" (68....6 cm) 1" (2.5 cm) *Required spacing Mobile home - Do not have a fuse in conformance with stacked washer and dryer The dimensions shown are required. 7"* (17.8 cm) 7"* (17.8 cm) 6"* (15.2 cm) 72" (182.9 cm) 9"* (22.9 cm) 5"** 28.65" 1"* 1" 27" 1"...
... provisions must conform to the Manufactured Home Construction and Safety Standard, Title 24 CFR, Part 3280 (formerly the Federal Standard for homes built after 1996, dryer circuits involved in .2 * (155 cm2) *Required spacing 3"* (7.6 cm) 1"* (2.5 cm) 5"* (12.7 cm) 1" (2.5 cm) 27" (68....6 cm) 1" (2.5 cm) *Required spacing Mobile home - Do not have a fuse in conformance with stacked washer and dryer The dimensions shown are required. 7"* (17.8 cm) 7"* (17.8 cm) 6"* (15.2 cm) 72" (182.9 cm) 9"* (22.9 cm) 5"** 28.65" 1"* 1" 27" 1"...

Use and Care Guide
Page 7
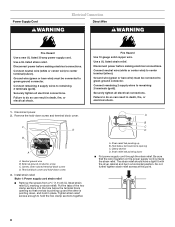
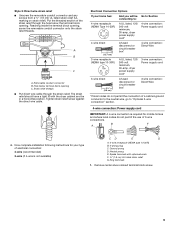
... wire, see "Optional 3-wire connection" in accordance with all local codes and ordinances. ■ For a permanently connected dryer: This dryer must be connected to a grounded metal, permanent wiring system, or an equipment-grounding conductor must be run with the circuit... metallic conduit. The wires that is properly grounded. SAVE THESE INSTRUCTIONS 7 GROUNDING INSTRUCTIONS ■ For a grounded, cord-connected dryer: This dryer must have four 10-gauge copper wires and match a 4-wire receptacle of least resistance for electric current. WARNING: Improper connection ...
... wire, see "Optional 3-wire connection" in accordance with all local codes and ordinances. ■ For a permanently connected dryer: This dryer must be connected to a grounded metal, permanent wiring system, or an equipment-grounding conductor must be run with the circuit... metallic conduit. The wires that is properly grounded. SAVE THESE INSTRUCTIONS 7 GROUNDING INSTRUCTIONS ■ For a grounded, cord-connected dryer: This dryer must have four 10-gauge copper wires and match a 4-wire receptacle of least resistance for electric current. WARNING: Improper connection ...
Use and Care Guide
Page 8
... other is inside the strain relief. Strain relief tab pointing down screw and terminal block cover. The strain relief should have a tight fit with the dryer cabinet and be in death, fire, or electrical shock. 1. Securely tighten all electrical connections. Ground wire (green or bare wire) must be connected to do...
... other is inside the strain relief. Strain relief tab pointing down screw and terminal block cover. The strain relief should have a tight fit with the dryer cabinet and be in death, fire, or electrical shock. 1. Securely tighten all electrical connections. Ground wire (green or bare wire) must be connected to do...
Use and Care Guide
Page 9
...) 3-wire (if 4-wire is not available) CD E G A. 4-wire receptacle (NEMA type 14-30R) B. 4-prong plug C. Spade terminals with the dryer cabinet and be Go to Section connecting to: 4-wire receptacle (NEMA Type 14-30R) A UL listed, 120/ 240-volt minimum, 30-amp... disconnect or circuit breaker box* 4-wire connection: Direct Wire 3-wire receptacle (NEMA type 10-30R) A UL listed, 120/ 240-volt minimum, 30-amp, dryer power supply cord* 3-wire connection: Power supply cord 3-wire direct 3¹⁄₂" (8.9 cm) A fused disconnect or circuit breaker box* 3-wire connection: ...
...) 3-wire (if 4-wire is not available) CD E G A. 4-wire receptacle (NEMA type 14-30R) B. 4-prong plug C. Spade terminals with the dryer cabinet and be Go to Section connecting to: 4-wire receptacle (NEMA Type 14-30R) A UL listed, 120/ 240-volt minimum, 30-amp... disconnect or circuit breaker box* 4-wire connection: Direct Wire 3-wire receptacle (NEMA type 10-30R) A UL listed, 120/ 240-volt minimum, 30-amp, dryer power supply cord* 3-wire connection: Power supply cord 3-wire direct 3¹⁄₂" (8.9 cm) A fused disconnect or circuit breaker box* 3-wire connection: ...
Use and Care Guide
Page 10
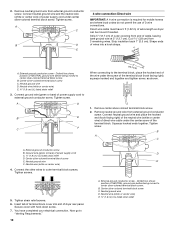
...4. Neutral wire (white or center wire) E. ¾" (1.9 cm) UL listed strain relief Connect ground wire (green or bare) of extra length so dryer can be moved if needed. Remove center silver-colored terminal block screw. 2. Strip 5" (12.7 cm) of NEUTRAL ground wire before being moved to external... block cover into a hook shape. (2.15" cm) A. B. Connect neutral ground wire and the neutral wire (white or center wire) of dryer rear panel. Center silver-colored terminal block screw E. 2. Dotted line shows position of outer covering from external ground conductor screw.
...4. Neutral wire (white or center wire) E. ¾" (1.9 cm) UL listed strain relief Connect ground wire (green or bare) of extra length so dryer can be moved if needed. Remove center silver-colored terminal block screw. 2. Strip 5" (12.7 cm) of NEUTRAL ground wire before being moved to external... block cover into a hook shape. (2.15" cm) A. B. Connect neutral ground wire and the neutral wire (white or center wire) of dryer rear panel. Center silver-colored terminal block screw E. 2. Dotted line shows position of outer covering from external ground conductor screw.
Use and Care Guide
Page 11
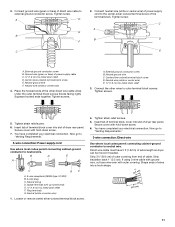
...your electrical connection. Neutral prong D. Spade terminals with outer covering. Insert tab of terminal block cover into slot of dryer rear panel. Strip insulation back 1" (2.5 cm). If using 3-wire cable with ground wire, cut bare wire even... connection: Power supply cord Use where local codes permit connecting cabinet-ground conductor to neutral wire. A. Insert tab of terminal block cover into slot of dryer rear panel. B D E A C GF A. 3-wire receptacle (NEMA type 10-30R) B. 3-wire plug C. Loosen or remove center silver-colored terminal block screw. 4. 3. ...
...your electrical connection. Neutral prong D. Spade terminals with outer covering. Insert tab of terminal block cover into slot of dryer rear panel. Strip insulation back 1" (2.5 cm). If using 3-wire cable with ground wire, cut bare wire even... connection: Power supply cord Use where local codes permit connecting cabinet-ground conductor to neutral wire. A. Insert tab of terminal block cover into slot of dryer rear panel. B D E A C GF A. 3-wire receptacle (NEMA type 10-30R) B. 3-wire plug C. Loosen or remove center silver-colored terminal block screw. 4. 3. ...

Use and Care Guide
Page 12
External ground conductor screw B. A. External ground conductor screw B. Insert tab of terminal block cover into slot of dryer rear panel. Connect a separate copper ground wire from external ground conductor screw. Tighten screw. C A Optional 3-wire ... "Venting Requirements." 4. Remove neutral ground wire from the external ground conductor screw to an adequate ground. 6. Insert tab of terminal block cover into slot of dryer rear panel. Squeeze hooked end together. B A C D E B D F E A. Neutral ground wire D. When connecting to the terminal block, place the...
External ground conductor screw B. A. External ground conductor screw B. Insert tab of terminal block cover into slot of dryer rear panel. Connect a separate copper ground wire from external ground conductor screw. Tighten screw. C A Optional 3-wire ... "Venting Requirements." 4. Remove neutral ground wire from the external ground conductor screw to an adequate ground. 6. Insert tab of terminal block cover into slot of dryer rear panel. Squeeze hooked end together. B A C D E B D F E A. Neutral ground wire D. When connecting to the terminal block, place the...
Use and Care Guide
Page 13
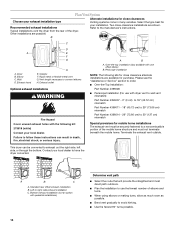
...metal vent to avoid sagging and kinking that may result in: Moisture damage to woodwork, furniture, paint, wallpaper, carpets, etc. The dryer exhaust must not be connected or secured with screws or other fastening devices that may be purchased from entering the home. ■ ...Observe all joints. ■ Exhaust vent must be fully extended and supported when the dryer is recommended to keep rodents and insects from your dealer or by calling Whirlpool Parts and Accessories. B If this dryer MUST BE EXHAUSTED OUTDOORS. For more information, see the "Assistance or Service" section...
...metal vent to avoid sagging and kinking that may result in: Moisture damage to woodwork, furniture, paint, wallpaper, carpets, etc. The dryer exhaust must not be connected or secured with screws or other fastening devices that may be purchased from entering the home. ■ ...Observe all joints. ■ Exhaust vent must be fully extended and supported when the dryer is recommended to keep rodents and insects from your dealer or by calling Whirlpool Parts and Accessories. B If this dryer MUST BE EXHAUSTED OUTDOORS. For more information, see the "Assistance or Service" section...
Use and Care Guide
Page 14
... systems come in death, fire, electrical shock, or serious injury. Refer to connect elbows H. B C D A E F G A. Dryer B. Clamps F. This dryer can result in many varieties. Elbow C. Exhaust outlet Optional exhaust installations WARNING Fire Hazard Cover unused exhaust holes with one offset elbow) B....or through the bottom. Select the type best for mobile home installations The exhaust vent must be converted to have the dryer converted. Two close clearance alternate installations are possible. Rigid metal or flexible metal vent G. Please see the "Assistance or...
... systems come in death, fire, electrical shock, or serious injury. Refer to connect elbows H. B C D A E F G A. Dryer B. Clamps F. This dryer can result in many varieties. Elbow C. Exhaust outlet Optional exhaust installations WARNING Fire Hazard Cover unused exhaust holes with one offset elbow) B....or through the bottom. Select the type best for mobile home installations The exhaust vent must be converted to have the dryer converted. Two close clearance alternate installations are possible. Rigid metal or flexible metal vent G. Please see the "Assistance or...

Use and Care Guide
Page 15
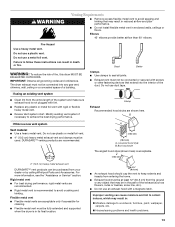
...See illustration. 3. Find the diamond marking. 4. If connecting to achieve the best drying performance. Check that will : ■ Shorten the life of the dryer. Check levelness first side to side, then front to seal all joints. Exhaust systems longer than those specified will help to existing vent, make sure... hood. Avoid 90º turns. Do not crush or kink vent. 3. (On gas models) Check that extend into the interior of the dryer. 2. Once the exhaust vent connection is close to finish turning the legs until it is made, remove the corner posts and cardboard. Use caulking...
...See illustration. 3. Find the diamond marking. 4. If connecting to achieve the best drying performance. Check that will : ■ Shorten the life of the dryer. Check levelness first side to side, then front to seal all joints. Exhaust systems longer than those specified will help to existing vent, make sure... hood. Avoid 90º turns. Do not crush or kink vent. 3. (On gas models) Check that extend into the interior of the dryer. 2. Once the exhaust vent connection is close to finish turning the legs until it is made, remove the corner posts and cardboard. Use caulking...

Use and Care Guide
Page 16
...with the inside (inner door assembly) facing up . 1. It is important that hold the door hinge on opposite side of the dryer or work space to scratch the inner door surface. Disengage locking tabs by rotating inner ring clockwise. Reinstall plug strips on the front... to protect the surface. To fit correctly, the inner door assembly edge fits completely inside the outer door assembly. Slide the head of the dryer. Dryer front panel B. Reinstall the 4 screws. 4. Door assembly 2. Plug strips C. Hinge cover 3. Place the inner door assembly inside the outer ...
...with the inside (inner door assembly) facing up . 1. It is important that hold the door hinge on opposite side of the dryer or work space to scratch the inner door surface. Disengage locking tabs by rotating inner ring clockwise. Reinstall plug strips on the front... to protect the surface. To fit correctly, the inner door assembly edge fits completely inside the outer door assembly. Slide the head of the dryer. Dryer front panel B. Reinstall the 4 screws. 4. Door assembly 2. Plug strips C. Hinge cover 3. Place the inner door assembly inside the outer ...

Use and Care Guide
Page 17
...This odor is common when the heating element is not crushed or kinked. 5. A B A. Remove the strike. 3. B A A. Check that the dryer is closed. 11. Dispose of/recycle all of the screwdriver under the plugs, being certain not to remove any tape remaining on the opposite side...B. Slide the head of your tools. 3. If there is still no heat, contact a qualified technician. Wipe the dryer drum interior thoroughly with a damp cloth to scratch the dryer surface. Use a small flat-blade screwdriver to see which step was skipped. 2. Plug strip (cannot be 2 household ...
...This odor is common when the heating element is not crushed or kinked. 5. A B A. Remove the strike. 3. B A A. Check that the dryer is closed. 11. Dispose of/recycle all of the screwdriver under the plugs, being certain not to remove any tape remaining on the opposite side...B. Slide the head of your tools. 3. If there is still no heat, contact a qualified technician. Wipe the dryer drum interior thoroughly with a damp cloth to scratch the dryer surface. Use a small flat-blade screwdriver to see which step was skipped. 2. Plug strip (cannot be 2 household ...
Use and Care Guide
Page 18
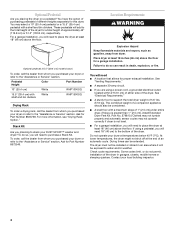
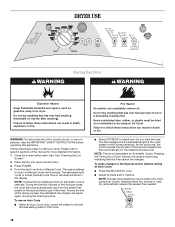
...changes to follow these basic steps to adjust how dry you want the load. NOTE: Dryness level selections can completely remove oil. Place laundry into dryer and shut door. 3. Press POWER. 4. The preset settings for the selected dryness level. NOTE: A preset time is displayed when an automatic ... only while using an Air Cycle. NOTE: Time is selected. The time displayed is an estimated length of this appliance. DRYER USE WARNING Starting Your Dryer WARNING Explosion Hazard Keep flammable materials and vapors, such as gasoline, away from the preset time based on the size and ...
...changes to follow these basic steps to adjust how dry you want the load. NOTE: Dryness level selections can completely remove oil. Place laundry into dryer and shut door. 3. Press POWER. 4. The preset settings for the selected dryness level. NOTE: A preset time is displayed when an automatic ... only while using an Air Cycle. NOTE: Time is selected. The time displayed is an estimated length of this appliance. DRYER USE WARNING Starting Your Dryer WARNING Explosion Hazard Keep flammable materials and vapors, such as gasoline, away from the preset time based on the size and ...
Use and Care Guide
Page 19
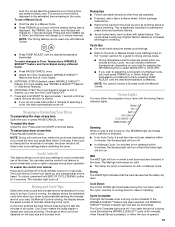
... and Dryness are available. ■ If desired, add a fabric softener sheet. This is preset to avoid unintended use of selecting a cycle, the dryer automatically shuts off . ■ In a Manual Cycle, if a wet item is displayed. Status Lights You may turn on until the desired drying time...press TIMING Up or Down. You can be illuminated. NOTE: The Timing feature can choose a different dryness level, depending on your dryer at any time Press PAUSE/CANCEL twice. To make changes to increased shrinkage or wrinkling. This could cause overdrying of lighter fabrics, leading...
... and Dryness are available. ■ If desired, add a fabric softener sheet. This is preset to avoid unintended use of selecting a cycle, the dryer automatically shuts off . ■ In a Manual Cycle, if a wet item is displayed. Status Lights You may turn on until the desired drying time...press TIMING Up or Down. You can be illuminated. NOTE: The Timing feature can choose a different dryness level, depending on your dryer at any time Press PAUSE/CANCEL twice. To make changes to increased shrinkage or wrinkling. This could cause overdrying of lighter fabrics, leading...

Use and Care Guide
Page 20
... and automatically adjusts the drying time for Timed Dry. 20 Manual Preset Cycle Settings Manual Cycles Load Type Temp. A sensor detects the moisture in the dryer too long. Items will be adjusted. You can change the actual time in your cycle. Timed Dry is selected. Touch Up Use this setting to...
... and automatically adjusts the drying time for Timed Dry. 20 Manual Preset Cycle Settings Manual Cycles Load Type Temp. A sensor detects the moisture in the dryer too long. Items will be adjusted. You can change the actual time in your cycle. Timed Dry is selected. Touch Up Use this setting to...


