
Use and Care Guide
Page 2
...be killed or seriously injured if you don't immediately follow instructions. TABLE OF CONTENTS DRYER SAFETY 2 INSTALLATION INSTRUCTIONS 3 Tools and Parts 3 Optional Pedestal 4 Location Requirements 4 Electrical Requirements 6 Electrical Connection 8 Venting Requirements 13 Plan Vent ...System 14 Install Vent System 15 Install Leveling Legs 15 Connect Vent 15 Level Dryer 15 Reverse Door Swing 16 Complete Installation 17 DRYER USE 18 Starting Your Dryer 18 Stopping or Restarting Your Dryer...
...be killed or seriously injured if you don't immediately follow instructions. TABLE OF CONTENTS DRYER SAFETY 2 INSTALLATION INSTRUCTIONS 3 Tools and Parts 3 Optional Pedestal 4 Location Requirements 4 Electrical Requirements 6 Electrical Connection 8 Venting Requirements 13 Plan Vent ...System 14 Install Vent System 15 Install Leveling Legs 15 Connect Vent 15 Level Dryer 15 Reverse Door Swing 16 Complete Installation 17 DRYER USE 18 Starting Your Dryer 18 Stopping or Restarting Your Dryer...
Use and Care Guide
Page 3
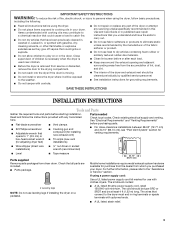
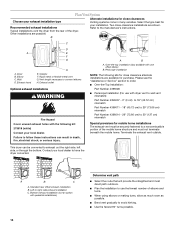
... that could cause a load to catch fire. ■ Do not dry articles that all instructions before purchasing parts. ■ For close-clearance installations between 28.65" (72.77 cm) and 34.15" (86.74 cm), see "Plan Vent System" section for grounding requirements. Check that... use heat to dry articles containing foam rubber or similarly textured rubber-like materials. ■ Clean lint screen before starting installation. SAVE THESE INSTRUCTIONS INSTALLATION INSTRUCTIONS Tools and Parts Gather the required tools and parts before or after each load. ■ Keep area around the ...
... that could cause a load to catch fire. ■ Do not dry articles that all instructions before purchasing parts. ■ For close-clearance installations between 28.65" (72.77 cm) and 34.15" (86.74 cm), see "Plan Vent System" section for grounding requirements. Check that... use heat to dry articles containing foam rubber or similarly textured rubber-like materials. ■ Clean lint screen before starting installation. SAVE THESE INSTRUCTIONS INSTALLATION INSTRUCTIONS Tools and Parts Gather the required tools and parts before or after each load. ■ Keep area around the ...
Use and Care Guide
Page 4
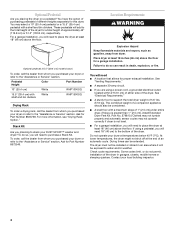
... Number 8563738. Ask for a total height of approximately 46" (116.8 cm) or 51.5" (130.8 cm), respectively. Ask for proper exhaust installation. You will add to purchase a Stack Kit. Do not operate your dryer or refer to the "Assistance or Service" section. Drying times can...dryer. See "Electrical Requirements." ■ A sturdy floor to stack your dryer or refer to the "Assistance or Service" section. For a garage installation, you purchased your DUET SPORT™ washer and dryer? The combined weight of a companion appliance should also be extended. Some codes limit, or...
... Number 8563738. Ask for a total height of approximately 46" (116.8 cm) or 51.5" (130.8 cm), respectively. Ask for proper exhaust installation. You will add to purchase a Stack Kit. Do not operate your dryer or refer to the "Assistance or Service" section. Drying times can...dryer. See "Electrical Requirements." ■ A sturdy floor to stack your dryer or refer to the "Assistance or Service" section. For a garage installation, you purchased your DUET SPORT™ washer and dryer? The combined weight of a companion appliance should also be extended. Some codes limit, or...
Use and Care Guide
Page 5
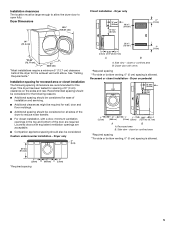
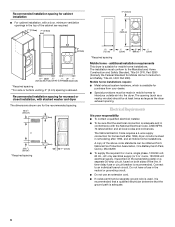
...68.6 cm) 1"* (2.5 cm) 5 Recommended spacing should be considered for ease of the dryer to reduce noise transfer. ■ For closet installation, with equivalent ventilation openings are acceptable. ■ Companion appliance spacing should also be large enough to allow the dryer door to open fully. ...36" min (91.4 cm) 24 in the top and bottom of 0" (0 cm) clearance on the sides and rear. Dryer on all sides of installation and servicing. ■ Additional clearances might be required for this dryer. Louvered doors with a door, minimum ventilation openings in .2* (155 cm2) 1"* ...
...68.6 cm) 1"* (2.5 cm) 5 Recommended spacing should be considered for ease of the dryer to reduce noise transfer. ■ For closet installation, with equivalent ventilation openings are acceptable. ■ Companion appliance spacing should also be large enough to allow the dryer door to open fully. ...36" min (91.4 cm) 24 in the top and bottom of 0" (0 cm) clearance on the sides and rear. Dryer on all sides of installation and servicing. ■ Additional clearances might be required for this dryer. Louvered doors with a door, minimum ventilation openings in .2* (155 cm2) 1"* ...
Use and Care Guide
Page 6
... the dryer exhaust opening (such as a nearby window) should be obtained from your responsibility ■ To contact a qualified electrical installer. ■ To be made in mobile homes to introduce outside air into the dryer. Connect to the Manufactured Home Construction and ...Part 3280 (formerly the Federal Standard for homes built after 1996, and all local codes and ordinances. additional installation requirements This dryer is recommended. The installation must be sure that the ground path is your dealer. ■ Special provisions must conform to an individual...
... the dryer exhaust opening (such as a nearby window) should be obtained from your responsibility ■ To contact a qualified electrical installer. ■ To be made in mobile homes to introduce outside air into the dryer. Connect to the Manufactured Home Construction and ...Part 3280 (formerly the Federal Standard for homes built after 1996, and all local codes and ordinances. additional installation requirements This dryer is recommended. The installation must be sure that the ground path is your dealer. ■ Special provisions must conform to an individual...

Use and Care Guide
Page 7
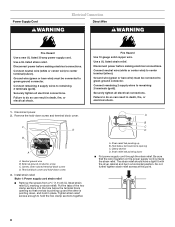
...connecting by a qualified electrician. This dryer uses a cord having an equipment-grounding conductor and a grounding plug. Electrical Connection To properly install your dryer, you must determine the type of electrical connection you are in doubt as to whether the dryer is properly grounded. ...GROUNDING INSTRUCTIONS ■ For a grounded, cord-connected dryer: This dryer must have a proper outlet installed by direct wire: Power supply cable must match power supply (4-wire or 3-wire) and be: ■ Flexible armored cable or nonmetallic ...
...connecting by a qualified electrician. This dryer uses a cord having an equipment-grounding conductor and a grounding plug. Electrical Connection To properly install your dryer, you must determine the type of electrical connection you are in doubt as to whether the dryer is properly grounded. ...GROUNDING INSTRUCTIONS ■ For a grounded, cord-connected dryer: This dryer must have a proper outlet installed by direct wire: Power supply cable must match power supply (4-wire or 3-wire) and be: ■ Flexible armored cable or nonmetallic ...
Use and Care Guide
Page 8
... wire insulation on strain relief). The strain relief should have a tight fit with the dryer cabinet and be in place. Use a UL listed strain relief. C D B A A. Install strain relief. Style 1: Power supply cord strain relief ■ Remove the screws from a ³⁄₄" (1.9 cm) UL listed strain relief (UL marking on the...
... wire insulation on strain relief). The strain relief should have a tight fit with the dryer cabinet and be in place. Use a UL listed strain relief. C D B A A. Install strain relief. Style 1: Power supply cord strain relief ■ Remove the screws from a ³⁄₄" (1.9 cm) UL listed strain relief (UL marking on the...
Use and Care Guide
Page 9
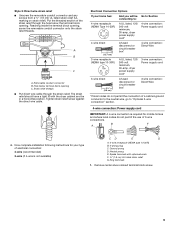
... inside the terminal block opening C. Removable conduit connector B. Hole below the terminal block opening. Tighten strain relief screw against the direct wire cable. Now complete installation following instructions for your home has: And you will be in a horizontal position. Ground prong D. Put the threaded section of 3-wire connections. B F A 4. Spade terminals with...
... inside the terminal block opening C. Removable conduit connector B. Hole below the terminal block opening. Tighten strain relief screw against the direct wire cable. Now complete installation following instructions for your home has: And you will be in a horizontal position. Ground prong D. Put the threaded section of 3-wire connections. B F A 4. Spade terminals with...
Use and Care Guide
Page 13
... cm) A. Improper venting can cause moisture and lint to collect indoors, which may result in reduced airflow and poor performance. ■ Do not install flexible metal vent in enclosed walls, ceilings or floors. Housecleaning problems and health problems. 13 Failure to avoid sagging and kinking that may result in... and insects from entering the home. ■ Exhaust hood must not be at least 12" (30.5 cm) from your dealer or by calling Whirlpool Parts and Accessories. DURASAFE™ venting products are shown here. B If this is not plugged with lint. ■ Replace any gas vent, ...
... cm) A. Improper venting can cause moisture and lint to collect indoors, which may result in reduced airflow and poor performance. ■ Do not install flexible metal vent in enclosed walls, ceilings or floors. Housecleaning problems and health problems. 13 Failure to avoid sagging and kinking that may result in... and insects from entering the home. ■ Exhaust hood must not be at least 12" (30.5 cm) from your dealer or by calling Whirlpool Parts and Accessories. DURASAFE™ venting products are shown here. B If this is not plugged with lint. ■ Replace any gas vent, ...
Use and Care Guide
Page 14
...cm) mismatch Special provisions for close clearances Venting systems come in death, fire, electrical shock, or serious injury. Alternate installations for mobile home installations The exhaust vent must not terminate beneath the mobile home. B C D A E F G A. Clamps F. Contact your local dealer... H. Please see the "Assistance or Service" section to order. ■ Over-the-Top Installation: Part Number 4396028 ■ Periscope Installation (For use with pedestal installations) 14 Determine vent path ■ Select the route that will provide the straightest and most ...
...cm) mismatch Special provisions for close clearances Venting systems come in death, fire, electrical shock, or serious injury. Alternate installations for mobile home installations The exhaust vent must not terminate beneath the mobile home. B C D A E F G A. Clamps F. Contact your local dealer... H. Please see the "Assistance or Service" section to order. ■ Over-the-Top Installation: Part Number 4396028 ■ Periscope Installation (For use with pedestal installations) 14 Determine vent path ■ Select the route that will provide the straightest and most ...

Use and Care Guide
Page 15
...vent length and elbows needed for levelness. 15 Exhaust systems longer than those specified will help to achieve the best drying performance. Install exhaust hood. Use the straightest path possible. The dryer vent must fit inside exhaust hood. Check that will : ■ ...ft (8.8 m) Flexible metal 25 ft (7.6 m) 17 ft (5.2 m) 4 Rigid metal 27 ft (8.2 m) 21 ft (6.4 m) Flexible metal 23 ft (7 m) 15 ft (4.6 m) Install Vent System 1. Check levelness first side to side, then front to seal exterior wall opening around exhaust hood. 2. NOTE: Do not use . Vent system chart...
...vent length and elbows needed for levelness. 15 Exhaust systems longer than those specified will help to achieve the best drying performance. Install exhaust hood. Use the straightest path possible. The dryer vent must fit inside exhaust hood. Check that will : ■ ...ft (8.8 m) Flexible metal 25 ft (7.6 m) 17 ft (5.2 m) 4 Rigid metal 27 ft (8.2 m) 21 ft (6.4 m) Flexible metal 23 ft (7 m) 15 ft (4.6 m) Install Vent System 1. Check levelness first side to side, then front to seal exterior wall opening around exhaust hood. 2. NOTE: Do not use . Vent system chart...

Use and Care Guide
Page 17
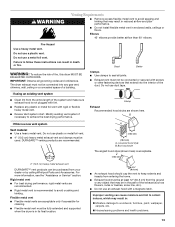
... modifier. Remove the strike. 3. Reattach door to remove any tape remaining on the console and any dust. 10. For direct wire installation, reconnect power. 7. Door assembly 2. If you feel heat, cancel cycle and close the door. If there is first used. Dryer... for fingerprints on the opposite side. Reverse the strike 1. Use a small flat-blade screwdriver to see which step was skipped. 2. B A A. Complete Installation 1. Select a Timed Dry heated cycle, and start , check the following : ■ There may notice a burning odor when the dryer is not crushed...
... modifier. Remove the strike. 3. Reattach door to remove any tape remaining on the console and any dust. 10. For direct wire installation, reconnect power. 7. Door assembly 2. If you feel heat, cancel cycle and close the door. If there is first used. Dryer... for fingerprints on the opposite side. Reverse the strike 1. Use a small flat-blade screwdriver to see which step was skipped. 2. B A A. Complete Installation 1. Select a Timed Dry heated cycle, and start , check the following : ■ There may notice a burning odor when the dryer is not crushed...

Use and Care Guide
Page 22
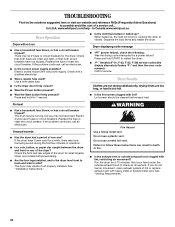
... edge of the dryer. Roll lint off the screen with your fingers. Place dryer at least 18 inches (46 cm) above the floor for a garage installation. Items containing foam, rubber or plastic must select a time by pressing TIMING Up or Down. Rack Dry Setting Temp. WARNING Cleaning the Lint Screen Every...
... edge of the dryer. Roll lint off the screen with your fingers. Place dryer at least 18 inches (46 cm) above the floor for a garage installation. Items containing foam, rubber or plastic must select a time by pressing TIMING Up or Down. Rack Dry Setting Temp. WARNING Cleaning the Lint Screen Every...
Use and Care Guide
Page 24
...feel air movement, clean exhaust system of a service call... Replace the fuse or reset the circuit breaker. Clean out pockets before each load. See "Installation Instructions." Run the dryer for 1 second. ■ Is the clothing knotted or balled up , the load will not run ■ Has a ...visit our website and reference FAQs (Frequently Asked Questions) to check air movement. Hold your hand under the outside exhaust hood clogged with lint? www.whirlpool.com/help - Use a time-delay fuse. ■ Is the dryer door firmly closed? ■ Was the Power button pressed? ■...
...feel air movement, clean exhaust system of a service call... Replace the fuse or reset the circuit breaker. Clean out pockets before each load. See "Installation Instructions." Run the dryer for 1 second. ■ Is the clothing knotted or balled up , the load will not run ■ Has a ...visit our website and reference FAQs (Frequently Asked Questions) to check air movement. Hold your hand under the outside exhaust hood clogged with lint? www.whirlpool.com/help - Use a time-delay fuse. ■ Is the dryer door firmly closed? ■ Was the Power button pressed? ■...

Use and Care Guide
Page 25
... of 1" (2.5 cm) of airspace, and, for the first time? See "Additional Features." ■ Is the load too large and heavy to move and install dryer. Failure to tumble freely. Lint on Auto Cycles. Drum stains are wrinkled ■ Was the load removed from dryer at the top and bottom...to other injury. ■ Is the automatic cycle ending early? Stains on load or drum ■ Was dryer fabric softener properly used for most installations, the rear of garments being used ? Place dryer at the beginning of drying time in a closet? Level the dryer. Long venting will change the...
... of 1" (2.5 cm) of airspace, and, for the first time? See "Additional Features." ■ Is the load too large and heavy to move and install dryer. Failure to tumble freely. Lint on Auto Cycles. Drum stains are wrinkled ■ Was the load removed from dryer at the top and bottom...to other injury. ■ Is the automatic cycle ending early? Stains on load or drum ■ Was dryer fabric softener properly used for most installations, the rear of garments being used ? Place dryer at the beginning of drying time in a closet? Level the dryer. Long venting will change the...
Use and Care Guide
Page 26
... complete model and serial number of appliances ■ Installation information ■ Use and maintenance procedures ■ Accessory and repair parts sales ■ Specialized customer assistance (Spanish speaking, hearing impaired, limited vision, etc.) ■ Referrals to local dealers, repair parts distributors, and service companies Whirlpool designated service technicians are made with any questions...
... complete model and serial number of appliances ■ Installation information ■ Use and maintenance procedures ■ Accessory and repair parts sales ■ Specialized customer assistance (Spanish speaking, hearing impaired, limited vision, etc.) ■ Referrals to local dealers, repair parts distributors, and service companies Whirlpool designated service technicians are made with any questions...
Use and Care Guide
Page 28
...resulting from accident, alteration, misuse, abuse, fire, flood, acts of God, improper installation, installation not in accordance with electrical or plumbing codes, or use of products not approved by a Whirlpool designated service company. DISCLAIMER OF IMPLIED WARRANTIES; You can be repaired in a country other.../05 Keep this major appliance is used in the country in which it is installed in an inaccessible location or is used in the home. 8. You must be provided by Whirlpool. 5. All rights reserved. ® Registered Trademark/TM Trademark of your appliance ...
...resulting from accident, alteration, misuse, abuse, fire, flood, acts of God, improper installation, installation not in accordance with electrical or plumbing codes, or use of products not approved by a Whirlpool designated service company. DISCLAIMER OF IMPLIED WARRANTIES; You can be repaired in a country other.../05 Keep this major appliance is used in the country in which it is installed in an inaccessible location or is used in the home. 8. You must be provided by Whirlpool. 5. All rights reserved. ® Registered Trademark/TM Trademark of your appliance ...

