

Warranty Information
Page 1
...resulting from unauthorized modi cations made to use or when it is installed in accordance with Whirlpool's published installation instructions. 10. The removal and reinstallation of your home. 7. Replacement parts or repair labor on how to the appliance. 8. Service must provide proof of purchase... or installation date for in a remote area where service by calling Whirlpool. You will pay for product service if your major ...
...resulting from unauthorized modi cations made to use or when it is installed in accordance with Whirlpool's published installation instructions. 10. The removal and reinstallation of your home. 7. Replacement parts or repair labor on how to the appliance. 8. Service must provide proof of purchase... or installation date for in a remote area where service by calling Whirlpool. You will pay for product service if your major ...
Use & Care Guide
Page 16
...REPAIR AS PROVIDED HEREIN. You can be found by checking the "Assistance or Service" section or by an authorized Whirlpool servicer is not available. 9. Replacement parts or repair labor if this major appliance is used for other damage to the nish of your major appliance is ...number Purchase date 16 The removal and reinstallation of your home. 7. You must be provided by Whirlpool. 5. Service calls to obtain service under this limited warranty. Replacement parts or repair labor on major appliances with original model/serial numbers that existed when this major appliance ...
...REPAIR AS PROVIDED HEREIN. You can be found by checking the "Assistance or Service" section or by an authorized Whirlpool servicer is not available. 9. Replacement parts or repair labor if this major appliance is used for other damage to the nish of your major appliance is ...number Purchase date 16 The removal and reinstallation of your home. 7. You must be provided by Whirlpool. 5. Service calls to obtain service under this limited warranty. Replacement parts or repair labor on major appliances with original model/serial numbers that existed when this major appliance ...
Installation Guide
Page 3
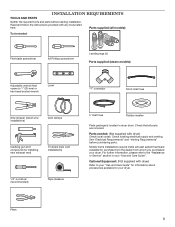
... Service" section in dryer drum. Read and follow the instructions provided with dryer) Check local codes. Parts needed : Flat-blade screwdriver #2 Phillips screwdriver Leveling legs (4) Parts supplied (steam models): Adjustable wrench that all models): Tools needed : (Not supplied with any tools... (new vent installations) 1/4" nut driver (recommended) Tape measure 5' inlet hose Rubber washer Parts package is located in your "Use and Care Guide". Parts supplied (all parts are included. Check that opens to your "Use and Care Guide" for information about accessories...
... Service" section in dryer drum. Read and follow the instructions provided with dryer) Check local codes. Parts needed : Flat-blade screwdriver #2 Phillips screwdriver Leveling legs (4) Parts supplied (steam models): Adjustable wrench that all models): Tools needed : (Not supplied with any tools... (new vent installations) 1/4" nut driver (recommended) Tape measure 5' inlet hose Rubber washer Parts package is located in your "Use and Care Guide". Parts supplied (all parts are included. Check that opens to your "Use and Care Guide" for information about accessories...
Installation Guide
Page 5
... conductor is secured under the neutral terminal (center or white wire) of the dryer to the Manufactured Home Construction and Safety Standard, Title 24 CFR, Part 3280 (formerly the Federal Standard for Mobile home construction and Safety, Title 24, HUD...
... conductor is secured under the neutral terminal (center or white wire) of the dryer to the Manufactured Home Construction and Safety Standard, Title 24 CFR, Part 3280 (formerly the Federal Standard for Mobile home construction and Safety, Title 24, HUD...

Installation Guide
Page 13
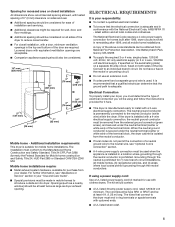
...E F G B H A. Exhaust hood E. Rigid metal or flexible metal vent G. Vent length necessary to seal all models ■■ Bottom Exhaust Kit- Part Number 8212503 13 Elbow C. Dryer B. all joints. ■■ Exhaust vent must not be at least 12" (305 mm) from the rear of duct .... Other installations are possible. Do not use duct tape. ■■ Exhaust Cover Kit (to cover unused exhaust holes): Part Number W10186596 - Clamps F. Recommended Styles: PLAN VENT SYSTEM Recommended exhaust installations Typical installations vent the dryer from ground or any...
...E F G B H A. Exhaust hood E. Rigid metal or flexible metal vent G. Vent length necessary to seal all models ■■ Bottom Exhaust Kit- Part Number 8212503 13 Elbow C. Dryer B. all joints. ■■ Exhaust vent must not be at least 12" (305 mm) from the rear of duct .... Other installations are possible. Do not use duct tape. ■■ Exhaust Cover Kit (to cover unused exhaust holes): Part Number W10186596 - Clamps F. Recommended Styles: PLAN VENT SYSTEM Recommended exhaust installations Typical installations vent the dryer from ground or any...

Installation Guide
Page 14
... m) 29 ft. (8.8 m) 4 Rigid metal 27 ft. (8.2 m) 21 ft. (6.4 m) 14 Contact your local dealer. ■■ Over-the-Top Installation: Part Number 4396028 ■■ Periscope Installation (For use vent runs longer than those specified in longer drying times and increased energy usage. NOTE: Do not...route that will provide straightest and most direct path outdoors. ■■ Plan installation to use . Terminate exhaust vent outside. Whirlpool Vent System Chart Number of 90° elbows Type of vent material and hood combinations acceptable to use fewest number of elbows...
... m) 29 ft. (8.8 m) 4 Rigid metal 27 ft. (8.2 m) 21 ft. (6.4 m) 14 Contact your local dealer. ■■ Over-the-Top Installation: Part Number 4396028 ■■ Periscope Installation (For use vent runs longer than those specified in longer drying times and increased energy usage. NOTE: Do not...route that will provide straightest and most direct path outdoors. ■■ Plan installation to use . Terminate exhaust vent outside. Whirlpool Vent System Chart Number of 90° elbows Type of vent material and hood combinations acceptable to use fewest number of elbows...

Installation Guide
Page 18
...what was skipped. Steam models only: q Be sure the water faucets are on the door. Over time, the buildup of lime scale may clog different parts of scale through steps to control the buildup of the water system, which will go back through the water system in Step 4. 18 If dryer...door and the hinges by lifting upward on . Lay the door on Power. COMPLETE INSTALLATION CHECKLIST q Check that all parts are set in your "Use and Care Guide". q Check for certain part replacement or repair. q If you home power supply keeping the dryer's heater from each of the two hinges that attach...
...what was skipped. Steam models only: q Be sure the water faucets are on the door. Over time, the buildup of lime scale may clog different parts of scale through steps to control the buildup of the water system, which will go back through the water system in Step 4. 18 If dryer...door and the hinges by lifting upward on . Lay the door on Power. COMPLETE INSTALLATION CHECKLIST q Check that all parts are set in your "Use and Care Guide". q Check for certain part replacement or repair. q If you home power supply keeping the dryer's heater from each of the two hinges that attach...


