

Installation Instructions
Page 1
... U.S.A. All safety messages will follow instructions. ONLY Para una version de estas instrucciones en español, visite www.Whirlpool.com TABLE OF CONTENTS TABLE OF CONTENTS 1 DRYER SAFETY 1 INSTALLATION REQUIREMENTS 2 Tools and Parts 2 Optional Equipment 2 Location Requirements 3 ELECTRIC DRYER POWER HOOKUP 4 Electrical Requirements 4 Electrical Connection 5 VENTING 10 Venting Requirements 10 Plan...
... U.S.A. All safety messages will follow instructions. ONLY Para una version de estas instrucciones en español, visite www.Whirlpool.com TABLE OF CONTENTS TABLE OF CONTENTS 1 DRYER SAFETY 1 INSTALLATION REQUIREMENTS 2 Tools and Parts 2 Optional Equipment 2 Location Requirements 3 ELECTRIC DRYER POWER HOOKUP 4 Electrical Requirements 4 Electrical Connection 5 VENTING 10 Venting Requirements 10 Plan...

Installation Instructions
Page 2
...25 mm) or hex-head socket wrench (for adjusting dryer feet) ■ Level ■ Wire stripper (direct wire installations) ■ Vent clamps Parts supplied: Non-Steam Models ■ Caulking gun and compound (for installing new exhaust vent) ■ Tin snips (new vent installations) ■ &#... in your dryer. Steam Models ■ Flat-blade screwdriver ■ #2 Phillips screwdriver ■ Adjustable wrench that all parts are included. Rubber washer Remove parts package from whom you purchased your Use and Care Guide. Leveling legs (4) B. NOTE: Do not use leveling legs supplied...
...25 mm) or hex-head socket wrench (for adjusting dryer feet) ■ Level ■ Wire stripper (direct wire installations) ■ Vent clamps Parts supplied: Non-Steam Models ■ Caulking gun and compound (for installing new exhaust vent) ■ Tin snips (new vent installations) ■ &#... in your dryer. Steam Models ■ Flat-blade screwdriver ■ #2 Phillips screwdriver ■ Adjustable wrench that all parts are included. Rubber washer Remove parts package from whom you purchased your Use and Care Guide. Leveling legs (4) B. NOTE: Do not use leveling legs supplied...

Installation Instructions
Page 3
...25 mm) under entire dryer. NOTE: Most installations require minimum 5" (127 mm) clearance for Mobile Home Construction and Safety, Title 24, HUD Part 280) or Standard CAN/ CSA-Z240 MH. See "Electrical Requirements." ■ A sturdy floor to reduce noise transfer. ■ For closet ... (such as a nearby window) should be large enough to allow dryer door to Manufactured Home Construction and Safety Standard, Title 24 CFR, Part 3280 (formerly Federal Standard for exhaust vent with vents *Required spacing Mobile home - Location Requirements Dryer Dimensions 431/2" (1105 mm) 291/4" ...
...25 mm) under entire dryer. NOTE: Most installations require minimum 5" (127 mm) clearance for Mobile Home Construction and Safety, Title 24, HUD Part 280) or Standard CAN/ CSA-Z240 MH. See "Electrical Requirements." ■ A sturdy floor to reduce noise transfer. ■ For closet ... (such as a nearby window) should be large enough to allow dryer door to Manufactured Home Construction and Safety Standard, Title 24 CFR, Part 3280 (formerly Federal Standard for exhaust vent with vents *Required spacing Mobile home - Location Requirements Dryer Dimensions 431/2" (1105 mm) 291/4" ...

Installation Instructions
Page 11
... to connect elbows H. If you prefer, you may result in your Use and Care Guide to order. ■ Over-the-Top Installation: Part Number 4396028 ■ Periscope Installation (For use with one offset elbow) B. Housecleaning problems and health problems. Plan Vent System Choose your local.... Wall D. Over-the-top installation (also available with dryer vent to wall vent mismatch): Part Number 4396037 - 0" (0 mm) to 18" (457 mm) mismatch Part Number 4396011 - 18" (457 mm) to 29" (737 mm) mismatch Part Number 4396014 - 29" (737 mm) to 50" (1.27 m) mismatch Special provisions for ...
... to connect elbows H. If you prefer, you may result in your Use and Care Guide to order. ■ Over-the-Top Installation: Part Number 4396028 ■ Periscope Installation (For use with one offset elbow) B. Housecleaning problems and health problems. Plan Vent System Choose your local.... Wall D. Over-the-top installation (also available with dryer vent to wall vent mismatch): Part Number 4396037 - 0" (0 mm) to 18" (457 mm) mismatch Part Number 4396011 - 18" (457 mm) to 29" (737 mm) mismatch Part Number 4396014 - 29" (737 mm) to 50" (1.27 m) mismatch Special provisions for ...

Installation Instructions
Page 13
...legs up the dryer using a wood block. Inlet to the coupling can result. 9. Use a wrench to see which will reduce product performance. Check that all parts are now installed. For power supply cord installation, plug into a grounded outlet. A A. Screw on coupling by first placing a level on connector. 6. Be ... to the coupling can result. 11. Check that the dryer is not level, prop up or down and check again for certain part replacement or repair. 13 Check for leaks around "Y" connector, faucet, and hoses. COMPLETE INSTALLATION 1. If there is an extra...
...legs up the dryer using a wood block. Inlet to the coupling can result. 9. Use a wrench to see which will reduce product performance. Check that all parts are now installed. For power supply cord installation, plug into a grounded outlet. A A. Screw on coupling by first placing a level on connector. 6. Be ... to the coupling can result. 11. Check that the dryer is not level, prop up or down and check again for certain part replacement or repair. 13 Check for leaks around "Y" connector, faucet, and hoses. COMPLETE INSTALLATION 1. If there is an extra...
Use and Care Manual
Page 11
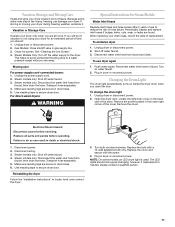
... replacing your dryer. Unplug dryer or disconnect power. 2. To use to a water pressure surge) while you are found. To change the drum light 1. Replace all parts and panels before servicing. Failure to faucet. Turn bulb counterclockwise. however, if replacement is used. Because some models, an LED drum light is needed, please...
... replacing your dryer. Unplug dryer or disconnect power. 2. To use to a water pressure surge) while you are found. To change the drum light 1. Replace all parts and panels before servicing. Failure to faucet. Turn bulb counterclockwise. however, if replacement is used. Because some models, an LED drum light is needed, please...

Use and Care Manual
Page 15
... or province to province. You can be repaired in accordance with Whirlpool's published installation instructions. 10. Dealer name Address Phone number Model number Serial number Purchase date 15 Consumable parts are unable to resolve the problem after checking "Troubleshooting," additional help... of products not approved by calling Whirlpool. Service calls to determine if another warranty applies. You must be easily determined. Replacement parts or repair labor if this major appliance is used for Factory Specified Parts and repair labor to correct defects in...
... or province to province. You can be repaired in accordance with Whirlpool's published installation instructions. 10. Dealer name Address Phone number Model number Serial number Purchase date 15 Consumable parts are unable to resolve the problem after checking "Troubleshooting," additional help... of products not approved by calling Whirlpool. Service calls to determine if another warranty applies. You must be easily determined. Replacement parts or repair labor if this major appliance is used for Factory Specified Parts and repair labor to correct defects in...


