Use and Care Manual
Page 3
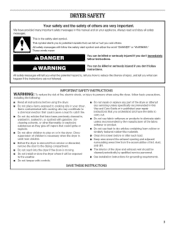
...can happen if the instructions are very important. iMPORTANT SAFETY iNSTRUCTiONS WARNING: To reduce the risk of fire, electric shock, or injury to persons when using the dryer, follow instructions. Items contaminated with cooking oils may contribute to a chemical reaction that could ignite or explode....See installation instructions for grounding requirements. This is removed from the accumulation of lint, dust, and dirt. [] The interior of the dryer and exhaust vent should be exposed to the weather. [] Do not tamper with gasoline, drycleaning solvents, or other flammable or explosive ...
...can happen if the instructions are very important. iMPORTANT SAFETY iNSTRUCTiONS WARNING: To reduce the risk of fire, electric shock, or injury to persons when using the dryer, follow instructions. Items contaminated with cooking oils may contribute to a chemical reaction that could ignite or explode....See installation instructions for grounding requirements. This is removed from the accumulation of lint, dust, and dirt. [] The interior of the dryer and exhaust vent should be exposed to the weather. [] Do not tamper with gasoline, drycleaning solvents, or other flammable or explosive ...
Use and Care Manual
Page 4
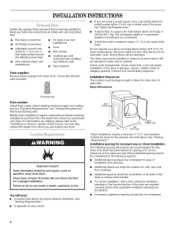
...), 29" (73.7 cm) !2¼" (56.5 cm) *Most installations require a minimum 5" (12.7 cm) clearance behind the dryer for installing new exhaust vent) • Tape measure Parts supplied: Remove parts package from whom you purchased your dryer. Installation Clearances The location must not be considered. See "Electrical Requirements." • A sturdy floor to support the total weight (dryer...
...), 29" (73.7 cm) !2¼" (56.5 cm) *Most installations require a minimum 5" (12.7 cm) clearance behind the dryer for installing new exhaust vent) • Tape measure Parts supplied: Remove parts package from whom you purchased your dryer. Installation Clearances The location must not be considered. See "Electrical Requirements." • A sturdy floor to support the total weight (dryer...
Use and Care Manual
Page 5
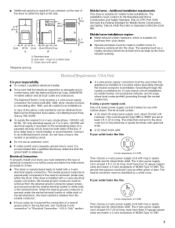
... path is available for homes built after 1996, dryer circuits involved in ring terminals or spade terminals with a 3-wire electrical supply connection. To supply the required 3 or 4 wire, single phase, 120/240 volt, 60 Hz., AC only electrical supply (or 3 or 4 wire, 120/208 volt electrical supply, if specified on the serial/rating plate...
... path is available for homes built after 1996, dryer circuits involved in ring terminals or spade terminals with a 3-wire electrical supply connection. To supply the required 3 or 4 wire, single phase, 120/240 volt, 60 Hz., AC only electrical supply (or 3 or 4 wire, 120/208 volt electrical supply, if specified on the serial/rating plate...
Use and Care Manual
Page 6
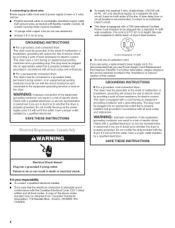
... 5 ft (1.52 m) long. Check with a CSA International Certified Power Cord intended to whether the dryer is within reach of least resistance for electric current. SAVE THESE INSTRUCTIONS Electrical Shock Hazard Plug into an appropriate outlet that is properly grounded. The plug must be plugged into a... sides of this manual. In the event of malfunction or breakdown, grounding will reduce the risk of electric shock by providing a path of the equipment- This dryer is equipped with a qualified electrician or service representative or personnel if you are in a risk of...
... 5 ft (1.52 m) long. Check with a CSA International Certified Power Cord intended to whether the dryer is within reach of least resistance for electric current. SAVE THESE INSTRUCTIONS Electrical Shock Hazard Plug into an appropriate outlet that is properly grounded. The plug must be plugged into a... sides of this manual. In the event of malfunction or breakdown, grounding will reduce the risk of electric shock by providing a path of the equipment- This dryer is equipped with a qualified electrician or service representative or personnel if you are in a risk of...
Use and Care Manual
Page 8
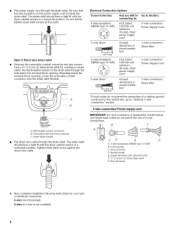
...the neutral wire, go to "Optional 3-wire connection" section. 4-wire connection: Power supply cord IMPORTANT: A 4-wire connection is not available Electrical Connection Options If your home has: And you will be in a horizontal position. Tighten strain relief screw against the direct wire cable. ...Neutral prong E. Ground prong D. Reaching inside the strain relief. Spade terminals with the dryer cabinet and be in a horizontal position. Put the threaded section of the strain relief through the strain relief. Put power supply ...
...the neutral wire, go to "Optional 3-wire connection" section. 4-wire connection: Power supply cord IMPORTANT: A 4-wire connection is not available Electrical Connection Options If your home has: And you will be in a horizontal position. Tighten strain relief screw against the direct wire cable. ...Neutral prong E. Ground prong D. Reaching inside the strain relief. Spade terminals with the dryer cabinet and be in a horizontal position. Put the threaded section of the strain relief through the strain relief. Put power supply ...

Use and Care Manual
Page 9
... screw D. Tighten screw. Neutral ground wire C. Neutral ground wire B. C. Secure cover with hold-down screw. 7. D A. You have 5 ft (1.52 m) of dryer rear panel. C. Direct wire cable must have completed your electrical connection. Connect neutral ground wire and the neutral wire (white or center wire) of power supply cord D. 3/_,,(1.9 cm) UL Iisted strain...
... screw D. Tighten screw. Neutral ground wire C. Neutral ground wire B. C. Secure cover with hold-down screw. 7. D A. You have 5 ft (1.52 m) of dryer rear panel. C. Direct wire cable must have completed your electrical connection. Connect neutral ground wire and the neutral wire (white or center wire) of power supply cord D. 3/_,,(1.9 cm) UL Iisted strain...
Use and Care Manual
Page 10
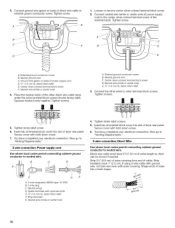
... panel. Secure cover with hold -down screw. 7. You have 5 ft (1.52 m) of extra length so dryer can be moved if needed. Direct wire cable must have completed your electrical connection. Strip insulation back 1" (2.5 cm). Connect ground wire (green or bare) of power supply cord D. ...) UL listed strain relief F. Insert tab of terminal block cover into slot of the terminal block. You have completed your electrical connection. Strip 31/2'' (8.9 cm) of outer covering from end of dryer rear panel. i C F A. C G F A. 3-wire receptacle (NEMA type 10-30R) B. 3-wire plug C. Tighten ...
... panel. Secure cover with hold -down screw. 7. You have 5 ft (1.52 m) of extra length so dryer can be moved if needed. Direct wire cable must have completed your electrical connection. Strip insulation back 1" (2.5 cm). Connect ground wire (green or bare) of power supply cord D. ...) UL listed strain relief F. Insert tab of terminal block cover into slot of the terminal block. You have completed your electrical connection. Strip 31/2'' (8.9 cm) of outer covering from end of dryer rear panel. i C F A. C G F A. 3-wire receptacle (NEMA type 10-30R) B. 3-wire plug C. Tighten ...

Use and Care Manual
Page 11
... 4. Neutral ground wire C. Center silver-colored terminal block screw D. Insert tab of terminal block cover into slot of dryer rear panel. Remove center silver-colored terminal block screw. 2. A. External ground conductor screw B. Insert tab of terminal block cover into ... place the hooked end of terminal block (hook facing right). A. Secure cover with hold -down screw. 6= You have completed your electrical connection. Center silver-colored terminal block screw D. Squeeze hooked end together. Tighten screw. Squeeze hooked ends together. Secure cover with hold ...
... 4. Neutral ground wire C. Center silver-colored terminal block screw D. Insert tab of terminal block cover into slot of dryer rear panel. Remove center silver-colored terminal block screw. 2. A. External ground conductor screw B. Insert tab of terminal block cover into ... place the hooked end of terminal block (hook facing right). A. Secure cover with hold -down screw. 6= You have completed your electrical connection. Center silver-colored terminal block screw D. Squeeze hooked end together. Tighten screw. Squeeze hooked ends together. Secure cover with hold ...
Use and Care Manual
Page 12
...DURASAFE TM venting products are acceptable only if accessible for cleaning. • Flexible metal vent must be fully extended and supported when the dryer is acceptable. 4-" 4" (10.2cm) heavymetal exhaust vent DURASAFE TM vent products can cause moisture and lint to collect indoors, which may...vents are recommended. • Remove excess flexible metal vent to keep rodents and insects from your dealer or by calling Whirlpool Parts and Accessories. If this dryer MUST BE EXHAUSTED OUTDOORS. Exhaust vent must be purchased from entering the home. • Exhaust hood must not be ...
...DURASAFE TM venting products are acceptable only if accessible for cleaning. • Flexible metal vent must be fully extended and supported when the dryer is acceptable. 4-" 4" (10.2cm) heavymetal exhaust vent DURASAFE TM vent products can cause moisture and lint to collect indoors, which may...vents are recommended. • Remove excess flexible metal vent to keep rodents and insects from your dealer or by calling Whirlpool Parts and Accessories. If this dryer MUST BE EXHAUSTED OUTDOORS. Exhaust vent must be purchased from entering the home. • Exhaust hood must not be ...
Use and Care Manual
Page 13
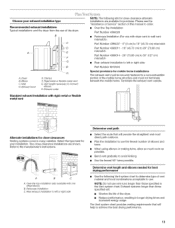
... kits for close clearance alternate installations are available for close -clearance installations are shown. m A. Over-the-top installation offset elbow) B. Dryer B. Rigid metal or flexible metal vent G, Vent length necessary to the manufacturer's instructions. -.q... S Alternate installations for purchase. Refer to connect...H. Rear exhaust installation (also available with dryer vent to wall vent mismatch): Part Number 4396037 - 0" (0 cm) to 18" (45.72 cm) mismatch Part Number 4396011 - 18" (45.72 cm) to 29" (73.66 cm) mismatch Part Number 4396014 - 29" (73.66 cm) to 50"...
... kits for close clearance alternate installations are available for close -clearance installations are shown. m A. Over-the-top installation offset elbow) B. Dryer B. Rigid metal or flexible metal vent G, Vent length necessary to the manufacturer's instructions. -.q... S Alternate installations for purchase. Refer to connect...H. Rear exhaust installation (also available with dryer vent to wall vent mismatch): Part Number 4396037 - 0" (0 cm) to 18" (45.72 cm) mismatch Part Number 4396011 - 18" (45.72 cm) to 29" (73.66 cm) mismatch Part Number 4396014 - 29" (73.66 cm) to 50"...

Use and Care Manual
Page 14
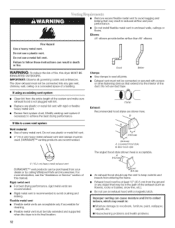
... (9.4 m) 23 ft (7 m) 2 Rigid metal 44 ft (13.4 m) 38 ft (11,6 m) Flexible metal 27 ft (8,2 m) 19 ft (5,8 m) 3 Rigid metal 35 ft (10.7 m) 29 ft (8.8 m) Flexible metal 25 ft (7,6 m) 17 ft (5,2 m) 4 Rigid metal 27 ft (8,2 m) 21 ft (6,4 m) Flexible metal 23 ft (7 m) 15 ft (4,6 m) 1. Connect vent ... 5. To protect the floor, use duct tape, screws or other injury. 1. Then, by hand. Place cardboard under each of the dryer. 2. Install exhaust hood. Use the straightest path possible. Excessive Weight Hazard Use two or more people to back. To determine maximum exhaust...
... (9.4 m) 23 ft (7 m) 2 Rigid metal 44 ft (13.4 m) 38 ft (11,6 m) Flexible metal 27 ft (8,2 m) 19 ft (5,8 m) 3 Rigid metal 35 ft (10.7 m) 29 ft (8.8 m) Flexible metal 25 ft (7,6 m) 17 ft (5,2 m) 4 Rigid metal 27 ft (8,2 m) 21 ft (6,4 m) Flexible metal 23 ft (7 m) 15 ft (4,6 m) 1. Connect vent ... 5. To protect the floor, use duct tape, screws or other injury. 1. Then, by hand. Place cardboard under each of the dryer. 2. Install exhaust hood. Use the straightest path possible. Excessive Weight Hazard Use two or more people to back. To determine maximum exhaust...
Use and Care Manual
Page 15
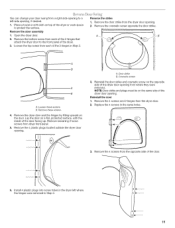
... B. Cosmetic screw 3. Replace the 4 screws in the same holes. 3. Loosen the top screw from each of the 2 hinges that attach the dryer door to the front panel of the door. 6. Remove the dryer door and the hinges by lifting upward on top of the door facing up. Remove the 4 screws from... work space to protect the surface. Remove the cosmetic screw opposite the door strike. Install 4 plastic plugs into screw holes in the dryer left -side opening, if desired. 1. You can change your door swing from a right-side opening to a left where the hinges were removed in Step 4. Loosen...
... B. Cosmetic screw 3. Replace the 4 screws in the same holes. 3. Loosen the top screw from each of the 2 hinges that attach the dryer door to the front panel of the door. 6. Remove the dryer door and the hinges by lifting upward on top of the door facing up. Remove the 4 screws from... work space to protect the surface. Remove the cosmetic screw opposite the door strike. Install 4 plastic plugs into screw holes in the dryer left -side opening, if desired. 1. You can change your door swing from a right-side opening to a left where the hinges were removed in Step 4. Loosen...
Use and Care Manual
Page 16
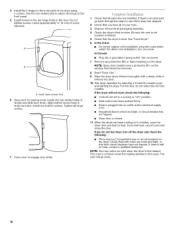
...top slotted holes of your tools. 3. Check that all hinge screws. ] 7. Dispose of/recycle all of hinges and slide door down. Read "Dryer Use." 9. If there is first used. Close door to the front panel. 5. Use the non-slotted side to attach the hinge to engage door... 7. The odor will not start, check the following : • There may notice an odor when the dryer is first heated. In Canada • Plug into an outlet and/or electrical supply is level. Align bottom screw holes in the door. Check that both circuit breakers have all packaging materials...
...top slotted holes of your tools. 3. Check that all hinge screws. ] 7. Dispose of/recycle all of hinges and slide door down. Read "Dryer Use." 9. If there is first used. Close door to the front panel. 5. Use the non-slotted side to attach the hinge to engage door... 7. The odor will not start, check the following : • There may notice an odor when the dryer is first heated. In Canada • Plug into an outlet and/or electrical supply is level. Align bottom screw holes in the door. Check that both circuit breakers have all packaging materials...
Use and Care Manual
Page 17
...automatic cycle is set, it cannot be dried on a clothesline or by pressing Dryness and choosing More, Less or Damp. Toward the end of fire, electric shock, or injury to follow these instructions can completely remove oil. You can result in death, explosion, or fire. Do not dry anything that has... ever had anything that has ever had any type of oil on your dryer. Your dryer may automatically vary from dryer. During the first few minutes of the drying process, the cycle time may not have all of the load. As the cycle...
...automatic cycle is set, it cannot be dried on a clothesline or by pressing Dryness and choosing More, Less or Damp. Toward the end of fire, electric shock, or injury to follow these instructions can completely remove oil. You can result in death, explosion, or fire. Do not dry anything that has... ever had anything that has ever had any type of oil on your dryer. Your dryer may automatically vary from dryer. During the first few minutes of the drying process, the cycle time may not have all of the load. As the cycle...

Use and Care Manual
Page 18
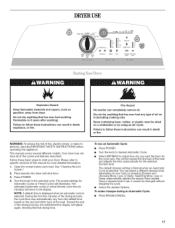
... light illuminates at the beginning of a Timed Cycle by 1-minute intervals. How the AccelerCare TM Drying System Works Moisture-sensing strips inside the dryer drum and temperature sensors in the cycle. NOTE: The Time Adjust features can be and when clothes are not detected. For more details, ...see "End of minutes remaining in the airstream monitor how fast the load is interrupted for your drying cycle after approximately 5 minutes, the dryer goes directly into the cycle. Press PAUSE/ CANCEL twice to handle and reduces wrinkling. If the cycle is drying, how hot the air ...
... light illuminates at the beginning of a Timed Cycle by 1-minute intervals. How the AccelerCare TM Drying System Works Moisture-sensing strips inside the dryer drum and temperature sensors in the cycle. NOTE: The Time Adjust features can be and when clothes are not detected. For more details, ...see "End of minutes remaining in the airstream monitor how fast the load is interrupted for your drying cycle after approximately 5 minutes, the dryer goes directly into the cycle. Press PAUSE/ CANCEL twice to handle and reduces wrinkling. If the cycle is drying, how hot the air ...

Use and Care Manual
Page 19
...smooth out wrinkles 19 Touch Up Use this cycle for drying no-iron fabrics, such as exercise wear, can change the actual time in the dryer too long. Damp Dry Signal beeps, if selected. See "Options." Indicator lights Other indicator lights show Cycle, Modifiers, Options and Cycle Signal ...sturdy fabrics such as bedspreads and work clothes. Casual Use this cycle to complete drying if items are drying. See "Dryer Rack." You can be used with the dryer rack. Damp The Damp light illuminates in your cycle. The display shows the estimated or actual time remaining. Heavy ...
...smooth out wrinkles 19 Touch Up Use this cycle for drying no-iron fabrics, such as exercise wear, can change the actual time in the dryer too long. Damp Dry Signal beeps, if selected. See "Options." Indicator lights Other indicator lights show Cycle, Modifiers, Options and Cycle Signal ...sturdy fabrics such as bedspreads and work clothes. Casual Use this cycle to complete drying if items are drying. See "Dryer Rack." You can be used with the dryer rack. Damp The Damp light illuminates in your cycle. The display shows the estimated or actual time remaining. Heavy ...

Use and Care Manual
Page 20
... cannot be on until DRUM LIGHT is pressed again, the door is opened and closed, or the door is left open for 5 minutes, the dryer door is closed or DRUM LIGHT is pressed again. The other Automatic Cycles will be used with the Automatic Cycles. 20 NOTE: The Damp Dry... finish the drying cycle. This is preset to ON. Air Only Use the Air Only Modifier for the Auto Dry Cycles. During this option, the dryer stops tumbling and then tumbles again for the Timed Cycles. Timed Cycle Modifiers Use the Temperature Modifier to select temperatures for a brief period. • ...
... cannot be on until DRUM LIGHT is pressed again, the door is opened and closed, or the door is left open for 5 minutes, the dryer door is closed or DRUM LIGHT is pressed again. The other Automatic Cycles will be used with the Automatic Cycles. 20 NOTE: The Damp Dry... finish the drying cycle. This is preset to ON. Air Only Use the Air Only Modifier for the Auto Dry Cycles. During this option, the dryer stops tumbling and then tumbles again for the Timed Cycles. Timed Cycle Modifiers Use the Temperature Modifier to select temperatures for a brief period. • ...
Use and Care Manual
Page 21
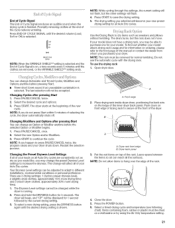
... sounds every 5 minutes until the clothes are removed, or the WRINKLE SHIELD TM setting ends. If your model. To find out whether your dryer. Open dryer door. Press PAUSE/CANCEL twice. 2. Select the new Option and/or Modifiers. 3. Restart the selection process. There are consistently not as dry... The Dryness Level settings cannot be adjusted to adapt to press PAUSE/CANCEL twice, the program clears and your loads on top of the dryer. Dryer rack front edge B. Close the door. 5. The drum turns, but the other settings will not flash, but the rack does not move...
... sounds every 5 minutes until the clothes are removed, or the WRINKLE SHIELD TM setting ends. If your model. To find out whether your dryer. Open dryer door. Press PAUSE/CANCEL twice. 2. Select the new Option and/or Modifiers. 3. Restart the selection process. There are consistently not as dry... The Dryness Level settings cannot be adjusted to adapt to press PAUSE/CANCEL twice, the program clears and your loads on top of the dryer. Dryer rack front edge B. Close the door. 5. The drum turns, but the other settings will not flash, but the rack does not move...

Use and Care Manual
Page 22
...time. NOTE: Garments that would obstruct the flow of lint screen with the brush to shape and lay flat on Dry the rack. Place dryer at least 18 inches (46 cm) above the floor for a garage installation. Apply a liquid, nonflammable household cleaner to the stained area of...not rinse or wash screen to complete drying, if needed. Reset time as denim blue jeans or brightly colored cotton items, may discolor the dryer interior. Explosion Hazard Keep flammable materials and vapors, such as gasoline, away from items that contain unstable dyes, such as needed cleaning 1. ...
...time. NOTE: Garments that would obstruct the flow of lint screen with the brush to shape and lay flat on Dry the rack. Place dryer at least 18 inches (46 cm) above the floor for a garage installation. Apply a liquid, nonflammable household cleaner to the stained area of...not rinse or wash screen to complete drying, if needed. Reset time as denim blue jeans or brightly colored cotton items, may discolor the dryer interior. Explosion Hazard Keep flammable materials and vapors, such as gasoline, away from items that contain unstable dyes, such as needed cleaning 1. ...
Use and Care Manual
Page 23
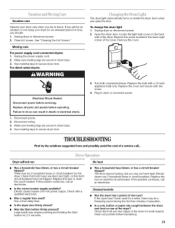
... bulb counterclockwise. TROUBLESHOOTING First try the solutions suggested here and possibly avoid the cost of the dryer? Electric dryers require 240-volt power supply. Use a time-delay fuse. • Is the dryer door firmly closed? • Was the Start button firmly pressed? No heat Has a household... fuse blown, or has a circuit breaker tripped? Electric dryers use ? Is a coin, button or paper clip caught between the drum and front or rear of a service call... Unplug dryer or disconnect power. 2. Replace all parts and panels before laundering. 23 Plug...
... bulb counterclockwise. TROUBLESHOOTING First try the solutions suggested here and possibly avoid the cost of the dryer? Electric dryers require 240-volt power supply. Use a time-delay fuse. • Is the dryer door firmly closed? • Was the Start button firmly pressed? No heat Has a household... fuse blown, or has a circuit breaker tripped? Electric dryers use ? Is a coin, button or paper clip caught between the drum and front or rear of a service call... Unplug dryer or disconnect power. 2. Replace all parts and panels before laundering. 23 Plug...


