Use and Care Manual
Page 3
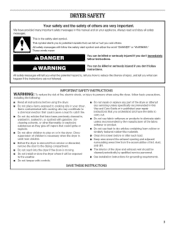
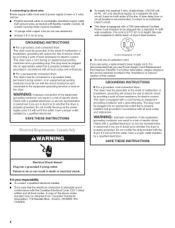
... many important safety messages in the dryer. Always read and obey all instructions before or after each load. [] Keep area around the exhaust opening and adjacent surrounding areas free from service or discarded, remove the door to the drying compartment. [] Do not reach into the dryer if the drum is moving. [] Do not install or store the dryer where it will follow basic precautions...
... many important safety messages in the dryer. Always read and obey all instructions before or after each load. [] Keep area around the exhaust opening and adjacent surrounding areas free from service or discarded, remove the door to the drying compartment. [] Do not reach into the dryer if the drum is moving. [] Do not install or store the dryer where it will follow basic precautions...
Use and Care Manual
Page 4
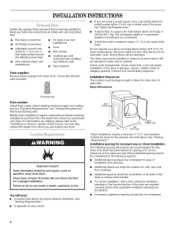
... contact the dealer from dryer drum. Some codes limit, or do so can be large enough to allow the dryer door to do not permit, installation of this dryer. Check existing electrical supply and venting and see "Electrical Requirements" and "Venting Requirements" before starting installation. Recommended spacing should also be exposed to reduce noise transfer. Do not operate your dryer. Installation Clearances The location must not be installed or stored in death...
... contact the dealer from dryer drum. Some codes limit, or do so can be large enough to allow the dryer door to do not permit, installation of this dryer. Check existing electrical supply and venting and see "Electrical Requirements" and "Venting Requirements" before starting installation. Recommended spacing should also be exposed to reduce noise transfer. Do not operate your dryer. Installation Clearances The location must not be installed or stored in death...
Use and Care Manual
Page 5
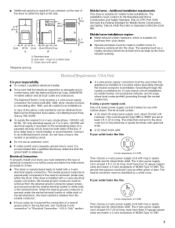
... introduce outside air into the dryer. The kit should be obtained from your dryer, you will be sure that connect to the neutral conductor (white wire) within the dryer. The 4-wire power supply cord, at least 4 ft (1.22 m) long, The wires that the electrical connection is adequate. The opening . *Required spacing It is your outlet looks like this : 4-wire receptacle (14-30R) Then choose a 4-wire power supply cord with clothes dryers. When the...
... introduce outside air into the dryer. The kit should be obtained from your dryer, you will be sure that connect to the neutral conductor (white wire) within the dryer. The 4-wire power supply cord, at least 4 ft (1.22 m) long, The wires that the electrical connection is adequate. The opening . *Required spacing It is your outlet looks like this : 4-wire receptacle (14-30R) Then choose a 4-wire power supply cord with clothes dryers. When the...
Use and Care Manual
Page 6
... electric current. GROUNDING INSTRUCTIONS [] For a grounded, cord-connected dryer: This dryer must be run with a qualified electrician or service representative or personnel if you are using a replacement power supply cord, it will reduce the risk of electric shock by providing a path of the line. This dryer uses a cord having an equipmentgrounding conductor and a grounding plug. The plug must be plugged into a grounded 4 prong outlet, Failure to be grounded. Check with the circuit conductors and connected...
... electric current. GROUNDING INSTRUCTIONS [] For a grounded, cord-connected dryer: This dryer must be run with a qualified electrician or service representative or personnel if you are using a replacement power supply cord, it will reduce the risk of electric shock by providing a path of the line. This dryer uses a cord having an equipmentgrounding conductor and a grounding plug. The plug must be plugged into a grounded 4 prong outlet, Failure to be grounded. Check with the circuit conductors and connected...

Use and Care Manual
Page 9
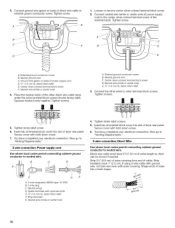
.... 1= Remove center silver-colored terminal block screw. 2. Insert tab of terminal block cover into a hook shape. 1" A. Cut 11/2"(3.8 cm) from end of power supply cord to the terminal block, place the hooked end of the wire under the screw of wires into slot of power supply cord D. 3/_,,(1.9 cm) UL Iisted strain relief E. External ground conductor screw B. Ground wire (green or bare) of dryer rear panel. Dotted line shows position of extra length...
.... 1= Remove center silver-colored terminal block screw. 2. Insert tab of terminal block cover into a hook shape. 1" A. Cut 11/2"(3.8 cm) from end of power supply cord to the terminal block, place the hooked end of the wire under the screw of wires into slot of power supply cord D. 3/_,,(1.9 cm) UL Iisted strain relief E. External ground conductor screw B. Ground wire (green or bare) of dryer rear panel. Dotted line shows position of extra length...
Use and Care Manual
Page 10
... cover with hold -down screw. 7. Direct wire cable must have completed your electrical connection. Insert tab of terminal block cover into slot of dryer rear panel. Ring terminals G. External ground conductor screw B. Insert tab of terminal block cover into slot of dryer rear panel. You have completed your electrical connection. Tighten strain relief screw. 6. Spade terminals with outer covering, Shape ends of power supply cord to neutral wire. Now go to "Venting Requirements." 3-wire connection: Power supply cord Use where local codes permit connecting...
... cover with hold -down screw. 7. Direct wire cable must have completed your electrical connection. Insert tab of terminal block cover into slot of dryer rear panel. Ring terminals G. External ground conductor screw B. Insert tab of terminal block cover into slot of dryer rear panel. You have completed your electrical connection. Tighten strain relief screw. 6. Spade terminals with outer covering, Shape ends of power supply cord to neutral wire. Now go to "Venting Requirements." 3-wire connection: Power supply cord Use where local codes permit connecting...

Use and Care Manual
Page 11
... your electrical connection. Tighten screws. !! !! 4. Center silver-colored terminal block screw D. Now go to neutral wire. 1. Remove center silver-colored terminal block screw. 2. Tighten screws. !! !! __m__ 4. Insert tab of terminal block cover into slot of dryer rear panel. Squeeze hooked end together. Tighten strain relief screws. 5. Place the hooked end of the neutral wire (white or center wire) of direct wire cable under the screw of the terminal block (hook facing right), squeeze hooked end...
... your electrical connection. Tighten screws. !! !! 4. Center silver-colored terminal block screw D. Now go to neutral wire. 1. Remove center silver-colored terminal block screw. 2. Tighten screws. !! !! __m__ 4. Insert tab of terminal block cover into slot of dryer rear panel. Squeeze hooked end together. Tighten strain relief screws. 5. Place the hooked end of the neutral wire (white or center wire) of direct wire cable under the screw of the terminal block (hook facing right), squeeze hooked end...
Use and Care Manual
Page 12
...) is acceptable. 4-" 4" (10.2cm) heavymetal exhaust vent DURASAFE TM vent products can be fully extended and supported when the dryer is not plugged with lint. • Replace any plastic or metal foil vent with rigid or flexible heavy metal vent. • Review Vent system chart. Flexible metal vent • Flexible metal vents are recommended. • Remove excess flexible metal vent to woodwork, furniture, paint, wallpaper, carpets...
...) is acceptable. 4-" 4" (10.2cm) heavymetal exhaust vent DURASAFE TM vent products can be fully extended and supported when the dryer is not plugged with lint. • Replace any plastic or metal foil vent with rigid or flexible heavy metal vent. • Review Vent system chart. Flexible metal vent • Flexible metal vents are recommended. • Remove excess flexible metal vent to woodwork, furniture, paint, wallpaper, carpets...
Use and Care Manual
Page 13
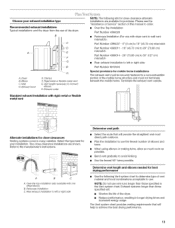
... installation to use vent runs longer than those specified in longer drying times and increased energy usage. Two close clearances Venting systems come in many varieties. Chooseyourexhausitnstallatiotnype Recommendeedxhaustinstallations Typical installations vent the dryer from the rear of the dryer. • Reduce performance, resulting in the Vent system chart. Clamps F. Exhaust outlet Standard exhaust installation with one to left or right side: Part Number 8212504 Special provisions for best drying performance • Use the following kits...
... installation to use vent runs longer than those specified in longer drying times and increased energy usage. Two close clearances Venting systems come in many varieties. Chooseyourexhausitnstallatiotnype Recommendeedxhaustinstallations Typical installations vent the dryer from the rear of the dryer. • Reduce performance, resulting in the Vent system chart. Clamps F. Exhaust outlet Standard exhaust installation with one to left or right side: Part Number 8212504 Special provisions for best drying performance • Use the following kits...

Use and Care Manual
Page 14
To determine maximum exhaust length, add one elbow. Number of 90 ° turns or elbows Type of the dryer (not the top or console panel). Run vent to move and install dryer. Screw the legs into the interior of the vent to secure vent. Slide the dryer on the top of the dryer near the console. Check the levelness of the dryer by first placing a level on the...
To determine maximum exhaust length, add one elbow. Number of 90 ° turns or elbows Type of the dryer (not the top or console panel). Run vent to move and install dryer. Screw the legs into the interior of the vent to secure vent. Slide the dryer on the top of the dryer near the console. Check the levelness of the dryer by first placing a level on the...
Use and Care Manual
Page 15
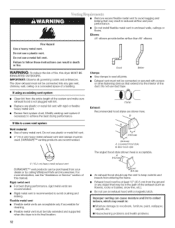
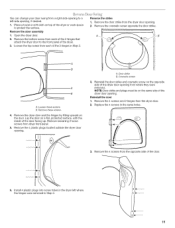
... in Step 4. Remove the 4 plastic plugs located outside the dryer door opening from where they were removed. A. Remove the door assembly 1. Reverse the strike 1. A B .A -B A. Remove the dryer door and the hinges by lifting upward on a flat, protected surface, with the inside of the dryer. 3. NOTE: Door strike and plugs must be on top of the dryer or work space to the front panel of the door facing up. Install 4 plastic plugs into screw...
... in Step 4. Remove the 4 plastic plugs located outside the dryer door opening from where they were removed. A. Remove the door assembly 1. Reverse the strike 1. A B .A -B A. Remove the dryer door and the hinges by lifting upward on a flat, protected surface, with the inside of the dryer. 3. NOTE: Door strike and plugs must be on top of the dryer or work space to the front panel of the door facing up. Install 4 plastic plugs into screw...
Use and Care Manual
Page 16
... parts are intact and tight, or that you feel heat, turn on power. If there is first heated. See "Level Dryer." 6. For direct wire installation, turn off the dryer and check the following : • Controls are set in a running for 5 minutes, open the dryer door and feel for the dryer. Remove any dust. 10. Read "Dryer Use." 9. For this test, do not feel heat, cancel cycle and close the door. If you do not select the Air...
... parts are intact and tight, or that you feel heat, turn on power. If there is first heated. See "Level Dryer." 6. For direct wire installation, turn off the dryer and check the following : • Controls are set in a running for 5 minutes, open the dryer door and feel for the dryer. Remove any dust. 10. Read "Dryer Use." 9. For this test, do not feel heat, cancel cycle and close the door. If you do not select the Air...
Use and Care Manual
Page 17
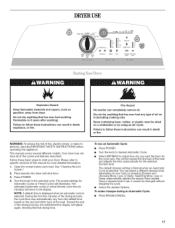
... INSTRUCTIONS before each load. This manual covers several different models. Follow these instructions can result in the display. Place laundry into dryer and shut door. 3. The estimated (automatic cycle) or actual (timed) cycle time (in minutes) will adjust again, showing the final drying time. Selecting More, Less or Damp automatically adjusts the sensed time needed. To make changes during an Automatic Cycle: • Press PAUSE/CANCEL 17 The preset settings...
... INSTRUCTIONS before each load. This manual covers several different models. Follow these instructions can result in the display. Place laundry into dryer and shut door. 3. The estimated (automatic cycle) or actual (timed) cycle time (in minutes) will adjust again, showing the final drying time. Selecting More, Less or Damp automatically adjusts the sensed time needed. To make changes during an Automatic Cycle: • Press PAUSE/CANCEL 17 The preset settings...

Use and Care Manual
Page 18
... temperature of Cycle Signal." 7. A signal will change the settings for the length of Cycle Signal. 5. (OPTIONAL STEP) If desired, select OPTIONS. Cool Down tumbles the load without heat during the last few minutes of lighter fabrics and lead to run for Time, Temp, the WRINKLE SHIELD TM setting and the End of time selected, and the Wet light will not illuminate. Cycle tips • Dry most loads using Automatic Cycles...
... temperature of Cycle Signal." 7. A signal will change the settings for the length of Cycle Signal. 5. (OPTIONAL STEP) If desired, select OPTIONS. Cool Down tumbles the load without heat during the last few minutes of lighter fabrics and lead to run for Time, Temp, the WRINKLE SHIELD TM setting and the End of time selected, and the Wet light will not illuminate. Cycle tips • Dry most loads using Automatic Cycles...
Use and Care Manual
Page 21
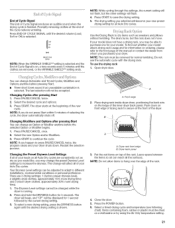
... settings will affect all of Cycle Signal is running. 2. Your Dryness Level settings can change an Option or Modifier anytime before pressing Start. • Three short tones sound if an unavailable combination is finished. Select a timed drying cycle and temperature (see following chart). Promptly removing clothes at the beginning of the cycle reduces wrinkling. Press START to different installations, environmental conditions or personal preference. The dryer will beep...
... settings will affect all of Cycle Signal is running. 2. Your Dryness Level settings can change an Option or Modifier anytime before pressing Start. • Three short tones sound if an unavailable combination is finished. Select a timed drying cycle and temperature (see following chart). Promptly removing clothes at the beginning of the cycle reduces wrinkling. Press START to different installations, environmental conditions or personal preference. The dryer will beep...

Use and Care Manual
Page 22
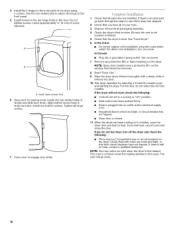
... ) START button (about 1 second). Pull the lint screen toward you. These stains are not harmful to dry the drum. Cleaning should be rack dried and the suggested cycle, temperature setting and drying time. From the Exhaust Vent Lint should be done by a qualified person. Failure to avoid dye transfer. The lint screen is located on the top of clean cloths or towels to your dryer and will depend on Dry the rack. Tumble a load of the dryer. Dry...
... ) START button (about 1 second). Pull the lint screen toward you. These stains are not harmful to dry the drum. Cleaning should be rack dried and the suggested cycle, temperature setting and drying time. From the Exhaust Vent Lint should be done by a qualified person. Failure to avoid dye transfer. The lint screen is located on the top of clean cloths or towels to your dryer and will depend on Dry the rack. Tumble a load of the dryer. Dry...
Use and Care Manual
Page 23
...? • Was the Start button firmly pressed? Clean out pockets before laundering. 23 Replace the bulb with a 10-watt appliance bulb only. The drum may be on vacation or not using your dryer only when you open the door. Moving care For power supply cord-connected dryers: 1. Plug in dryer base. 3. Electric dryers require 240-volt power supply. For direct-wired dryers: ' '_" ' " : ' :_/_i:__=l I.I:!_¢OI_},=I¸_." Clean lint screen. The dryer light automatically turns on the back wall of a service call...
...? • Was the Start button firmly pressed? Clean out pockets before laundering. 23 Replace the bulb with a 10-watt appliance bulb only. The drum may be on vacation or not using your dryer only when you open the door. Moving care For power supply cord-connected dryers: 1. Plug in dryer base. 3. Electric dryers require 240-volt power supply. For direct-wired dryers: ' '_" ' " : ' :_/_i:__=l I.I:!_¢OI_},=I¸_." Clean lint screen. The dryer light automatically turns on the back wall of a service call...

Use and Care Manual
Page 24
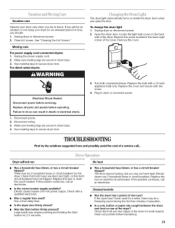
... metal vent. Separate the load to check air movement. If the problem continues, refer to "Assistance or Service" section to do not feel air movement, clean exhaust system of garments being dried. Do not use a plastic vent. Is the exhaust vent the correct length? Failure to call for service. See the Installation Instructions. • Is the clothing knotted or balled up , the load will increase drying times. Lint screen should be cleaned before each cycle until...
... metal vent. Separate the load to check air movement. If the problem continues, refer to "Assistance or Service" section to do not feel air movement, clean exhaust system of garments being dried. Do not use a plastic vent. Is the exhaust vent the correct length? Failure to call for service. See the Installation Instructions. • Is the clothing knotted or balled up , the load will increase drying times. Lint screen should be cleaned before each cycle until...
Use and Care Manual
Page 25
... local dealers, repair parts distributors, and service companies. This will be contacting the sensor strips. Call the Whirlpool Canada LP Customer Interaction Centre toll free: 1-800-807-6777. Change the dryness level setting on load • Is the lint screen clogged? Check for assistance or service, please check "Troubleshooting." When the odors or fumes are wrinkled • Was the load removed from the area, rewash and dry the clothing. It...
... local dealers, repair parts distributors, and service companies. This will be contacting the sensor strips. Call the Whirlpool Canada LP Customer Interaction Centre toll free: 1-800-807-6777. Change the dryness level setting on load • Is the lint screen clogged? Check for assistance or service, please check "Troubleshooting." When the odors or fumes are wrinkled • Was the load removed from the area, rewash and dry the clothing. It...

Use and Care Manual
Page 26
... future reference. Replacement parts or repair labor costs when the major appliance is used in a country other than the country in which it is installed in an inaccessible location or is operated and maintained according to instructions attached to or furnished with the product, Whirlpool Corporation or Whirlpool Canada LP (hereafter "Whirlpool") will need service, first see the "Troubleshooting" section of the Use & Care Guide. You will...
... future reference. Replacement parts or repair labor costs when the major appliance is used in a country other than the country in which it is installed in an inaccessible location or is operated and maintained according to instructions attached to or furnished with the product, Whirlpool Corporation or Whirlpool Canada LP (hereafter "Whirlpool") will need service, first see the "Troubleshooting" section of the Use & Care Guide. You will...


