Whirlpool WED5810BW Support and Manuals
Get Help and Manuals for this Whirlpool item
View All Support Options Below
Free Whirlpool WED5810BW manuals!
Problems with Whirlpool WED5810BW?
Ask a Question
Free Whirlpool WED5810BW manuals!
Problems with Whirlpool WED5810BW?
Ask a Question
Popular Whirlpool WED5810BW Manual Pages
Warranty Information - Page 1
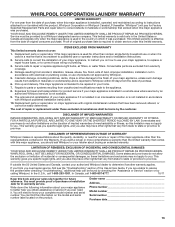
... according to instructions attached to or furnished with the product, Whirlpool Corporation or Whirlpool Canada LP (hereafter "Whirlpool") will need repair service, first see the "Troubleshooting" section of the Use & Care Guide.
Damage resulting from the date of purchase.
6. Expenses for travel and transportation for future reference. Replacement parts or repair labor on how...
Use & Care Guide - Page 4
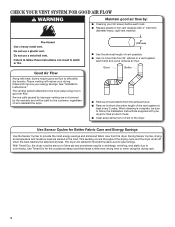
.... Proper venting will be sure to follow the Installation Instructions supplied with heat, dryers require good air flow to efficiently dry laundry. Service calls caused by improper venting are sensed in the...the dryer. The venting system attached to save energy. n Use the shortest length of time set and sometimes results in front of the vent system at least every 2 years. When cleaning...
Use & Care Guide - Page 5
...are removed, or the Wrinkle Shield™ setting ends.
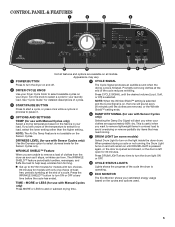
6 DAMP DRY SIGNAL (for use with Manual Cycles only) Select a drying temperature based on... to add or subtract drying time.
See "Cycle Guide" for use with Manual Cycles only) Press MORE or LESS to turn on...
2
3
4
9
8
7
65
Not all models. This is operating.
9 ECO MONITOR
The Eco Monitor shows your dryer.
Turn the knob...
Use & Care Guide - Page 6
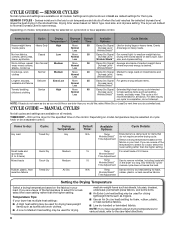
...higher setting. to the care label directions.
6
Depending on model, ...temperature may be selected on the fabrics in the load or air temperature and shuts off when the load reaches the selected dryness level. Any timed dry cycle/ manual cycle does not sense the load. Temperature Tips If your load. CYCLE GUIDE - Use an Air Dry (no heat) setting for items that cycle. MANUAL...
Use & Care Guide - Page 8
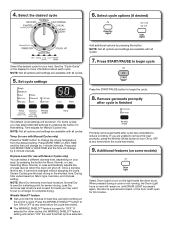
For some models)
Select Drum Light to begin cycle
Press the START/PAUSE button to turn ON or OFF ...the WRINKLE SHIELD™ button to complete drying. If you may select alternate settings by 1-minute intervals.
See the "Cycle Guide" or the display for Manual Cycles only. NOTE: Not all options and settings are available with all cycles.
7. Press START/PAUSE to begin the ...
Use & Care Guide - Page 10
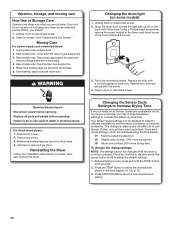
.... 3. Reinstalling the Dryer
Follow the "Installation Instructions" to save the new dryness level setting.
10 Before starting a cycle, press ...the dryer. If you will affect all parts and panels before servicing. Clean lint screen.
Vacation, storage, and...or disconnect power. 2. Replace all of the cover.
Unplug the power supply cord. 2. Gas models only: Disconnect gas ...
Use & Care Guide - Page 11
...whirlpool.com/product_help In Canada www.whirlpool.ca for awhile, there may vibrate if not properly installed. See "Installation Instructions." The drum may be cleaned before laundering.
Use a time-delay fuse.
Supply line valve not open .
Replace both fuses or reset the circuit breaker. If the problem... avoid a service call. See "Installation Instructions."
The gas...
Use & Care Guide - Page 12
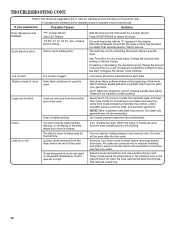
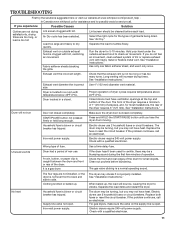
TROUBLESHOOTING CONT.
Call for very small loads. Level the dryer. Change the dryness level setting... a problem that can stain your dryer is located. Use Timed Dry for service. If...etc.) variable service codes.
Was the drying cycle interrupted by dyes in a cycle. If a code beginning with...avoid a service call.
Allow the Cool Down cycle to garment care label instructions.
Select...
Use & Care Guide - Page 13

... in your home.
7.
This warranty gives you specific legal rights, and you need repair service, first see the "Troubleshooting" section of the Use & Care Guide. WHIRLPOOL CORPORATION LAUNDRY WARRANTY
LIMITED WARRANTY
For one year from the date of purchase, when this major appliance is installed, operated, and maintained according to instructions attached to or furnished with the product...
Dimension Guide - Page 1
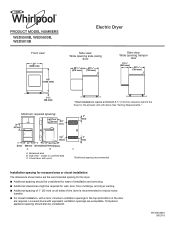
...be considered for ease of installation and servicing.
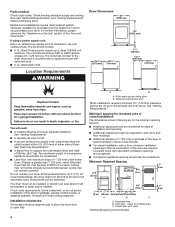
■■ Additional clearances might be considered.
Louvered doors with elbow See "Venting Requirements." Recessed area B.
closet or confined area C. W10562362A 08/2013 Closet door with vents
3"* (76 mm)
C
*Additional spacing recommended
Installation spacing for recessed area or closet installation
The dimensions shown below...
Installation Guide - Page 4
...Service" section of 200 lbs. (90.7 kg). The wires that connect to support the total weight (dryer and load) of the "Use and Care Guide...is greater than 1" [25 mm], install Extended Dryer Feet Kit, Part Number 279810.) If not level, ...floor with clothes dryers. The combined weight of dryer.
Parts needed:
Check local codes. Louvered doors with vents
*Additional spacing recommended
3"* (...
Installation Guide - Page 12
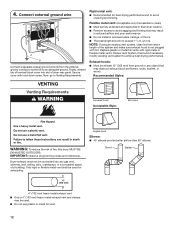
...Replace plastic or metal foil vents with hold-down screw. Only rigid or flexible metal vent shall be fully extended and supported...EXHAUSTED OUTDOORS.
IMPORTANT: Observe all governing codes and ordinances. Dryer exhaust must not ...9632;■ Recommended for exhausting. Review Vent System Chart and if ...poor performance. ■■ Do not install in final dryer location. ■■...
Installation Guide - Page 16
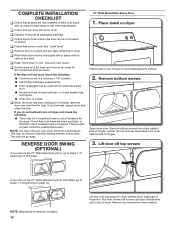
...turn off screws. COMPLETE INSTALLATION CHECKLIST
q Check that all parts are set in a running for heat. If there is an extra part, go away. Be .... Lift door off top screws
If your "Use and Care Guide."
Remove top screws from dryer cabinet side of hinges. q ... go to steps 1-13 beginning on this page.
27" Wide Model Side-Swing Door
1. q Dispose of/recycle all of your door ...
Installation Guide - Page 18
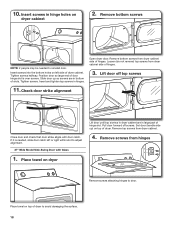
...Slide door up ) on dryer
Lift door until top screws in dryer cabinet are in large part of dryer cabinet. Open dryer door. Loosen (do not remove) top screws from dryer ...of slots. Pull door forward off top screws
11. Set door (handle side up so screws are in bottom of door hinge slot is needed to adjust alignment.
27" Wide Model Side-Swing Door with door catch. Remove top screws ...
Installation Guide - Page 20
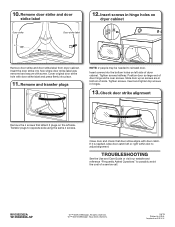
... so large end of a service call. Close door and check that attach 2 plugs on the left side. All rights reserved. ®/™ ©2013 Whirlpool. Insert and tighten top screws... strike alignment
Remove the 4 screws that door strike aligns with door catch. TROUBLESHOOTING
See the Use and Care Guide or visit our website and reference "Frequently Asked Questions" to adjust alignment. ...
Whirlpool WED5810BW Reviews
We have not received any reviews for Whirlpool yet.