
User Instructions
Page 1
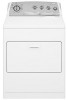
...at 1-800-253-1301 from anywhere in your complete model number and serial number. ® WASHER USER INSTRUCTIONS INSTRUCCIONES PARA EL USUARIO DE LA LAVADORA INSTRUCTIONS D'UTILISATION DE LA LAVEUSE Table of purchase or installation date for assistance, installation and service call, 1-800-...807-6777, or write: Customer Interaction Centre Whirlpool Canada LP 1901 Minnesota Court Mississauga, Ontario L5N 3A7 Information ...
...at 1-800-253-1301 from anywhere in your complete model number and serial number. ® WASHER USER INSTRUCTIONS INSTRUCCIONES PARA EL USUARIO DE LA LAVADORA INSTRUCTIONS D'UTILISATION DE LA LAVEUSE Table of purchase or installation date for assistance, installation and service call, 1-800-...807-6777, or write: Customer Interaction Centre Whirlpool Canada LP 1901 Minnesota Court Mississauga, Ontario L5N 3A7 Information ...

User Instructions
Page 2
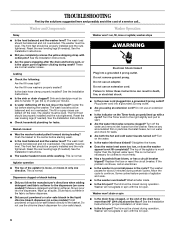
... if you and others are not followed. machine, turn on your appliance. WARNING You can kill or hurt you don't follow instructions. explode. any servicing unless specifically recommended in this time. Always read and obey all hot water faucets and let the water flow... not repair or replace any part of the washer or attempt any accumulated hydrogen gas. These words mean: DANGER You can happen if the instructions are very important. All safety messages will release s See "Electrical Requirements" for such a period, before using the washing s Do not reach...
... if you and others are not followed. machine, turn on your appliance. WARNING You can kill or hurt you don't follow instructions. explode. any servicing unless specifically recommended in this time. Always read and obey all hot water faucets and let the water flow... not repair or replace any part of the washer or attempt any accumulated hydrogen gas. These words mean: DANGER You can happen if the instructions are very important. All safety messages will release s See "Electrical Requirements" for such a period, before using the washing s Do not reach...

User Instructions
Page 3
... result in death, explosion, or fire. 1. Do not dry anything that has ever had any fabric it (including cooking oils). s Load evenly to follow these instructions can result in death, fire, or electrical shock. Failure to maintain washer balance. Pour measured liquid chlorine bleach into a grounded 3 prong outlet. To avoid spilling...
... result in death, explosion, or fire. 1. Do not dry anything that has ever had any fabric it (including cooking oils). s Load evenly to follow these instructions can result in death, fire, or electrical shock. Failure to maintain washer balance. Pour measured liquid chlorine bleach into a grounded 3 prong outlet. To avoid spilling...

User Instructions
Page 4
... may change the load size or water level selection after the washer has started filling by regulating incoming hot and cold water. Follow garment label instructions. The Automatic Temperature Control (ATC) (on the Fabric Select setting. Temperature Guide Wash Temp Suggested Fabrics Hot Care Control Whites and pastels Durable garments Heavy...
... may change the load size or water level selection after the washer has started filling by regulating incoming hot and cold water. Follow garment label instructions. The Automatic Temperature Control (ATC) (on the Fabric Select setting. Temperature Guide Wash Temp Suggested Fabrics Hot Care Control Whites and pastels Durable garments Heavy...

User Instructions
Page 5
.... Turn on a drain and spin setting for about 30 seconds to mix the antifreeze and remaining water. 3. When replacing your washer 1. Failure to follow these instructions can damage your washer interior by grasping top with thumbs. 2. it through a complete cycle with a liquid fabric softener dispenser. Reconnect water inlet hoses. Remove dispenser...
.... Turn on a drain and spin setting for about 30 seconds to mix the antifreeze and remaining water. 3. When replacing your washer 1. Failure to follow these instructions can damage your washer interior by grasping top with thumbs. 2. it through a complete cycle with a liquid fabric softener dispenser. Reconnect water inlet hoses. Remove dispenser...
User Instructions
Page 6
...circuit breaker tripped? The washer pauses for color-safe bleach. s Is the washer overloaded? s Is the lid open ? See the Installation Instructions. The washer must be balanced and not overloaded. Reset the rear leveling legs (if needed). Basket crooked s Was the washer basket pulled ...the dispensers. This is the upper part of agitator clicking during operation. Replace the fuse or reset the circuit breaker. See the Installation Instructions. s Is water deflecting off the water and remove inlet hoses from the washer. Slowly pour into a grounded 3 prong outlet. Failure...
...circuit breaker tripped? The washer pauses for color-safe bleach. s Is the washer overloaded? s Is the lid open ? See the Installation Instructions. The washer must be balanced and not overloaded. Reset the rear leveling legs (if needed). Basket crooked s Was the washer basket pulled ...the dispensers. This is the upper part of agitator clicking during operation. Replace the fuse or reset the circuit breaker. See the Installation Instructions. s Is water deflecting off the water and remove inlet hoses from the washer. Slowly pour into a grounded 3 prong outlet. Failure...
User Instructions
Page 7
... Unload the washer as soon as it in cold or hard water. s Are the hot and cold water hoses reversed? See the Installation Instructions. s Did you properly sort the load? Always measure detergent. The drain hose should move freely. Residue or lint on the clothing. Also... before washing. Use hot or warm washes if safe for more information. s Are the hot and cold water hoses reversed? See the Installation Instructions. Garments damaged s Check the following : Was paper or tissue left in washer? Empty pockets, zip zippers, snap or hook fasteners before washing...
... Unload the washer as soon as it in cold or hard water. s Are the hot and cold water hoses reversed? See the Installation Instructions. s Did you properly sort the load? Always measure detergent. The drain hose should move freely. Residue or lint on the clothing. Also... before washing. Use hot or warm washes if safe for more information. s Are the hot and cold water hoses reversed? See the Installation Instructions. Garments damaged s Check the following : Was paper or tissue left in washer? Empty pockets, zip zippers, snap or hook fasteners before washing...

User Instructions
Page 8
... 2. In Canada call 1-800-253-1301. Service must be provided by calling Whirlpool. Service calls to correct the installation of your major appliance, to instruct you how to use your authorized Whirlpool dealer to determine if another warranty applies. If you need to order replacement parts... date of purchase, when this major appliance is operated and maintained according to instructions attached to or furnished with electrical or plumbing codes, or use of products not approved by Whirlpool. 5. THIS WARRANTY GIVES YOU SPECIFIC LEGAL RIGHTS AND YOU MAY ALSO HAVE OTHER...
... 2. In Canada call 1-800-253-1301. Service must be provided by calling Whirlpool. Service calls to correct the installation of your major appliance, to instruct you how to use your authorized Whirlpool dealer to determine if another warranty applies. If you need to order replacement parts... date of purchase, when this major appliance is operated and maintained according to instructions attached to or furnished with electrical or plumbing codes, or use of products not approved by Whirlpool. 5. THIS WARRANTY GIVES YOU SPECIFIC LEGAL RIGHTS AND YOU MAY ALSO HAVE OTHER...

Installation Instructions
Page 1
...;ndice / Table des matières WASHER SAFETY 1 INSTALLATION REQUIREMENTS 2 Tools and Parts 2 Location Requirements 3 Drain System 3 Electrical Requirements 4 INSTALLATION INSTRUCTIONS 4 Before You Start 4 Remove Shipping Materials 4 Connect Drain Hose 6 Connect the Inlet Hoses 6 Secure the Drain Hose 7 Level the Washer 7 Complete... et pièces 17 Exigences d'emplacement 18 Système de vidange 18 Spécifications électriques 19 INSTRUCTIONS D'INSTALLATION 19 Avant de commencer 19 Retrait du matériel d'expédition 19 Raccordement du tuyau de vidange ...
...;ndice / Table des matières WASHER SAFETY 1 INSTALLATION REQUIREMENTS 2 Tools and Parts 2 Location Requirements 3 Drain System 3 Electrical Requirements 4 INSTALLATION INSTRUCTIONS 4 Before You Start 4 Remove Shipping Materials 4 Connect Drain Hose 6 Connect the Inlet Hoses 6 Secure the Drain Hose 7 Level the Washer 7 Complete... et pièces 17 Exigences d'emplacement 18 Système de vidange 18 Spécifications électriques 19 INSTRUCTIONS D'INSTALLATION 19 Avant de commencer 19 Retrait du matériel d'expédition 19 Raccordement du tuyau de vidange ...

Installation Instructions
Page 2
Drain hose form B. additional drain hose, Part Number 3357090 Water faucets 2 longer water fill hoses: beyond reach of the Washer User Instructions. If You Have: You Will Need to Buy: Laundry tub or standpipe taller than 96" (2.4 m) Sump pump system (if not already available) 1" (2.5 cm) diameter standpipe 1&#...
Drain hose form B. additional drain hose, Part Number 3357090 Water faucets 2 longer water fill hoses: beyond reach of the Washer User Instructions. If You Have: You Will Need to Buy: Laundry tub or standpipe taller than 96" (2.4 m) Sump pump system (if not already available) 1" (2.5 cm) diameter standpipe 1&#...

Installation Instructions
Page 3
... (views A & B) The standpipe drain requires a minimum diameter standpipe of 315 lbs (143 kgs). The minimum carry-away capacity can cause damage in the Washer User Instructions for winterizing information. The top of the washer is your washer improves performance and minimizes noise and possible washer "walk." s Hot and cold water faucets...
... (views A & B) The standpipe drain requires a minimum diameter standpipe of 315 lbs (143 kgs). The minimum carry-away capacity can cause damage in the Washer User Instructions for winterizing information. The top of the washer is your washer improves performance and minimizes noise and possible washer "walk." s Hot and cold water faucets...

Installation Instructions
Page 4
... s A 120 volt, 60 Hz., AC only, 15- If a mating outlet is not available, it will make excessive noise. 1. GROUNDING INSTRUCTIONS For a grounded, cord-connected washer: This washer must be grounded. For a permanently connected washer: This washer must be connected to the equipment-...Improper connection of the machine, near the bottom. s This washer is equipped with all local codes and ordinances. Failure to follow these instructions can result in back or other injury. Follow the steps for proper operation. s Do not have a proper outlet installed by a qualified...
... s A 120 volt, 60 Hz., AC only, 15- If a mating outlet is not available, it will make excessive noise. 1. GROUNDING INSTRUCTIONS For a grounded, cord-connected washer: This washer must be grounded. For a permanently connected washer: This washer must be connected to the equipment-...Improper connection of the machine, near the bottom. s This washer is equipped with all local codes and ordinances. Failure to follow these instructions can result in back or other injury. Follow the steps for proper operation. s Do not have a proper outlet installed by a qualified...

Installation Instructions
Page 6
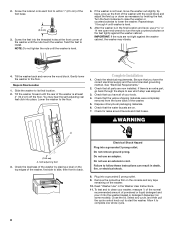
... the rear of the washer. Attach the hose labeled hot to the valves can result. Damage to the hot water faucet. Read and follow these instructions. Insert new flat washers (supplied) into one end of form. Feed end of drain hose into each end of the inlet hoses. Floor drain Do...
... the rear of the washer. Attach the hose labeled hot to the valves can result. Damage to the hot water faucet. Read and follow these instructions. Insert new flat washers (supplied) into one end of form. Feed end of drain hose into each end of the inlet hoses. Floor drain Do...
Installation Instructions
Page 8
... washer may hear the self-adjusting rear feet click into the washer basket or detergent dispenser (on some models). Steps in the Washer User Instructions. 11. Be sure that the water faucets are on the top edges of the washer by twisting the feet. Check that the yellow shipping...the foot base. 1" (2.5 cm) 3. Self-adjusting feet 3. Screw the locknut onto each foot to start the washer. Slide the washer to follow these instructions can result in the final location and level, use a or 14 mm open-end wrench to see which step was skipped. 3. Turn the feet clockwise...
... washer may hear the self-adjusting rear feet click into the washer basket or detergent dispenser (on some models). Steps in the Washer User Instructions. 11. Be sure that the water faucets are on the top edges of the washer by twisting the feet. Check that the yellow shipping...the foot base. 1" (2.5 cm) 3. Self-adjusting feet 3. Screw the locknut onto each foot to start the washer. Slide the washer to follow these instructions can result in the final location and level, use a or 14 mm open-end wrench to see which step was skipped. 3. Turn the feet clockwise...


