Dimension Guide
Page 1
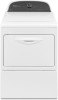
PRODUCT MODEL NUMBERS WED5500B, WED5800B, WED5810B Front view: 27" (686 mm) 43" (1092 mm) Electric Dryer Side view: Wide opening side-swing door 223/4" (578 mm) 291/2" (749 mm) Side view: Wide opening hamper door 133/4" (349 mm) 291...3"* (76 mm) C *Additional spacing recommended Installation spacing for recessed area or closet installation The dimensions shown below are the recommended spacing for this dryer. ■■ Additional spacing should also be required for the exhaust vent with equivalent ventilation openings are required. Minimum required spacing: 18"* (457 ...
PRODUCT MODEL NUMBERS WED5500B, WED5800B, WED5810B Front view: 27" (686 mm) 43" (1092 mm) Electric Dryer Side view: Wide opening side-swing door 223/4" (578 mm) 291/2" (749 mm) Side view: Wide opening hamper door 133/4" (349 mm) 291...3"* (76 mm) C *Additional spacing recommended Installation spacing for recessed area or closet installation The dimensions shown below are the recommended spacing for this dryer. ■■ Additional spacing should also be required for the exhaust vent with equivalent ventilation openings are required. Minimum required spacing: 18"* (457 ...
Use & Care Guide
Page 5
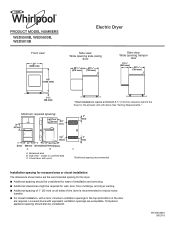
CONTROL PANEL & FEATURES 1 2 3 5 4 Not all models. Timed Dry Will run the dryer for detailed descriptions of clothes from forming. NOTE: The Air Dry Temp Feature is finished. Press the WRINKLE SHIELD™ button to pause it stops, ...; feature periodically tumbles, rearranges, and fluffs the load to select available cycles on your dryer model. Press CYCLE SIGNAL button to turn the dryer on and off. 2 DRYER CYCLE Knob Use your Dryer Cycle Knob to help keep wrinkles from the dryer as soon as it . 4 OPTIONS AND SETTINGS Temp Select a drying temperature based on the...
CONTROL PANEL & FEATURES 1 2 3 5 4 Not all models. Timed Dry Will run the dryer for detailed descriptions of clothes from forming. NOTE: The Air Dry Temp Feature is finished. Press the WRINKLE SHIELD™ button to pause it stops, ...; feature periodically tumbles, rearranges, and fluffs the load to select available cycles on your dryer model. Press CYCLE SIGNAL button to turn the dryer on and off. 2 DRYER CYCLE Knob Use your Dryer Cycle Knob to help keep wrinkles from the dryer as soon as it . 4 OPTIONS AND SETTINGS Temp Select a drying temperature based on the...

Use & Care Guide
Page 6
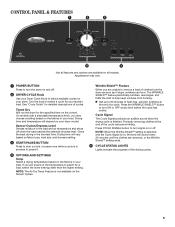
... in the load or air temperature and shuts off when the load reaches the selected dryness level. SENSOR CYCLES Not all models. SENSOR CYCLES - TIMED DRY Not all models. Select a drying temperature based on all cycles and settings are added at the end of the temperature to a damp ... setting for foam, rubber, plastic, or heat-sensitive fabrics. ■■ Line dry bonded or laminated fabrics. Setting the Drying Temperature If your dryer has multiple heat settings: ■■ A High heat setting may be used for drying medium-weight items such as you would like , select ...
... in the load or air temperature and shuts off when the load reaches the selected dryness level. SENSOR CYCLES Not all models. SENSOR CYCLES - TIMED DRY Not all models. Select a drying temperature based on all cycles and settings are added at the end of the temperature to a damp ... setting for foam, rubber, plastic, or heat-sensitive fabrics. ■■ Line dry bonded or laminated fabrics. Setting the Drying Temperature If your dryer has multiple heat settings: ■■ A High heat setting may be used for drying medium-weight items such as you would like , select ...
Use & Care Guide
Page 10
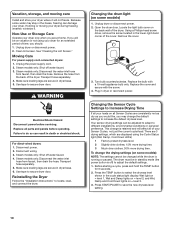
...and will not freeze. Use tape to adjust the default settings. 1. For direct-wired dryers: 1. Changing the drum light (on some models): NOTE: The settings cannot be on all of the dryer. Open the dryer door. Changing the Sensor Cycle Settings to Increase Drying Time If all parts and panels... a 10-watt appliance bulb only. This change the default settings to do so can damage your dryer. Press START/PAUSE to secure dryer door. Steam models only: Shut off water faucet. 4. Steam models only: Disconnect the water inlet hose from faucet, then drain the hose. Remove the hose from ...
...and will not freeze. Use tape to adjust the default settings. 1. For direct-wired dryers: 1. Changing the drum light (on some models): NOTE: The settings cannot be on all of the dryer. Open the dryer door. Changing the Sensor Cycle Settings to Increase Drying Time If all parts and panels... a 10-watt appliance bulb only. This change the default settings to do so can damage your dryer. Press START/PAUSE to secure dryer door. Steam models only: Shut off water faucet. 4. Steam models only: Disconnect the water inlet hose from faucet, then drain the hose. Remove the hose from ...
Installation Guide
Page 16
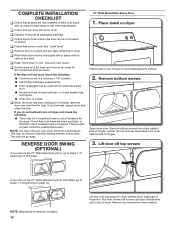
... that all of your tools. If there is not crushed or kinked. If the dryer will go to steps 1-13 beginning on this page. 27" Wide Model Side-Swing Door 1. If you feel for the dryer. Place towel on dryer Place towel on . ■■ Household fuse is intact and tight, or circuit ...breaker has not tripped. ■■ Dryer door is the 27" Wide Side-Swing Door, go back...
... that all of your tools. If there is not crushed or kinked. If the dryer will go to steps 1-13 beginning on this page. 27" Wide Model Side-Swing Door 1. If you feel for the dryer. Place towel on dryer Place towel on . ■■ Household fuse is intact and tight, or circuit ...breaker has not tripped. ■■ Dryer door is the 27" Wide Side-Swing Door, go back...
Installation Guide
Page 18
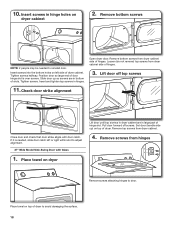
... right within slot to reinstall door. Lift door off screws. Pull door forward off top screws 11. Remove top screws from dryer cabinet side of dryer cabinet. 10. Remove bottom screws from dryer cabinet. 4. Remove bottom screws NOTE: 2 people may be needed , slide door catch left side of hinges. Slide door ... slot. Set door (handle side up so screws are in bottom of door hinge slot is needed to adjust alignment. 27" Wide Model Side-Swing Door with door catch. Insert screws in hinges. Position door so large end of slots. Insert screws into the bottom holes on...
... right within slot to reinstall door. Lift door off screws. Pull door forward off top screws 11. Remove top screws from dryer cabinet side of dryer cabinet. 10. Remove bottom screws from dryer cabinet. 4. Remove bottom screws NOTE: 2 people may be needed , slide door catch left side of hinges. Slide door ... slot. Set door (handle side up so screws are in bottom of door hinge slot is needed to adjust alignment. 27" Wide Model Side-Swing Door with door catch. Insert screws in hinges. Position door so large end of slots. Insert screws into the bottom holes on...


