Owners Manual
Page 1
...DRYER SAFETY 1 CONTROL PANEL 4 CYCLE GUIDE 5 DRYER USE 6 DRYER CARE 7 TROUBLESHOOTING 9 WARRANTY 11 ASSISTANCE OR SERVICE Back Cover Keep this book and your appliance to potential hazards that can find this manual and on the model and serial number label, located at the top inside dryer door well. WARNING You can be killed or seriously injured if you what can happen if the instructions...231;u de vente ensemble pour référence ultérieure. Pour le service sous garantie, vous devez présenter un document prouvant la date d'achat ou d'installation. Inscrivez les ...
...DRYER SAFETY 1 CONTROL PANEL 4 CYCLE GUIDE 5 DRYER USE 6 DRYER CARE 7 TROUBLESHOOTING 9 WARRANTY 11 ASSISTANCE OR SERVICE Back Cover Keep this book and your appliance to potential hazards that can find this manual and on the model and serial number label, located at the top inside dryer door well. WARNING You can be killed or seriously injured if you what can happen if the instructions...231;u de vente ensemble pour référence ultérieure. Pour le service sous garantie, vous devez présenter un document prouvant la date d'achat ou d'installation. Inscrivez les ...
Owners Manual
Page 2
IMPORTANT: The gas installation must be electrically grounded in accordance with local codes, or in the absence of local codes, with the National Fuel Gas Code, ANSI Z223.1/NFPA 54. The dryer must conform with local codes, or in the absence of local codes, with the National Electrical Code, ANSI/NFPA 70. 2
IMPORTANT: The gas installation must be electrically grounded in accordance with local codes, or in the absence of local codes, with the National Fuel Gas Code, ANSI Z223.1/NFPA 54. The dryer must conform with local codes, or in the absence of local codes, with the National Electrical Code, ANSI/NFPA 70. 2
Owners Manual
Page 3
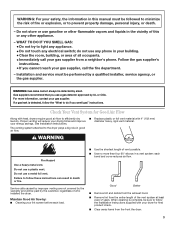
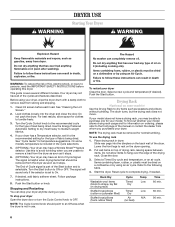
... good air flow. ■■ Replace plastic or foil vent material with heat, dryers require good air flow to do not use a gas detector approved by the customer, regardless of this manual must be performed by smell. When cleaning is detected, follow these instructions can result in this or any other flammable vapors and liquids in a vent system; each load. ■■ Use the shortest length of the vent...
... good air flow. ■■ Replace plastic or foil vent material with heat, dryers require good air flow to do not use a gas detector approved by the customer, regardless of this manual must be performed by smell. When cleaning is detected, follow these instructions can result in this or any other flammable vapors and liquids in a vent system; each load. ■■ Use the shortest length of the vent...
Owners Manual
Page 4
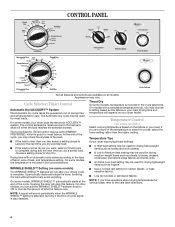
.... ■■ Use a no heat (air) setting for drying lightweight items such as towels and work clothes. ■■ A Low to help avoid wrinkling. The Automatic Dry cycle may vary. NOTE: A signal will run after your dryer uses the electronic ACCUDRY™ system. The Cycle Selector (Timer) control may be used for rubber, plastic, or heatsensitive fabrics. ■■ Line dry bonded or laminated fabrics. Opening the door will depend on...
.... ■■ Use a no heat (air) setting for drying lightweight items such as towels and work clothes. ■■ A Low to help avoid wrinkling. The Automatic Dry cycle may vary. NOTE: A signal will run after your dryer uses the electronic ACCUDRY™ system. The Cycle Selector (Timer) control may be used for rubber, plastic, or heatsensitive fabrics. ■■ Line dry bonded or laminated fabrics. Opening the door will depend on...
Owners Manual
Page 5
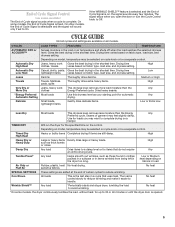
... time. Drying time Low lightweight items varies based on fabric type, load size, and dryness setting. TIMED DRY Will run the dryer for loads you open the door or turn the Cycle Control knob to complete drying on a hanger. Tumble Press® Any load Helps smooth out wrinkles, such as your starting point for automatic Any drying. Low or Medium heat depending on fabric type, load size, and dryness setting. No heat Wrinkle Shield™ Any load *Periodically starts and stops dryer...
... time. Drying time Low lightweight items varies based on fabric type, load size, and dryness setting. TIMED DRY Will run the dryer for loads you open the door or turn the Cycle Control knob to complete drying on a hanger. Tumble Press® Any load Helps smooth out wrinkles, such as your starting point for automatic Any drying. Low or Medium heat depending on fabric type, load size, and dryness setting. No heat Wrinkle Shield™ Any load *Periodically starts and stops dryer...
Owners Manual
Page 6
... or by using an air cycle. Turn the Start button to the following table. 4. NOTE: The Cycle Control knob should be able to the recommended setting for normal tumbling. Start the dryer. Push the Start button. Refer to ON or OFF. This guide covers several different models. Rack Dry Washable wool items (block to dry items such as sweaters and pillows without tumbling. Follow package instructions. 8. See "Cleaning the Lint Screen." 2. Slide rear pegs into...
... or by using an air cycle. Turn the Start button to the following table. 4. NOTE: The Cycle Control knob should be able to the recommended setting for normal tumbling. Start the dryer. Push the Start button. Refer to ON or OFF. This guide covers several different models. Rack Dry Washable wool items (block to dry items such as sweaters and pillows without tumbling. Follow package instructions. 8. See "Cleaning the Lint Screen." 2. Slide rear pegs into...
Owners Manual
Page 7
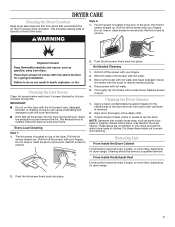
... dryer during removal, check the exhaust hood and remove the lint. Do not rinse or wash screen to remove lint. Every Load Cleaning Style 1: 1. The lint screen is removed. 2. Pull the lint screen toward you. Do not rinse or wash screen to remove lint. Scrub lint screen with hot water. 3. Replace screen in front of lint screen with the brush to your fingers. Cleaning the Dryer Interior 1. Apply a liquid, nonflammable household cleaner to avoid drum staining. Wipe drum thoroughly with a soft cloth...
... dryer during removal, check the exhaust hood and remove the lint. Do not rinse or wash screen to remove lint. Every Load Cleaning Style 1: 1. The lint screen is removed. 2. Pull the lint screen toward you. Do not rinse or wash screen to remove lint. Scrub lint screen with hot water. 3. Replace screen in front of lint screen with the brush to your fingers. Cleaning the Dryer Interior 1. Apply a liquid, nonflammable household cleaner to avoid drum staining. Wipe drum thoroughly with a soft cloth...
Owners Manual
Page 8
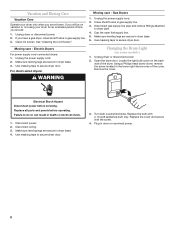
... should: 1. Gas Dryers 1. Electric Dryers For power supply cord-connected dryers: 1. Failure to dryer pipe. 4. Use masking tape to secure dryer door. If you are secure in dryer base. 3. Use masking tape to secure dryer door. 3. Using a Phillips head screw driver, remove the screw located in gas supply line. 3. Disconnect power. 2. Clean lint screen. Use masking tape to secure dryer door. For direct-wired dryers: Changing the Drum Light (on the back wall of the cover. Replace the cover and secure with a 10-watt appliance bulb only. Open the dryer door. Turn bulb...
... should: 1. Gas Dryers 1. Electric Dryers For power supply cord-connected dryers: 1. Failure to dryer pipe. 4. Use masking tape to secure dryer door. If you are secure in dryer base. 3. Use masking tape to secure dryer door. 3. Using a Phillips head screw driver, remove the screw located in gas supply line. 3. Disconnect power. 2. Clean lint screen. Use masking tape to secure dryer door. For direct-wired dryers: Changing the Drum Light (on the back wall of the cover. Replace the cover and secure with a 10-watt appliance bulb only. Open the dryer door. Turn bulb...
Owners Manual
Page 9
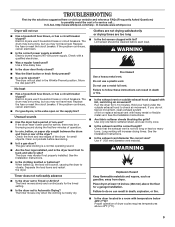
... the valve open on the supply line? The timer moves only when the clothing is the dryer level front to back and side to check air movement. Electric dryers use 2 household fuses or circuit breakers. If the problem continues, call ... If the dryer hasn't been used ? Run the dryer for awhile, there may not have heat. See the Installation Instructions. ■■ Is the exhaust vent diameter the correct size? Use 4" (102 mm) diameter vent material. The drum...
... the valve open on the supply line? The timer moves only when the clothing is the dryer level front to back and side to check air movement. Electric dryers use 2 household fuses or circuit breakers. If the problem continues, call ... If the dryer hasn't been used ? Run the dryer for awhile, there may not have heat. See the Installation Instructions. ■■ Is the exhaust vent diameter the correct size? Use 4" (102 mm) diameter vent material. The drum...
Owners Manual
Page 10
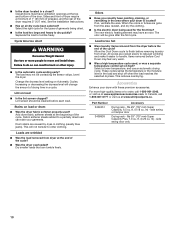
.... ft. (0.20 cu. side swing door only 10 The new electric heating element may not be cleaned before the end of drying time in clothing (usually blue jeans). Allow the Cool Down cycle to do so can result in the area where your dryer is too hot ■■ Were laundry items removed from dryer. This reduces overdrying. fits 29" (737 mm) Super Capacity Plus, 7.0 cu. Select the right cycle...
.... ft. (0.20 cu. side swing door only 10 The new electric heating element may not be cleaned before the end of drying time in clothing (usually blue jeans). Allow the Cool Down cycle to do so can result in the area where your dryer is too hot ■■ Were laundry items removed from dryer. This reduces overdrying. fits 29" (737 mm) Super Capacity Plus, 7.0 cu. Select the right cycle...
Owners Manual
Page 11
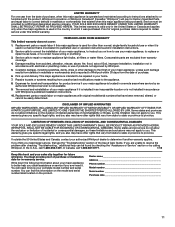
... an authorized Whirlpool servicer is not available. 9. Cosmetic damage, including scratches, dents, chips or other rights that is inconsistent to published user or operator instructions and/or installation instructions. 2. Some states and provinces do not allow limitations on the product. Consumable parts are unable to resolve the problem after checking "Troubleshooting," additional help can find this information on the model and serial number label located on...
... an authorized Whirlpool servicer is not available. 9. Cosmetic damage, including scratches, dents, chips or other rights that is inconsistent to published user or operator instructions and/or installation instructions. 2. Some states and provinces do not allow limitations on the product. Consumable parts are unable to resolve the problem after checking "Troubleshooting," additional help can find this information on the model and serial number label located on...


