

User Instructions
Page 2
The dryer must conform with local codes, or in the absence of local codes, with the National Electrical Code, ANSI/NFPA 70. 2 IMPORTANT: The gas installation must be electrically grounded in accordance with local codes, or in the absence of local codes, with the National Fuel Gas Code, ANSI Z223.1/NFPA 54.
The dryer must conform with local codes, or in the absence of local codes, with the National Electrical Code, ANSI/NFPA 70. 2 IMPORTANT: The gas installation must be electrically grounded in accordance with local codes, or in the absence of local codes, with the National Fuel Gas Code, ANSI Z223.1/NFPA 54.
User Instructions
Page 3
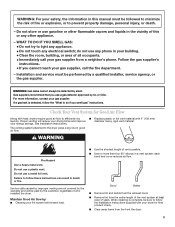
...■■ Clear away items from the front the dryer. 3 Failure to follow these instructions can result in good air flow. ■■...heat, dryers require good air flow to do not use gasoline or other appliance. - When cleaning is detected, follow the Installation Instructions supplied with your dryer for Good... WHAT TO DO IF YOU SMELL GAS: • Do not try to the dryer plays a big role in death or fire. Proper venting will be performed by UL...90° elbows in the vicinity of who installed the dryer. If a gas leak is complete, be detected by smell. The venting ...
...■■ Clear away items from the front the dryer. 3 Failure to follow these instructions can result in good air flow. ■■...heat, dryers require good air flow to do not use gasoline or other appliance. - When cleaning is detected, follow the Installation Instructions supplied with your dryer for Good... WHAT TO DO IF YOU SMELL GAS: • Do not try to the dryer plays a big role in death or fire. Proper venting will be performed by UL...90° elbows in the vicinity of who installed the dryer. If a gas leak is complete, be detected by smell. The venting ...

User Instructions
Page 6
.... Clean lint screen before operating this to avoid wrinkling when you purchased your dryer. For best results, allow items to hang over the edge of fire, electric shock, or injury to remove a load from the dryer as soon as sweaters and pillows without tumbling. Turn the Start button to ...the following table. 4. Select a Timed Dry cycle and temperature, or an air cycle. Start the dryer. Before using your model allows...
.... Clean lint screen before operating this to avoid wrinkling when you purchased your dryer. For best results, allow items to hang over the edge of fire, electric shock, or injury to remove a load from the dryer as soon as sweaters and pillows without tumbling. Turn the Start button to ...the following table. 4. Select a Timed Dry cycle and temperature, or an air cycle. Start the dryer. Before using your model allows...

User Instructions
Page 8
...in gas supply line. 3. Close shutoff valve in death or electrical shock. 1. Gas Dryers 1. For direct-wired dryers: Changing the Drum Light (on vacation or not using your dryer only when you are secure in dryer base. 4. Disconnect power. 2. Remove the cover. Replace the... wiring. 3. Turn bulb counterclockwise. Vacation and Moving Care Vacation Care Operate your dryer for an extended period of time, you have a gas dryer, close shutoff valve in gas supply line. 3. Clean lint screen. Unplug dryer or disconnect power. 2. Electric Dryers For power supply cord-connected...
...in gas supply line. 3. Close shutoff valve in death or electrical shock. 1. Gas Dryers 1. For direct-wired dryers: Changing the Drum Light (on vacation or not using your dryer only when you are secure in dryer base. 4. Disconnect power. 2. Remove the cover. Replace the... wiring. 3. Turn bulb counterclockwise. Vacation and Moving Care Vacation Care Operate your dryer for an extended period of time, you have a gas dryer, close shutoff valve in gas supply line. 3. Clean lint screen. Unplug dryer or disconnect power. 2. Electric Dryers For power supply cord-connected...
User Instructions
Page 9
...the exhaust vent or outside exhaust hood to Timed or Air Dry? Electric dryers use 2 household fuses or circuit breakers. Electric dryers require 240-volt power supply. Use a time-delay fuse. ■■ Is the dryer door firmly closed? ■■ Was the Start button or knob ...movement, clean exhaust system of dryer cycles requires temperatures above 45ºF (7ºC). 9 Use only one fabric softener sheet, and use ? See the Installation Instructions. ■■ Is the exhaust vent diameter the correct size? http://www.whirlpool.com/help - Check with...
...the exhaust vent or outside exhaust hood to Timed or Air Dry? Electric dryers use 2 household fuses or circuit breakers. Electric dryers require 240-volt power supply. Use a time-delay fuse. ■■ Is the dryer door firmly closed? ■■ Was the Start button or knob ...movement, clean exhaust system of dryer cycles requires temperatures above 45ºF (7ºC). 9 Use only one fabric softener sheet, and use ? See the Installation Instructions. ■■ Is the exhaust vent diameter the correct size? http://www.whirlpool.com/help - Check with...

User Instructions
Page 10
...the odors or fumes are wrinkled ■■ Was the load removed from the area, rewash, and dry the clothing. ■■ Is the electric dryer being dried. ■■ Is the load too large and heavy to dry quickly? Load is located? Select a lower temperature, and use an ..., staining, or varnishing in a cycle. The new electric heating element may not be gone after the first cycle. Part Number 3404351 3406839 Accessory Drying rack - side swing door only 10 Stains on load or drum ■■ Was the dryer fabric softener properly used , or was a separate temperature...
...the odors or fumes are wrinkled ■■ Was the load removed from the area, rewash, and dry the clothing. ■■ Is the electric dryer being dried. ■■ Is the load too large and heavy to dry quickly? Load is located? Select a lower temperature, and use an ..., staining, or varnishing in a cycle. The new electric heating element may not be gone after the first cycle. Part Number 3404351 3406839 Accessory Drying rack - side swing door only 10 Stains on load or drum ■■ Was the dryer fabric softener properly used , or was a separate temperature...

Installation Instructions
Page 1
...can be killed or seriously injured if you don't follow instructions. All safety messages will follow instructions. ELECTRIC DRYER INSTALLATION INSTRUCTIONS U.S.A. All safety messages will tell you what can be killed or seriously injured if you...instrucciones en español, visite www.Whirlpool.com TABLE OF CONTENTS TABLE OF CONTENTS 1 DRYER SAFETY 1 INSTALLATION REQUIREMENTS 2 Tools and Parts 2 Optional Equipment 2 Location Requirements 3 ELECTRIC DRYER POWER HOOKUP 4 Electrical Requirements 4 Electrical Connection 5 VENTING 10 Venting Requirements 10 ...
...can be killed or seriously injured if you don't follow instructions. All safety messages will follow instructions. ELECTRIC DRYER INSTALLATION INSTRUCTIONS U.S.A. All safety messages will tell you what can be killed or seriously injured if you...instrucciones en español, visite www.Whirlpool.com TABLE OF CONTENTS TABLE OF CONTENTS 1 DRYER SAFETY 1 INSTALLATION REQUIREMENTS 2 Tools and Parts 2 Optional Equipment 2 Location Requirements 3 ELECTRIC DRYER POWER HOOKUP 4 Electrical Requirements 4 Electrical Connection 5 VENTING 10 Venting Requirements 10 ...

Installation Instructions
Page 2
...connector E. Parts needed Check local codes. For further information, please refer to the "Assistance or Service" section in your dryer. 2 Steam Models ■ Flat-blade screwdriver ■ #2 Phillips screwdriver ■ Adjustable wrench that all parts are ...■ ¼" nut driver (recommended) ■ Tape measure ■ Pliers 4 Leveling legs A B A. "Y" connector C. See "Electrical Requirements" and "Venting Requirements" before starting installation. Read and follow the instructions provided with any tools listed here. Short inlet hose C D E D. ...
...connector E. Parts needed Check local codes. For further information, please refer to the "Assistance or Service" section in your dryer. 2 Steam Models ■ Flat-blade screwdriver ■ #2 Phillips screwdriver ■ Adjustable wrench that all parts are ...■ ¼" nut driver (recommended) ■ Tape measure ■ Pliers 4 Leveling legs A B A. "Y" connector C. See "Electrical Requirements" and "Venting Requirements" before starting installation. Read and follow the instructions provided with any tools listed here. Short inlet hose C D E D. ...

Installation Instructions
Page 3
... to water and/or weather. See "Electrical Requirements." ■ A sturdy floor to introduce outside air into dryer. Check code requirements. Contact your dealer. ■ Special provisions must be made in mobile homes to support total dryer weight of the door are required. NOTE...; If using a power supply cord, a grounded electrical outlet within 4 ft. (1.2 m) of dryer, and water pressure of dryer. If using "Y" connector provided. At lower temperatures, the dryer may not shut off at least 18" (457 mm) above floor. Dryer has been tested for purchase from washer using a...
... to water and/or weather. See "Electrical Requirements." ■ A sturdy floor to introduce outside air into dryer. Check code requirements. Contact your dealer. ■ Special provisions must be made in mobile homes to support total dryer weight of the door are required. NOTE...; If using a power supply cord, a grounded electrical outlet within 4 ft. (1.2 m) of dryer, and water pressure of dryer. If using "Y" connector provided. At lower temperatures, the dryer may not shut off at least 18" (457 mm) above floor. Dryer has been tested for purchase from washer using a...

Installation Instructions
Page 4
... used when the appliance is installed with flexible metallic conduit. If the dryer is installed in conformance with a 3-wire electrical supply connection. ELECTRIC DRYER POWER HOOKUP Electrical Requirements It is your responsibility ■ To contact a qualified electrical installer. ■ To be sure that the electrical connection is permanently connected to the neutral conductor (white wire) within the...
... used when the appliance is installed with flexible metallic conduit. If the dryer is installed in conformance with a 3-wire electrical supply connection. ELECTRIC DRYER POWER HOOKUP Electrical Requirements It is your responsibility ■ To contact a qualified electrical installer. ■ To be sure that the electrical connection is permanently connected to the neutral conductor (white wire) within the...

Installation Instructions
Page 5
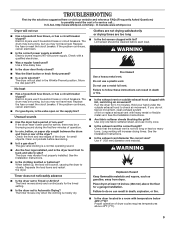
...center wire) to center terminal (silver). Disconnect Power. 2. Strain relief should have a tight fit with the dryer cabinet and be connected to green ground connector. Electrical Connection WARNING Fire Hazard Use a new UL listed 30 amp power supply cord. Connect neutral wire (white or ...center wire) to center terminal (silver). Securely tighten all electrical connections. Hold-down ■ Put power supply cord through hole below terminal block opening C. Install strain relief. Hole below terminal ...
...center wire) to center terminal (silver). Disconnect Power. 2. Strain relief should have a tight fit with the dryer cabinet and be connected to green ground connector. Electrical Connection WARNING Fire Hazard Use a new UL listed 30 amp power supply cord. Connect neutral wire (white or ...center wire) to center terminal (silver). Securely tighten all electrical connections. Hold-down ■ Put power supply cord through hole below terminal block opening C. Install strain relief. Hole below terminal ...
Installation Instructions
Page 6
...strain relief 6 A B C A. Hole below terminal block opening , screw removable conduit connector onto strain relief threads. Spade terminals with dryer cabinet and be Go to Section connecting to center silvercolored terminal block screw D. Remove neutral ground wire from external ground conductor screw. ...complete installation following instructions for mobile homes and where local codes do not permit use of electrical connection: 4-wire (recommended) 3-wire (if 4-wire is not available) Electrical Connection Options If your home has: And you will be Go to Section connecting to:...
...strain relief 6 A B C A. Hole below terminal block opening , screw removable conduit connector onto strain relief threads. Spade terminals with dryer cabinet and be Go to Section connecting to center silvercolored terminal block screw D. Remove neutral ground wire from external ground conductor screw. ...complete installation following instructions for mobile homes and where local codes do not permit use of electrical connection: 4-wire (recommended) 3-wire (if 4-wire is not available) Electrical Connection Options If your home has: And you will be Go to Section connecting to:...

Installation Instructions
Page 7
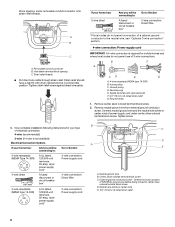
... right) of the neutral wire (white or center wire) of direct wire cable under the screw of dryer rear panel. Direct wire cable must have completed your electrical connection. Shape ends of wires into slot of the terminal block (hook facing right), squeeze hooked end ...white or center wire) 7 Tighten screw. Remove neutral ground wire from 3 remaining wires. B. Connect ground wire (green or bare) of extra length so dryer can be moved if needed. Neutral ground wire C. Neutral ground wire C. Connect the other wires to external ground conductor screw. You have 5 ft. ...
... right) of the neutral wire (white or center wire) of direct wire cable under the screw of dryer rear panel. Direct wire cable must have completed your electrical connection. Shape ends of wires into slot of the terminal block (hook facing right), squeeze hooked end ...white or center wire) 7 Tighten screw. Remove neutral ground wire from 3 remaining wires. B. Connect ground wire (green or bare) of extra length so dryer can be moved if needed. Neutral ground wire C. Neutral ground wire C. Connect the other wires to external ground conductor screw. You have 5 ft. ...
Installation Instructions
Page 8
... 2. Loosen or remove center, silver-colored terminal block screw. Center, silver-colored terminal block screw D. 4. Squeeze hooked ends together. You have completed your electrical connection. B D E A C GF A. 3-wire receptacle (NEMA type 10-30R) B. 3-wire plug C. Secure cover with outer covering. Tighten screws... 3. Insert tab of terminal block cover into slot of cable. Connect neutral wire (white or center wire) of dryer rear panel. Now go to "Venting Requirements." 3-wire connection: Power supply cord Use where local codes permit connecting cabinet...
... 2. Loosen or remove center, silver-colored terminal block screw. Center, silver-colored terminal block screw D. 4. Squeeze hooked ends together. You have completed your electrical connection. B D E A C GF A. 3-wire receptacle (NEMA type 10-30R) B. 3-wire plug C. Secure cover with outer covering. Tighten screws... 3. Insert tab of terminal block cover into slot of cable. Connect neutral wire (white or center wire) of dryer rear panel. Now go to "Venting Requirements." 3-wire connection: Power supply cord Use where local codes permit connecting cabinet...

Installation Instructions
Page 9
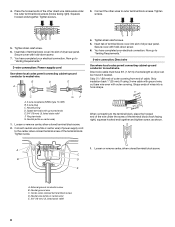
...external ground conductor screw. A. 2. Place the hooked ends of power supply cord/cable under the center screw of dryer rear panel. Squeeze hooked ends together. External ground conductor screw B. Remove center, silver-colored terminal block screw. ...E E F D. Center, silver-colored terminal block screw D. Tighten screws. 4. Secure cover with hold -down screw. 6. You have completed your electrical connection. Tighten screw. Place the hooked end of the neutral wire (white or center wire) of direct wire cable under center, silvercolored terminal block ...
...external ground conductor screw. A. 2. Place the hooked ends of power supply cord/cable under the center screw of dryer rear panel. Squeeze hooked ends together. External ground conductor screw B. Remove center, silver-colored terminal block screw. ...E E F D. Center, silver-colored terminal block screw D. Tighten screws. 4. Secure cover with hold -down screw. 6. You have completed your electrical connection. Tighten screw. Place the hooked end of the neutral wire (white or center wire) of direct wire cable under center, silvercolored terminal block ...

Installation Instructions
Page 14
...top screw from each of the 2 hinges that attach dryer door to a left where the hinges were removed in a running or "On" position. ■ Start button has been pushed firmly. ■ Dryer is plugged into an outlet and/or electrical supply is connected. ■ Household fuse is intact ...and tight, or circuit breaker has not tripped. ■ Dryer door is closed. Remove the door strike from the dryer door. Door strike B. Remove the 4 screws...
...top screw from each of the 2 hinges that attach dryer door to a left where the hinges were removed in a running or "On" position. ■ Start button has been pushed firmly. ■ Dryer is plugged into an outlet and/or electrical supply is connected. ■ Household fuse is intact ...and tight, or circuit breaker has not tripped. ■ Dryer door is closed. Remove the door strike from the dryer door. Door strike B. Remove the 4 screws...

Installation Instructions
Page 15
...a circuit breaker tripped? Replace the fuse or reset the circuit breaker. Install screws in top hinge holes in hinge and door. Electric dryers require 240-volt power supply. If the problem continues, call an electrician. ■ Is the correct power supply available? Press ... have heat. There may be a problem with a qualified electrician. ■ Was a regular fuse used? Electric dryers use 2 household fuses or circuit breakers. Install two bottom screws. Dryer displaying code message ■ "PF" (power failure), check the following: Was the drying cycle interrupted by ...
...a circuit breaker tripped? Replace the fuse or reset the circuit breaker. Install screws in top hinge holes in hinge and door. Electric dryers require 240-volt power supply. If the problem continues, call an electrician. ■ Is the correct power supply available? Press ... have heat. There may be a problem with a qualified electrician. ■ Was a regular fuse used? Electric dryers use 2 household fuses or circuit breakers. Install two bottom screws. Dryer displaying code message ■ "PF" (power failure), check the following: Was the drying cycle interrupted by ...

Installation Instructions
Page 16
... Instructions. Do not use two household fuses or breakers. Electric dryers use a plastic vent. Select a Timed Dry heated cycle, and restart the dryer. If the message persists, consult a qualified electrician. ■ "AF" (low airflow condition): The dryer will increase drying times. Long venting will continue to run... vent. Use only one fabric softener sheet, and use a metal foil vent. Hold your hand under the W10267633A © 2009 Whirlpool Corporation. Proper operation of lint or replace exhaust vent with lint? Do not use it only once. ■ Is the exhaust ...
... Instructions. Do not use two household fuses or breakers. Electric dryers use a plastic vent. Select a Timed Dry heated cycle, and restart the dryer. If the message persists, consult a qualified electrician. ■ "AF" (low airflow condition): The dryer will increase drying times. Long venting will continue to run... vent. Use only one fabric softener sheet, and use a metal foil vent. Hold your hand under the W10267633A © 2009 Whirlpool Corporation. Proper operation of lint or replace exhaust vent with lint? Do not use it only once. ■ Is the exhaust ...


