

Use & Care Guide
Page 5
... will depend on your load. If you are unsure of the temperature to select available cycles on the fabrics in your dryer model. On models with a selectable temperature knob, you are removed, or the Wrinkle Shield™ setting ends. 5 ACCUDRY™/AUTOMATIC DRY Senses moisture...2 DRYER CYCLE KNOB Use your Dryer Cycle Knob to select for your laundry load. CONTROL PANEL & FEATURES 1 2 3 4 2 3 4 Not all models. The WRINKLE SHIELD™ feature periodically tumbles, rearranges, and fluffs the load to on or off when the load reaches the selected dryness level. n Get...
... will depend on your load. If you are unsure of the temperature to select available cycles on the fabrics in your dryer model. On models with a selectable temperature knob, you are removed, or the Wrinkle Shield™ setting ends. 5 ACCUDRY™/AUTOMATIC DRY Senses moisture...2 DRYER CYCLE KNOB Use your Dryer Cycle Knob to select for your laundry load. CONTROL PANEL & FEATURES 1 2 3 4 2 3 4 Not all models. The WRINKLE SHIELD™ feature periodically tumbles, rearranges, and fluffs the load to on or off when the load reaches the selected dryness level. n Get...

Use & Care Guide
Page 6
... drying in the shortest time. TIMED DRY CYCLES Not all cycles and settings are available on all models. CYCLE GUIDE - ACCUDRY™/AUTOMATIC DRY CYCLES Not all cycles and settings are available on all models. NOTE: If loads do not require an entire drying cycle. Use the No Heat setting for optimal...
... drying in the shortest time. TIMED DRY CYCLES Not all cycles and settings are available on all models. CYCLE GUIDE - ACCUDRY™/AUTOMATIC DRY CYCLES Not all cycles and settings are available on all models. NOTE: If loads do not require an entire drying cycle. Use the No Heat setting for optimal...
Use & Care Guide
Page 7
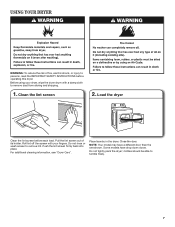
... lint screen out of fire, electric shock, or injury to remove dust from storing and shipping. 1. Place laundry in the dryer. NOTE: Your model may have drop down doors. Do not tightly pack the dryer; Close the door. clothes should be able to remove lint. Do not rinse or... wash screen to tumble freely. 7 Push the lint screen firmly back into place. For additional cleaning information, see "Dryer Care". Some models have a different door than the one shown. Before using your dryer, wipe the dryer drum with your fingers. Clean the lint screen 2. Load the ...
... lint screen out of fire, electric shock, or injury to remove dust from storing and shipping. 1. Place laundry in the dryer. NOTE: Your model may have drop down doors. Do not tightly pack the dryer; Close the door. clothes should be able to remove lint. Do not rinse or... wash screen to tumble freely. 7 Push the lint screen firmly back into place. For additional cleaning information, see "Dryer Care". Some models have a different door than the one shown. Before using your dryer, wipe the dryer drum with your fingers. Clean the lint screen 2. Load the ...
Use & Care Guide
Page 8
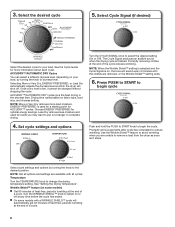
...options Turn the CYCLE SIGNAL knob to reduce wrinkling. Select cycle settings and options by turning the knob to begin the cycle. n On some models) n Get 90 minutes of heat-free, periodic tumbling at the end of a cycle. 8 Select Cycle Signal (if desired) Select the ...stopping the cycle. See "Setting the Drying Temperature". ACCUDRY™/AUTOMATIC DRY Cycles You can select a different dryness level, depending on some models with all cycles. NOTE: More or Very Dry removes more information about each cycle. Promptly removing clothes at any time before the cycle...
...options Turn the CYCLE SIGNAL knob to reduce wrinkling. Select cycle settings and options by turning the knob to begin the cycle. n On some models) n Get 90 minutes of heat-free, periodic tumbling at the end of a cycle. 8 Select Cycle Signal (if desired) Select the ...stopping the cycle. See "Setting the Drying Temperature". ACCUDRY™/AUTOMATIC DRY Cycles You can select a different dryness level, depending on some models with all cycles. NOTE: More or Very Dry removes more information about each cycle. Promptly removing clothes at any time before the cycle...

Use & Care Guide
Page 10
... fuel supply line. 5. Turn bulb counterclockwise. Unplug or disconnect power to secure dryer door. Use tape to dryer. 2. Locate the light bulb cover on some models) 1. WARNING Electrical Shock Hazard Disconnect power before operating. Make sure leveling legs are secure in dryer base. 6. Open the dryer door. Use tape to dryer...
... fuel supply line. 5. Turn bulb counterclockwise. Unplug or disconnect power to secure dryer door. Use tape to dryer. 2. Locate the light bulb cover on some models) 1. WARNING Electrical Shock Hazard Disconnect power before operating. Make sure leveling legs are secure in dryer base. 6. Open the dryer door. Use tape to dryer...

Use & Care Guide
Page 13
... this major appliance is installed, operated, and maintained according to instructions attached to or furnished with the product, Whirlpool Corporation or Whirlpool Canada LP (hereafter "Whirlpool") will need to know your major appliance, unless such damage results from defects in materials or workmanship and is... under these limitations and exclusions may not apply to you also may have other than the limited warranty that comes with original model/serial numbers that vary from warranty coverage. 4. This warranty gives you specific legal rights, and you want a longer or more...
... this major appliance is installed, operated, and maintained according to instructions attached to or furnished with the product, Whirlpool Corporation or Whirlpool Canada LP (hereafter "Whirlpool") will need to know your major appliance, unless such damage results from defects in materials or workmanship and is... under these limitations and exclusions may not apply to you also may have other than the limited warranty that comes with original model/serial numbers that vary from warranty coverage. 4. This warranty gives you specific legal rights, and you want a longer or more...

Warranty Information
Page 1
... U.S.A., call 1-800-807-6777. 10/11 Keep this book and your complete model number and serial number. You can be provided by calling Whirlpool. Service must provide proof of your authorized Whirlpool dealer to determine if another warranty applies. This limited warranty is valid only in...is not available. 9. You must be found by checking the "Assistance or Service" section or by a Whirlpool designated service company. Dealer name Address Phone number Model number Serial number Purchase date 13 This major appliance is intended to the finish of products not approved by...
... U.S.A., call 1-800-807-6777. 10/11 Keep this book and your complete model number and serial number. You can be provided by calling Whirlpool. Service must provide proof of your authorized Whirlpool dealer to determine if another warranty applies. This limited warranty is valid only in...is not available. 9. You must be found by checking the "Assistance or Service" section or by a Whirlpool designated service company. Dealer name Address Phone number Model number Serial number Purchase date 13 This major appliance is intended to the finish of products not approved by...

Installation Guide
Page 4
... system hardware, available for proper exhaust installation. For further information, please reference the "Assistance or Service" section of 200 lbs. (90.7 kg). Check that all models): Flat-blade screwdriver #2 Phillips screwdriver Wire stripper (direct wire installations) Tin snips (new vent installations) 1/4" nut driver (recommended) Vent clamps Leveling legs (4) Parts package is...
... system hardware, available for proper exhaust installation. For further information, please reference the "Assistance or Service" section of 200 lbs. (90.7 kg). Check that all models): Flat-blade screwdriver #2 Phillips screwdriver Wire stripper (direct wire installations) Tin snips (new vent installations) 1/4" nut driver (recommended) Vent clamps Leveling legs (4) Parts package is...
Installation Guide
Page 5
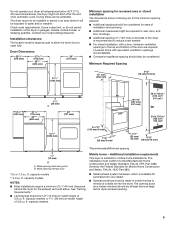
...it will be exposed to reduce noise transfer. ■■ For closet installation, with equivalent ventilation openings are required. ft. capacity models NOTES: ■■ Most installations require a minimum 5½" (140 mm) clearance behind the dryer for purchase from your dealer... Additional clearances might not shut off at least twice as large as a nearby window) should be required for mobile home installations. capacity models ** 6.0 cu. Additional installation requirements This dryer is suitable for wall, door, and floor moldings. ■■ Additional spacing of ...
...it will be exposed to reduce noise transfer. ■■ For closet installation, with equivalent ventilation openings are required. ft. capacity models NOTES: ■■ Most installations require a minimum 5½" (140 mm) clearance behind the dryer for purchase from your dealer... Additional clearances might not shut off at least twice as large as a nearby window) should be required for mobile home installations. capacity models ** 6.0 cu. Additional installation requirements This dryer is suitable for wall, door, and floor moldings. ■■ Additional spacing of ...
Installation Guide
Page 15
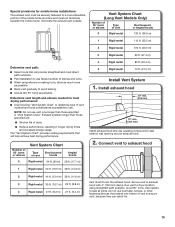
...;■ Use following "Vent System Chart" to determine type of vent to secure vent, because they can catch lint. 15 Vent System Chart (Long Vent Models Only) Number of 90° turns or elbows Type of vent Box/louvered, or Angled hoods 0 Rigid metal 120 ft. (36.6 m) 1 Rigid metal 110 ft...
...;■ Use following "Vent System Chart" to determine type of vent to secure vent, because they can catch lint. 15 Vent System Chart (Long Vent Models Only) Number of 90° turns or elbows Type of vent Box/louvered, or Angled hoods 0 Rigid metal 120 ft. (36.6 m) 1 Rigid metal 110 ft...


