

Use & Care Guide
Page 5
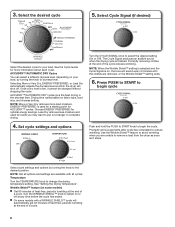
...from forming. Press the PUSH to START knob to select the desired setting (On or Off). NOTE: The No Heat temperature setting (on some models) When you are unable to select available cycles on your laundry load. TIMED DRY Will run the dryer for a load, select the lower ... the knob to help keep wrinkles from the dryer as soon as it stops, wrinkles can form. On models with a selectable temperature knob, you may vary. 1 WRINKLE SHIELD™ Feature (on some models) is on, the tone will vary based on fabric type, load size, and dryness setting. 3 TEMPERATURE Select...
...from forming. Press the PUSH to START knob to select the desired setting (On or Off). NOTE: The No Heat temperature setting (on some models) When you are unable to select available cycles on your laundry load. TIMED DRY Will run the dryer for a load, select the lower ... the knob to help keep wrinkles from the dryer as soon as it stops, wrinkles can form. On models with a selectable temperature knob, you may vary. 1 WRINKLE SHIELD™ Feature (on some models) is on, the tone will vary based on fabric type, load size, and dryness setting. 3 TEMPERATURE Select...

Use & Care Guide
Page 6
... to dry: Cycle: Temperature: Available Options: Cycle Details: Jeans, heavy work clothes. If you dry a similar load. TIMED DRY CYCLES Not all models. CYCLE GUIDE - Select a drying temperature based on all cycles and settings are unsure of the temperature to dry large or heavy loads. If loads ...level. Items to dry: Cycle: Large or heavy items such as you would like , select Less Dry next time you are available on all models. Use the No Heat setting for optimal energy savings. Drying time varies based on the control. ACCUDRY™ - Line dry bonded or laminated...
... to dry: Cycle: Temperature: Available Options: Cycle Details: Jeans, heavy work clothes. If you dry a similar load. TIMED DRY CYCLES Not all models. CYCLE GUIDE - Select a drying temperature based on all cycles and settings are unsure of the temperature to dry large or heavy loads. If loads ...level. Items to dry: Cycle: Large or heavy items such as you would like , select Less Dry next time you are available on all models. Use the No Heat setting for optimal energy savings. Drying time varies based on the control. ACCUDRY™ - Line dry bonded or laminated...
Use & Care Guide
Page 7
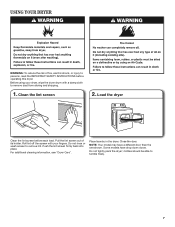
... pack the dryer; Before using your fingers. Do not rinse or wash screen to tumble freely. 7 NOTE: Your model may have drop down doors. clothes should be able to remove lint. Some models have a different door than the one shown. USING YOUR DRYER WARNING: To reduce the risk of its holder. For...
... pack the dryer; Before using your fingers. Do not rinse or wash screen to tumble freely. 7 NOTE: Your model may have drop down doors. clothes should be able to remove lint. Some models have a different door than the one shown. USING YOUR DRYER WARNING: To reduce the risk of its holder. For...
Use & Care Guide
Page 8
...Promptly remove garments after cycle has completed to the desired position. Select cycle settings and options by turning the knob to dryness level. n On some models) n Get 90 minutes of heat-free, periodic tumbling at the end of a cycle. 8 Selecting More or Very Dry, ENERGY PREFERRED, or Less... the CYCLE SIGNAL knob to change the drying temperature setting. See the Cycle Guide for ACCUDRY™ cycles. ENERGY PREFERRED is on some models with all cycles. Promptly removing clothes at any time before the cycle has ended. Less Dry removes less moisture and used for a starting...
...Promptly remove garments after cycle has completed to the desired position. Select cycle settings and options by turning the knob to dryness level. n On some models) n Get 90 minutes of heat-free, periodic tumbling at the end of a cycle. 8 Selecting More or Very Dry, ENERGY PREFERRED, or Less... the CYCLE SIGNAL knob to change the drying temperature setting. See the Cycle Guide for ACCUDRY™ cycles. ENERGY PREFERRED is on some models with all cycles. Promptly removing clothes at any time before the cycle has ended. Less Dry removes less moisture and used for a starting...

Use & Care Guide
Page 10
... disconnect power to secure dryer door. Clean lint screen. Unplug dryer or disconnect power. 2. Use tape to dryer. 2. Locate the light bulb cover on some models) 1. Disconnect wiring. 3. Turn bulb counterclockwise. Make sure leveling legs are secure in death or electrical shock. For gas dryers: 1. Disconnect gas supply line pipe and...
... disconnect power to secure dryer door. Clean lint screen. Unplug dryer or disconnect power. 2. Use tape to dryer. 2. Locate the light bulb cover on some models) 1. Disconnect wiring. 3. Turn bulb counterclockwise. Make sure leveling legs are secure in death or electrical shock. For gas dryers: 1. Disconnect gas supply line pipe and...

Use & Care Guide
Page 13
...vary from state to state or province to province. DISCLAIMER OF REPRESENTATIONS OUTSIDE OF WARRANTY Whirlpool makes no representations about the quality, durability, or need to know your complete model number and serial number. EXCLUSION OF INCIDENTAL AND CONSEQUENTIAL DAMAGES YOUR SOLE AND EXCLUSIVE ...in materials or workmanship that comes with this major appliance, you should ask Whirlpool or your retailer about your major appliance to better help can find this information on the model and serial number label located on the duration of implied warranties of merchantability...
...vary from state to state or province to province. DISCLAIMER OF REPRESENTATIONS OUTSIDE OF WARRANTY Whirlpool makes no representations about the quality, durability, or need to know your complete model number and serial number. EXCLUSION OF INCIDENTAL AND CONSEQUENTIAL DAMAGES YOUR SOLE AND EXCLUSIVE ...in materials or workmanship that comes with this major appliance, you should ask Whirlpool or your retailer about your major appliance to better help can find this information on the model and serial number label located on the duration of implied warranties of merchantability...

Warranty Information
Page 1
...is installed, operated, and maintained according to instructions attached to or furnished with the product, Whirlpool Corporation or Whirlpool Canada LP (hereafter "Whirlpool") will need to know your complete model number and serial number. YOUR SOLE AND EXCLUSIVE REMEDY UNDER THIS LIMITED WARRANTY SHALL BE PRODUCT...operator instructions and/or installation instructions. 2. If you should ask Whirlpool or your major appliance, to replace or repair house fuses, or to better help can find this information on the model and serial number label located on major appliances with this limitation...
...is installed, operated, and maintained according to instructions attached to or furnished with the product, Whirlpool Corporation or Whirlpool Canada LP (hereafter "Whirlpool") will need to know your complete model number and serial number. YOUR SOLE AND EXCLUSIVE REMEDY UNDER THIS LIMITED WARRANTY SHALL BE PRODUCT...operator instructions and/or installation instructions. 2. If you should ask Whirlpool or your major appliance, to replace or repair house fuses, or to better help can find this information on the model and serial number label located on major appliances with this limitation...

Installation Guide
Page 4
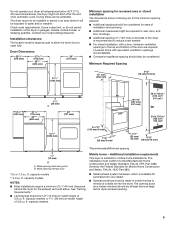
... within 2 ft. (610 mm) of either side of dryer. The kit should also be at least 4 ft. (1.22 m) long. Location Requirements Adjustable wrench that all models): Flat-blade screwdriver #2 Phillips screwdriver Wire stripper (direct wire installations) Tin snips (new vent installations) 1/4" nut driver (recommended) Vent clamps Leveling legs (4) Parts package is...
... within 2 ft. (610 mm) of either side of dryer. The kit should also be at least 4 ft. (1.22 m) long. Location Requirements Adjustable wrench that all models): Flat-blade screwdriver #2 Phillips screwdriver Wire stripper (direct wire installations) Tin snips (new vent installations) 1/4" nut driver (recommended) Vent clamps Leveling legs (4) Parts package is...
Installation Guide
Page 5
... twice as large as a nearby window) should also be installed or stored in garages, closets, mobile homes, or sleeping quarters. capacity models ** 6.0 cu. ft. ft. The opening (such as the dryer exhaust opening. 5 Do not operate your dryer at the end ...Minimum spacing 1/2" (13 mm) B A. Installation clearances: The location must conform to water and/or weather. Wide opening side-swing door B. capacity models NOTES: ■■ Most installations require a minimum 5½" (140 mm) clearance behind the dryer for wall, door, and floor moldings. ■...
... twice as large as a nearby window) should also be installed or stored in garages, closets, mobile homes, or sleeping quarters. capacity models ** 6.0 cu. ft. ft. The opening (such as the dryer exhaust opening. 5 Do not operate your dryer at the end ...Minimum spacing 1/2" (13 mm) B A. Installation clearances: The location must conform to water and/or weather. Wide opening side-swing door B. capacity models NOTES: ■■ Most installations require a minimum 5½" (140 mm) clearance behind the dryer for wall, door, and floor moldings. ■...
Installation Guide
Page 15
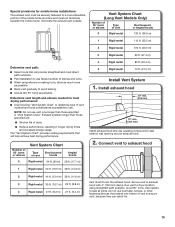
... portion of the mobile home structure and must fit over the exhaust hood. Do not use . Avoid 90° turns. Vent System Chart (Long Vent Models Only) Number of 90° turns or elbows Type of vent Box/louvered, or Angled hoods 0 Rigid metal 120 ft. (36.6 m) 1 Rigid metal 110 ft...
... portion of the mobile home structure and must fit over the exhaust hood. Do not use . Avoid 90° turns. Vent System Chart (Long Vent Models Only) Number of 90° turns or elbows Type of vent Box/louvered, or Angled hoods 0 Rigid metal 120 ft. (36.6 m) 1 Rigid metal 110 ft...


