
Use & Care Guide
Page 5
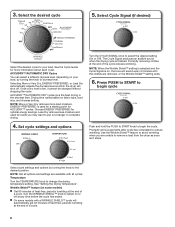
... a cycle for detailed descriptions of cycles. TIMED DRY Will run the dryer for a load, select the lower setting rather than the higher setting. Drying time and temperature will depend on the fabrics in your dryer model. Drying time will sound every 5 minutes until the clothes are available on... some models) is on, the tone will vary based on fabric type, load size, and dryness setting. 3...
... a cycle for detailed descriptions of cycles. TIMED DRY Will run the dryer for a load, select the lower setting rather than the higher setting. Drying time and temperature will depend on the fabrics in your dryer model. Drying time will sound every 5 minutes until the clothes are available on... some models) is on, the tone will vary based on fabric type, load size, and dryness setting. 3...

Use & Care Guide
Page 6
.... 6 Use the No Heat setting for optimal energy savings. ACCUDRY™/AUTOMATIC DRY CYCLES Not all cycles and settings are available on all models. Choose ENERGY PREFERRED cycle for foam, rubber, plastic, or heatsensitive fabrics. Line dry bonded or laminated fabrics. Items to a damp level ...No Heat Temperature Cycle Details: Choose high to select for the specified time on fabric type, load size, and dryness setting. Will run the dryer for a load, select the lower setting rather than you like , select More or Very Dry next time you dry a similar load. CYCLE...
.... 6 Use the No Heat setting for optimal energy savings. ACCUDRY™/AUTOMATIC DRY CYCLES Not all cycles and settings are available on all models. Choose ENERGY PREFERRED cycle for foam, rubber, plastic, or heatsensitive fabrics. Line dry bonded or laminated fabrics. Items to a damp level ...No Heat Temperature Cycle Details: Choose high to select for the specified time on fabric type, load size, and dryness setting. Will run the dryer for a load, select the lower setting rather than you like , select More or Very Dry next time you dry a similar load. CYCLE...
Use & Care Guide
Page 7
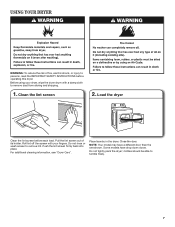
... the lint screen before operating this dryer. Some models have a different door than the one shown. USING YOUR DRYER WARNING: To reduce the risk of its holder. Close the door. Do not rinse or wash screen to tumble freely. 7 clothes should be able to ... lint screen 2. Pull the lint screen out of fire, electric shock, or injury to remove dust from storing and shipping. 1. For additional cleaning information, see "Dryer Care". Do not tightly pack the dryer; NOTE: Your model may have drop down doors. Push the lint screen firmly back into place. Place laundry in the...
... the lint screen before operating this dryer. Some models have a different door than the one shown. USING YOUR DRYER WARNING: To reduce the risk of its holder. Close the door. Do not rinse or wash screen to tumble freely. 7 clothes should be able to ... lint screen 2. Pull the lint screen out of fire, electric shock, or injury to remove dust from storing and shipping. 1. For additional cleaning information, see "Dryer Care". Do not tightly pack the dryer; NOTE: Your model may have drop down doors. Push the lint screen firmly back into place. Place laundry in the...
Use & Care Guide
Page 8
...(On or Off). Promptly removing clothes at which the dryer will shut off at any time before the cycle has ended. See "Setting the Drying Temperature". n On some models) n Get 90 minutes of heat-free, periodic tumbling ...the Wrinkle Shield™ feature to avoid wrinkling when you may want to put on some models with all options and settings are unable to begin cycle Push and hold the PUSH to START knob to... remove a load from the dryer as soon as it cannot be changed without stopping the cycle. Drying time varies based on ...
...(On or Off). Promptly removing clothes at which the dryer will shut off at any time before the cycle has ended. See "Setting the Drying Temperature". n On some models) n Get 90 minutes of heat-free, periodic tumbling ...the Wrinkle Shield™ feature to avoid wrinkling when you may want to put on some models with all options and settings are unable to begin cycle Push and hold the PUSH to START knob to... remove a load from the dryer as soon as it cannot be changed without stopping the cycle. Drying time varies based on ...

Use & Care Guide
Page 10
If you will be on vacation or not using your dryer only when you should: 1. Locate the light bulb cover on some models) 1. Replace all parts and panels before servicing. Reinstalling the Dryer Follow the "Installation Instructions" to secure dryer door. Turn bulb counterclockwise. See "Cleaning the Lint Screen." Make sure leveling legs are secure...
If you will be on vacation or not using your dryer only when you should: 1. Locate the light bulb cover on some models) 1. Replace all parts and panels before servicing. Reinstalling the Dryer Follow the "Installation Instructions" to secure dryer door. Turn bulb counterclockwise. See "Cleaning the Lint Screen." Make sure leveling legs are secure...

Installation Guide
Page 4
... at least 4 ft. (1.22 m) long. The wires that all models): Flat-blade screwdriver #2 Phillips screwdriver Wire stripper (direct wire installations) Tin snips (new vent installations) 1/4" nut driver (recommended) Vent clamps Leveling legs (4) Parts package is greater than 1" [25 mm], install Extended Dryer Feet Kit, Part Number 279810.) If not level, clothes may...
... at least 4 ft. (1.22 m) long. The wires that all models): Flat-blade screwdriver #2 Phillips screwdriver Wire stripper (direct wire installations) Tin snips (new vent installations) 1/4" nut driver (recommended) Vent clamps Leveling legs (4) Parts package is greater than 1" [25 mm], install Extended Dryer Feet Kit, Part Number 279810.) If not level, clothes may...
Installation Guide
Page 5
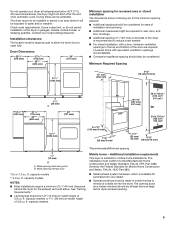
... cycle. Contact your local building inspector. Louvered doors with equivalent ventilation openings are required. capacity models ** 6.0 cu. ft. Drying times can be at temperatures below 45°F (7°C). Dryer Dimensions 223/4" (578 mm) 273/4"* (705 mm) 26"** (660 mm) 29" (.../ 310 cm2) 24 in.2/24 in garages, closets, mobile homes, or sleeping quarters. capacity models NOTES: ■■ Most installations require a minimum 5½" (140 mm) clearance behind the dryer for mobile home installations. ft. Wide opening side-swing door B. capacity washer) or 1½...
... cycle. Contact your local building inspector. Louvered doors with equivalent ventilation openings are required. capacity models ** 6.0 cu. ft. Drying times can be at temperatures below 45°F (7°C). Dryer Dimensions 223/4" (578 mm) 273/4"* (705 mm) 26"** (660 mm) 29" (.../ 310 cm2) 24 in.2/24 in garages, closets, mobile homes, or sleeping quarters. capacity models NOTES: ■■ Most installations require a minimum 5½" (140 mm) clearance behind the dryer for mobile home installations. ft. Wide opening side-swing door B. capacity washer) or 1½...
Installation Guide
Page 15
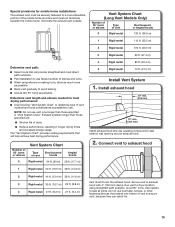
... and use fewest number of vent to secure vent, because they can catch lint. 15 Terminate the exhaust vent outside. Run vent to dryer location using elbows or making turns, allow as much room as possible. ■■ Bend vent gradually to avoid kinking. ■■...provisions for best drying performance: ■■ Use following "Vent System Chart" to determine type of dryer. ■■ Reduce performance, resulting in "Vent System Chart." Vent System Chart (Long Vent Models Only) Number of 90° turns or elbows Type of vent Box/louvered, or Angled hoods 0...
... and use fewest number of vent to secure vent, because they can catch lint. 15 Terminate the exhaust vent outside. Run vent to dryer location using elbows or making turns, allow as much room as possible. ■■ Bend vent gradually to avoid kinking. ■■...provisions for best drying performance: ■■ Use following "Vent System Chart" to determine type of dryer. ■■ Reduce performance, resulting in "Vent System Chart." Vent System Chart (Long Vent Models Only) Number of 90° turns or elbows Type of vent Box/louvered, or Angled hoods 0...


