Installation Instructions
Page 4
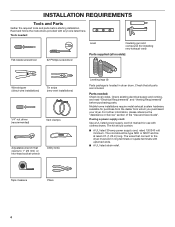
...with upturned ends. ■■ A UL listed strain relief. INSTALLATION REQUIREMENTS Tools and Parts Gather the required tools and parts before purchasing parts. Tape measure Pliers 4 Parts needed : Flat-blade screwdriver #2 Phillips screwdriver Level Caulking gun and compound (for purchase ...) Vent clamps Adjustable wrench that connect to 1" (25 mm) or hex-head socket wrench Utility knife Leveling legs (4) Parts package is located in ring terminals or spade terminals with clothes dryers. For further information, please reference the "Assistance or Service...
...with upturned ends. ■■ A UL listed strain relief. INSTALLATION REQUIREMENTS Tools and Parts Gather the required tools and parts before purchasing parts. Tape measure Pliers 4 Parts needed : Flat-blade screwdriver #2 Phillips screwdriver Level Caulking gun and compound (for purchase ...) Vent clamps Adjustable wrench that connect to 1" (25 mm) or hex-head socket wrench Utility knife Leveling legs (4) Parts package is located in ring terminals or spade terminals with clothes dryers. For further information, please reference the "Assistance or Service...
Installation Instructions
Page 5
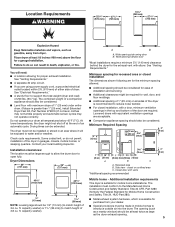
...closet or confined area C. Closet door with elbow. The installation must conform to the Manufactured Home Construction and Safety Standard, Title 24 CFR, Part 3280 (formerly the Federal Standard for mobile home installations. Some codes limit, or do not permit, installation of 1" (25 mm) under ...local building inspector. Side view - Additional installation requirements This dryer is greater than 1" [25 mm], install Extended Dryer Feet Kit, Part Number 279810.) If not level, clothes may not tumble properly and automatic sensor cycles may not operate correctly. At lower temperatures, the...
...closet or confined area C. Closet door with elbow. The installation must conform to the Manufactured Home Construction and Safety Standard, Title 24 CFR, Part 3280 (formerly the Federal Standard for mobile home installations. Some codes limit, or do not permit, installation of 1" (25 mm) under ...local building inspector. Side view - Additional installation requirements This dryer is greater than 1" [25 mm], install Extended Dryer Feet Kit, Part Number 279810.) If not level, clothes may not tumble properly and automatic sensor cycles may not operate correctly. At lower temperatures, the...

Installation Instructions
Page 14
... 4396007RW Through-the-wall vent cap 4396008RP 4" steel dryer venting clamps - 2 pack 8212662 Flush mounting louvered vent hood 4" 14 A A. Rigid metal or flexible metal vent G. Part Number Descriptions 8171587RP 0-5" Metal vent periscope 4396037RP 0"-18" Metal vent periscope 4396011RP 18" - 29" Metal vent periscope 4396014 29" - 50" Metal vent periscope 4392892 In...
... 4396007RW Through-the-wall vent cap 4396008RP 4" steel dryer venting clamps - 2 pack 8212662 Flush mounting louvered vent hood 4" 14 A A. Rigid metal or flexible metal vent G. Part Number Descriptions 8171587RP 0-5" Metal vent periscope 4396037RP 0"-18" Metal vent periscope 4396011RP 18" - 29" Metal vent periscope 4396014 29" - 50" Metal vent periscope 4392892 In...
Installation Instructions
Page 16
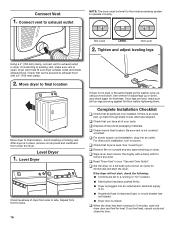
... again for 20 minutes and start , check the following: ■■ Controls are snug against the floor before tightening them. If you have all parts are level, make sure vent is not crushed or kinked. See "Level Dryer". q Remove film on console and any dust. q Read "Dryer Use...; Household fuse is intact and tight, or circuit breaker has not tripped. ■■ Dryer door is level. After dryer is an extra part, go back through steps to remove any tape remaining on power. If there is in dryer. Repeat from under the dryer. Connect Vent 1. Tighten...
... again for 20 minutes and start , check the following: ■■ Controls are snug against the floor before tightening them. If you have all parts are level, make sure vent is not crushed or kinked. See "Level Dryer". q Remove film on console and any dust. q Read "Dryer Use...; Household fuse is intact and tight, or circuit breaker has not tripped. ■■ Dryer door is level. After dryer is an extra part, go back through steps to remove any tape remaining on power. If there is in dryer. Repeat from under the dryer. Connect Vent 1. Tighten...
Installation Instructions
Page 17
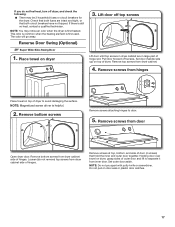
... when the heating element is first heated. The odor will go away. Pull door forward off top screws Lift door until top screws in large part of hinge slot. NOTE: Magnetized screw driver is still no heat, contact a qualified technician. Loosen (do not feel heat, turn off dryer, and check the...
... when the heating element is first heated. The odor will go away. Pull door forward off top screws Lift door until top screws in large part of hinge slot. NOTE: Magnetized screw driver is still no heat, contact a qualified technician. Loosen (do not feel heat, turn off dryer, and check the...
W10562352B v01.indd
Page 13
... attached to correct product damage or defects caused by the use with the product, Whirlpool Corporation or Whirlpool Canada LP (hereafter "Whirlpool") will be borne by Whirlpool. 8. Service to review the Troubleshooting or Problem Solver section of your appliance will ... codes, or correction of non-genuine Whirlpool parts or accessories. 6. Service or parts for in remote locations where an authorized Whirlpool servicer is reported to : https://www.whirlpool.com/product_help Whirlpool Customer eXperience Center In the U.S.A. WHIRLPOOL SHALL NOT BE LIABLE FOR INCIDENTAL OR...
... attached to correct product damage or defects caused by the use with the product, Whirlpool Corporation or Whirlpool Canada LP (hereafter "Whirlpool") will be borne by Whirlpool. 8. Service to review the Troubleshooting or Problem Solver section of your appliance will ... codes, or correction of non-genuine Whirlpool parts or accessories. 6. Service or parts for in remote locations where an authorized Whirlpool servicer is reported to : https://www.whirlpool.com/product_help Whirlpool Customer eXperience Center In the U.S.A. WHIRLPOOL SHALL NOT BE LIABLE FOR INCIDENTAL OR...


