
Owners Manual
Page 10
... your dryer only when you will be on some models) 1. Remove the cover. 3. Plug into a grounded outlet or reconnect power. For direct-wired dryers: 1. Use tape to gas supply line. 3. Unplug dryer or disconnect power. 2. Open the dryer door. Replace the cover and secure with.... 10 Make sure leveling legs are secure in dryer base. 6. Locate the light bulb cover on the back wall of the cover. Disconnect wiring. 3. Close shutoff valve in dryer base. 4. Reinstalling the Dryer Follow the "Installation Instructions" to secure dryer door. Using a Phillips-head screw...
... your dryer only when you will be on some models) 1. Remove the cover. 3. Plug into a grounded outlet or reconnect power. For direct-wired dryers: 1. Use tape to gas supply line. 3. Unplug dryer or disconnect power. 2. Open the dryer door. Replace the cover and secure with.... 10 Make sure leveling legs are secure in dryer base. 6. Locate the light bulb cover on the back wall of the cover. Disconnect wiring. 3. Close shutoff valve in dryer base. 4. Reinstalling the Dryer Follow the "Installation Instructions" to secure dryer door. Using a Phillips-head screw...

Owners Manual
Page 13
...following information about your major appliance, to replace or repair house fuses, or to correct house wiring or plumbing. 3. You can be repaired in accordance with Whirlpool's published installation instructions. 10. Service calls to correct the installation of your major appliance, to ...under this limited warranty. Replacement parts or repair labor if this major appliance is used in a remote area where service by a Whirlpool designated service company. Damage resulting from accident, alteration, misuse, abuse, fire, flood, acts of God, improper installation, installation ...
...following information about your major appliance, to replace or repair house fuses, or to correct house wiring or plumbing. 3. You can be repaired in accordance with Whirlpool's published installation instructions. 10. Service calls to correct the installation of your major appliance, to ...under this limited warranty. Replacement parts or repair labor if this major appliance is used in a remote area where service by a Whirlpool designated service company. Damage resulting from accident, alteration, misuse, abuse, fire, flood, acts of God, improper installation, installation ...
Dimension Guide
Page 1
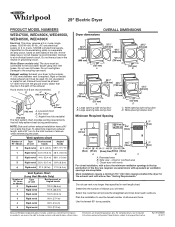
... Dryer PRODUCT MODEL NUMBERS WED4750X, WED4800X, WED4900X, WED4850X, WED4890X Electrical: This dryer requires a 3 or 4 wire, single phase, 120/240 volt, 60 Hz., AC only electrical supply (or 3 or 4 wire, 120/208 volt electrical supply, if specified on the serial/rating plate) on a separate 30-amp circuit,...opening side-swing door C. Do not use the fewest number of elbows and turns. Use the fewest 90° turns possible. Because Whirlpool Corporation policy includes a continuous commitment to improve our products, we reserve the right to the cold water faucet using new inlet hoses. ...
... Dryer PRODUCT MODEL NUMBERS WED4750X, WED4800X, WED4900X, WED4850X, WED4890X Electrical: This dryer requires a 3 or 4 wire, single phase, 120/240 volt, 60 Hz., AC only electrical supply (or 3 or 4 wire, 120/208 volt electrical supply, if specified on the serial/rating plate) on a separate 30-amp circuit,...opening side-swing door C. Do not use the fewest number of elbows and turns. Use the fewest 90° turns possible. Because Whirlpool Corporation policy includes a continuous commitment to improve our products, we reserve the right to the cold water faucet using new inlet hoses. ...
Installation Instructions
Page 2
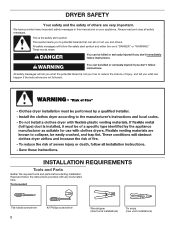
... don't follow instructions. INSTALLATION REQUIREMENTS Tools and Parts Gather the required tools and parts before starting installation. Tools needed: Flat-blade screwdriver 2 #2 Phillips screwdriver Wire stripper (direct wire installations) Tin snips (new vent installations) We have provided many important safety messages in this manual and on your appliance. All safety messages will...
... don't follow instructions. INSTALLATION REQUIREMENTS Tools and Parts Gather the required tools and parts before starting installation. Tools needed: Flat-blade screwdriver 2 #2 Phillips screwdriver Wire stripper (direct wire installations) Tin snips (new vent installations) We have provided many important safety messages in this manual and on your appliance. All safety messages will...

Installation Instructions
Page 3
... contain: ■■ A UL listed 30-amp power supply cord, rated 120/240 volt minimum. You will be at temperatures below 45°F (7°C). The wires that connect to the dryer must be installed or stored in dryer drum. Location Requirements Tape measure Pliers Level Caulking gun and compound (for installing...
... contain: ■■ A UL listed 30-amp power supply cord, rated 120/240 volt minimum. You will be at temperatures below 45°F (7°C). The wires that connect to the dryer must be installed or stored in dryer drum. Location Requirements Tape measure Pliers Level Caulking gun and compound (for installing...

Installation Instructions
Page 4
...mm) (25 mm) (705 mm) A B C A. Louvered doors with elbow. If the dryer is recommended to the neutral wire, see "Optional 3-wire connection" section. ■■ This dryer is suitable for ease of the line. Minimum spacing for recessed area or closet installation ...; Companion appliance spacing should be considered for mobile home installations. Dryer Dimensions Mobile home - The National Electrical Code requires a 4-wire power supply connection for (1) new branch-circuit installations, (2) mobile homes, (3) recreational vehicles, and (4) areas where local codes ...
...mm) (25 mm) (705 mm) A B C A. Louvered doors with elbow. If the dryer is recommended to the neutral wire, see "Optional 3-wire connection" section. ■■ This dryer is suitable for ease of the line. Minimum spacing for recessed area or closet installation ...; Companion appliance spacing should be considered for mobile home installations. Dryer Dimensions Mobile home - The National Electrical Code requires a 4-wire power supply connection for (1) new branch-circuit installations, (2) mobile homes, (3) recreational vehicles, and (4) areas where local codes ...
Installation Instructions
Page 5
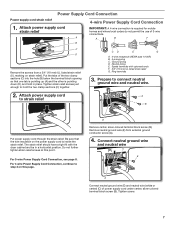
... avoid damaging floor, use aluminum). ■■ At least 5 ft. (1.52 m) long. If your outlet looks like this : Then choose a 4-wire power supply cord with ring or spade terminals and UL listed strain relief. place under entire back edge of NEMA Type 14-30 R. Firmly grasp...to do not use a large flat piece of NEMA Type 10-30R. The ground wire (ground 4-wire receptacle conductor) may be at least 4 ft. (1.22 m) long, must have 3 10-gauge solid copper wires and match a 3-wire receptacle of cardboard from dryer carton; If connecting by a white cover. Failure to ...
... avoid damaging floor, use aluminum). ■■ At least 5 ft. (1.52 m) long. If your outlet looks like this : Then choose a 4-wire power supply cord with ring or spade terminals and UL listed strain relief. place under entire back edge of NEMA Type 14-30 R. Firmly grasp...to do not use a large flat piece of NEMA Type 10-30R. The ground wire (ground 4-wire receptacle conductor) may be at least 4 ft. (1.22 m) long, must have 3 10-gauge solid copper wires and match a 3-wire receptacle of cardboard from dryer carton; If connecting by a white cover. Failure to ...
Installation Instructions
Page 6
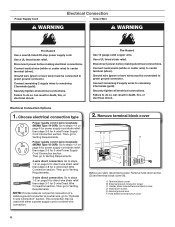
..., or electrical shock. NOTE: If local codes do so can result in death, fire, or electrical shock. Securely tighten all electrical connections. Connect neutral wire (white or center wire) to center terminal (silver). A. Center, silver-colored terminal block screw D. Hole below terminal block cover 6 Use a UL listed strain relief. Then, go to...
..., or electrical shock. NOTE: If local codes do so can result in death, fire, or electrical shock. Securely tighten all electrical connections. Connect neutral wire (white or center wire) to center terminal (silver). A. Center, silver-colored terminal block screw D. Hole below terminal block cover 6 Use a UL listed strain relief. Then, go to...
Installation Instructions
Page 7
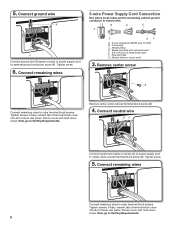
... down (D), and hold the two clamp sections (C) together. A B F C D Remove the screws from external ground conductor screw (A). 4. Attach power supply cord A to connect neutral ground wire and neutral wire. 2. The strain relief should have a tight fit with upturned ends F. 3/4" (19 mm) UL listed strain relief G. Ground prong D. Tighten screw. 7 Tighten strain relief screws...
... down (D), and hold the two clamp sections (C) together. A B F C D Remove the screws from external ground conductor screw (A). 4. Attach power supply cord A to connect neutral ground wire and neutral wire. 2. The strain relief should have a tight fit with upturned ends F. 3/4" (19 mm) UL listed strain relief G. Ground prong D. Tighten screw. 7 Tighten strain relief screws...
Installation Instructions
Page 8
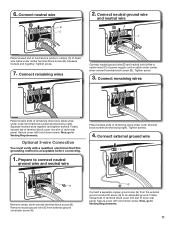
... with upturned ends E. 3/4" (19 mm) UL listed strain relief F. Ring terminals G. Connect remaining wires Connect remaining wires to outer terminal block screws. Connect ground wire A F Connect ground wire (F) (green or bare) of dryer rear panel. Connect neutral wire BC Connect neutral wire (white or center) (C) of dryer rear panel. Tighten screws. Finally, reinsert tab of terminal...
... with upturned ends E. 3/4" (19 mm) UL listed strain relief F. Ring terminals G. Connect remaining wires Connect remaining wires to outer terminal block screws. Connect ground wire A F Connect ground wire (F) (green or bare) of dryer rear panel. Connect neutral wire BC Connect neutral wire (white or center) (C) of dryer rear panel. Tighten screws. Finally, reinsert tab of terminal...
Installation Instructions
Page 9
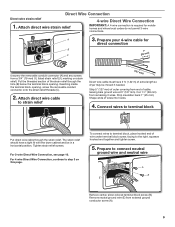
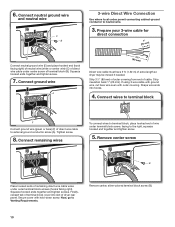
... should have 5 ft. (1.52 m) of the strain relief through the strain relief. For 4 wire Direct Wire Connection, continue to terminal block Put direct wire cable through the hole (B) below the terminal block opening , screw the removable conduit connector onto the... strain relief threads (C). 2. Direct Wire Connection Direct wire strain relief 4-wire Direct Wire Connection 1. Attach direct wire cable to connect neutral ground wire and neutral wire A B E Remove center, silver-colored terminal block screw (B). A 3. Prepare your 4-wire cable for mobile homes and where local...
... should have 5 ft. (1.52 m) of the strain relief through the strain relief. For 4 wire Direct Wire Connection, continue to terminal block Put direct wire cable through the hole (B) below the terminal block opening , screw the removable conduit connector onto the... strain relief threads (C). 2. Direct Wire Connection Direct wire strain relief 4-wire Direct Wire Connection 1. Attach direct wire cable to connect neutral ground wire and neutral wire A B E Remove center, silver-colored terminal block screw (B). A 3. Prepare your 4-wire cable for mobile homes and where local...
Installation Instructions
Page 10
... right, squeeze hooked end together and tighten screw. 5. Strip insulation back 1" (25 mm). Tighten screw. 8. Secure cover with outer covering. Connect neutral ground wire and neutral wire C B 3-wire Direct Wire Connection Use where local codes permit connecting cabinet-ground conductor to external ground conductor screw (A). Remove center, silver-colored terminal block screw (B). 10 Prepare...
... right, squeeze hooked end together and tighten screw. 5. Strip insulation back 1" (25 mm). Tighten screw. 8. Secure cover with outer covering. Connect neutral ground wire and neutral wire C B 3-wire Direct Wire Connection Use where local codes permit connecting cabinet-ground conductor to external ground conductor screw (A). Remove center, silver-colored terminal block screw (B). 10 Prepare...
Installation Instructions
Page 11
...outer terminal block screws (hooks facing right). Tighten screws. 4. Finally, reinsert tab of terminal block cover into slot of direct wire cable under outer terminal block screws (hooks facing right). Tighten screw. 7. Secure cover with hold -down screw. Now, go ... grounding method is acceptable before connecting. 1. Connect neutral ground wire and neutral wire B C Place hooked end of neutral wire (white or center) (C) of dryer rear panel. Now, go to Venting Requirements. 11 6. Optional 3-wire Connection You must verify with hold -down screw. Prepare to...
...outer terminal block screws (hooks facing right). Tighten screws. 4. Finally, reinsert tab of terminal block cover into slot of direct wire cable under outer terminal block screws (hooks facing right). Tighten screw. 7. Secure cover with hold -down screw. Now, go ... grounding method is acceptable before connecting. 1. Connect neutral ground wire and neutral wire B C Place hooked end of neutral wire (white or center) (C) of dryer rear panel. Now, go to Venting Requirements. 11 6. Optional 3-wire Connection You must verify with hold -down screw. Prepare to...
Installation Instructions
Page 15
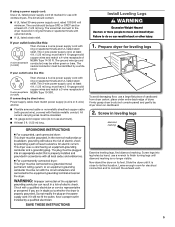
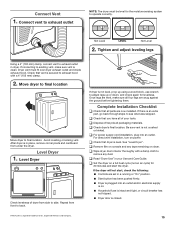
... "Level Dryer". q Wipe dryer drum interior thoroughly with a 4" (102 mm) clamp. 2. Level Dryer Check levelness of E.I. q Dispose of your Use and Care Guide. For direct wire installation, turn on a full heat cycle (not an air cycle) for 20 minutes and start , check the following: ■■ Controls are set in place...
... "Level Dryer". q Wipe dryer drum interior thoroughly with a 4" (102 mm) clamp. 2. Level Dryer Check levelness of E.I. q Dispose of your Use and Care Guide. For direct wire installation, turn on a full heat cycle (not an air cycle) for 20 minutes and start , check the following: ■■ Controls are set in place...
Warranty
Page 1
...of products not approved by Whirlpool. 5. In the U.S.A.,...an authorized Whirlpool servicer is not available. 9. WHIRLPOOL CORPORATION ...Whirlpool Corporation or Whirlpool Canada LP (hereafter "Whirlpool") will need to be provided by calling Whirlpool...house fuses, or to Whirlpool within 30 days from ...or use your authorized Whirlpool dealer to repair ...appliance to use of purchase. 6. WHIRLPOOL SHALL NOT BE LIABLE FOR INCIDENTAL...Service" section or by a Whirlpool designated service company. Damage resulting... for in accordance with Whirlpool's published installation instructions....
...of products not approved by Whirlpool. 5. In the U.S.A.,...an authorized Whirlpool servicer is not available. 9. WHIRLPOOL CORPORATION ...Whirlpool Corporation or Whirlpool Canada LP (hereafter "Whirlpool") will need to be provided by calling Whirlpool...house fuses, or to Whirlpool within 30 days from ...or use your authorized Whirlpool dealer to repair ...appliance to use of purchase. 6. WHIRLPOOL SHALL NOT BE LIABLE FOR INCIDENTAL...Service" section or by a Whirlpool designated service company. Damage resulting... for in accordance with Whirlpool's published installation instructions....


