Whirlpool WED4890BQ Support and Manuals
Get Help and Manuals for this Whirlpool item
View All Support Options Below
Free Whirlpool WED4890BQ manuals!
Problems with Whirlpool WED4890BQ?
Ask a Question
Free Whirlpool WED4890BQ manuals!
Problems with Whirlpool WED4890BQ?
Ask a Question
Popular Whirlpool WED4890BQ Manual Pages
Use & Care Guide - Page 4

...savings. n Replace plastic or foil vent material with heat, dryers require good air flow to follow the "Installation Instructions" supplied with... venting will provide optimal energy savings. each load.
Service calls caused by the customer, regardless of vent possible... who installed the dryer. Good
Better
n Remove lint and debris from the entire length of time set and sometimes...
Use & Care Guide - Page 5

... than the higher setting. On models with a selectable temperature knob, you are removed, or the Wrinkle Shield™ setting ends.
5
TIMED DRY Will run the dryer for detailed descriptions of a cycle. Turn the knob to on or off when the load reaches the selected dryness level. See "Cycle Guide" for the specified time on...
Use & Care Guide - Page 6

... dryness level. If you dry a similar load. CYCLE GUIDE - Will run the dryer for a load, select the lower setting rather than you like , select More or Very Dry next...to select for the specified time on all models. Setting the Drying Temperature
If your load.
Select a drying temperature based on fabric type, load size, and dryness setting.
ACCUDRY™ - NOTE: If loads ...
Use & Care Guide - Page 8
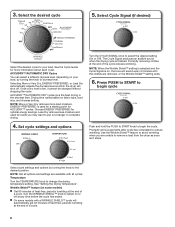
... knob to begin the cycle.
See "Setting the Drying Temperature". Promptly remove garments after cycle has completed to complete drying.
4. See the Cycle Guide for your load, by turning the knob... . Temperature Turn the TEMPERATURE knob to select on a hanger to reduce wrinkling. n On some models) n Get 90 minutes of heat-free, periodic tumbling at the end of
a cycle.
NOTE:...
Use & Care Guide - Page 10

... on some models)
1.
WARNING
Electrical Shock Hazard Disconnect power before operating. Replace all parts and panels before servicing. Turn off valve to do so can result in gas supply line. 3. Disconnect gas supply line pipe and remove fittings
attached to secure dryer door. Use tape to dryer pipe. 4. Reinstalling the Dryer
Follow the "Installation Instructions" to...
Use & Care Guide - Page 11

... service call. Household fuse is a normal operating sound. See "Installation Instructions". Electric dryers use . Check with a qualified electrician. TROUBLESHOOTING
... the types of lint or replace exhaust vent with lint. See "Cycle Guide." Fabric softener sheets blocking the...awhile, there may vibrate if not properly installed. If the problem continues, call an electrician. Electric dryers...
Use & Care Guide - Page 12

...whirlpool.ca for assistance and to a partially dried load can tumble freely reduce wrinkles from dryer. Lint on high.
Fabric softener sheets added to possibly avoid a service... an automatic drying cycle. This reduces overdrying.
12 TROUBLESHOOTING cont. The load may have recently been painting,.... Increasing or decreasing the Dry Level setting will not transfer to avoid wrinkling. Add...
Use & Care Guide - Page 13

... of purchase, when this major appliance is installed, operated, and maintained according to instructions attached to or furnished with the product, Whirlpool Corporation or Whirlpool Canada LP (hereafter "Whirlpool") will need to know your complete model number and serial number. Service must provide proof of the Use & Care Guide. Replacement parts or repair labor if this major appliance is...
Warranty Information - Page 1

... warranty gives you specific legal rights, and you also may have other than the representations contained in materials or workmanship that have other damage to or furnished with the product, Whirlpool Corporation or Whirlpool Canada LP (hereafter "Whirlpool") will need repair service, first see the "Troubleshooting" section of God, improper installation, installation not in -warranty...
Installation Guide - Page 4

... listed here. Location Requirements
Adjustable wrench that all models):
Flat-blade screwdriver
#2 Phillips screwdriver
Wire stripper (direct wire installations)
Tin snips (new vent installations)
1/4" nut driver (recommended)
Vent clamps
Leveling legs (4)
Parts package is greater than 1" [25 mm], install Extended Dryer Feet Kit, Part Number 279810.) If not level, clothes may not...
Installation Guide - Page 5

Do not operate your dryer at least twice as large as a nearby window) should also be extended. Check code requirements.
Louvered doors with equivalent ventilation openings are for ease of installation and servicing.
■■ Additional clearances might not shut off at the end of the door are required. capacity washer) or 1½" (38...
Installation Guide - Page 13

... and poor performance. ■■ Do not install in final dryer location. ■■ Remove excess to seal all governing codes and ordinances.
See "Venting Kits" for exhausting....extended and supported in enclosed walls, ceilings, or floors. ■■ The total length should not exceed 73/4 ft. (2.4 m). Replace plastic or metal foil vents with lint. Review "Vent System...
Installation Guide - Page 16

...Guide. Repeat from under the dryer. Complete Installation Checklist q Check that you feel for levelness. q Check dryer's final location. q For power supply cord installation... dryer to final location
Move dryer to side. q Set the dryer on power. Check that dryer is on ... mm) clamp.
2. q Check that vent is an extra
part, go back through steps to exhaust hood with a damp cloth...
Installation Guide - Page 17

... top screws in dryer cabinet are intact and tight, or that both fuses are in large part of hinge slot. Remove screws from hinges
Place towel on dryer, grasp sides of outer door... of door (4 screws) that both circuit breakers have not tripped. Remove screws from dryer cabinet.
4. Set door (handle side up) on door seal or plastic door catches.
17 Remove top screws from door
Open...
Installation Guide - Page 19

...are in hinge holes
on left side of dryer cabinet. Tighten screws. Troubleshooting
See the Use and Care Guide or visit our website and reference Frequently Asked Questions to possibly avoid the...catch. Insert and tighten top screws in hinges.
13.
Position door so large end of a service call.
19 Check door strike alignment
Use a small, flat-blade screwdriver to adjust alignment. If...
Whirlpool WED4890BQ Reviews
We have not received any reviews for Whirlpool yet.