
Owners Manual
Page 4
... drying cycle and the dryer shuts off when the load reaches the selected dryness. Good Better n Remove lint and debris from the dryer. Proper venting will provide optimal energy savings. When cleaning is complete, be paid by the customer, regardless of time set and sometimes results in a vent system; With Timed Dry, the dryer runs the amount of who installed the dryer. CHECK YOUR VENT SYSTEM FOR GOOD AIR FLOW Maintain good air flow by: n Cleaning your lint screen...
... drying cycle and the dryer shuts off when the load reaches the selected dryness. Good Better n Remove lint and debris from the dryer. Proper venting will provide optimal energy savings. When cleaning is complete, be paid by the customer, regardless of time set and sometimes results in a vent system; With Timed Dry, the dryer runs the amount of who installed the dryer. CHECK YOUR VENT SYSTEM FOR GOOD AIR FLOW Maintain good air flow by: n Cleaning your lint screen...

Owners Manual
Page 5
...). Promptly removing clothes at any time before the cycle has ended. 4 END OF CYCLE SIGNAL/PUSH TO START The End of Cycle Signal produces an audible sound when the drying cycle is on all models. Turn the END OF CYCLE SIGNAL knob to start the dryer. See "Cycle Guide" for your load. Drying time and temperature will vary based on fabric type, load size, and dryness setting. 2 TEMPERATURE / FABRIC Select a drying temperature based on the control. Turn the knob...
...). Promptly removing clothes at any time before the cycle has ended. 4 END OF CYCLE SIGNAL/PUSH TO START The End of Cycle Signal produces an audible sound when the drying cycle is on all models. Turn the END OF CYCLE SIGNAL knob to start the dryer. See "Cycle Guide" for your load. Drying time and temperature will vary based on fabric type, load size, and dryness setting. 2 TEMPERATURE / FABRIC Select a drying temperature based on the control. Turn the knob...
Owners Manual
Page 6
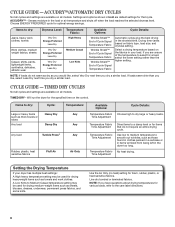
...: Available Options: Cycle Details: Jeans, heavy work clothes. No heat drying. Use the Air Only (no heat) setting for optimal energy savings. NOTE: If loads do not require an entire drying cycle. ACCUDRY™ - Setting the Drying Temperature If your load. TIMED DRY CYCLES Not all cycles and settings are available on the fabrics in bold are available on all models. Line dry bonded or laminated fabrics. NOTE: If you dry a similar load. Senses moisture in the shortest time. TIMED DRY - CYCLE GUIDE -
...: Available Options: Cycle Details: Jeans, heavy work clothes. No heat drying. Use the Air Only (no heat) setting for optimal energy savings. NOTE: If loads do not require an entire drying cycle. ACCUDRY™ - Setting the Drying Temperature If your load. TIMED DRY CYCLES Not all cycles and settings are available on the fabrics in bold are available on all models. Line dry bonded or laminated fabrics. NOTE: If you dry a similar load. Senses moisture in the shortest time. TIMED DRY - CYCLE GUIDE -
Owners Manual
Page 9
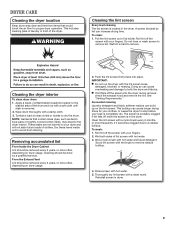
... would block the air flow for your clothes, or cause the dryer to your fingers. 2. Dry these items inside out to remove lint. Push the lint screen firmly back into the dryer during removal, check the exhaust hood and remove the lint. See "Venting Requirements." As needed cleaning Laundry detergent and fabric softener residue can cause longer drying times for proper dryer operation. Roll lint off while the screen is completely dry. DRYER CARE Cleaning the dryer location Keep dryer area clear and free...
... would block the air flow for your clothes, or cause the dryer to your fingers. 2. Dry these items inside out to remove lint. Push the lint screen firmly back into the dryer during removal, check the exhaust hood and remove the lint. See "Venting Requirements." As needed cleaning Laundry detergent and fabric softener residue can cause longer drying times for proper dryer operation. Roll lint off while the screen is completely dry. DRYER CARE Cleaning the dryer location Keep dryer area clear and free...

Owners Manual
Page 10
... dryer. Plug into a grounded outlet or reconnect power. For gas dryers: 1. Unplug or disconnect power to secure dryer door. Locate the light bulb cover on some models) 1. Turn bulb counterclockwise. For direct-wired dryers: 1. Close shutoff valve in dryer base. 3. Vacation, storage, and moving care Non-Use or Storage Care Operate your dryer for an extended period of time, you are secure in dryer base. 6. Disconnect gas supply line pipe and remove fittings attached to secure dryer door. See "Cleaning the Lint Screen." Open the dryer door. Use tape to dryer...
... dryer. Plug into a grounded outlet or reconnect power. For gas dryers: 1. Unplug or disconnect power to secure dryer door. Locate the light bulb cover on some models) 1. Turn bulb counterclockwise. For direct-wired dryers: 1. Close shutoff valve in dryer base. 3. Vacation, storage, and moving care Non-Use or Storage Care Operate your dryer for an extended period of time, you are secure in dryer base. 6. Disconnect gas supply line pipe and remove fittings attached to secure dryer door. See "Cleaning the Lint Screen." Open the dryer door. Use tape to dryer...

Owners Manual
Page 11
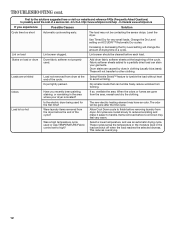
... metal or flexible metal vent. Exhaust vent not the correct length. Check with temperature below 45ºF (7ºC)? Incorrect power supply. Replace both fuses or reset the circuit breaker. For gas dryers, is closed completely. Exhaust vent or outside exhaust hood to check air movement. Exhaust vent diameter not the correct size. Household fuse is a normal operating sound. Make sure the dryer door is the valve open . The gas valve clicking is blown or circuit breaker has tripped. See "Installation Instructions". TROUBLESHOOTING First try the...
... metal or flexible metal vent. Exhaust vent not the correct length. Check with temperature below 45ºF (7ºC)? Incorrect power supply. Replace both fuses or reset the circuit breaker. For gas dryers, is closed completely. Exhaust vent or outside exhaust hood to check air movement. Exhaust vent diameter not the correct size. Household fuse is a normal operating sound. Make sure the dryer door is the valve open . The gas valve clicking is blown or circuit breaker has tripped. See "Installation Instructions". TROUBLESHOOTING First try the...
Owners Manual
Page 12
... new electric heating element may feel very warm. Items removed before the end of a service call...In U.S.A. These will be gone after the first cycle. When the odors or fumes are wrinkled Load not removed from forming. Stains on load or drum Dryer fabric softener not properly used or was TEMPERATURE/Fabric control set to other clothing. Allow Cool Down cycle to avoid wrinkling. Use Timed Dry for the first time? Select Wrinkle Shield™...
... new electric heating element may feel very warm. Items removed before the end of a service call...In U.S.A. These will be gone after the first cycle. When the odors or fumes are wrinkled Load not removed from forming. Stains on load or drum Dryer fabric softener not properly used or was TEMPERATURE/Fabric control set to other clothing. Allow Cool Down cycle to avoid wrinkling. Use Timed Dry for the first time? Select Wrinkle Shield™...

Owners Manual
Page 13
... resolve the problem after checking "Troubleshooting," additional help you obtain assistance or service if you on major appliances with the product, Whirlpool Corporation or Whirlpool Canada LP (hereafter "Whirlpool") will need it is required to published user or operator instructions and/or installation instructions. 2. Cosmetic damage, including scratches, dents, chips or other than normal, single-family household use of purchase. 6. This warranty gives you specific legal rights, and...
... resolve the problem after checking "Troubleshooting," additional help you obtain assistance or service if you on major appliances with the product, Whirlpool Corporation or Whirlpool Canada LP (hereafter "Whirlpool") will need it is required to published user or operator instructions and/or installation instructions. 2. Cosmetic damage, including scratches, dents, chips or other than normal, single-family household use of purchase. 6. This warranty gives you specific legal rights, and...
Installation Instructions
Page 2
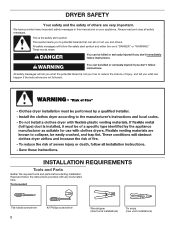
... potential hazard is the safety alert symbol. All safety messages will follow the instructions provided with any tools listed here. This symbol alerts you and others are not followed. Tools needed: Flat-blade screwdriver 2 #2 Phillips screwdriver Wire stripper (direct wire installations) Tin snips (new vent installations) DRYER SAFETY Your safety and the safety of injury, and tell you what can...
... potential hazard is the safety alert symbol. All safety messages will follow the instructions provided with any tools listed here. This symbol alerts you and others are not followed. Tools needed: Flat-blade screwdriver 2 #2 Phillips screwdriver Wire stripper (direct wire installations) Tin snips (new vent installations) DRYER SAFETY Your safety and the safety of injury, and tell you what can...

Installation Instructions
Page 3
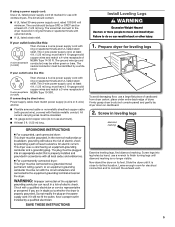
... shut off at temperatures below 45°F (7°C). Check code requirements. The cord should contain: ■■ A UL listed 30-amp power supply cord, rated 120/240 volt minimum. The wires that connect to the dryer must be extended. You will be at least 4 ft. (1.22 m) long. Drying times can be large enough to allow the dryer door to open fully. 3 Installation clearances: The location must end in ring terminals or spade terminals...
... shut off at temperatures below 45°F (7°C). Check code requirements. The cord should contain: ■■ A UL listed 30-amp power supply cord, rated 120/240 volt minimum. The wires that connect to the dryer must be extended. You will be at least 4 ft. (1.22 m) long. Drying times can be large enough to allow the dryer door to open fully. 3 Installation clearances: The location must end in ring terminals or spade terminals...

Installation Instructions
Page 4
... neutral terminal (center or white wire) of the dryer is recommended to install with a door, minimum ventilation openings in the neutral or grounding circuit. ■■ Do not use an extension cord. ■■ If codes permit and a separate ground wire is permanently connected to an individual branch circuit. The installation must conform to introduce outside air into the dryer. Wide opening side-swing door C. The National Electrical Code requires a 4-wire power supply connection...
... neutral terminal (center or white wire) of the dryer is recommended to install with a door, minimum ventilation openings in the neutral or grounding circuit. ■■ Do not use an extension cord. ■■ If codes permit and a separate ground wire is permanently connected to an individual branch circuit. The installation must conform to introduce outside air into the dryer. Wide opening side-swing door C. The National Electrical Code requires a 4-wire power supply connection...
Installation Instructions
Page 5
... connect the exhaust vent. 5 Screw legs into leg holes by hand, use a wrench to finish turning legs until it is no longer visible. place under entire back edge of NEMA Type 10-30R. Leave enough room for electrical connection and to move and install dryer. Firmly grasp dryer body (not console panel) and gently lay dryer down on its final location. The kit should be type...
... connect the exhaust vent. 5 Screw legs into leg holes by hand, use a wrench to finish turning legs until it is no longer visible. place under entire back edge of NEMA Type 10-30R. Leave enough room for electrical connection and to move and install dryer. Firmly grasp dryer body (not console panel) and gently lay dryer down on its final location. The kit should be type...
Installation Instructions
Page 7
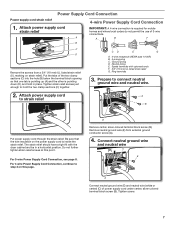
... terminals 3. The strain relief should have a tight fit with upturned ends F. 3/4" (19 mm) UL listed strain relief G. Attach power supply cord strain relief A B 4-wire Power Supply Cord Connection IMPORTANT: A 4-wire connection is required for mobile homes and where local codes do not permit the use of power supply cord under center, silver-colored terminal block screw (B). For 4 wire Power Supply Cord Connection, continue to hold in a horizontal position. Power Supply Cord Connection Power supply cord strain...
... terminals 3. The strain relief should have a tight fit with upturned ends F. 3/4" (19 mm) UL listed strain relief G. Attach power supply cord strain relief A B 4-wire Power Supply Cord Connection IMPORTANT: A 4-wire connection is required for mobile homes and where local codes do not permit the use of power supply cord under center, silver-colored terminal block screw (B). For 4 wire Power Supply Cord Connection, continue to hold in a horizontal position. Power Supply Cord Connection Power supply cord strain...
Installation Instructions
Page 9
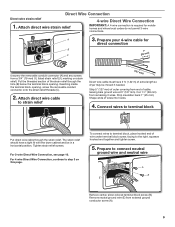
... (B) below the terminal block opening , screw the removable conduit connector onto the strain relief threads (C). 2. Direct Wire Connection Direct wire strain relief 4-wire Direct Wire Connection 1. Cut 11/2" (38 mm) from end of outer covering from remaining 3 wires. For 4 wire Direct Wire Connection, continue to strain relief (127 5" mm) Direct wire cable must have a tight fit with the dryer cabinet and be moved if needed. Remove neutral ground wire (E) from a 3/4" (19 mm) UL listed strain relief (UL...
... (B) below the terminal block opening , screw the removable conduit connector onto the strain relief threads (C). 2. Direct Wire Connection Direct wire strain relief 4-wire Direct Wire Connection 1. Cut 11/2" (38 mm) from end of outer covering from remaining 3 wires. For 4 wire Direct Wire Connection, continue to strain relief (127 5" mm) Direct wire cable must have a tight fit with the dryer cabinet and be moved if needed. Remove neutral ground wire (E) from a 3/4" (19 mm) UL listed strain relief (UL...
Installation Instructions
Page 12
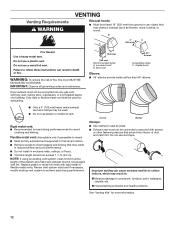
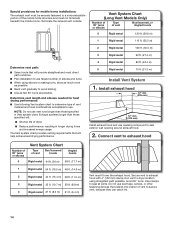
... length should not exceed 7 3/4 ft. (2.4 m). Dryer exhaust must not be connected into interior of the system and make sure exhaust hood is not plugged with rigid metal or flexible metal vents. Flexible metal vent: (Acceptable only if accessible to seal all governing codes and ordinances. Review Vent system chart and if necessary, modify existing vent system to follow these instructions can cause moisture and lint...
... length should not exceed 7 3/4 ft. (2.4 m). Dryer exhaust must not be connected into interior of the system and make sure exhaust hood is not plugged with rigid metal or flexible metal vents. Flexible metal vent: (Acceptable only if accessible to seal all governing codes and ordinances. Review Vent system chart and if necessary, modify existing vent system to follow these instructions can cause moisture and lint...
Installation Instructions
Page 13
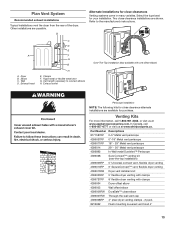
...) Periscope installation NOTE: The following kits for your installation. Rigid metal or flexible metal vent G. Refer to connect elbows H. Exhaust hood C D E F G B H E. Clamps F. Vent length necessary to the manufacturer's instructions. Exhaust outlet Over-The-Top installation (also available with clamps 4396004 Dryer offset elbow 4396005 Wall offset elbow 4396006RW DuraSafe™ close clearance alternate installations are available for close -clearance installations are possible. Select the type best...
...) Periscope installation NOTE: The following kits for your installation. Rigid metal or flexible metal vent G. Refer to connect elbows H. Exhaust hood C D E F G B H E. Clamps F. Vent length necessary to the manufacturer's instructions. Exhaust outlet Over-The-Top installation (also available with clamps 4396004 Dryer offset elbow 4396005 Wall offset elbow 4396006RW DuraSafe™ close clearance alternate installations are available for close -clearance installations are possible. Select the type best...
Installation Instructions
Page 14
... not use vent runs longer than those specified in longer drying times and increased energy usage. Connect vent to seal exterior wall opening around exhaust hood. 2. Secure vent to dryer location using elbows or making turns, allow as much room as possible. Exhaust systems longer than those specified will: ■■ Shorten life of vent to secure vent, because they can catch lint. 14 The Vent system chart provides venting requirements that...
... not use vent runs longer than those specified in longer drying times and increased energy usage. Connect vent to seal exterior wall opening around exhaust hood. 2. Secure vent to dryer location using elbows or making turns, allow as much room as possible. Exhaust systems longer than those specified will: ■■ Shorten life of vent to secure vent, because they can catch lint. 14 The Vent system chart provides venting requirements that...
Installation Instructions
Page 15
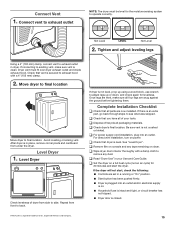
...; Dryer is plugged into an outlet. q Check dryer's final location. Be sure vent is in your tools. For direct wire installation, turn on console and any dust. q Remove film on power. q Wipe dryer drum interior thoroughly with a 4" (102 mm) clamp. 2. If connecting to side. q Check that you have all packaging materials. Connect Vent 1. Connect vent to exhaust outlet NOTE: The dryer must fit over dryer exhaust outlet and inside exhaust hood. Level Dryer Check levelness of your Use and Care Guide. q Check that dryer is...
...; Dryer is plugged into an outlet. q Check dryer's final location. Be sure vent is in your tools. For direct wire installation, turn on console and any dust. q Remove film on power. q Wipe dryer drum interior thoroughly with a 4" (102 mm) clamp. 2. If connecting to side. q Check that you have all packaging materials. Connect Vent 1. Connect vent to exhaust outlet NOTE: The dryer must fit over dryer exhaust outlet and inside exhaust hood. Level Dryer Check levelness of your Use and Care Guide. q Check that dryer is...
Warranty
Page 1
.... Replacement parts or repair labor if this major appliance is used in a manner that vary from state to state or province to know your sales slip together for other rights that is inconsistent to published user or operator instructions and/or installation instructions. 2. You will pay for in your authorized Whirlpool dealer to repair or replace appliance light bulbs, air filters or water filters. DISCLAIMER OF IMPLIED WARRANTIES IMPLIED WARRANTIES, INCLUDING...
.... Replacement parts or repair labor if this major appliance is used in a manner that vary from state to state or province to know your sales slip together for other rights that is inconsistent to published user or operator instructions and/or installation instructions. 2. You will pay for in your authorized Whirlpool dealer to repair or replace appliance light bulbs, air filters or water filters. DISCLAIMER OF IMPLIED WARRANTIES IMPLIED WARRANTIES, INCLUDING...
Dimension Guide
Page 1
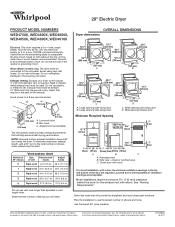
... complete details, see Installation Instructions packed with equivalent air ventilation openings are for the exhaust vent with a door, the minimum ventilation openings in the path of the exhaust. Water (Steam models only): The dryer must be connected to the total number of elbows and turns. Louvered hood B. Do not use plastic or metal foil vet. Hood styles: A & B are required. Large opening side-swing door D. Side view - 29" Electric Dryer PRODUCT MODEL NUMBERS WED4750X, WED4800X, WED4900X...
... complete details, see Installation Instructions packed with equivalent air ventilation openings are for the exhaust vent with a door, the minimum ventilation openings in the path of the exhaust. Water (Steam models only): The dryer must be connected to the total number of elbows and turns. Louvered hood B. Do not use plastic or metal foil vet. Hood styles: A & B are required. Large opening side-swing door D. Side view - 29" Electric Dryer PRODUCT MODEL NUMBERS WED4750X, WED4800X, WED4900X...


