Installation Instructions
Page 4
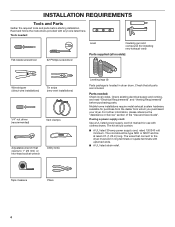
INSTALLATION REQUIREMENTS Tools and Parts Gather the required tools and parts before purchasing parts. If using a power supply cord: Use a UL listed power supply cord kit marked for installing new exhaust vent) Parts supplied (all parts are included. The wires that all models):...For further information, please reference the "Assistance or Service" section of the "Use and Care Guide". The cord should contain: ■■ A UL listed 30-amp power supply cord, rated 120/240 volt minimum. Check existing electrical supply and venting, and read "Electrical Requirements" and "...
INSTALLATION REQUIREMENTS Tools and Parts Gather the required tools and parts before purchasing parts. If using a power supply cord: Use a UL listed power supply cord kit marked for installing new exhaust vent) Parts supplied (all parts are included. The wires that all models):...For further information, please reference the "Assistance or Service" section of the "Use and Care Guide". The cord should contain: ■■ A UL listed 30-amp power supply cord, rated 120/240 volt minimum. Check existing electrical supply and venting, and read "Electrical Requirements" and "...
Installation Instructions
Page 5
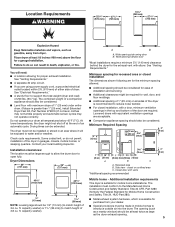
... hamper door *Most installations require a minimum 5½" (140 mm) clearance behind the dryer for recessed area or closet installation The dimensions shown following are using power supply cord, a grounded electrical outlet located within 2 ft. (610 mm) of either side of a companion appliance should be required for purchase from your local building inspector...
... hamper door *Most installations require a minimum 5½" (140 mm) clearance behind the dryer for recessed area or closet installation The dimensions shown following are using power supply cord, a grounded electrical outlet located within 2 ft. (610 mm) of either side of a companion appliance should be required for purchase from your local building inspector...
Installation Instructions
Page 6
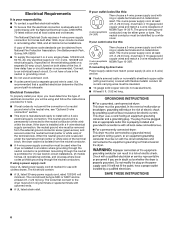
...at least 4 ft. (1.22 m) long, must have 3 10-gauge solid copper wires and match a 3-wire receptacle of the terminal block. The 4-wire power supply cord, at least 4 ft. (1.22 m) long, must have a fuse in a location where grounding through the neutral conductors. The neutral conductor must be identified by... sides of NEMA Type 14-30 R. All current-carrying wires must determine the type of electrical connection you will be using a power supply cord: Use a UL listed power supply cord kit marked for it here. ■■ If local codes do not use with upturned ends. ■■ A UL ...
...at least 4 ft. (1.22 m) long, must have 3 10-gauge solid copper wires and match a 3-wire receptacle of the terminal block. The 4-wire power supply cord, at least 4 ft. (1.22 m) long, must have a fuse in a location where grounding through the neutral conductors. The neutral conductor must be identified by... sides of NEMA Type 14-30 R. All current-carrying wires must determine the type of electrical connection you will be using a power supply cord: Use a UL listed power supply cord kit marked for it here. ■■ If local codes do not use with upturned ends. ■■ A UL ...

Installation Instructions
Page 7
...Type 14-30R): Go to Venting Requirements. Then, go to steps 1-2 on page 11 for direct wire strain relief: then steps 3-7 for 4-wire Power Supply Cord Connection section. Then go to Venting Requirements. 3-wire direct connection: Go to match height of dryer. capacity washer) or 1½" (38 mm)... dryer carton; Slide the dryer until bottom of foot is close to connect the exhaust vent. This connection may be used with either a power supply cord or a direct wire connection. 7 Screw in leveling legs Using a wrench and tape measure, screw legs into leg holes until it is ...
...Type 14-30R): Go to Venting Requirements. Then, go to steps 1-2 on page 11 for direct wire strain relief: then steps 3-7 for 4-wire Power Supply Cord Connection section. Then go to Venting Requirements. 3-wire direct connection: Go to match height of dryer. capacity washer) or 1½" (38 mm)... dryer carton; Slide the dryer until bottom of foot is close to connect the exhaust vent. This connection may be used with either a power supply cord or a direct wire connection. 7 Screw in leveling legs Using a wrench and tape measure, screw legs into leg holes until it is ...
Installation Instructions
Page 8
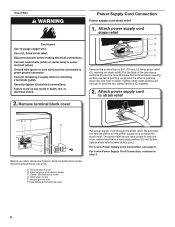
... sections (C) into the hole (B) below terminal block cover Put power supply cord through the strain relief. For 4 wire Power Supply Cord Connection, continue to hold -down screw E. Remove terminal block cover Power Supply Cord Connection Power supply cord strain relief 1. Attach power supply cord to strain relief BC D A E F Before you start, disconnect power. Terminal block cover B. Neutral ground wire F. Direct Wire...
... sections (C) into the hole (B) below terminal block cover Put power supply cord through the strain relief. For 4 wire Power Supply Cord Connection, continue to hold -down screw E. Remove terminal block cover Power Supply Cord Connection Power supply cord strain relief 1. Attach power supply cord to strain relief BC D A E F Before you start, disconnect power. Terminal block cover B. Neutral ground wire F. Direct Wire...

Installation Instructions
Page 9
... for mobile homes and where local codes do not permit the use of power supply cord under center terminal block screw (B). Now, go to Venting Requirements. 3-wire Power Supply Cord Connection Use where local codes permit connecting cabinet-ground conductor to external ground ... E Connect neutral ground wire (E) and neutral wire (white or center) (C) of 3-wire connections. Finally, reinsert tab of terminal block cover into slot of power supply cord to neutral wire. B D E A C GF A. 3-wire receptacle (NEMA type 10-30R) B. 3-wire plug C. Spade terminals with upturned ends F....
... for mobile homes and where local codes do not permit the use of power supply cord under center terminal block screw (B). Now, go to Venting Requirements. 3-wire Power Supply Cord Connection Use where local codes permit connecting cabinet-ground conductor to external ground ... E Connect neutral ground wire (E) and neutral wire (white or center) (C) of 3-wire connections. Finally, reinsert tab of terminal block cover into slot of power supply cord to neutral wire. B D E A C GF A. 3-wire receptacle (NEMA type 10-30R) B. 3-wire plug C. Spade terminals with upturned ends F....
Installation Instructions
Page 10
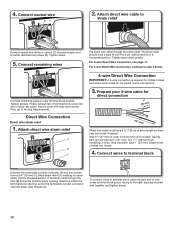
... 11/2" (38 mm) from a 3/4" (19 mm) UL listed strain relief (UL marking on strain relief). Strip 5" (127 mm) of outer covering from end of power supply cord to terminal block, place hooked end of extra length so dryer may be in a horizontal position. 4. Reaching inside the terminal block opening . Attach direct wire...
... 11/2" (38 mm) from a 3/4" (19 mm) UL listed strain relief (UL marking on strain relief). Strip 5" (127 mm) of outer covering from end of power supply cord to terminal block, place hooked end of extra length so dryer may be in a horizontal position. 4. Reaching inside the terminal block opening . Attach direct wire...

Installation Instructions
Page 12
Connect neutral ground wire and neutral wire B C Place hooked end of neutral wire (white or center) (C) of power supply cord or cable under center terminal block screw (B). Connect remaining wires E Connect neutral ground wire (E) and neutral wire (white or center wire) (C) of direct wire cable ...
Connect neutral ground wire and neutral wire B C Place hooked end of neutral wire (white or center) (C) of power supply cord or cable under center terminal block screw (B). Connect remaining wires E Connect neutral ground wire (E) and neutral wire (white or center wire) (C) of direct wire cable ...
Installation Instructions
Page 16
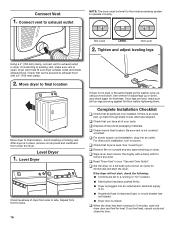
... 4" (102 mm) clamp. 2. Connect Vent 1. Move dryer to final location Move dryer to adjust legs up using a wood block. q For power supply cord installation, plug into an outlet and/or electrical supply is on. ■■ Household fuse is intact and tight, or circuit breaker has not tripped...dryer. Not Level LEVEL Not Level 2. Check that all four legs are set in your tools. Repeat from side to remove any tape remaining on power. q Check dryer's final location. q Check that you feel for 5 minutes, open the dryer door and feel heat, cancel cycle and close...
... 4" (102 mm) clamp. 2. Connect Vent 1. Move dryer to final location Move dryer to adjust legs up using a wood block. q For power supply cord installation, plug into an outlet and/or electrical supply is on. ■■ Household fuse is intact and tight, or circuit breaker has not tripped...dryer. Not Level LEVEL Not Level 2. Check that all four legs are set in your tools. Repeat from side to remove any tape remaining on power. q Check dryer's final location. q Check that you feel for 5 minutes, open the dryer door and feel heat, cancel cycle and close...


