
Owners Manual
Page 10
... the screw. 4. Turn off valve to gas supply line. 3. Cap the open fuel supply line. 5. Moving Care For power supply cord-connected dryers: 1. Turn bulb counterclockwise. Disconnect wiring. 3. Use tape to dryer. 2. See "Cleaning the Lint Screen." Unplug dryer or disconnect... cover. Remove the cover. 3. For direct-wired dryers: 1. Use tape to locate, level, and connect the dryer. 10 Unplug the power supply cord. 2. Clean lint screen. Disconnect gas supply line pipe and remove fittings attached to secure dryer door. Vacation, storage, and moving care Non...
... the screw. 4. Turn off valve to gas supply line. 3. Cap the open fuel supply line. 5. Moving Care For power supply cord-connected dryers: 1. Turn bulb counterclockwise. Disconnect wiring. 3. Use tape to dryer. 2. See "Cleaning the Lint Screen." Unplug dryer or disconnect... cover. Remove the cover. 3. For direct-wired dryers: 1. Use tape to locate, level, and connect the dryer. 10 Unplug the power supply cord. 2. Clean lint screen. Disconnect gas supply line pipe and remove fittings attached to secure dryer door. Vacation, storage, and moving care Non...

Installation Instructions
Page 3
... do not permit, installation of an automatic cycle. The wires that connect to 1" (25 mm) or hex-head socket wrench Utility knife If using power supply cord, a grounded electrical outlet located within 2 ft. (610 mm) of either side of 1" (25 mm) under entire dryer. (If slope is ...where it will need: ■■ A location allowing for installing new exhaust vent) Parts supplied (all parts are using a power supply cord: Use a UL listed power supply cord kit marked for purchase from the dealer from whom you are included. Parts needed: Check local codes. You will be extended. ...
... do not permit, installation of an automatic cycle. The wires that connect to 1" (25 mm) or hex-head socket wrench Utility knife If using power supply cord, a grounded electrical outlet located within 2 ft. (610 mm) of either side of 1" (25 mm) under entire dryer. (If slope is ...where it will need: ■■ A location allowing for installing new exhaust vent) Parts supplied (all parts are using a power supply cord: Use a UL listed power supply cord kit marked for purchase from the dealer from whom you are included. Parts needed: Check local codes. You will be extended. ...

Installation Instructions
Page 4
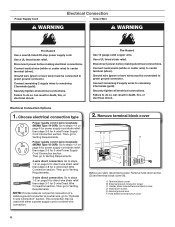
... (76 mm) Electrical Requirements It is your dealer. ■■ Special provisions must be removed from the neutral conductor. ■■ A 4-wire power supply connection must determine the type of the door are required. Minimum spacing for wall, door, and floor moldings. ■■ Additional spacing of 1"... appliance spacing should be used when the dryer is installed in the neutral or grounding circuit. ■■ Do not use an extension cord. ■■ If codes permit and a separate ground wire is used, it here. ■■ If local codes do not permit...
... (76 mm) Electrical Requirements It is your dealer. ■■ Special provisions must be removed from the neutral conductor. ■■ A 4-wire power supply connection must determine the type of the door are required. Minimum spacing for wall, door, and floor moldings. ■■ Additional spacing of 1"... appliance spacing should be used when the dryer is installed in the neutral or grounding circuit. ■■ Do not use an extension cord. ■■ If codes permit and a separate ground wire is used, it here. ■■ If local codes do not permit...
Installation Instructions
Page 5
... or spade terminals and UL listed strain relief. If your outlet looks like this : 3-wire receptacle (10-30R) Then choose a 3-wire power supply cord with clothes dryers. Prepare dryer for leveling legs To avoid damaging floor, use aluminum). ■■ At least 5 ft. (1.52 m) long...to its feet. place under entire back edge of cardboard from dryer carton; If your outlet looks like this : Then choose a 4-wire power supply cord with upturned ends. ■■ A UL listed strain relief. Screw in back or other injury. 1. Leave enough room for electrical connection ...
... or spade terminals and UL listed strain relief. If your outlet looks like this : 3-wire receptacle (10-30R) Then choose a 3-wire power supply cord with clothes dryers. Prepare dryer for leveling legs To avoid damaging floor, use aluminum). ■■ At least 5 ft. (1.52 m) long...to its feet. place under entire back edge of cardboard from dryer carton; If your outlet looks like this : Then choose a 4-wire power supply cord with upturned ends. ■■ A UL listed strain relief. Screw in back or other injury. 1. Leave enough room for electrical connection ...
Installation Instructions
Page 6
...3-wire direct connection: Go to steps 1-2 on page 9 for direct wire strain relief: then steps 3-7 for 4-wire Power Supply Cord Connection section. A. Disconnect power before making electrical connections. Ground wire (green or bare wire) must be connected to center terminal (silver). Connect neutral ... electrical connections. Then go to Venting Requirements. Center, silver-colored terminal block screw D. Use a UL listed strain relief. Power supply cord 3-wire receptacle (NEMA Type 10-30R): Go to do not permit connection of a cabinet-ground conductor to neutral wire, go...
...3-wire direct connection: Go to steps 1-2 on page 9 for direct wire strain relief: then steps 3-7 for 4-wire Power Supply Cord Connection section. A. Disconnect power before making electrical connections. Ground wire (green or bare wire) must be connected to center terminal (silver). Connect neutral ... electrical connections. Then go to Venting Requirements. Center, silver-colored terminal block screw D. Use a UL listed strain relief. Power supply cord 3-wire receptacle (NEMA Type 10-30R): Go to do not permit connection of a cabinet-ground conductor to neutral wire, go...
Installation Instructions
Page 7
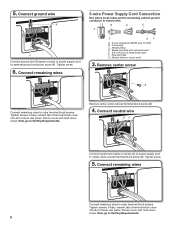
... ground wire (E) from a 3/4" (19 mm) UL listed strain relief (UL marking on this point. Neutral prong E. Attach power supply cord A to hold in a horizontal position. Tighten screw. 7 A B F C D Remove the screws from external ground conductor screw... (A). 4. Tighten strain relief screws just enough to strain relief B Put power supply cord through the strain relief. For 4 wire Power Supply Cord Connection, continue to connect neutral ground wire and neutral wire. 2. CD E G A. 4-wire receptacle (NEMA type 14...
... ground wire (E) from a 3/4" (19 mm) UL listed strain relief (UL marking on this point. Neutral prong E. Attach power supply cord A to hold in a horizontal position. Tighten screw. 7 A B F C D Remove the screws from external ground conductor screw... (A). 4. Tighten strain relief screws just enough to strain relief B Put power supply cord through the strain relief. For 4 wire Power Supply Cord Connection, continue to connect neutral ground wire and neutral wire. 2. CD E G A. 4-wire receptacle (NEMA type 14...
Installation Instructions
Page 8
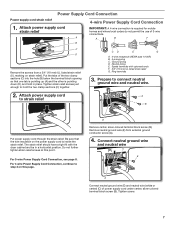
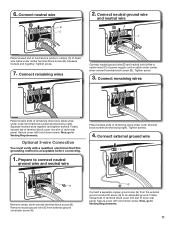
... Connect neutral wire BC Connect neutral wire (white or center) (C) of power supply cord to Venting Requirements. Tighten screws. Connect remaining wires 3-wire Power Supply Cord Connection Use where local codes permit connecting cabinet-ground conductor to outer terminal block... strain relief F. Now, go to external ground conductor screw (A). Connect ground wire A F Connect ground wire (F) (green or bare) of power supply cord to outer terminal block screws. Remove center, silver-colored terminal block screw (B). 4. Ring terminals G. Neutral (white or center wire) 3. 5....
... Connect neutral wire BC Connect neutral wire (white or center) (C) of power supply cord to Venting Requirements. Tighten screws. Connect remaining wires 3-wire Power Supply Cord Connection Use where local codes permit connecting cabinet-ground conductor to outer terminal block... strain relief F. Now, go to external ground conductor screw (A). Connect ground wire A F Connect ground wire (F) (green or bare) of power supply cord to outer terminal block screws. Remove center, silver-colored terminal block screw (B). 4. Ring terminals G. Neutral (white or center wire) 3. 5....
Installation Instructions
Page 11
... Requirements. Secure cover with hold -down screw. Connect neutral wire B C 2. Now, go to connect neutral ground wire and neutral wire A Place hooked ends of power supply cord or cable under outer terminal block screws (hooks facing right). Now, go to an adequate ground. Finally, reinsert tab of terminal block cover into slot...
... Requirements. Secure cover with hold -down screw. Connect neutral wire B C 2. Now, go to connect neutral ground wire and neutral wire A Place hooked ends of power supply cord or cable under outer terminal block screws (hooks facing right). Now, go to an adequate ground. Finally, reinsert tab of terminal block cover into slot...
Installation Instructions
Page 15
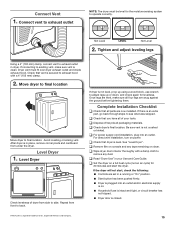
... minutes and start , check the following: ■■ Controls are snug against the ground before tightening them. q Check dryer's final location. q For power supply cord installation, plug into an outlet and/or electrical supply is on. ■■ Household fuse is intact and tight, or circuit breaker has not tripped... Avoid crushing or kinking vent. After dryer is a registered trademark of your Use and Care Guide. See "Level Dryer". q Set the dryer on power. Be sure vent is not level, prop up using a wood block, use wrench to adjust legs up or down, and check again for the ...
... minutes and start , check the following: ■■ Controls are snug against the ground before tightening them. q Check dryer's final location. q For power supply cord installation, plug into an outlet and/or electrical supply is on. ■■ Household fuse is intact and tight, or circuit breaker has not tripped... Avoid crushing or kinking vent. After dryer is a registered trademark of your Use and Care Guide. See "Level Dryer". q Set the dryer on power. Be sure vent is not level, prop up using a wood block, use wrench to adjust legs up or down, and check again for the ...


