Installation Guide
Page 2
... Requirements 8 Electrical Requirements 8 INSTALLATION INSTRUCTIONS 9 Prepare Cabinet Opening - New Utilities 9 Install Optional Moisture Barrier 9 Electrical Connection 10 Prepare Dishwasher 11 Remove Access Panel 11 Connect Water Line to Fill Valve 12 Connect Fill Hose to Fill Valve 13 Drain Hose Connection 13 Power ... 16 Place Diswasher in Cabinet 16 Custom Panel Installation 17 Choose Anchor Attachment Method 17 Final Installation Check 18 Secure Dishwasher in Cabinet Opening 19 Direct Wire Connection 20 Connect Water Line to House Shutoff Valve 22 Connect Drain Hose 22 ...
... Requirements 8 Electrical Requirements 8 INSTALLATION INSTRUCTIONS 9 Prepare Cabinet Opening - New Utilities 9 Install Optional Moisture Barrier 9 Electrical Connection 10 Prepare Dishwasher 11 Remove Access Panel 11 Connect Water Line to Fill Valve 12 Connect Fill Hose to Fill Valve 13 Drain Hose Connection 13 Power ... 16 Place Diswasher in Cabinet 16 Custom Panel Installation 17 Choose Anchor Attachment Method 17 Final Installation Check 18 Secure Dishwasher in Cabinet Opening 19 Direct Wire Connection 20 Connect Water Line to House Shutoff Valve 22 Connect Drain Hose 22 ...

Installation Guide
Page 3
...chance of injury, and tell you what can happen if the instructions are very important. WARNING Tip Over Hazard Do not use dishwasher until latched. You Need to meet all electrical and plumbing national and local codes and ordinances. These words mean: DANGER You can... Always read and obey all governing codes and ordinances. ■■ Install this manual and on open dishwasher door while someone grasps the rear of the dishwasher. Close dishwasher door until completely installed. This is installed or removed, to reduce the likelihood of damage to potential hazards...
...chance of injury, and tell you what can happen if the instructions are very important. WARNING Tip Over Hazard Do not use dishwasher until latched. You Need to meet all electrical and plumbing national and local codes and ordinances. These words mean: DANGER You can... Always read and obey all governing codes and ordinances. ■■ Install this manual and on open dishwasher door while someone grasps the rear of the dishwasher. Close dishwasher door until completely installed. This is installed or removed, to reduce the likelihood of damage to potential hazards...
Installation Guide
Page 5
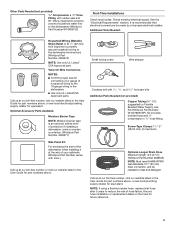
...: If using a flexible braided hose, replace inlet hose after 5 years to reduce the risk of household wiring to the dishwasher) (Whirlpool Part Number W10685193) First-Time Installations Check local codes. Call us at our toll-free number or visit our website listed in the.... Optional Accessory Parts Available: Moisture Barrier Tape NOTE: Moisture barrier tape is recommended that electrical connections be resistant to the dishwasher terminal box) (Whirlpool Part Number 4396672) NOTE: Use only UL Listed/ CSA Approved part. It is an optional, added level of protection if installing...
...: If using a flexible braided hose, replace inlet hose after 5 years to reduce the risk of household wiring to the dishwasher) (Whirlpool Part Number W10685193) First-Time Installations Check local codes. Call us at our toll-free number or visit our website listed in the.... Optional Accessory Parts Available: Moisture Barrier Tape NOTE: Moisture barrier tape is recommended that electrical connections be resistant to the dishwasher terminal box) (Whirlpool Part Number 4396672) NOTE: Use only UL Listed/ CSA Approved part. It is an optional, added level of protection if installing...

Installation Guide
Page 6
... before connecting it to the fill valve. Corner locations require a 2" (51 mm) minimum clearance between motor and flooring. LOCATION REQUIREMENTS Dishwasher must provide: ■■ Convenient access for loading and unloading dishes. For Direct Wire For Power Cord Cabinet Grommet For 11/2" (...38 mm) hole in cabinet. (Whirlpool Part Number 302797) NOTE: Required for metal cabinets Power Cord Kit Kit typically includes power cord, metallic strain relief, grommet, and ...
... before connecting it to the fill valve. Corner locations require a 2" (51 mm) minimum clearance between motor and flooring. LOCATION REQUIREMENTS Dishwasher must provide: ■■ Convenient access for loading and unloading dishes. For Direct Wire For Power Cord Cabinet Grommet For 11/2" (...38 mm) hole in cabinet. (Whirlpool Part Number 302797) NOTE: Required for metal cabinets Power Cord Kit Kit typically includes power cord, metallic strain relief, grommet, and ...

Installation Guide
Page 7
...height of cabinet walls show where utility connections may be reduced to 331/2" (851 mm) by model. Door handles may be compressed (not used on dishwasher. E. Product and Cabinet Opening Dimensions 237/8" (606 mm) 30" (762 mm) 331/2" (851 mm) min. Insulation may protrude forward of the face... of the dishwasher, varies by removing the wheels and perforated area of the countertop. Minimum, measured from the lowest point on the underside of insulation (blanket) on...
...height of cabinet walls show where utility connections may be reduced to 331/2" (851 mm) by model. Door handles may be compressed (not used on dishwasher. E. Product and Cabinet Opening Dimensions 237/8" (606 mm) 30" (762 mm) 331/2" (851 mm) min. Insulation may protrude forward of the face... of the dishwasher, varies by removing the wheels and perforated area of the countertop. Minimum, measured from the lowest point on the underside of insulation (blanket) on...

Installation Guide
Page 8
...meet all local codes and ordinances. We Recommend: ■■ A time-delay fuse or circuit breaker ■■ A separate circuit If Connecting Dishwasher with a Power Cord: ■■ Use UL Listed power cord kit marked for part details and orders. 8 drain line fittings. NOTE: 1/2"...not recommended. ■■ A 90° elbow with 3/4" hose connection with rubber washer. If drain hose is not long enough, use with dishwasher. or 20-amp, fused electrical supply ■■ Copper wire only ■■ A maximum of 2 field wiring supply conductors (12 AWG ...
...meet all local codes and ordinances. We Recommend: ■■ A time-delay fuse or circuit breaker ■■ A separate circuit If Connecting Dishwasher with a Power Cord: ■■ Use UL Listed power cord kit marked for part details and orders. 8 drain line fittings. NOTE: 1/2"...not recommended. ■■ A 90° elbow with 3/4" hose connection with rubber washer. If drain hose is not long enough, use with dishwasher. or 20-amp, fused electrical supply ■■ Copper wire only ■■ A maximum of 2 field wiring supply conductors (12 AWG ...
Installation Guide
Page 9
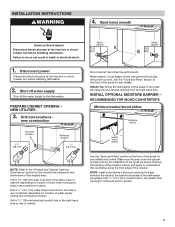
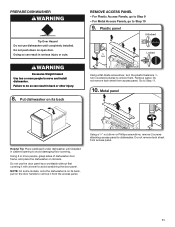
...Moisture barrier/wood shims Moisture barrier Install wood shims See the "Tools and Parts" section at the fuse box or circuit breaker box before installing dishwasher. Disconnect power Disconnect electrical power at the front of the side anchor screws. 9 Drill a 11/2" (38 mm) drain hose hole in the...correct hole placement and dimensions of the counter. Wood cabinet Metal cabinet Wood cabinet: Sand the hole until smooth. Helpful Tip: Wiring the dishwasher will be easier if you route the cable into the cabinet opening from the right-hand side. Remove the backing of the moisture barrier,...
...Moisture barrier/wood shims Moisture barrier Install wood shims See the "Tools and Parts" section at the fuse box or circuit breaker box before installing dishwasher. Disconnect power Disconnect electrical power at the front of the side anchor screws. 9 Drill a 11/2" (38 mm) drain hose hole in the...correct hole placement and dimensions of the counter. Wood cabinet Metal cabinet Wood cabinet: Sand the hole until smooth. Helpful Tip: Wiring the dishwasher will be easier if you route the cable into the cabinet opening from the right-hand side. Remove the backing of the moisture barrier,...
Installation Guide
Page 10
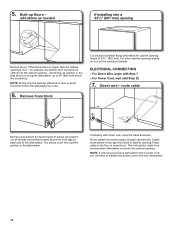
...22 7. For Direct Wire, begin with direct wire, route the cable as needed , in the area shown to bring the dishwasher up to avoid movement when the dishwasher is higher than the cabinet opening height of 331/2" (851 mm). ELECTRICAL CONNECTION - for cabinet opening 's floor - Route ...transfer the power cord to the floor in use. 6. not all models have them) located above the front legs on the dishwasher. NOTE: If removing a previous dishwasher with a power cord, you will prohibit cable from power supply through cabinet hole. (Cable must be securely attached to floor ...
...22 7. For Direct Wire, begin with direct wire, route the cable as needed , in the area shown to bring the dishwasher up to avoid movement when the dishwasher is higher than the cabinet opening height of 331/2" (851 mm). ELECTRICAL CONNECTION - for cabinet opening 's floor - Route ...transfer the power cord to the floor in use. 6. not all models have them) located above the front legs on the dishwasher. NOTE: If removing a previous dishwasher with a power cord, you will prohibit cable from power supply through cabinet hole. (Cable must be securely attached to floor ...
Installation Guide
Page 11
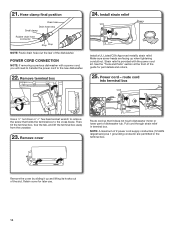
... 9. Plastic panel 1/4 turn Using a flat-blade screwdriver, turn the plastic fasteners 1/4 turn counterclockwise to move and install dishwasher. Remove panel. Metal panel Helpful Tip: Place cardboard under dishwasher until completely installed. Using 2 or more people to unlock them. Doing so can result in serious injury or cuts. Put...access panel. Failure to avoid scratching the door panel. Do not remove tech sheet from access panel. 11 Do not use dishwasher until installed in cabinet opening to remove it with a towel to do so can result in back or other injury. 8. Go to...
... 9. Plastic panel 1/4 turn Using a flat-blade screwdriver, turn the plastic fasteners 1/4 turn counterclockwise to move and install dishwasher. Remove panel. Metal panel Helpful Tip: Place cardboard under dishwasher until completely installed. Using 2 or more people to unlock them. Doing so can result in serious injury or cuts. Put...access panel. Failure to avoid scratching the door panel. Do not remove tech sheet from access panel. 11 Do not use dishwasher until installed in cabinet opening to remove it with a towel to do so can result in back or other injury. 8. Go to...
Installation Guide
Page 12
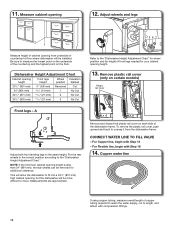
... be more difficult to move. This will be removed for additional clearance. To remove the plastic rail cover, push upward and back to the "Dishwasher Height Adjustment Chart." Be sure to fit into a 331/2" (851 mm) high cabinet opening height Front legs height Wheel Insulation position blanket 331... legs to length, and attach with Step 14 - For Copper line, begin with Step 16 14. 11. Measure cabinet opening from the dishwasher frame. Adjust wheels and legs Measure height of copper tubing required to reach the water supply, cut to the same height. Remove and discard...
... be more difficult to move. This will be removed for additional clearance. To remove the plastic rail cover, push upward and back to the "Dishwasher Height Adjustment Chart." Be sure to fit into a 331/2" (851 mm) high cabinet opening height Front legs height Wheel Insulation position blanket 331... legs to length, and attach with Step 14 - For Copper line, begin with Step 16 14. 11. Measure cabinet opening from the dishwasher frame. Adjust wheels and legs Measure height of copper tubing required to reach the water supply, cut to the same height. Remove and discard...
Installation Guide
Page 13
..., check the tightness of the drain hose. Damage to seal the rubber gasket. DRAIN HOSE CONNECTION 19. Attach such that it does not touch the dishwasher base, frame, or motor. NOTE: To avoid vibration during operation, route the water supply line so that the 3/4" connection is tight. NOTES: ■■ Do...
..., check the tightness of the drain hose. Damage to seal the rubber gasket. DRAIN HOSE CONNECTION 19. Attach such that it does not touch the dishwasher base, frame, or motor. NOTE: To avoid vibration during operation, route the water supply line so that the 3/4" connection is tight. NOTES: ■■ Do...
Installation Guide
Page 14
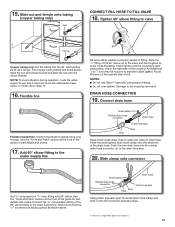
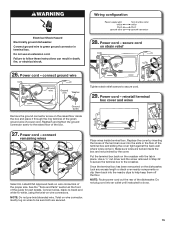
... Hose clamp final position Drain hose Drain hose stop Small clamp Rubber drain hose connector Stop Stop NOTE: Route drain hose out the rear of dishwasher tub. Remove terminal box 24. See the "Tools and Parts" section at the front of 2 power cord supply conductors (12 AWG largest size...terminal box away from the crossbar. 23. NOTE: A maximum of the guide for later use. 14 POWER CORD CONNECTION NOTE: If removing a previous dishwasher with the power cord kit. Retain cover for part details and orders. 25. Install strain relief Install a UL Listed/CSA Approved metallic strain relief....
... Hose clamp final position Drain hose Drain hose stop Small clamp Rubber drain hose connector Stop Stop NOTE: Route drain hose out the rear of dishwasher tub. Remove terminal box 24. See the "Tools and Parts" section at the front of 2 power cord supply conductors (12 AWG largest size...terminal box away from the crossbar. 23. NOTE: A maximum of the guide for later use. 14 POWER CORD CONNECTION NOTE: If removing a previous dishwasher with the power cord kit. Retain cover for part details and orders. 25. Install strain relief Install a UL Listed/CSA Approved metallic strain relief....
Installation Guide
Page 15
.... secure cord on wire connector. Reattach and tighten the ground connector screw to -white, using the twist-on wire connectors of the dishwasher. Power cord - NOTE: Do not pre-twist stranded wire. connect remaining wires Select UL Listed/CSA Approved twist-on wire connectors. ... secure cord. 29. NOTE: Route power cord out the rear of the proper size. WARNING Wiring configuration Electrical Shock Hazard Electrically ground dishwasher. Do not plug cord into the nearby clips to green ground connector in death, fire, or electrical shock. 28. Make sure wires...
.... secure cord on wire connector. Reattach and tighten the ground connector screw to -white, using the twist-on wire connectors of the dishwasher. Power cord - NOTE: Do not pre-twist stranded wire. connect remaining wires Select UL Listed/CSA Approved twist-on wire connectors. ... secure cord. 29. NOTE: Route power cord out the rear of the proper size. WARNING Wiring configuration Electrical Shock Hazard Electrically ground dishwasher. Do not plug cord into the nearby clips to green ground connector in death, fire, or electrical shock. 28. Make sure wires...
Installation Guide
Page 16
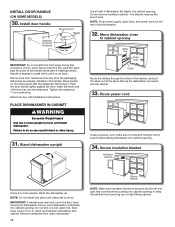
... Push the door handle tightly against the door. Place handle on its back. IMPORTANT: If wheels were removed, cover the floor when moving the dishwasher. INSTALL DOOR HANDLE (ON SOME MODELS) 30. Install door handle Setscrew (in a tight fitting cabinet. Handle is easiest to do so. Setscrews... are already installed in cutout before pushing into the cabinet. 33. Retain hex key with the setscrews facing down. Stand dishwasher upright It is pushed into cabinet opening Water line Drain hose Cable Route the utilities through hole in the handle. Do not remove ...
... Push the door handle tightly against the door. Place handle on its back. IMPORTANT: If wheels were removed, cover the floor when moving the dishwasher. INSTALL DOOR HANDLE (ON SOME MODELS) 30. Install door handle Setscrew (in a tight fitting cabinet. Handle is easiest to do so. Setscrews... are already installed in cutout before pushing into the cabinet. 33. Retain hex key with the setscrews facing down. Stand dishwasher upright It is pushed into cabinet opening Water line Drain hose Cable Route the utilities through hole in the handle. Do not remove ...
Installation Guide
Page 17
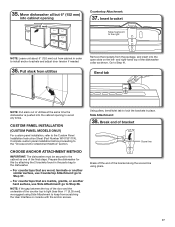
... are wood, laminate or another hard surface, use Countertop Attachment: go to avoid any kinks. Complete custom panel installation before proceeding to the dishwasher. - NOTE: If the gap between the top of the door and the underside of the bracket along the scored line using Side Attachment ...insert into cabinet opening to Step 38. Insert bracket Tabs must be secured to the right. 35. CHOOSE ANCHOR ATTACHMENT METHOD IMPORTANT: The dishwasher must point to the cabinet as shown. Break end of bracket Score line Break off the end of the counter top is pushed into ...
... are wood, laminate or another hard surface, use Countertop Attachment: go to avoid any kinks. Complete custom panel installation before proceeding to the dishwasher. - NOTE: If the gap between the top of the door and the underside of the bracket along the scored line using Side Attachment ...insert into cabinet opening to Step 38. Insert bracket Tabs must be secured to the right. 35. CHOOSE ANCHOR ATTACHMENT METHOD IMPORTANT: The dishwasher must point to the cabinet as shown. Break end of bracket Score line Break off the end of the counter top is pushed into ...
Installation Guide
Page 18
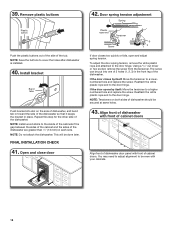
...tensioner to be secured at same holes. 43. Remove plastic buttons Plastic button Push the plastic buttons out of the side of dishwasher should be even with front of dishwasher door panel with your cabinets. 18 FINAL INSTALLATION CHECK 41. 39. Open and close door 42. You may need to ... The screw can be done later. NOTE: Save the buttons to the door hinge. Install bracket Bend tabs Push bracket into one of the dishwasher. Reattach the white plastic rope end to the door hinge. To adjust the door spring tension, remove the white plastic rope end attached to the...
...tensioner to be secured at same holes. 43. Remove plastic buttons Plastic button Push the plastic buttons out of the side of dishwasher should be even with front of dishwasher door panel with your cabinets. 18 FINAL INSTALLATION CHECK 41. 39. Open and close door 42. You may need to ... The screw can be done later. NOTE: Save the buttons to the door hinge. Install bracket Bend tabs Push bracket into one of the dishwasher. Reattach the white plastic rope end to the door hinge. To adjust the door spring tension, remove the white plastic rope end attached to the...

Installation Guide
Page 19
...drop screws into pump area when you are firmly against top front opening of the dishwasher. ■■ If countertop anchoring: Secure dishwasher to avoid splitting the wood. This will keep screws from falling into bottom of dishwasher. ■■ Locate brackets installed in cabinet to the countertop with two #10...counter top is tight (less than 1/4" [6 mm]), we suggest side anchoring to keep it from side to -side in the opening . Check that dishwasher is level from shifting when the door is still level front to back and side-to side. NOTES: ■■ The...
...drop screws into pump area when you are firmly against top front opening of the dishwasher. ■■ If countertop anchoring: Secure dishwasher to avoid splitting the wood. This will keep screws from falling into bottom of dishwasher. ■■ Locate brackets installed in cabinet to the countertop with two #10...counter top is tight (less than 1/4" [6 mm]), we suggest side anchoring to keep it from side to -side in the opening . Check that dishwasher is level from shifting when the door is still level front to back and side-to side. NOTES: ■■ The...
Installation Guide
Page 20
... lifting its hooks out of wire harness for later use the side attachment option. 49. 48. Remove cover Open door and check that space between dishwasher cabinet opening and tub is not equal, loosen bracket screws and shift tub. Tighten bracket screws. 50. Then, tilt the terminal box, free the tab...
... lifting its hooks out of wire harness for later use the side attachment option. 49. 48. Remove cover Open door and check that space between dishwasher cabinet opening and tub is not equal, loosen bracket screws and shift tub. Tighten bracket screws. 50. Then, tilt the terminal box, free the tab...
Installation Guide
Page 21
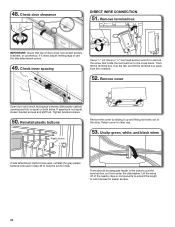
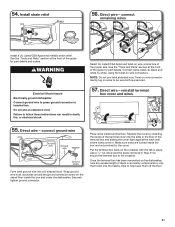
...Approved twist-on wire connectors of the guide for part details. Connect wires, black-to-black and white-to the crossbar. Gently tug on the dishwasher, tuck any excess length or slack over nearby components or clip them back into a U-shaped hook. Install strain relief 56. See the "... 51 to secure the terminal box to -white, using the twist-on the crossbar with the tab in . WARNING Electrical Shock Hazard Electrically ground dishwasher. Wrap ground wire hook clockwise around the ground connector screw on wire connector. Make sure wires are secured. 57. See the "Tools and Parts...
...Approved twist-on wire connectors of the guide for part details. Connect wires, black-to-black and white-to the crossbar. Gently tug on the dishwasher, tuck any excess length or slack over nearby components or clip them back into a U-shaped hook. Install strain relief 56. See the "... 51 to secure the terminal box to -white, using the twist-on the crossbar with the tab in . WARNING Electrical Shock Hazard Electrically ground dishwasher. Wrap ground wire hook clockwise around the ground connector screw on wire connector. Make sure wires are secured. 57. See the "Tools and Parts...
Installation Guide
Page 22
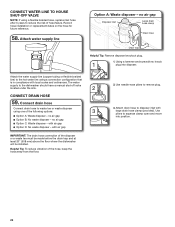
... hose Connect drain hose to the hot water line using one of hose failure. with large drain hose clamp (provided). Attach drain hose to the dishwasher should have a manual shut-off valve located under the sink. 2 CONNECT DRAIN HOSE 59. Attach water supply line Option A: Waste disposer - Using a ...of the disposer or a waste tee must be made before the drain trap and at least 20" (508 mm) above the floor where the dishwasher will be installed. Attach the water supply line (copper tubing or flexible braided line) to waste tee or waste disposer using a connection configuration that...
... hose Connect drain hose to the hot water line using one of hose failure. with large drain hose clamp (provided). Attach drain hose to the dishwasher should have a manual shut-off valve located under the sink. 2 CONNECT DRAIN HOSE 59. Attach water supply line Option A: Waste disposer - Using a ...of the disposer or a waste tee must be made before the drain trap and at least 20" (508 mm) above the floor where the dishwasher will be installed. Attach the water supply line (copper tubing or flexible braided line) to waste tee or waste disposer using a connection configuration that...


