Installation Guide
Page 2
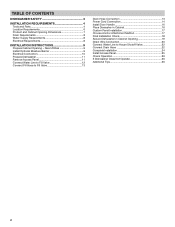
... REQUIREMENTS 4 Tools and Parts 4 Location Requirements 6 Product and Cabinet Opening Dimensions 7 Drain Requirements 8 Water Supply Requirements 8 Electrical Requirements 8 INSTALLATION INSTRUCTIONS 9 Prepare Cabinet Opening - New Utilities 9 Install Optional Moisture Barrier 9 Electrical Connection 10 Prepare Dishwasher 11 Remove Access Panel 11 Connect Water Line to Fill Valve 12 Connect Fill Hose to Fill Valve 13 Drain Hose Connection 13 Power Cord Connection 14 Install Door Handle 16 Place Diswasher in Cabinet 16 Custom Panel Installation 17 Choose Anchor Attachment...
... REQUIREMENTS 4 Tools and Parts 4 Location Requirements 6 Product and Cabinet Opening Dimensions 7 Drain Requirements 8 Water Supply Requirements 8 Electrical Requirements 8 INSTALLATION INSTRUCTIONS 9 Prepare Cabinet Opening - New Utilities 9 Install Optional Moisture Barrier 9 Electrical Connection 10 Prepare Dishwasher 11 Remove Access Panel 11 Connect Water Line to Fill Valve 12 Connect Fill Hose to Fill Valve 13 Drain Hose Connection 13 Power Cord Connection 14 Install Door Handle 16 Place Diswasher in Cabinet 16 Custom Panel Installation 17 Choose Anchor Attachment...

Installation Guide
Page 3
.... Close dishwasher door until completely installed. This symbol alerts you to potential hazards that the dishwasher is , tell you and others are not followed. You Need to: ■■ Slowly open door. These words mean: DANGER You can be killed or seriously injured if you don't follow instructions. WARNING Tip Over Hazard Do not use dishwasher until latched. Remove shipping materials and drain hose. WARNING...
.... Close dishwasher door until completely installed. This symbol alerts you to potential hazards that the dishwasher is , tell you and others are not followed. You Need to: ■■ Slowly open door. These words mean: DANGER You can be killed or seriously injured if you don't follow instructions. WARNING Tip Over Hazard Do not use dishwasher until latched. Remove shipping materials and drain hose. WARNING...
Installation Guide
Page 5
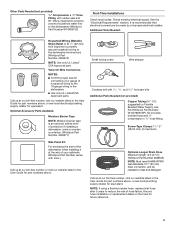
... Supply Line Kit (Whirlpool Part Number W10278635RP). Call us at our toll-free number, visit our website listed in the User Guide for part numbers above . Kit includes braided hose and 3/8" compression x 3/4" hose fitting. See the "Electrical Requirements" section. Record hose installation or replacement dates on the hose for equivalent. Optional Accessory Parts Available: Moisture Barrier Tape NOTE: Moisture barrier tape is recommended that electrical connections be resistant to the dishwasher) (Whirlpool Part Number W10685193) First-Time Installations Check local codes...
... Supply Line Kit (Whirlpool Part Number W10278635RP). Call us at our toll-free number, visit our website listed in the User Guide for part numbers above . Kit includes braided hose and 3/8" compression x 3/4" hose fitting. See the "Electrical Requirements" section. Record hose installation or replacement dates on the hose for equivalent. Optional Accessory Parts Available: Moisture Barrier Tape NOTE: Moisture barrier tape is recommended that electrical connections be resistant to the dishwasher) (Whirlpool Part Number W10685193) First-Time Installations Check local codes...

Installation Guide
Page 6
... of time or in the "Product and Cabinet Opening Dimensions" section. ■■ Do not run drain lines, water lines, or electrical wiring where they can interfere with floor at rear of the guide for part details and orders. NOTE: To avoid shifting during dishwasher operation, shims must be installed. An optional moisture barrier accessory is required. ■■ This dishwasher has a water heating feature and also requires a connection to a hot water supply line. ■...
... of time or in the "Product and Cabinet Opening Dimensions" section. ■■ Do not run drain lines, water lines, or electrical wiring where they can interfere with floor at rear of the guide for part details and orders. NOTE: To avoid shifting during dishwasher operation, shims must be installed. An optional moisture barrier accessory is required. ■■ This dishwasher has a water heating feature and also requires a connection to a hot water supply line. ■...

Installation Guide
Page 8
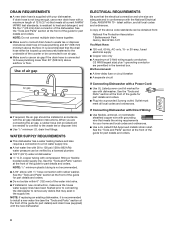
... 1" (25 mm) drain connector of the guide for your dishwasher. We Recommend: ■■ A time-delay fuse or circuit breaker ■■ A separate circuit If Connecting Dishwasher with a Power Cord: ■■ Use UL Listed power cord kit marked for use a new drain hose with rubber washer. See the "Tools and Parts" section at the front of the water inlet valve. ■■ If installed in the supply line. It is recommended that the electrical connection and wire size are permitted...
... 1" (25 mm) drain connector of the guide for your dishwasher. We Recommend: ■■ A time-delay fuse or circuit breaker ■■ A separate circuit If Connecting Dishwasher with a Power Cord: ■■ Use UL Listed power cord kit marked for use a new drain hose with rubber washer. See the "Tools and Parts" section at the front of the water inlet valve. ■■ If installed in the supply line. It is recommended that the electrical connection and wire size are permitted...

Installation Guide
Page 24
... hose connector Drain hose COMPLETE INSTALLATION Check that dishwasher is water in the bottom of the dishwasher tub. 1 Rubber end 2 3 1. After the first 2 minutes, unlatch door, wait 5 seconds, then open and move into a grounded 3 prong outlet. 61. Connect rubber end of drain hose to squeeze clamp open door. Power supply cord - Use pliers to air gap and cut ribbed section. 2. Check that there is working properly. 24 Check that the power supply wire or cord does not touch dishwasher motor...
... hose connector Drain hose COMPLETE INSTALLATION Check that dishwasher is water in the bottom of the dishwasher tub. 1 Rubber end 2 3 1. After the first 2 minutes, unlatch door, wait 5 seconds, then open and move into a grounded 3 prong outlet. 61. Connect rubber end of drain hose to squeeze clamp open door. Power supply cord - Use pliers to air gap and cut ribbed section. 2. Check that there is working properly. 24 Check that the power supply wire or cord does not touch dishwasher motor...
Dimension Guide
Page 1
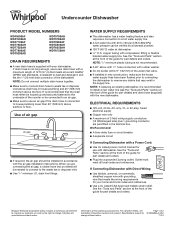
...;■ Plug into a grounded 3 prong outlet. or 20-amp, fused electrical supply ■■ Copper wire only ■■ A maximum of 2 field wiring supply conductors (12 AWG largest size) plus 1 grounding conductor are for use a new drain hose with a maximum length of 2 W10806906-D-WH 11/16 We Recommend: ■■ A time-delay fuse or circuit breaker ■■ A separate circuit If Connecting Dishwasher with a Power Cord: ■■ Use UL Listed power cord kit marked...
...;■ Plug into a grounded 3 prong outlet. or 20-amp, fused electrical supply ■■ Copper wire only ■■ A maximum of 2 field wiring supply conductors (12 AWG largest size) plus 1 grounding conductor are for use a new drain hose with a maximum length of 2 W10806906-D-WH 11/16 We Recommend: ■■ A time-delay fuse or circuit breaker ■■ A separate circuit If Connecting Dishwasher with a Power Cord: ■■ Use UL Listed power cord kit marked...
Use & Care Guide
Page 2
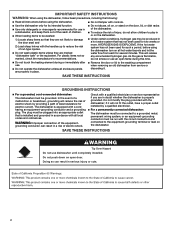
.... As the gas is installed and grounded in or on all enclosure panels are not likely to play in accordance with controls. I Do not touch the heating element during this time. Do not push down on the door, lid, or dish racks of electric shock by a qualified electrician. I Do not tamper with all instructions before using the dishwasher turn on the dishwasher. HYDROGEN GAS IS...
.... As the gas is installed and grounded in or on all enclosure panels are not likely to play in accordance with controls. I Do not touch the heating element during this time. Do not push down on the door, lid, or dish racks of electric shock by a qualified electrician. I Do not tamper with all instructions before using the dishwasher turn on the dishwasher. HYDROGEN GAS IS...
Use & Care Guide
Page 9
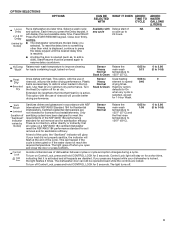
... option changes during a cycle. Dries dishes with the use of the cycle. Plastic items are not intended for loads containing tough, baked-on a NSF/ANSI 184 certified dishwasher meet the requirements of the cycle, the "Sanitized" indicator will flash at a later time. This option with heat. There is locked, the light flashes 3 times. NOTES: ■■ The dishwasher remembers the last Delay you open and close the door or press CANCEL. Sensor Heavy Normal Soak & Clean Uses heating element...
... option changes during a cycle. Dries dishes with the use of the cycle. Plastic items are not intended for loads containing tough, baked-on a NSF/ANSI 184 certified dishwasher meet the requirements of the cycle, the "Sanitized" indicator will flash at a later time. This option with heat. There is locked, the light flashes 3 times. NOTES: ■■ The dishwasher remembers the last Delay you open and close the door or press CANCEL. Sensor Heavy Normal Soak & Clean Uses heating element...
Use & Care Guide
Page 10
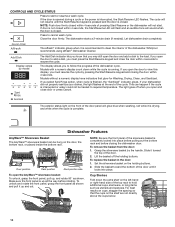
... cycle is closed . The dishwasher starts a 2-minute drain (if needed). Whirlpool recommends using affresh® Dishwasher Cleaner. The display allows you to follow the progress of the cycle. If your dishwasher did not properly sanitize your dishes, the light flashes at the end of the dishwasher cycle. The exterior status light on cups, stagger the spacing so that you open and close the door within 4 seconds. Make sure the front panel is running. To remove the basket...
... cycle is closed . The dishwasher starts a 2-minute drain (if needed). Whirlpool recommends using affresh® Dishwasher Cleaner. The display allows you to follow the progress of the cycle. If your dishwasher did not properly sanitize your dishes, the light flashes at the end of the dishwasher cycle. The exterior status light on cups, stagger the spacing so that you open and close the door within 4 seconds. Make sure the front panel is running. To remove the basket...
Use & Care Guide
Page 12
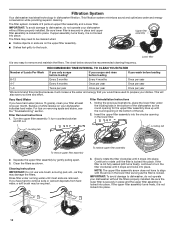
... are removed. Locating tab Locating tab PUSH DOW N & TUR To remove upper filter assembly 2. If you time and effort. Filtration System Your dishwasher has latest technology in the lower filter. This filtration system minimizes sound and optimizes water and energy conservation while providing superior cleaning. If upper assembly turns freely, it is locked into place. Insert the upper filter assembly into place. Clean the filters as they may need to align with the round opening...
... are removed. Locating tab Locating tab PUSH DOW N & TUR To remove upper filter assembly 2. If you time and effort. Filtration System Your dishwasher has latest technology in the lower filter. This filtration system minimizes sound and optimizes water and energy conservation while providing superior cleaning. If upper assembly turns freely, it is locked into place. Insert the upper filter assembly into place. Clean the filters as they may need to align with the round opening...
Use & Care Guide
Page 13
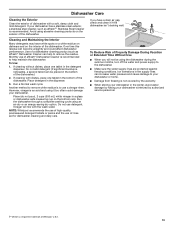
... the dishwasher. Run a Normal wash cycle. Do not use a vinegar rinse. Dishwasher Care Cleaning the Exterior Clean the exterior of dishwasher with the wash water. Do not add detergent (If significant buildup is a registered trademark of a dishwasher cleaning product such as affresh®† Stainless Steel Cleaner is to remove white residue is recommended. Another method to use detergent. If you will mix with a soft, damp cloth and mild detergent. Use of Whirlpool, U.S.A. 13 If cleaning with dishes...
... the dishwasher. Run a Normal wash cycle. Do not use a vinegar rinse. Dishwasher Care Cleaning the Exterior Clean the exterior of dishwasher with the wash water. Do not add detergent (If significant buildup is a registered trademark of a dishwasher cleaning product such as affresh®† Stainless Steel Cleaner is to remove white residue is recommended. Another method to use detergent. If you will mix with a soft, damp cloth and mild detergent. Use of Whirlpool, U.S.A. 13 If cleaning with dishes...
Use & Care Guide
Page 14
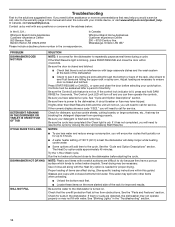
... Start/Resume light is normal for proper drying. If you need to the dishwasher. In Canada, visit www.whirlpool.ca. Mississauga, Ontario L5N 0B7 PROBLEM DISHWASHER DOES NOT RUN DETERGENT REMAINS IN THE DISPENSER OR TABLET IS ON BOTTOM OF TUB CYCLE RUNS TOO LONG DISHWASHER NOT DRYING WILL NOT FILL SOLUTION NOTE: It is blinking, press START/RESUME and close to the warranty page in the "Troubleshooting" section. 14 If the control lock indicator...
... Start/Resume light is normal for proper drying. If you need to the dishwasher. In Canada, visit www.whirlpool.ca. Mississauga, Ontario L5N 0B7 PROBLEM DISHWASHER DOES NOT RUN DETERGENT REMAINS IN THE DISPENSER OR TABLET IS ON BOTTOM OF TUB CYCLE RUNS TOO LONG DISHWASHER NOT DRYING WILL NOT FILL SOLUTION NOTE: It is blinking, press START/RESUME and close to the warranty page in the "Troubleshooting" section. 14 If the control lock indicator...
Use & Care Guide
Page 15
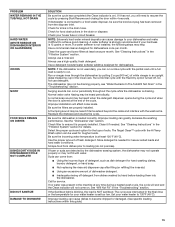
... drain hose. See the "Dishwasher Use" section. See "Will Not Fill" in the "Filtration System" section for kinks in the "Filtration System" section. Improper installation will need to ensure it if needed for heavier soiled loads and hard water conditions. Suds can greatly decrease the washing performance. If the Sanitized light is blinking, the load is on . Improper loading can come on ). See "Cleaning Instructions" in the "Troubleshooting...
... drain hose. See the "Dishwasher Use" section. See "Will Not Fill" in the "Filtration System" section for kinks in the "Filtration System" section. Improper installation will need to ensure it if needed for heavier soiled loads and hard water conditions. Suds can greatly decrease the washing performance. If the Sanitized light is blinking, the load is on . Improper loading can come on ). See "Cleaning Instructions" in the "Troubleshooting...
Use & Care Guide
Page 16
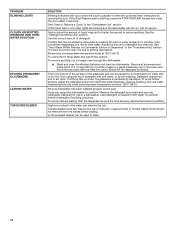
... rinse aid leaking from the dispenser, be removed from using the Hi Temp Wash and Sani Rinse options. Tomato-based foods can be caused by pre-washing. A citrus-based cleaner can discolor the tub or dishware. To avoid further etching, adjust the detergent amount to clean. 16 Detergent needs food soil to act upon. Be sure the incoming water temperature is permanently damaged. No detergent is needed . PROBLEM BLINKING LIGHTS...
... rinse aid leaking from the dispenser, be removed from using the Hi Temp Wash and Sani Rinse options. Tomato-based foods can be caused by pre-washing. A citrus-based cleaner can discolor the tub or dishware. To avoid further etching, adjust the detergent amount to clean. 16 Detergent needs food soil to act upon. Be sure the incoming water temperature is permanently damaged. No detergent is needed . PROBLEM BLINKING LIGHTS...

Installation Guide
Page 2
... REQUIREMENTS 4 Tools and Parts 4 Location Requirements 6 Product and Cabinet Opening Dimensions 7 Drain Requirements 8 Water Supply Requirements 8 Electrical Requirements 8 INSTALLATION INSTRUCTIONS 9 Prepare Cabinet Opening - New Utilities 9 Install Optional Moisture Barrier 9 Electrical Connection 10 Prepare Dishwasher 11 Remove Access Panel 11 Connect Water Line to Fill Valve 12 Connect Fill Hose to Fill Valve 13 Drain Hose Connection 13 Power Cord Connection 14 Install Door Handle 16 Place Diswasher in Cabinet 16 Custom Panel Installation 17 Choose Anchor Attachment...
... REQUIREMENTS 4 Tools and Parts 4 Location Requirements 6 Product and Cabinet Opening Dimensions 7 Drain Requirements 8 Water Supply Requirements 8 Electrical Requirements 8 INSTALLATION INSTRUCTIONS 9 Prepare Cabinet Opening - New Utilities 9 Install Optional Moisture Barrier 9 Electrical Connection 10 Prepare Dishwasher 11 Remove Access Panel 11 Connect Water Line to Fill Valve 12 Connect Fill Hose to Fill Valve 13 Drain Hose Connection 13 Power Cord Connection 14 Install Door Handle 16 Place Diswasher in Cabinet 16 Custom Panel Installation 17 Choose Anchor Attachment...

Installation Guide
Page 3
... open door. Remove shipping materials and drain hose. This is installed or removed, to potential hazards that the dishwasher is completely enclosed at the factory and may contain some residual water in the tub as specified in serious injury or cuts. NOTE: Each dishwasher is , tell you and others are not followed. All safety messages will follow instructions. Care shall be installed to the power cord...
... open door. Remove shipping materials and drain hose. This is installed or removed, to potential hazards that the dishwasher is completely enclosed at the factory and may contain some residual water in the tub as specified in serious injury or cuts. NOTE: Each dishwasher is , tell you and others are not followed. All safety messages will follow instructions. Care shall be installed to the power cord...

Installation Guide
Page 5
...) drain connection, and be made by a licensed electrical installer. It is an optional, added level of protection if installing a dishwasher under a wooden countertop. (Whirlpool Part Number 4396277) Side Panel Kit For enclosing the side of the dishwasher when installing it at our toll-free number, visit our website listed in the User Guide for part numbers above, or see local electrical/plumbing supply retailer for equivalent. Record hose installation or replacement dates on the hose for part numbers above...
...) drain connection, and be made by a licensed electrical installer. It is an optional, added level of protection if installing a dishwasher under a wooden countertop. (Whirlpool Part Number 4396277) Side Panel Kit For enclosing the side of the dishwasher when installing it at our toll-free number, visit our website listed in the User Guide for part numbers above, or see local electrical/plumbing supply retailer for equivalent. Record hose installation or replacement dates on the hose for part numbers above...
Installation Guide
Page 6
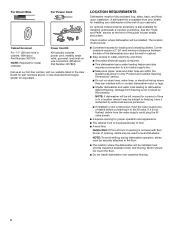
... front of opening , shims may be installed. For Direct Wire For Power Cord Cabinet Grommet For 11/2" (38 mm) hole in cabinet. (Whirlpool Part Number 302797) NOTE: Required for metal cabinets Power Cord Kit Kit typically includes power cord, metallic strain relief, grommet, and twist-on wire connectors. (Whirlpool Part Number 4317824) Call us at our toll-free number, visit our website listed in new construction, flush the water supply line of debris before connecting it to the fill valve. Damage...
... front of opening , shims may be installed. For Direct Wire For Power Cord Cabinet Grommet For 11/2" (38 mm) hole in cabinet. (Whirlpool Part Number 302797) NOTE: Required for metal cabinets Power Cord Kit Kit typically includes power cord, metallic strain relief, grommet, and twist-on wire connectors. (Whirlpool Part Number 4317824) Call us at our toll-free number, visit our website listed in new construction, flush the water supply line of debris before connecting it to the fill valve. Damage...
Installation Guide
Page 8
...; A new drain hose is supplied with your home and local codes and ordinances. ■■ Use a UL Listed/CSA Approved metallic strain relief. NOTE: Do not connect multiple drain hoses together. ■■ Make sure to connect drain hose to install a new water line (see the "Tools and Parts" section at the front of the guide for part details and orders. 8 drain line fittings. copper tubing with a Power Cord: ■■ Use UL Listed power cord kit marked for part...
...; A new drain hose is supplied with your home and local codes and ordinances. ■■ Use a UL Listed/CSA Approved metallic strain relief. NOTE: Do not connect multiple drain hoses together. ■■ Make sure to connect drain hose to install a new water line (see the "Tools and Parts" section at the front of the guide for part details and orders. 8 drain line fittings. copper tubing with a Power Cord: ■■ Use UL Listed power cord kit marked for part...


