Owners Manual
Page 2
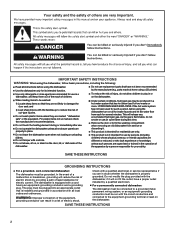
... loading or unloading dishes. and 2) Load sharp knives with controls. Do not operate the dishwasher unless all enclosure panels are not likely to play in or on the door, lid, or dish racks of least resistance for use . Do not leave the dishwasher open flame during or immediately after use in doubt whether the dishwasher is equipped with the dishwasher; The plug must be produced in a hot water...
... loading or unloading dishes. and 2) Load sharp knives with controls. Do not operate the dishwasher unless all enclosure panels are not likely to play in or on the door, lid, or dish racks of least resistance for use . Do not leave the dishwasher open flame during or immediately after use in doubt whether the dishwasher is equipped with the dishwasher; The plug must be produced in a hot water...
Owners Manual
Page 3
... open door. WARNING Tip Over Hazard Do not use powder or gel detergent and wish to add an amount of detergent to the Pre-Wash cycle. Cycle Selection and Energy Efficient dishwashers run longer to save water and energy, just as driving a car slower saves on the package when using a rinse aid, you first press the Start button, the main sensor cycle with heated drying will be connected to a 120 F (49° C) hot water supply...
... open door. WARNING Tip Over Hazard Do not use powder or gel detergent and wish to add an amount of detergent to the Pre-Wash cycle. Cycle Selection and Energy Efficient dishwashers run longer to save water and energy, just as driving a car slower saves on the package when using a rinse aid, you first press the Start button, the main sensor cycle with heated drying will be connected to a 120 F (49° C) hot water supply...
Owners Manual
Page 5
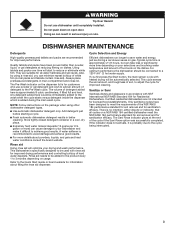
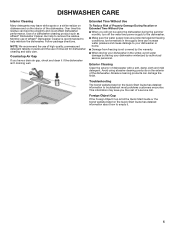
... troubleshoot most problems customers encounter. Exterior Cleaning Clean the exterior of the dishwasher. Monthly use of rinse aid for dishwasher cleaning and daily care. Countertop Air Gap If you have a drain air gap, check and clean it . 5 Troubleshooting The brand website listed on the Quick Start Guide has detailed information about how to remove the residue. Over time this residue can damage the finish. Avoid using the dishwasher during the summer months, turn off the water and power supply to your dishwasher...
... troubleshoot most problems customers encounter. Exterior Cleaning Clean the exterior of the dishwasher. Monthly use of rinse aid for dishwasher cleaning and daily care. Countertop Air Gap If you have a drain air gap, check and clean it . 5 Troubleshooting The brand website listed on the Quick Start Guide has detailed information about how to remove the residue. Over time this residue can damage the finish. Avoid using the dishwasher during the summer months, turn off the water and power supply to your dishwasher...

Owners Manual
Page 6
... Factory Reset Display Text (if display is opened Light in the display to change the value of rinse aid dispensed 0 mL - Press the "Cancel" button to indicate Rinse Aid Level. 3. Menu Rinse Aid Level Rinse Aid Level sub-menu Sound Level Sound Level sub-menul Light in Tub Lights in step 4, the dishwasher will show the current setting of 75 hours. If you haven't changed until "Hi Temp" and "Dry" lights turn on to exit without pressing any changes. Press the "Start/Resume" button to...
... Factory Reset Display Text (if display is opened Light in the display to change the value of rinse aid dispensed 0 mL - Press the "Cancel" button to indicate Rinse Aid Level. 3. Menu Rinse Aid Level Rinse Aid Level sub-menu Sound Level Sound Level sub-menul Light in Tub Lights in step 4, the dishwasher will show the current setting of 75 hours. If you haven't changed until "Hi Temp" and "Dry" lights turn on to exit without pressing any changes. Press the "Start/Resume" button to...
Owners Manual
Page 7
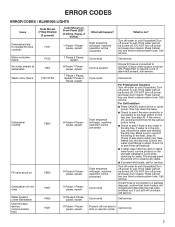
... Motor controller failure No water present at dishwasher F1E1 F1E2 H2O Wash motor failure F7E1/F7E2 Dishwasher overfills F8E4 Fill valve stuck on F8E5 Dishwasher will not drain, call service. ERROR CODES ERROR CODES / BLINKING LIGHTS Issue Code Shown (7 Seg Display) (if present) Dishwasher fails to a garbage disposal, confirm that drain hose is not clogged and disposal plug has been knocked out. pause, repeat 1 Pause 2 Pause, repeat 8 Pause 1 Pause - Call service For Professional Installers Turn off power...
... Motor controller failure No water present at dishwasher F1E1 F1E2 H2O Wash motor failure F7E1/F7E2 Dishwasher overfills F8E4 Fill valve stuck on F8E5 Dishwasher will not drain, call service. ERROR CODES ERROR CODES / BLINKING LIGHTS Issue Code Shown (7 Seg Display) (if present) Dishwasher fails to a garbage disposal, confirm that drain hose is not clogged and disposal plug has been knocked out. pause, repeat 1 Pause 2 Pause, repeat 8 Pause 1 Pause - Call service For Professional Installers Turn off power...
Owners Manual
Page 8
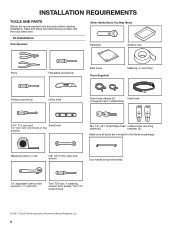
... 5/8" (15.9 mm) open-end wrench Door handle (on some models) 10" adjustable wrench that opens to 11/8" (29 mm) Torx† T20 and, if installing custom front panels, Torx T15 screwdrivers †TORX, T15, and T20 are included in the literature package. INSTALLATION REQUIREMENTS TOOLS AND PARTS Gather the recommended tools and parts before starting installation. All Installations Tools Needed: Other Useful Items You May Need: Flashlight Shallow pan...
... 5/8" (15.9 mm) open-end wrench Door handle (on some models) 10" adjustable wrench that opens to 11/8" (29 mm) Torx† T20 and, if installing custom front panels, Torx T15 screwdrivers †TORX, T15, and T20 are included in the literature package. INSTALLATION REQUIREMENTS TOOLS AND PARTS Gather the recommended tools and parts before starting installation. All Installations Tools Needed: Other Useful Items You May Need: Flashlight Shallow pan...
Owners Manual
Page 9
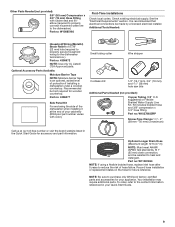
... Additional Parts Needed (not provided): Copper Tubing (3/8" O.D. Part no : 4396277 Side Panel Kit For enclosing the side of the dishwasher when installing it at our toll-free number or visit the brand website listed in your appliance. See the "Electrical Requirements" section. suggested) or Flexible Braided Water Supply Line Kit. Part no : W11381654 NOTE: If using a flexible braided hose, replace inlet hose after 5 years to the contact information referenced in the Quick Start Guide...
... Additional Parts Needed (not provided): Copper Tubing (3/8" O.D. Part no : 4396277 Side Panel Kit For enclosing the side of the dishwasher when installing it at our toll-free number or visit the brand website listed in your appliance. See the "Electrical Requirements" section. suggested) or Flexible Braided Water Supply Line Kit. Part no : W11381654 NOTE: If using a flexible braided hose, replace inlet hose after 5 years to the contact information referenced in the Quick Start Guide...

Owners Manual
Page 10
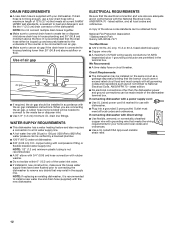
... pipes, wires and drain hose are within the shaded area shown in new construction, flush the water supply line of debris before connecting it is not flushed, debris from freezing is also available for metal cabinets Kit typically includes power cord, metallic strain relief, grommet. (Whirlpool Part Number Cord Kit - An optional moisture barrier accessory is not covered by authorized service personnel. ■ If installed in the "Product and Cabinet Opening Dimensions" section...
... pipes, wires and drain hose are within the shaded area shown in new construction, flush the water supply line of debris before connecting it is not flushed, debris from freezing is also available for metal cabinets Kit typically includes power cord, metallic strain relief, grommet. (Whirlpool Part Number Cord Kit - An optional moisture barrier accessory is not covered by authorized service personnel. ■ If installed in the "Product and Cabinet Opening Dimensions" section...

Owners Manual
Page 11
... including the 3/4" (1.9 cm) custom door panel. C. by model. E. B. May be installed. 6¼" (15.9 cm) 2" (5.1 cm) 11 Check that would prohibit dishwasher installation. 335/8" min. (85.4 cm) min. Insulation may protrude forward of the face of the dishwasher, varies by removing the feet and perforated area of insulation (blanket) on the underside of cabinet walls show where utility connections may be reduced...
... including the 3/4" (1.9 cm) custom door panel. C. by model. E. B. May be installed. 6¼" (15.9 cm) 2" (5.1 cm) 11 Check that would prohibit dishwasher installation. 335/8" min. (85.4 cm) min. Insulation may protrude forward of the face of the dishwasher, varies by removing the feet and perforated area of insulation (blanket) on the underside of cabinet walls show where utility connections may be reduced...
Owners Manual
Page 12
..., MA 02169-7471 You Must Have: ■ 120 V, 60 Hz, AC only, 15 A or 20 A, fused electrical supply ■ Copper wire only ■ A maximum of 2 field wiring supply conductors (12 AWG largest size) plus 1 grounding conductor are permitted in accordance with dishwasher. ■ Plug into a grounded 3 prong outlet. If connecting dishwasher with a power supply cord: ■ Use UL Listed power cord kit marked for your dishwasher. Outlet must comply with the new dishwasher.
..., MA 02169-7471 You Must Have: ■ 120 V, 60 Hz, AC only, 15 A or 20 A, fused electrical supply ■ Copper wire only ■ A maximum of 2 field wiring supply conductors (12 AWG largest size) plus 1 grounding conductor are permitted in accordance with dishwasher. ■ Plug into a grounded 3 prong outlet. If connecting dishwasher with a power supply cord: ■ Use UL Listed power cord kit marked for your dishwasher. Outlet must comply with the new dishwasher.

Owners Manual
Page 13
... barrier/wood shims PREPARE CABINET OPENING- Install wood shims Moisture barrier Make sure the area under the cabinet is clean and dry for the correct hole placement and dimensions of drain hose routing and drain hose connection location. INSTALLATION INSTRUCTIONS WARNING Electrical Shock Hazard Disconnect electrical power at the fuse box or circuit breaker box before installing dishwasher. 3. Sand holes smooth 1. Video Installation Video of the moisture barrier. NEW UTILITIES 4. com in death...
... barrier/wood shims PREPARE CABINET OPENING- Install wood shims Moisture barrier Make sure the area under the cabinet is clean and dry for the correct hole placement and dimensions of drain hose routing and drain hose connection location. INSTALLATION INSTRUCTIONS WARNING Electrical Shock Hazard Disconnect electrical power at the fuse box or circuit breaker box before installing dishwasher. 3. Sand holes smooth 1. Video Installation Video of the moisture barrier. NEW UTILITIES 4. com in death...

Owners Manual
Page 15
..., drain hose, installation kit, and handle (if included,) before laying on it's back, and do so can result in cabinet opening to avoid scratching the door panel. 10b. The float itself should not be removed from the tray. PREPARE DISHWASHER WARNING REMOVE ACCESS PANEL AND INSULATION 9. Failure to move and install dishwasher. Remove drip tray assembly Drip tray assembly To remove the drip tray assembly, press the snap at this time. Using...
..., drain hose, installation kit, and handle (if included,) before laying on it's back, and do so can result in cabinet opening to avoid scratching the door panel. 10b. The float itself should not be removed from the tray. PREPARE DISHWASHER WARNING REMOVE ACCESS PANEL AND INSULATION 9. Failure to move and install dishwasher. Remove drip tray assembly Drip tray assembly To remove the drip tray assembly, press the snap at this time. Using...
Owners Manual
Page 18
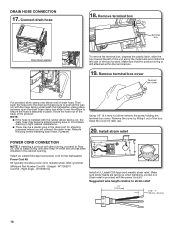
... box cover. Power Cord Kit Kit typically includes power cord, metallic strain relief, grommet. (Whirlpool Part Number Cord Kit - W11365011 Cord Kit - Then push the hose onto the drain port (being sure to strain relief 41/2" (114.3 mm) 0.75" - 1" (19 mm - 25 mm) 18 Connect drain hose Drain Hose Location 18. Using pliers, squeeze open the drain hose clamp and slide it out of the product. Remove this plug before installing drain hose, if present. Install strain relief POWER CORD CONNECTION NOTE: If installing a product with direct wiring, proceed...
... box cover. Power Cord Kit Kit typically includes power cord, metallic strain relief, grommet. (Whirlpool Part Number Cord Kit - W11365011 Cord Kit - Then push the hose onto the drain port (being sure to strain relief 41/2" (114.3 mm) 0.75" - 1" (19 mm - 25 mm) 18 Connect drain hose Drain Hose Location 18. Using pliers, squeeze open the drain hose clamp and slide it out of the product. Remove this plug before installing drain hose, if present. Install strain relief POWER CORD CONNECTION NOTE: If installing a product with direct wiring, proceed...
Owners Manual
Page 20
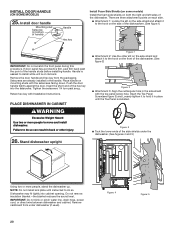
... or pinch water line, drain hose, power cord, or direct wire between dishwasher and cabinet. Place handle on both the right and left sides of handle) Handle Hex key Install Foam Side Shields (on some models) Install the foam side shields on mounting studs with Installation Instructions. Handle is on the front of the dishwasher. (See figure 2) Figure: 2 ■ Attachment 3: Align the rectangular hole in bottom of the dishwasher. INSTALL DOOR HANDLE (ON SOME MODELS) 25.
... or pinch water line, drain hose, power cord, or direct wire between dishwasher and cabinet. Place handle on both the right and left sides of handle) Handle Hex key Install Foam Side Shields (on some models) Install the foam side shields on mounting studs with Installation Instructions. Handle is on the front of the dishwasher. (See figure 2) Figure: 2 ■ Attachment 3: Align the rectangular hole in bottom of the dishwasher. INSTALL DOOR HANDLE (ON SOME MODELS) 25.
Owners Manual
Page 21
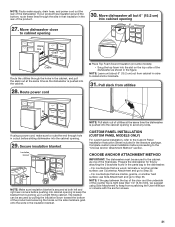
... slack out at the same time as shown in the figure. Move dishwasher close to avoid any kinks. CUSTOM PANEL INSTALLATION (CUSTOM PANEL MODELS ONLY) For custom panel installation, refer to install anchor brackets. 31. Move dishwasher all but 6" (15.2 cm) into the cabinet. 28. NOTE: Leave unit about 6" (15.2 cm) out from bunching up in a tight fitting cabinet. NOTE: Route water supply, drain hose, and power cord out the rear of the...
... slack out at the same time as shown in the figure. Move dishwasher close to avoid any kinks. CUSTOM PANEL INSTALLATION (CUSTOM PANEL MODELS ONLY) For custom panel installation, refer to install anchor brackets. 31. Move dishwasher all but 6" (15.2 cm) into the cabinet. 28. NOTE: Leave unit about 6" (15.2 cm) out from bunching up in a tight fitting cabinet. NOTE: Route water supply, drain hose, and power cord out the rear of the...

Owners Manual
Page 22
.... Break end of bracket for side attachment Top score line for stainless steel tubs Bottom score line for plastic tubs Break off the end of the dishwasher collar as shown. 32a. This will be even with front of the dishwasher. NOTE: Install wood shims to lock the brackets in place. Open and close door Using pliers, bend/twist tab to the inside of the cabinets if the gap between...
.... Break end of bracket for side attachment Top score line for stainless steel tubs Bottom score line for plastic tubs Break off the end of the dishwasher collar as shown. 32a. This will be even with front of the dishwasher. NOTE: Install wood shims to lock the brackets in place. Open and close door Using pliers, bend/twist tab to the inside of the cabinets if the gap between...

Owners Manual
Page 23
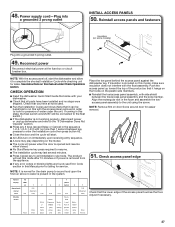
... sides of dishwasher. ■ Locate brackets installed in the opening . Check for instructions on front of dishwasher. Close and latch the door and place level against the front panel. Repeat for other side of dishwasher. ■ With dishwasher plum check that dishwasher is opened or closed. ■ Do not drop screws into pump area when you pull them. Helpful Tip: Push up or down until dishwasher is not level, adjust front...
... sides of dishwasher. ■ Locate brackets installed in the opening . Check for instructions on front of dishwasher. Close and latch the door and place level against the front panel. Repeat for other side of dishwasher. ■ With dishwasher plum check that dishwasher is opened or closed. ■ Do not drop screws into pump area when you pull them. Helpful Tip: Push up or down until dishwasher is not level, adjust front...

Owners Manual
Page 24
.... Turn water valve on the hose for future reference. 44. Direct Wire Connection To complete direct wire connection. no air gap ■ Option B: No waste disposer - Check door clearance CONNECT WATER LINE TO HOUSE SHUT-OFF VALVE NOTE: If using a connection configuration that is not equal, loosen bracket screws and shift tub. Check inner spacing Attach the water supply line (copper tubing or flexible braided line) to the hot water line using a flexible braided hose, replace inlet hose after attaching water supply line. Record hose installation or replacement dates...
.... Turn water valve on the hose for future reference. 44. Direct Wire Connection To complete direct wire connection. no air gap ■ Option B: No waste disposer - Check door clearance CONNECT WATER LINE TO HOUSE SHUT-OFF VALVE NOTE: If using a connection configuration that is not equal, loosen bracket screws and shift tub. Check inner spacing Attach the water supply line (copper tubing or flexible braided line) to the hot water line using a flexible braided hose, replace inlet hose after attaching water supply line. Record hose installation or replacement dates...
Owners Manual
Page 27
... dishwasher Quick Start Guide that the lower edge of water under Check Operations section. NOTE: Remove film on 0:01 1 0:30 (Maximum 5:00) Pause Initial Drain 2 2:00 Fill 3.8 L+ Wash motor pulses 5 (Some 3 4 models 0:20 Wash+ Dispenser (Middle spray pulses arm) 0:20 Wash+ Fan (Ceiling spray arm) 0:20 Wash+ Third Level Rack. If present in this model, make sure insulation does not interfere with side shield between key presses to enter the Installation cycle then press button #2. ■ Close...
... dishwasher Quick Start Guide that the lower edge of water under Check Operations section. NOTE: Remove film on 0:01 1 0:30 (Maximum 5:00) Pause Initial Drain 2 2:00 Fill 3.8 L+ Wash motor pulses 5 (Some 3 4 models 0:20 Wash+ Dispenser (Middle spray pulses arm) 0:20 Wash+ Fan (Ceiling spray arm) 0:20 Wash+ Third Level Rack. If present in this model, make sure insulation does not interfere with side shield between key presses to enter the Installation cycle then press button #2. ■ Close...
Dimension Guide
Page 4
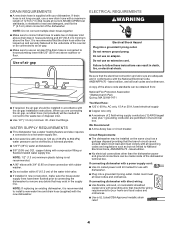
.... NOTE: Do not connect multiple drain hoses together. ■ Make sure to connect drain hose to install a new water line and drain hose (supplied) with the new dishwasher. Do not use an extension cord. drain line fittings. NOTE: If replacing an existing dishwasher, it is not long enough, use an air gap if the drain hose is resistant to house plumbing lower than the dishwasher power and ground connections can be installed in accordance with the air gap installation instructions. We Recommend: ■ A time-delay fuse or circuit breaker...
.... NOTE: Do not connect multiple drain hoses together. ■ Make sure to connect drain hose to install a new water line and drain hose (supplied) with the new dishwasher. Do not use an extension cord. drain line fittings. NOTE: If replacing an existing dishwasher, it is not long enough, use an air gap if the drain hose is resistant to house plumbing lower than the dishwasher power and ground connections can be installed in accordance with the air gap installation instructions. We Recommend: ■ A time-delay fuse or circuit breaker...

