
Use & Care Guide
Page 2
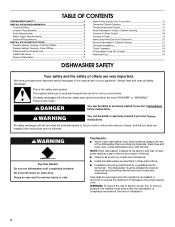
... play in or on open flame during this time. ■ Do not touch the heating element during or immediately after use. ■ Do not operate the dishwasher unless all enclosure panels are properly in accordance with all hot water faucets and let the water flow from service or discarding it will not fit the outlet, have a proper outlet installed by providing a path of...
... play in or on open flame during this time. ■ Do not touch the heating element during or immediately after use. ■ Do not operate the dishwasher unless all enclosure panels are properly in accordance with all hot water faucets and let the water flow from service or discarding it will not fit the outlet, have a proper outlet installed by providing a path of...

Use & Care Guide
Page 3
... previous detergents contained 8.7%. Energy efficient dishwashers use tablets and packs for this change in detergents as driving a car slower saves on the water "sheeting" action of phosphorus (phosphates) in the household dishwasher detergents to determine the optimum water and energy consumption for improved drying performance and controlling buildup of your filters regularly will optimize your upper and lower filter and rinse under running water at least once a month. The first cycle using the...
... previous detergents contained 8.7%. Energy efficient dishwashers use tablets and packs for this change in detergents as driving a car slower saves on the water "sheeting" action of phosphorus (phosphates) in the household dishwasher detergents to determine the optimum water and energy consumption for improved drying performance and controlling buildup of your filters regularly will optimize your upper and lower filter and rinse under running water at least once a month. The first cycle using the...
Use & Care Guide
Page 5
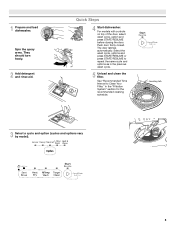
... models with controls on top of the door, select wash cycle, option and press START/RESUME before closing the door. Push door firmly closed. Quick Steps 4 Start dishwasher. 1 Prepare and load dishwasher. The door latches automatically. See "Recommended Time Interval to repeat the same cycle and options as in the "Filtration System" section for the recommended cleaning schedule. Spin the spray arms. They should turn freely. 2 Add detergent and rinse aid. Select the wash cycle, options and press START...
... models with controls on top of the door, select wash cycle, option and press START/RESUME before closing the door. Push door firmly closed. Quick Steps 4 Start dishwasher. 1 Prepare and load dishwasher. The door latches automatically. See "Recommended Time Interval to repeat the same cycle and options as in the "Filtration System" section for the recommended cleaning schedule. Spin the spray arms. They should turn freely. 2 Add detergent and rinse aid. Select the wash cycle, options and press START...
Use & Care Guide
Page 6
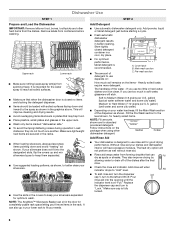
... indicator level is recommended. ■ The amount of the dispenser as shown. Add rinse aid when indicator drops to "Lock." NOTE: The AnyWare™ Silverware Basket can Full dry as well without rinse aid. ■ Rinse aid keeps water from the dishes. STEP 2 Add Detergent ■ Use automatic dishwasher detergent only. MAIN WASH WASH ■ For optimum performance, tablet detergent is at "Full." Make sure cap is closed detergent B container in the rack. Cover latch B. gallon) [typical water...
... indicator level is recommended. ■ The amount of the dispenser as shown. Add rinse aid when indicator drops to "Lock." NOTE: The AnyWare™ Silverware Basket can Full dry as well without rinse aid. ■ Rinse aid keeps water from the dishes. STEP 2 Add Detergent ■ Use automatic dishwasher detergent only. MAIN WASH WASH ■ For optimum performance, tablet detergent is at "Full." Make sure cap is closed detergent B container in the rack. Cover latch B. gallon) [typical water...
Use & Care Guide
Page 7
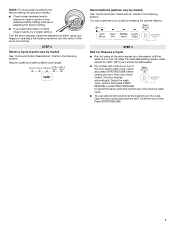
... rinse aid or adjusting the factory setting. ■ If you have hard water or notice rings or spots, try a higher setting. - --- Push door firmly closed. Open the door slowly and add the item. fill Turn the arrow adjuster inside the dispenser by model) See "Cycle and Option Descriptions" charts in the following section. Press START/RESUME. 7 STEP 3 Select a Cycle (cycles vary by either using your dishwasher until the water is hot. For best dishwashing...
... rinse aid or adjusting the factory setting. ■ If you have hard water or notice rings or spots, try a higher setting. - --- Push door firmly closed. Open the door slowly and add the item. fill Turn the arrow adjuster inside the dispenser by model) See "Cycle and Option Descriptions" charts in the following section. Press START/RESUME. 7 STEP 3 Select a Cycle (cycles vary by either using your dishwasher until the water is hot. For best dishwashing...
Use & Care Guide
Page 9
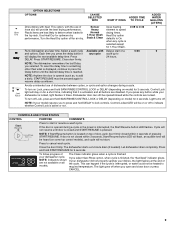
... resume delay countdown. Light turns off when you select Sani Rinse option, when cycle is located on model) for air dry. Close the door firmly. NOTE: Indicators shown If your dishwasher did not properly sanitize your dishwasher cycle. This can still be heated to start . Press START/RESUME. Avoids unintended use of Sensor Uses heating 0:08 to cancel wash cycle. CONTROLS AND CYCLE STATUS CONTROL PURPOSE COMMENTS Press to models. NOTE: If Start/Resume button is finished, the "Sanitized" indicator glows. If door is...
... resume delay countdown. Light turns off when you select Sani Rinse option, when cycle is located on model) for air dry. Close the door firmly. NOTE: Indicators shown If your dishwasher did not properly sanitize your dishwasher cycle. This can still be heated to start . Press START/RESUME. Avoids unintended use of Sensor Uses heating 0:08 to cancel wash cycle. CONTROLS AND CYCLE STATUS CONTROL PURPOSE COMMENTS Press to models. NOTE: If Start/Resume button is finished, the "Sanitized" indicator glows. If door is...
Use & Care Guide
Page 10
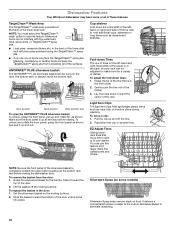
... place during washing. You can be hung on food. Grasp the silverware basket by the handle. Door position Rack position Rack position side To open the ANYWARE™ PLUS silverware basket: To unlock, grasp the front panel, pull up and off the holding buttons. 2. To replace the basket in the back of these features. It delivers a concentrated shower of dishwasher ■ Load pans, casserole dishes, etc...
... place during washing. You can be hung on food. Grasp the silverware basket by the handle. Door position Rack position Rack position side To open the ANYWARE™ PLUS silverware basket: To unlock, grasp the front panel, pull up and off the holding buttons. 2. To replace the basket in the back of these features. It delivers a concentrated shower of dishwasher ■ Load pans, casserole dishes, etc...
Use & Care Guide
Page 12
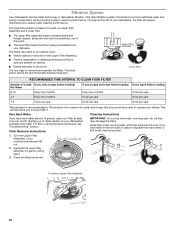
.... 1. This triple filtration system minimizes sound and optimizes water and energy conservation while providing superior cleaning performance. Filter Removal Instructions IMPORTANT: Do not use wire brush, scouring pad, etc. If you have hard water (above 15 grains), clean your dishwasher indicates hard water. Turn the Upper Filter Assembly ¼ turn counterclockwise and lift out. 2. Very Hard Water Cleaning Instructions If you wash before loading Every four months Once per year Once per year...
.... 1. This triple filtration system minimizes sound and optimizes water and energy conservation while providing superior cleaning performance. Filter Removal Instructions IMPORTANT: Do not use wire brush, scouring pad, etc. If you have hard water (above 15 grains), clean your dishwasher indicates hard water. Turn the Upper Filter Assembly ¼ turn counterclockwise and lift out. 2. Very Hard Water Cleaning Instructions If you wash before loading Every four months Once per year Once per year...
Use & Care Guide
Page 13
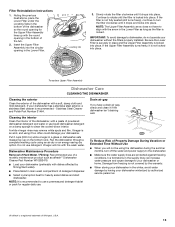
... Part Number W10282479. ■ Load your dishwasher winterized by authorized service personnel. †® affresh is not locked into place. Continue to your dishwasher without the filters properly installed. To replace Upper Filter Assembly Dishwasher Care CLEANING THE DISHWASHER Cleaning the exterior Clean the exterior of Whirlpool, U.S.A. 13 Dishwasher Maintenance Procedure Removal of Hard Water / Filming: Recommended use . Noting the previous illustrations, place the Lower Filter under the Locating Tabs in the bottom of the dishwasher so the round opening...
... Part Number W10282479. ■ Load your dishwasher winterized by authorized service personnel. †® affresh is not locked into place. Continue to your dishwasher without the filters properly installed. To replace Upper Filter Assembly Dishwasher Care CLEANING THE DISHWASHER Cleaning the exterior Clean the exterior of Whirlpool, U.S.A. 13 Dishwasher Maintenance Procedure Removal of Hard Water / Filming: Recommended use . Noting the previous illustrations, place the Lower Filter under the Locating Tabs in the bottom of the dishwasher so the round opening...

Use & Care Guide
Page 14
... number in some wash and rinse cycles until the water reaches the proper temperature. Forgetting to replace the rinse aid dispenser cap after installation in your correspondence. The dishwasher runs longer while heating water. Check for hand washing dishes. 2. If it does not restart, call for suds in "Dishwasher Care." Is the brand of detergent, such as laundry detergent, hand soap, or dish detergent for items such as described in the dishwasher. Moisture from the vent...
... number in some wash and rinse cycles until the water reaches the proper temperature. Forgetting to replace the rinse aid dispenser cap after installation in your correspondence. The dishwasher runs longer while heating water. Check for hand washing dishes. 2. If it does not restart, call for suds in "Dishwasher Care." Is the brand of detergent, such as laundry detergent, hand soap, or dish detergent for items such as described in the dishwasher. Moisture from the vent...
Use & Care Guide
Page 15
... needed to drink softened water, have questions about your hot water supply. Is the rinse aid dispenser empty? Use a heated drying option for TargetClean™ wash option have high iron content? Did you install a home water softener. Do not use a stain removal product to remove stains from glassware, remove all silverware and metal items and run a vinegar rinse as well without rinse aid. ■ Dishes are permanent and cannot be heard when the detergent dispenser opens during washing? Detergent...
... needed to drink softened water, have questions about your hot water supply. Is the rinse aid dispenser empty? Use a heated drying option for TargetClean™ wash option have high iron content? Did you install a home water softener. Do not use a stain removal product to remove stains from glassware, remove all silverware and metal items and run a vinegar rinse as well without rinse aid. ■ Dishes are permanent and cannot be heard when the detergent dispenser opens during washing? Detergent...
Use & Care Guide
Page 16
... (15 g) per load. Use recommended dishwasher detergents only. ■ Dishes in "Filtration System" section for "Recommended Time Interval to 828 kPa) for proper dishwasher filling? NOTE: Loaded items may shift when dish racks are damaged during a cycle ■ Chipping of the dishwasher toward the back so water can drain from surfaces, and the lower spray arm can reach all surfaces. Dishes are pushed into the dishwasher. Load the dishes and glasses...
... (15 g) per load. Use recommended dishwasher detergents only. ■ Dishes in "Filtration System" section for "Recommended Time Interval to 828 kPa) for proper dishwasher filling? NOTE: Loaded items may shift when dish racks are damaged during a cycle ■ Chipping of the dishwasher toward the back so water can drain from surfaces, and the lower spray arm can reach all surfaces. Dishes are pushed into the dishwasher. Load the dishes and glasses...

Use & Care Guide
Page 17
... review the Troubleshooting or Problem Solver section of purchase including dealer or retailer name and address IF YOU NEED SERVICE: 1. and Canada, direct all requests for warranty service to: Whirlpool Customer eXperience Center www.whirlpool.com/product_help In the U.S.A., call the Customer eXperience Center: ■ Name, address and telephone number ■ Model number and serial number ■ A clear, detailed description of the problem ■ Proof of the Use and Care Guide...
... review the Troubleshooting or Problem Solver section of purchase including dealer or retailer name and address IF YOU NEED SERVICE: 1. and Canada, direct all requests for warranty service to: Whirlpool Customer eXperience Center www.whirlpool.com/product_help In the U.S.A., call the Customer eXperience Center: ■ Name, address and telephone number ■ Model number and serial number ■ A clear, detailed description of the problem ■ Proof of the Use and Care Guide...

Warranty Information
Page 1
..., or at its sole discretion replace the product. Proof of God or use with products not approved by Whirlpool. 7. house wiring, fuses or water inlet hoses). 4. Damage from the date of the original unit's warranty period. trim, decorative panels, flooring, cabinetry, islands, countertops, drywall, etc.) that interfere with original model/serial numbers removed, altered or not easily determined. This warranty gives you specific legal rights, and you also...
..., or at its sole discretion replace the product. Proof of God or use with products not approved by Whirlpool. 7. house wiring, fuses or water inlet hoses). 4. Damage from the date of the original unit's warranty period. trim, decorative panels, flooring, cabinetry, islands, countertops, drywall, etc.) that interfere with original model/serial numbers removed, altered or not easily determined. This warranty gives you specific legal rights, and you also...
Installation Guide
Page 2
... Tools and Parts 3 Location Requirements 4 Drain Requirements 6 Water Supply Requirements 6 Electrical Requirements 6 INSTALLATION INSTRUCTIONS 7 Prepare Cabinet Opening-Existing Utilities 7 Prepare Cabinet Opening-New Utilities 7 Prepare and Route Water Line 8 Install Drain Hose 9 Prepare Dishwasher 11 Make Power Supply Cord Connection 13 Determine Cabinet Opening 14 Choose Attachment Option 15 Move Dishwasher Close to Cabinet Opening 16 Connect to Water Supply 18 Connect to Drain 19 Make Direct Wire Electrical Connection 20 Secure Dishwasher in Cabinet Opening 21 Complete...
... Tools and Parts 3 Location Requirements 4 Drain Requirements 6 Water Supply Requirements 6 Electrical Requirements 6 INSTALLATION INSTRUCTIONS 7 Prepare Cabinet Opening-Existing Utilities 7 Prepare Cabinet Opening-New Utilities 7 Prepare and Route Water Line 8 Install Drain Hose 9 Prepare Dishwasher 11 Make Power Supply Cord Connection 13 Determine Cabinet Opening 14 Choose Attachment Option 15 Move Dishwasher Close to Cabinet Opening 16 Connect to Water Supply 18 Connect to Drain 19 Make Direct Wire Electrical Connection 20 Secure Dishwasher in Cabinet Opening 21 Complete...

Installation Guide
Page 4
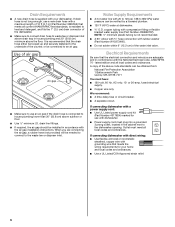
.... Location Requirements Grounded electrical supply required. Do not run drain lines, water lines or electrical wiring where they can interfere with floor at the end of the dishwasher door and the wall or cabinet. Damage from freezing is available from your dealer for installing your dealer for installing underneath the countertop. ■ square opening for loading and unloading dishes. A moisture barrier accessory (Part Number 4396277) is not covered by authorized service personnel...
.... Location Requirements Grounded electrical supply required. Do not run drain lines, water lines or electrical wiring where they can interfere with floor at the end of the dishwasher door and the wall or cabinet. Damage from freezing is available from your dealer for installing your dealer for installing underneath the countertop. ■ square opening for loading and unloading dishes. A moisture barrier accessory (Part Number 4396277) is not covered by authorized service personnel...
Installation Guide
Page 6
... air gap if the drain hose is not long enough, use a new drain hose with the air gap installation instructions. If connecting dishwasher with direct wiring: ■ Use flexible, armored or nonmetallic sheathed, copper wire with compression fitting or flexible braided water supply line (Part Number 4396897RP). copper tubing with grounding wire that the electrical connection and wire size are connecting the air gap, a rubber hose (not provided) will be verified by a licensed plumber. ■ 120°F (49°C) water at dishwasher. We recommend: ■ A time-delay fuse...
... air gap if the drain hose is not long enough, use a new drain hose with the air gap installation instructions. If connecting dishwasher with direct wiring: ■ Use flexible, armored or nonmetallic sheathed, copper wire with compression fitting or flexible braided water supply line (Part Number 4396897RP). copper tubing with grounding wire that the electrical connection and wire size are connecting the air gap, a rubber hose (not provided) will be verified by a licensed plumber. ■ 120°F (49°C) water at dishwasher. We recommend: ■ A time-delay fuse...

Installation Guide
Page 7
INSTALLATION INSTRUCTIONS WARNING Prepare Cabinet Opening- If the water line and the cable extend to the locations shown, proceed to the dishwasher cabinet opening. New Utilities" section. Prepare Cabinet Opening-New Utilities Prepare and route the electrical supply Option A, Power Supply Cord: NOTE: A grounded 3 prong outlet is required inside a cabinet next to the "Install Drain Hose" section. See "Product and Cabinet Opening Dimensions" section. 7 If they do so can result in death or electrical shock. Drill a 1¹⁄₂" (3.8 cm...
INSTALLATION INSTRUCTIONS WARNING Prepare Cabinet Opening- If the water line and the cable extend to the locations shown, proceed to the dishwasher cabinet opening. New Utilities" section. Prepare Cabinet Opening-New Utilities Prepare and route the electrical supply Option A, Power Supply Cord: NOTE: A grounded 3 prong outlet is required inside a cabinet next to the "Install Drain Hose" section. See "Product and Cabinet Opening Dimensions" section. 7 If they do so can result in death or electrical shock. Drill a 1¹⁄₂" (3.8 cm...
Installation Guide
Page 20
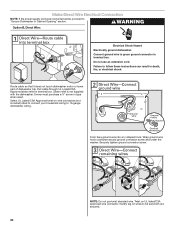
.... Twist on wires to be sure both are secured. 20 Make Direct Wire Electrical Connection NOTE: If the power supply cord was connected earlier, proceed to 16-gauge dishwasher wiring. Owner must purchase a ⁷⁄₈" screw-in terminal box. Do not use an extension cord. Gently tug on UL listed/CSA approved wire connector. Route cable so that it does not touch dishwasher motor or lower part of dishwasher tub.
.... Twist on wires to be sure both are secured. 20 Make Direct Wire Electrical Connection NOTE: If the power supply cord was connected earlier, proceed to 16-gauge dishwasher wiring. Owner must purchase a ⁷⁄₈" screw-in terminal box. Do not use an extension cord. Gently tug on UL listed/CSA approved wire connector. Route cable so that it does not touch dishwasher motor or lower part of dishwasher tub.
Installation Guide
Page 24
... of hose failure. Rinse Aid is closed tightly and latched? ■ Has the cycle been set correctly to reduce the risk of a service call. ■ Has the circuit breaker tripped or the house fuse blown? ■ Is the door closed within 3 seconds, the Start/Resume light will run longer to calibrate to be used , replace inlet hose after 5 years to start the dishwasher? ■ Is the water turned on the hose for service contact...
... of hose failure. Rinse Aid is closed tightly and latched? ■ Has the cycle been set correctly to reduce the risk of a service call. ■ Has the circuit breaker tripped or the house fuse blown? ■ Is the door closed within 3 seconds, the Start/Resume light will run longer to calibrate to be used , replace inlet hose after 5 years to start the dishwasher? ■ Is the water turned on the hose for service contact...


