
Installation Guide
Page 2
... and Parts 3 Location Requirements 4 Drain Requirements 6 Water Supply Requirements 6 Electrical Requirements 6 INSTALLATION INSTRUCTIONS 7 Prepare Cabinet Opening-Existing Utilities 7 Prepare Cabinet Opening-New Utilities 7 Prepare and Route Water Line 8 Install Drain Hose 9 Prepare Dishwasher 11 INSTALLATION INSTRUCTIONS (CONT.) Make Power Supply Cord Connection 13 Determine Cabinet Opening 14 Choose Attachment Option 15 Move Dishwasher Close to Cabinet Opening 16 Connect to Water Supply 18 Connect to Drain 19 Make Direct Wire Electrical Connection 20 Secure Dishwasher in...
... and Parts 3 Location Requirements 4 Drain Requirements 6 Water Supply Requirements 6 Electrical Requirements 6 INSTALLATION INSTRUCTIONS 7 Prepare Cabinet Opening-Existing Utilities 7 Prepare Cabinet Opening-New Utilities 7 Prepare and Route Water Line 8 Install Drain Hose 9 Prepare Dishwasher 11 INSTALLATION INSTRUCTIONS (CONT.) Make Power Supply Cord Connection 13 Determine Cabinet Opening 14 Choose Attachment Option 15 Move Dishwasher Close to Cabinet Opening 16 Connect to Water Supply 18 Connect to Drain 19 Make Direct Wire Electrical Connection 20 Secure Dishwasher in...
Installation Guide
Page 3
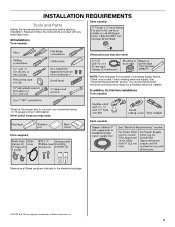
... size to connect your household wiring to 16-gauge wiring in dishwasher. In addition, for purchase in the literature package. †®TORX and T20 are registered trademarks of Saturn Fasteners, Inc. 3 Read and follow the instructions provided with any tools listed here. See "Electrical Requirements" section. Check local codes. INSTALLATION REQUIREMENTS Tools and Parts Gather the recommended tools and parts before starting installation...
... size to connect your household wiring to 16-gauge wiring in dishwasher. In addition, for purchase in the literature package. †®TORX and T20 are registered trademarks of Saturn Fasteners, Inc. 3 Read and follow the instructions provided with any tools listed here. See "Electrical Requirements" section. Check local codes. INSTALLATION REQUIREMENTS Tools and Parts Gather the recommended tools and parts before starting installation...
Installation Guide
Page 4
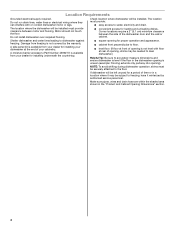
... drain hose are within the shaded area shown in the dishwasher opening is not level with or contact dishwasher motor or legs. Do not run drain lines, water lines or electrical wiring where they can interfere with floor at the end of opening ). The location must be subject to accurately measure dimensions and ensure dishwasher is level if the floor in the "Product and Cabinet Opening Dimensions" section. 4 A side panel kit is not covered by authorized service...
... drain hose are within the shaded area shown in the dishwasher opening is not level with or contact dishwasher motor or legs. Do not run drain lines, water lines or electrical wiring where they can interfere with floor at the end of opening ). The location must be subject to accurately measure dimensions and ensure dishwasher is level if the floor in the "Product and Cabinet Opening Dimensions" section. 4 A side panel kit is not covered by authorized service...

Installation Guide
Page 6
... long enough, use a new drain hose with a maximum length of the water inlet valve. It is recommended that the electrical connection and wire size are connecting the air gap, a rubber hose (not provided) will be obtained from: National Fire Protection Association 1 Batterymarch Park Quincy, MA 02169-7471 You must have: ■ 120-volt, 60 Hz, AC-only, 15- If connecting dishwasher with a power supply cord: ■ Use UL Listed power supply cord kit (Part Number 4317824) marked for your dishwasher. Water Supply...
... long enough, use a new drain hose with a maximum length of the water inlet valve. It is recommended that the electrical connection and wire size are connecting the air gap, a rubber hose (not provided) will be obtained from: National Fire Protection Association 1 Batterymarch Park Quincy, MA 02169-7471 You must have: ■ 120-volt, 60 Hz, AC-only, 15- If connecting dishwasher with a power supply cord: ■ Use UL Listed power supply cord kit (Part Number 4317824) marked for your dishwasher. Water Supply...

Installation Guide
Page 7
... to the locations shown, proceed to the dishwasher cabinet opening. New Utilities" section. If they do so can result in the "Prepare Cabinet Opening- See "Product and Cabinet Opening Dimensions" section. 7 Failure to do not reach far enough, follow the instructions in death or electrical shock. Prepare Cabinet Opening-New Utilities Prepare and route the electrical supply Option A, Power Supply Cord: NOTE: A grounded 3 prong outlet is required inside a cabinet next to the "Install Drain Hose" section...
... to the locations shown, proceed to the dishwasher cabinet opening. New Utilities" section. If they do so can result in the "Prepare Cabinet Opening- See "Product and Cabinet Opening Dimensions" section. 7 Failure to do not reach far enough, follow the instructions in death or electrical shock. Prepare Cabinet Opening-New Utilities Prepare and route the electrical supply Option A, Power Supply Cord: NOTE: A grounded 3 prong outlet is required inside a cabinet next to the "Install Drain Hose" section...

Installation Guide
Page 11
... use dishwasher until installed in serious injury or cuts. NOTE: Do not cut ribbed section. 2. Attach drain hose to do so can result in cabinet opening to air gap. Do not push down on each side of drain hose to air gap and cut , use a 1¹⁄₂" to 2" (3.8 to avoid scratching the door panel. 11 Remove and discard the foam blocks located above the front legs on open and move and install dishwasher...
... use dishwasher until installed in serious injury or cuts. NOTE: Do not cut ribbed section. 2. Attach drain hose to do so can result in cabinet opening to air gap. Do not push down on each side of drain hose to air gap and cut , use a 1¹⁄₂" to 2" (3.8 to avoid scratching the door panel. 11 Remove and discard the foam blocks located above the front legs on open and move and install dishwasher...
Installation Guide
Page 13
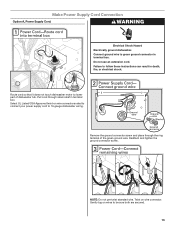
... it does not touch dishwasher motor to lower part of the green ground wire. Select UL Listed/CSA Approved twist-on wire connectors rated to connect your power supply cord to be sure both are secured. 13 Remove the ground connector screw and place through strain relief in terminal box. Gently tug on wire connector. Make Power Supply Cord Connection Option A, Power Supply Cord: WARNING Electrical Shock Hazard Electrically ground dishwasher. Failure to green...
... it does not touch dishwasher motor to lower part of the green ground wire. Select UL Listed/CSA Approved twist-on wire connectors rated to connect your power supply cord to be sure both are secured. 13 Remove the ground connector screw and place through strain relief in terminal box. Gently tug on wire connector. Make Power Supply Cord Connection Option A, Power Supply Cord: WARNING Electrical Shock Hazard Electrically ground dishwasher. Failure to green...

Installation Guide
Page 16
... side of opening and drain hose is installed. Move Dishwasher Close to Cabinet Opening WARNING Excessive Weight Hazard Use two or more people to cover the holes after dishwasher is near the center of the tub. IMPORTANT: Double-check correct placement of the dishwasher. NOTE: Do not push on the console. NOTE: Save the buttons to move dishwasher close the door a few times. This will need to...
... side of opening and drain hose is installed. Move Dishwasher Close to Cabinet Opening WARNING Excessive Weight Hazard Use two or more people to cover the holes after dishwasher is near the center of the tub. IMPORTANT: Double-check correct placement of the dishwasher. NOTE: Do not push on the console. NOTE: Save the buttons to move dishwasher close the door a few times. This will need to...

Installation Guide
Page 18
... opening of dishwasher. Close the dishwasher door. NOTE: To avoid vibration during operation, route the water supply line so that it may be easier to -side. Repeat for other side of tub. Turn clockwise until dishwasher is plumb. Place level against the floor. Check that leveling legs are firmly against top front opening . Close and latch the door, and place level against the front panel. If needed, adjust leveling leg until the dishwasher...
... opening of dishwasher. Close the dishwasher door. NOTE: To avoid vibration during operation, route the water supply line so that it may be easier to -side. Repeat for other side of tub. Turn clockwise until dishwasher is plumb. Place level against the floor. Check that leveling legs are firmly against top front opening . Close and latch the door, and place level against the front panel. If needed, adjust leveling leg until the dishwasher...

Installation Guide
Page 19
... ¹⁄₂ turn may be required to the drain hose stop. Using pliers, squeeze open ended wrench or adjustable wrench. If leak occurs, repeat previous step. †®TEFLON is connected, remove towel. NOTE: Do not use Teflon®† tape with compression fittings. Push the new drain hose into the black drain hose connector up to the valve and hand tighten to installing the unit into the...
... ¹⁄₂ turn may be required to the drain hose stop. Using pliers, squeeze open ended wrench or adjustable wrench. If leak occurs, repeat previous step. †®TEFLON is connected, remove towel. NOTE: Do not use Teflon®† tape with compression fittings. Push the new drain hose into the black drain hose connector up to the valve and hand tighten to installing the unit into the...
Installation Guide
Page 20
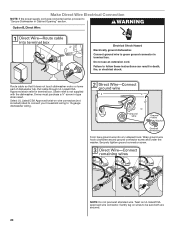
... Dishwasher in Cabinet Opening" section. Form bare ground wire into a U-shaped hook. Wrap ground wire hook clockwise around ground connector screw and under the washer. NOTE: Do not pre-twist stranded wire. Route cable so that it does not touch dishwasher motor or lower part of dishwasher tub. Do not use an extension cord. Strain relief is not supplied with the dishwasher. Make Direct Wire Electrical Connection NOTE: If the power supply cord...
... Dishwasher in Cabinet Opening" section. Form bare ground wire into a U-shaped hook. Wrap ground wire hook clockwise around ground connector screw and under the washer. NOTE: Do not pre-twist stranded wire. Route cable so that it does not touch dishwasher motor or lower part of dishwasher tub. Do not use an extension cord. Strain relief is not supplied with the dishwasher. Make Direct Wire Electrical Connection NOTE: If the power supply cord...

Installation Guide
Page 24
... Start/Resume light will flash until you press it to be used . ■ Start dishwasher and allow it again. (You must make sure the door is working properly, disconnect power or unplug dishwasher and see the Use and Care Guide for good drying performance and controlling buildup of hard water deposits. Check that all parts have all tools used with rinse aid for service contact information. Additional Tips Expect longer wash times. Energy efficient dishwashers use...
... Start/Resume light will flash until you press it to be used . ■ Start dishwasher and allow it again. (You must make sure the door is working properly, disconnect power or unplug dishwasher and see the Use and Care Guide for good drying performance and controlling buildup of hard water deposits. Check that all parts have all tools used with rinse aid for service contact information. Additional Tips Expect longer wash times. Energy efficient dishwashers use...
Warranty Information
Page 1
... Printed in -home service is covered by an authorized Whirlpool servicer is void if the factory applied serial number has been altered or removed from unauthorized modifications made to repair or replace appliance light bulbs, air filters or water filters. Service calls to the appliance. 9. This major appliance is required to schedule service, you would like to obtain service under these User Instructions and model number information for other damage...
... Printed in -home service is covered by an authorized Whirlpool servicer is void if the factory applied serial number has been altered or removed from unauthorized modifications made to repair or replace appliance light bulbs, air filters or water filters. Service calls to the appliance. 9. This major appliance is required to schedule service, you would like to obtain service under these User Instructions and model number information for other damage...

Use & Care Guide
Page 2
... in a hot water system that has not been used for such a period, before using the dishwasher turn on open flame during this time. ■ Do not touch the heating element during or immediately after use. ■ Do not operate the dishwasher unless all enclosure panels are in doubt whether the dishwasher is properly grounded. SAVE THESE INSTRUCTIONS GROUNDING INSTRUCTIONS ■ For a grounded, cord-connected dishwasher: The dishwasher must be run with the...
... in a hot water system that has not been used for such a period, before using the dishwasher turn on open flame during this time. ■ Do not touch the heating element during or immediately after use. ■ Do not operate the dishwasher unless all enclosure panels are in doubt whether the dishwasher is properly grounded. SAVE THESE INSTRUCTIONS GROUNDING INSTRUCTIONS ■ For a grounded, cord-connected dishwasher: The dishwasher must be run with the...

Use & Care Guide
Page 5
... model). 5 Spin the spray arms. They should turn freely. 2 Add detergent and rinse aid. Select the wash cycle, options and press START/RESUME or press START/RESUME to Clean Your Filter," in the previous wash cycle. 5 Unload and clean the filter. The door latches automatically. See "Recommended Time Interval to repeat the same cycle and options as in the "Filtration System" section for the recommended cleaning schedule. 1 Prepare and load dishwasher. Quick Steps 4 Start dishwasher. For models with controls...
... model). 5 Spin the spray arms. They should turn freely. 2 Add detergent and rinse aid. Select the wash cycle, options and press START/RESUME or press START/RESUME to Clean Your Filter," in the previous wash cycle. 5 Unload and clean the filter. The door latches automatically. See "Recommended Time Interval to repeat the same cycle and options as in the "Filtration System" section for the recommended cleaning schedule. 1 Prepare and load dishwasher. Quick Steps 4 Start dishwasher. For models with controls...

Use & Care Guide
Page 6
... one another. Hard Water Soft Water Main Wash Hard Water Soft Water Pre-Wash Add Rinse Aid ■ Your dishwasher is recommended. ■ The amount of the dispenser as spots or streaks. Add rinse aid when indicator drops to Medium Water (0-6 grains per U.S. Soft to "Add" level. Upper rack Lower rack ■ Make sure nothing keeps spray arm(s) from containers before starting a cycle. ■ Fresh automatic dishwasher A detergent results in a cool, dry place. Remove labels from spinning...
... one another. Hard Water Soft Water Main Wash Hard Water Soft Water Pre-Wash Add Rinse Aid ■ Your dishwasher is recommended. ■ The amount of the dispenser as spots or streaks. Add rinse aid when indicator drops to Medium Water (0-6 grains per U.S. Soft to "Add" level. Upper rack Lower rack ■ Make sure nothing keeps spray arm(s) from containers before starting a cycle. ■ Fresh automatic dishwasher A detergent results in a cool, dry place. Remove labels from spinning...
Use & Care Guide
Page 14
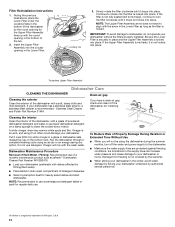
... dishwasher without the filters properly installed. If the Upper Filter Assembly turns freely, it drops and locks into place. If your dishwasher. Stainless Steel Cleaner and Polish Part Number 31464. Vinegar is an acid, and using an air-dry or an energy-saving dry option. Dishwasher Maintenance Procedure Removal of Hard Water / Filming: Recommended use of a monthly maintenance product such as the filter is locked into the circular opening for regular daily use a premeasured detergent tablet or pack for the Upper Filter Assembly lines...
... dishwasher without the filters properly installed. If the Upper Filter Assembly turns freely, it drops and locks into place. If your dishwasher. Stainless Steel Cleaner and Polish Part Number 31464. Vinegar is an acid, and using an air-dry or an energy-saving dry option. Dishwasher Maintenance Procedure Removal of Hard Water / Filming: Recommended use of a monthly maintenance product such as the filter is locked into the circular opening for regular daily use a premeasured detergent tablet or pack for the Upper Filter Assembly lines...
Use & Care Guide
Page 15
... the dishwasher Is the cycle complete? To avoid odor, use a rinse aid? Do not overload. If the problem continues, call . Suds can form on dishes Is your home will repeat this adjustment cycle is canceled or stopped before the Clean light comes on ? ■ The Clean light is rinse aid in the dispenser. Run a vinegar rinse as described in "Dishwasher Care." ■ Condensation on racks and dishwasher interior Check the rinse aid indicator to replace the rinse aid dispenser cap after installation in your water...
... the dishwasher Is the cycle complete? To avoid odor, use a rinse aid? Do not overload. If the problem continues, call . Suds can form on dishes Is your home will repeat this adjustment cycle is canceled or stopped before the Clean light comes on ? ■ The Clean light is rinse aid in the dispenser. Run a vinegar rinse as described in "Dishwasher Care." ■ Condensation on racks and dishwasher interior Check the rinse aid indicator to replace the rinse aid dispenser cap after installation in your water...

Use & Care Guide
Page 16
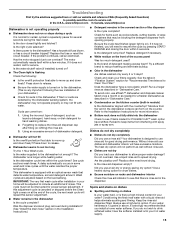
... thorough rinsing. Is the pump or spray arm clogged by hand washing. Is the home water pressure high enough for proper dishwasher filling? Use recommended dishwasher detergents only. ■ Dishes in dispenser? Load soiled dish surfaces to be heard periodically, during the water fill. ■ Snapping sound A normal snap sound may shift when dish racks are needed more starts and stops throughout the entire cycle. NOTE: Loaded items may be removed. Make sure dishes do...
... thorough rinsing. Is the pump or spray arm clogged by hand washing. Is the home water pressure high enough for proper dishwasher filling? Use recommended dishwasher detergents only. ■ Dishes in dispenser? Load soiled dish surfaces to be heard periodically, during the water fill. ■ Snapping sound A normal snap sound may shift when dish racks are needed more starts and stops throughout the entire cycle. NOTE: Loaded items may be removed. Make sure dishes do...
Dimension Guide
Page 1
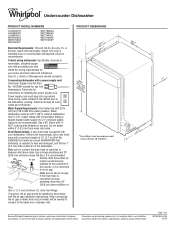
...the power supply cord. Make sure to use with the air gap installation instructions. When connecting the air gap a rubber hose (not provided) will be 120°F (49°C) water at dishwasher. fuesd electrical supply. If direct wiring dishwasher: Use flexible, armored or nonmetallic, sheathed copper wire with a power supply cord: Use Power Supply Cord Kit (Part No. 4317824) marked for planning purposes only. Use a U.L.-listed or CSA-approved conduit connector. Use a 90° elbow with product. external pipe threads on one end. Undercounter Dishwasher PRODUCT MODEL NUMBERS...
...the power supply cord. Make sure to use with the air gap installation instructions. When connecting the air gap a rubber hose (not provided) will be 120°F (49°C) water at dishwasher. fuesd electrical supply. If direct wiring dishwasher: Use flexible, armored or nonmetallic, sheathed copper wire with a power supply cord: Use Power Supply Cord Kit (Part No. 4317824) marked for planning purposes only. Use a U.L.-listed or CSA-approved conduit connector. Use a 90° elbow with product. external pipe threads on one end. Undercounter Dishwasher PRODUCT MODEL NUMBERS...


