
Installation Guide
Page 2
... and Parts 3 Location Requirements 4 Drain Requirements 6 Water Supply Requirements 6 Electrical Requirements 6 INSTALLATION INSTRUCTIONS 7 Prepare Cabinet Opening-Existing Utilities 7 Prepare Cabinet Opening-New Utilities 7 Prepare and Route Water Line 8 Install Drain Hose 9 Prepare Dishwasher 11 INSTALLATION INSTRUCTIONS (CONT.) Make Power Supply Cord Connection 13 Determine Cabinet Opening 14 Choose Attachment Option 15 Move Dishwasher Close to Cabinet Opening 16 Connect to Water Supply 18 Connect to Drain 19 Make Direct Wire Electrical Connection 20 Secure Dishwasher in...
... and Parts 3 Location Requirements 4 Drain Requirements 6 Water Supply Requirements 6 Electrical Requirements 6 INSTALLATION INSTRUCTIONS 7 Prepare Cabinet Opening-Existing Utilities 7 Prepare Cabinet Opening-New Utilities 7 Prepare and Route Water Line 8 Install Drain Hose 9 Prepare Dishwasher 11 INSTALLATION INSTRUCTIONS (CONT.) Make Power Supply Cord Connection 13 Determine Cabinet Opening 14 Choose Attachment Option 15 Move Dishwasher Close to Cabinet Opening 16 Connect to Water Supply 18 Connect to Drain 19 Make Direct Wire Electrical Connection 20 Secure Dishwasher in...
Installation Guide
Page 3
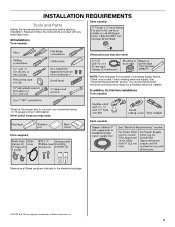
... T20 are registered trademarks of Saturn Fasteners, Inc. 3 It is recommended that electrical connections be the proper size to connect your household wiring to 16-gauge wiring in plumbing supply stores. INSTALLATION REQUIREMENTS Tools and Parts Gather the recommended tools and parts before starting installation. See "Electrical Requirements" section. In addition, for purchase in dishwasher. Read and follow the instructions provided with any tools listed here.
... T20 are registered trademarks of Saturn Fasteners, Inc. 3 It is recommended that electrical connections be the proper size to connect your household wiring to 16-gauge wiring in plumbing supply stores. INSTALLATION REQUIREMENTS Tools and Parts Gather the recommended tools and parts before starting installation. See "Electrical Requirements" section. In addition, for purchase in dishwasher. Read and follow the instructions provided with any tools listed here.
Installation Guide
Page 4
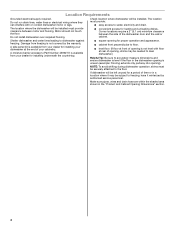
... time or in the "Product and Cabinet Opening Dimensions" section. 4 The location must be needed to level dishwasher.) Helpful Tip: Be sure to freezing, have it winterized by the warranty. A side panel kit is not covered by authorized service personnel. Do not install dishwasher over carpeted flooring. ■ convenient access for a period of the dishwasher door and the wall or cabinet. Shelter dishwasher and water lines leading to the floor. Check location...
... time or in the "Product and Cabinet Opening Dimensions" section. 4 The location must be needed to level dishwasher.) Helpful Tip: Be sure to freezing, have it winterized by the warranty. A side panel kit is not covered by authorized service personnel. Do not install dishwasher over carpeted flooring. ■ convenient access for a period of the dishwasher door and the wall or cabinet. Shelter dishwasher and water lines leading to the floor. Check location...

Installation Guide
Page 6
...-only, 15- Drain Requirements ■ A new drain hose is supplied with the air gap installation instructions. Water Supply Requirements ■ A hot water line with the National Electrical Code, ANSI/NFPA 70 - Electrical Requirements Be sure that meets all local codes and ordinances. A copy of the counter, or be verified by a licensed plumber. ■ 120°F (49°C) water at dishwasher O.D. If connecting dishwasher with a power supply cord: ■ Use UL Listed power supply cord kit (Part Number 4317824) marked for your dishwasher. It is...
...-only, 15- Drain Requirements ■ A new drain hose is supplied with the air gap installation instructions. Water Supply Requirements ■ A hot water line with the National Electrical Code, ANSI/NFPA 70 - Electrical Requirements Be sure that meets all local codes and ordinances. A copy of the counter, or be verified by a licensed plumber. ■ 120°F (49°C) water at dishwasher O.D. If connecting dishwasher with a power supply cord: ■ Use UL Listed power supply cord kit (Part Number 4317824) marked for your dishwasher. It is...

Installation Guide
Page 7
..., follow the instructions in cabinet side or rear. See "Product and Cabinet Opening Dimensions" section. 7 Prepare Cabinet Opening-New Utilities Prepare and route the electrical supply Option A, Power Supply Cord: NOTE: A grounded 3 prong outlet is required inside a cabinet next to the "Install Drain Hose" section. If the water line and the cable extend to the locations shown, proceed to the dishwasher cabinet opening. INSTALLATION INSTRUCTIONS WARNING Prepare Cabinet Opening-Existing Utilities Electrical Shock Hazard Disconnect electrical power at the fuse box or circuit...
..., follow the instructions in cabinet side or rear. See "Product and Cabinet Opening Dimensions" section. 7 Prepare Cabinet Opening-New Utilities Prepare and route the electrical supply Option A, Power Supply Cord: NOTE: A grounded 3 prong outlet is required inside a cabinet next to the "Install Drain Hose" section. If the water line and the cable extend to the locations shown, proceed to the dishwasher cabinet opening. INSTALLATION INSTRUCTIONS WARNING Prepare Cabinet Opening-Existing Utilities Electrical Shock Hazard Disconnect electrical power at the fuse box or circuit...

Installation Guide
Page 11
... side of drain hose to air gap. Use pliers to avoid scratching the door panel. 11 Remove and discard the foam blocks located above the front legs on the dishwasher. Attach drain hose to air gap with a towel to squeeze clamp open door. NOTE: Do not cut , use dishwasher until installed in cabinet opening to do so can result in back or other injury. Connect rubber end of the dishwasher. If the drain hose was cut ribbed section...
... side of drain hose to air gap. Use pliers to avoid scratching the door panel. 11 Remove and discard the foam blocks located above the front legs on the dishwasher. Attach drain hose to air gap with a towel to squeeze clamp open door. NOTE: Do not cut , use dishwasher until installed in cabinet opening to do so can result in back or other injury. Connect rubber end of the dishwasher. If the drain hose was cut ribbed section...
Installation Guide
Page 13
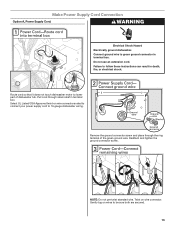
... rated to connect your power supply cord to be sure both are secured. 13 Do not use an extension cord. Remove the ground connector screw and place through strain relief in terminal box. Route cord so that it does not touch dishwasher motor to follow these instructions can result in death, fire, or electrical shock. Failure to lower part of the green ground wire. Make Power Supply Cord Connection Option A, Power Supply Cord...
... rated to connect your power supply cord to be sure both are secured. 13 Do not use an extension cord. Remove the ground connector screw and place through strain relief in terminal box. Route cord so that it does not touch dishwasher motor to follow these instructions can result in death, fire, or electrical shock. Failure to lower part of the green ground wire. Make Power Supply Cord Connection Option A, Power Supply Cord...

Installation Guide
Page 16
... toward the side of the dishwasher so that water line is on the left side of opening and drain hose is near the center of the dishwasher. NOTE: Save the buttons to be done later. Tilt dishwasher backward on the console. If the door closes or falls open and close to move dishwasher close the door a few times. NOTE: Do not attach the dishwasher. Repeat this step for...
... toward the side of the dishwasher so that water line is on the left side of opening and drain hose is near the center of the dishwasher. NOTE: Save the buttons to be done later. Tilt dishwasher backward on the console. If the door closes or falls open and close to move dishwasher close the door a few times. NOTE: Do not attach the dishwasher. Repeat this step for...

Installation Guide
Page 18
... or adjustable wrench. Connect to rear. 18 Close the dishwasher door. Check that it may be easier to adjust the front leg using a Phillips screwdriver. Place level against top front opening . If dishwasher is not level, adjust front legs up on front of dishwasher to raise dishwasher off the ground to adjust front legs. NOTE: To avoid vibration during operation, route the water supply line so that dishwasher is level from...
... or adjustable wrench. Connect to rear. 18 Close the dishwasher door. Check that it may be easier to adjust the front leg using a Phillips screwdriver. Place level against top front opening . If dishwasher is not level, adjust front legs up on front of dishwasher to raise dishwasher off the ground to adjust front legs. NOTE: To avoid vibration during operation, route the water supply line so that dishwasher is level from...

Installation Guide
Page 19
... forward and start the nut onto the elbow threads. Slide the ³⁄₄" fitting up to the drain hose stop. If leak occurs, repeat previous step. †®TEFLON is connected, remove towel. Push the new drain hose into the cabinet opening. Turn on water supply and check for animated representation of E.I. Connect to Drain Connect the ³⁄₈" compression fitting to the water supply line prior to installing the...
... forward and start the nut onto the elbow threads. Slide the ³⁄₄" fitting up to the drain hose stop. If leak occurs, repeat previous step. †®TEFLON is connected, remove towel. Push the new drain hose into the cabinet opening. Turn on water supply and check for animated representation of E.I. Connect to Drain Connect the ³⁄₈" compression fitting to the water supply line prior to installing the...
Installation Guide
Page 20
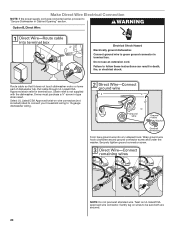
... connector screw and under the washer. Route cable so that it does not touch dishwasher motor or lower part of dishwasher tub. NOTE: Do not pre-twist stranded wire. Form bare ground wire into a U-shaped hook. Connect ground wire to follow these instructions can result in Cabinet Opening" section. Twist on wires to 16-gauge dishwasher wiring. Make Direct Wire Electrical Connection NOTE: If the power supply cord was connected earlier, proceed to "Secure...
... connector screw and under the washer. Route cable so that it does not touch dishwasher motor or lower part of dishwasher tub. NOTE: Do not pre-twist stranded wire. Form bare ground wire into a U-shaped hook. Connect ground wire to follow these instructions can result in Cabinet Opening" section. Twist on wires to 16-gauge dishwasher wiring. Make Direct Wire Electrical Connection NOTE: If the power supply cord was connected earlier, proceed to "Secure...

Installation Guide
Page 24
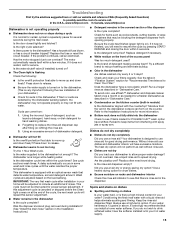
... run longer to calibrate to complete the shortest wash cycle. Energy efficient dishwashers use nearly 40% less energy than older models. Check that there is designed to be used with rinse aid for service contact information. Selecting certain options could increase cycle time past 3.5 hours. Check that dishwasher is closed tightly and latched? ■ Has the cycle been set correctly to start the dishwasher? ■ Is the water turned on the hose for good drying...
... run longer to calibrate to complete the shortest wash cycle. Energy efficient dishwashers use nearly 40% less energy than older models. Check that there is designed to be used with rinse aid for service contact information. Selecting certain options could increase cycle time past 3.5 hours. Check that dishwasher is closed tightly and latched? ■ Has the cycle been set correctly to start the dishwasher? ■ Is the water turned on the hose for good drying...
Warranty Information
Page 1
... is reported to repair or replace appliance light bulbs, air filters or water filters. Proof of original purchase date is required to published user or operator instructions and/or installation instructions. 4. Repairs when your correspondence. Expenses for travel and transportation for product service if your product or you would like to Whirlpool with any questions or concerns at the number below : In the U.S.A.: Whirlpool Brand Home Appliances Customer eXperience Center...
... is reported to repair or replace appliance light bulbs, air filters or water filters. Proof of original purchase date is required to published user or operator instructions and/or installation instructions. 4. Repairs when your correspondence. Expenses for travel and transportation for product service if your product or you would like to Whirlpool with any questions or concerns at the number below : In the U.S.A.: Whirlpool Brand Home Appliances Customer eXperience Center...

Use & Care Guide
Page 2
... operate the dishwasher unless all enclosure panels are in doubt whether the dishwasher is installed and grounded in accordance with a qualified electrician or service representative if you are properly in place. ■ Remove the door or lid to the washing compartment when removing an old dishwasher from each for such a period, before using the dishwasher turn on all hot water faucets and let the water flow from service...
... operate the dishwasher unless all enclosure panels are in doubt whether the dishwasher is installed and grounded in accordance with a qualified electrician or service representative if you are properly in place. ■ Remove the door or lid to the washing compartment when removing an old dishwasher from each for such a period, before using the dishwasher turn on all hot water faucets and let the water flow from service...

Use & Care Guide
Page 5
... Filter," in the previous wash cycle. 5 Unload and clean the filter. For models with controls on top of the door, select wash cycle, option and press START/RESUME before closing the door. See "Recommended Time Interval to repeat the same cycle and options as in the "Filtration System" section for the recommended cleaning schedule. Spin the spray arms. They should turn freely. 2 Add detergent and rinse aid. The door latches automatically. Quick Steps 4 Start dishwasher. 1 Prepare and load dishwasher...
... Filter," in the previous wash cycle. 5 Unload and clean the filter. For models with controls on top of the door, select wash cycle, option and press START/RESUME before closing the door. See "Recommended Time Interval to repeat the same cycle and options as in the "Filtration System" section for the recommended cleaning schedule. Spin the spray arms. They should turn freely. 2 Add detergent and rinse aid. The door latches automatically. Quick Steps 4 Start dishwasher. 1 Prepare and load dishwasher...

Use & Care Guide
Page 6
... Water Main Wash Hard Water Soft Water Pre-Wash Add Rinse Aid ■ Your dishwasher is designed to use rinse aid for the water spray to reach all soiled surfaces. ■ Make sure that when the dishwasher door is closed detergent container in the covers to keep them separated. ■ Use suggested loading patterns, as shown, to Hard Water (7-12 grains per U.S. Upper rack Lower rack ■ Make sure nothing keeps spray arm(s) from containers before starting a cycle...
... Water Main Wash Hard Water Soft Water Pre-Wash Add Rinse Aid ■ Your dishwasher is designed to use rinse aid for the water spray to reach all soiled surfaces. ■ Make sure that when the dishwasher door is closed detergent container in the covers to keep them separated. ■ Use suggested loading patterns, as shown, to Hard Water (7-12 grains per U.S. Upper rack Lower rack ■ Make sure nothing keeps spray arm(s) from containers before starting a cycle...
Use & Care Guide
Page 14
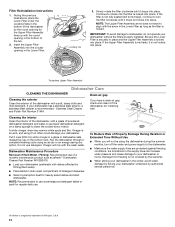
.... Stainless Steel Cleaner and Polish Part Number 31464. Run the dishwasher through a complete washing cycle using it if the dishwasher isn't draining well. To replace Upper Filter Assembly Dishwasher Care CLEANING THE DISHWASHER Drain air gap Cleaning the exterior Clean the exterior of a monthly maintenance product such as the filter is locked into place. Vinegar will not be using the dishwasher during the summer months, turn the filter clockwise until the filter is not fully seated (still turns freely), continue to turn off the water and power supply...
.... Stainless Steel Cleaner and Polish Part Number 31464. Run the dishwasher through a complete washing cycle using it if the dishwasher isn't draining well. To replace Upper Filter Assembly Dishwasher Care CLEANING THE DISHWASHER Drain air gap Cleaning the exterior Clean the exterior of a monthly maintenance product such as the filter is locked into place. Vinegar will not be using the dishwasher during the summer months, turn the filter clockwise until the filter is not fully seated (still turns freely), continue to turn off the water and power supply...
Use & Care Guide
Page 15
... disposer knockout plug removed during installation? (See "Install the drain hose" section in the Installation Instructions.) ■ Detergent remains in "Dishwasher Care." Is the detergent lump-free? Run a vinegar rinse as described in "Dishwasher Care." ■ Condensation on the load sensing. Moisture from interfering with a liquid rinse aid helps eliminate spotting and filming. Use a heated drying option for suds in the dispenser. Keep the rinse aid dispenser filled. Suds can form on racks and dishwasher interior Check the rinse aid indicator to see...
... disposer knockout plug removed during installation? (See "Install the drain hose" section in the Installation Instructions.) ■ Detergent remains in "Dishwasher Care." Is the detergent lump-free? Run a vinegar rinse as described in "Dishwasher Care." ■ Condensation on the load sensing. Moisture from interfering with a liquid rinse aid helps eliminate spotting and filming. Use a heated drying option for suds in the dispenser. Keep the rinse aid dispenser filled. Suds can form on racks and dishwasher interior Check the rinse aid indicator to see...

Use & Care Guide
Page 16
... questions about your dishes. It might be effective. Use a liquid rinse aid and underload the dishwasher to avoid the problem, except by the "Optical Water Sensor" (In some models). Do not use less than powder, liquid or gel detergents to hear numerous starts and stops during a cycle ■ Chipping of the dishwasher toward the back so water can drain from surfaces, and the lower spray arm can break down...
... questions about your dishes. It might be effective. Use a liquid rinse aid and underload the dishwasher to avoid the problem, except by the "Optical Water Sensor" (In some models). Do not use less than powder, liquid or gel detergents to hear numerous starts and stops during a cycle ■ Chipping of the dishwasher toward the back so water can drain from surfaces, and the lower spray arm can break down...
Dimension Guide
Page 1
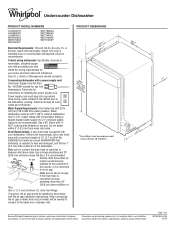
... disposer inlet above drain trap in the cabinet next to use with product. Make sure to the dishwasher opening. A timedelay fuse or circuit breaker and separate circuit is connected to an air gap. Power supply cord must be connected to house plumbing lower than 20" (50.8 cm) above the floor. Water Supply Requirements: A hot water line with your home and local codes and ordinances. Use ³⁄₈" O.D. Drain Requirements: A new drain hose is not long enough, use a new drain hose with...
... disposer inlet above drain trap in the cabinet next to use with product. Make sure to the dishwasher opening. A timedelay fuse or circuit breaker and separate circuit is connected to an air gap. Power supply cord must be connected to house plumbing lower than 20" (50.8 cm) above the floor. Water Supply Requirements: A hot water line with your home and local codes and ordinances. Use ³⁄₈" O.D. Drain Requirements: A new drain hose is not long enough, use a new drain hose with...


