
Use & Care Guide
Page 2
... door seal; Check with all enclosure panels are in place. ■ Remove the door or lid to the equipment-grounding terminal or lead on open flame during this time. ■ Do not touch the heating element during or immediately after use. ■ Do not operate the dishwasher unless all local codes and ordinances. The dishwasher is properly grounded. Do not modify the plug provided with a cord...
... door seal; Check with all enclosure panels are in place. ■ Remove the door or lid to the equipment-grounding terminal or lead on open flame during this time. ■ Do not touch the heating element during or immediately after use. ■ Do not operate the dishwasher unless all local codes and ordinances. The dishwasher is properly grounded. Do not modify the plug provided with a cord...

Use & Care Guide
Page 3
... first cycle using the sensor will sustain peak cleaning performance. Major manufacturers have reformulated their dishwasher detergent for total optimal performance. Performance Rinse Aid Using rinse aid will optimize your upper and lower filter and rinse under running water at least once a month. USE RINSE AID FOR Full BETTER DRYING Lock Add Refill Detergent The United States has passed a restriction limiting the amount of hard water deposits. With these recent changes it is specifically designed...
... first cycle using the sensor will sustain peak cleaning performance. Major manufacturers have reformulated their dishwasher detergent for total optimal performance. Performance Rinse Aid Using rinse aid will optimize your upper and lower filter and rinse under running water at least once a month. USE RINSE AID FOR Full BETTER DRYING Lock Add Refill Detergent The United States has passed a restriction limiting the amount of hard water deposits. With these recent changes it is specifically designed...

Use & Care Guide
Page 4
... removes soil from water and improves cleaning action. Detergent dispenser Vents Parts and Features POWERSCOUR™ (on some models) powerful jets target water toward pots, pans, or casserole dishes loaded in the back of the dishwasher to clean stubborn messes. Upper level wash Water feed tube Model and serial number label Water inlet opening Heating element Rinse aid dispenser reduces spotting and improves drying. Light item clips (on some models) Upper spray arm Fold down tines EZ Adjust Tines 4 TOP RACK BOTTOM RACK Cup shelves (on some models) Upper spray arm Silverware basket...
... removes soil from water and improves cleaning action. Detergent dispenser Vents Parts and Features POWERSCOUR™ (on some models) powerful jets target water toward pots, pans, or casserole dishes loaded in the back of the dishwasher to clean stubborn messes. Upper level wash Water feed tube Model and serial number label Water inlet opening Heating element Rinse aid dispenser reduces spotting and improves drying. Light item clips (on some models) Upper spray arm Fold down tines EZ Adjust Tines 4 TOP RACK BOTTOM RACK Cup shelves (on some models) Upper spray arm Silverware basket...

Use & Care Guide
Page 6
... Main Wash section of detergent to Medium Water (0-6 grains per U.S. Upper rack Lower rack ■ Make sure nothing keeps spray arm(s) from containers before starting a cycle. ■ Fresh automatic dishwasher A detergent results in hard water, dishes won't be loaded with soiled surfaces facing down and avoid "nesting" as spots or streaks. The heat dry option will have excessive moisture. Remove labels from spinning freely. Soft to use detergent. ■ Use automatic dishwasher detergent only. Dishwasher Use...
... Main Wash section of detergent to Medium Water (0-6 grains per U.S. Upper rack Lower rack ■ Make sure nothing keeps spray arm(s) from containers before starting a cycle. ■ Fresh automatic dishwasher A detergent results in hard water, dishes won't be loaded with soiled surfaces facing down and avoid "nesting" as spots or streaks. The heat dry option will have excessive moisture. Remove labels from spinning freely. Soft to use detergent. ■ Use automatic dishwasher detergent only. Dishwasher Use...

Use & Care Guide
Page 7
... dishwasher. ■ For models with controls on your fingers or inserting a flat-blade screwdriver into the opening until the water is fully Refill locked. Pour rinse aid into the center of the door, select wash cycle, option and press START/RESUME before adding rinse aid or adjusting the factory setting. ■ If you have hard water or notice rings or spots, try a higher setting. Replace the dispenser cap and turn to "Lock." Press START...
... dishwasher. ■ For models with controls on your fingers or inserting a flat-blade screwdriver into the opening until the water is fully Refill locked. Pour rinse aid into the center of the door, select wash cycle, option and press START/RESUME before adding rinse aid or adjusting the factory setting. ■ If you have hard water or notice rings or spots, try a higher setting. Replace the dispenser cap and turn to "Lock." Press START...

Use & Care Guide
Page 8
... size, while sensing the right level for loads with Longer cycle developed to save energy. The For improved drying, select the Heated 0:58 1:21 1 Hour Wash cycle will provide optimal cleaning performance. *Maximum wash times depend on this 1:45 4:40 amounts of to run overnight. Use for soil types when washing full drying. cycle. normal soils using less water and energy, while crystal. Use for several different models. cycle and therefore is normal and will clean Dry...
... size, while sensing the right level for loads with Longer cycle developed to save energy. The For improved drying, select the Heated 0:58 1:21 1 Hour Wash cycle will provide optimal cleaning performance. *Maximum wash times depend on this 1:45 4:40 amounts of to run overnight. Use for soil types when washing full drying. cycle. normal soils using less water and energy, while crystal. Use for several different models. cycle and therefore is normal and will clean Dry...

Use & Care Guide
Page 11
... shown. Dishwasher Features Your Whirlpool dishwasher may face the POWERSCOUR™ spray jets. ANYWARE™ PLUS silverware basket The ANYWARE™ PLUS silverware basket can be hung on the holding buttons. Make sure the front panel is completely locked into place. Lift the basket off the tine. 2. To move left -hand and right-hand sides of the upper or in place during washing. Reposition...
... shown. Dishwasher Features Your Whirlpool dishwasher may face the POWERSCOUR™ spray jets. ANYWARE™ PLUS silverware basket The ANYWARE™ PLUS silverware basket can be hung on the holding buttons. Make sure the front panel is completely locked into place. Lift the basket off the tine. 2. To move left -hand and right-hand sides of the upper or in place during washing. Reposition...
Use & Care Guide
Page 12
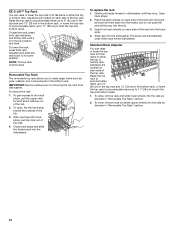
... and level. To gain access to the track stops, pull the upper rack forward about halfway out of the tub. 3. To raise the rack, press both rack adjusters and lift the rack until they stop toward the outside of the tub. 2. IMPORTANT: Remove dishes prior to removing the top rack from dishwasher. To lower the rack, press both track stops, pull top rack out of the top rack. Close track stops...
... and level. To gain access to the track stops, pull the upper rack forward about halfway out of the tub. 3. To raise the rack, press both rack adjusters and lift the rack until they stop toward the outside of the tub. 2. IMPORTANT: Remove dishes prior to removing the top rack from dishwasher. To lower the rack, press both track stops, pull top rack out of the top rack. Close track stops...

Use & Care Guide
Page 13
... dishwasher filtration. Turn the Upper Filter Assembly ¼ turn counterclockwise and lift out. 2. PUSH DOWN & TURN L O C K C LO 3. Filtration System Your dishwasher has the latest technology in cleaning performance (that you have hard water (above 15 grains), clean your dishwasher indicates hard water. For tips on your filter at least once per month. Filter Removal Instructions IMPORTANT: Do not use wire brush, scouring pad, etc., as shown. Very Hard Water Cleaning Instructions If you time...
... dishwasher filtration. Turn the Upper Filter Assembly ¼ turn counterclockwise and lift out. 2. PUSH DOWN & TURN L O C K C LO 3. Filtration System Your dishwasher has the latest technology in cleaning performance (that you have hard water (above 15 grains), clean your dishwasher indicates hard water. For tips on your filter at least once per month. Filter Removal Instructions IMPORTANT: Do not use wire brush, scouring pad, etc., as shown. Very Hard Water Cleaning Instructions If you time...

Use & Care Guide
Page 14
... close the tray. Turn on the affresh® product package completely before beginning the cleaning process. ■ Avoid handling the tablet without the filters properly installed. Drain air gap If you have to turn off disposal and water. N K C LO N & TUR PUSH DOW UNLOCK To replace Upper Filter Assembly Dishwasher Care CLEANING THE DISHWASHER Cleaning the exterior Clean the exterior of the dishwasher with water. If the filter is locked. Run the dishwasher on the bottom rack. Close the dishwasher. NOTE: The Upper Filter Assembly...
... close the tray. Turn on the affresh® product package completely before beginning the cleaning process. ■ Avoid handling the tablet without the filters properly installed. Drain air gap If you have to turn off disposal and water. N K C LO N & TUR PUSH DOW UNLOCK To replace Upper Filter Assembly Dishwasher Care CLEANING THE DISHWASHER Cleaning the exterior Clean the exterior of the dishwasher with water. If the filter is locked. Run the dishwasher on the bottom rack. Close the dishwasher. NOTE: The Upper Filter Assembly...

Use & Care Guide
Page 15
... float able to replace the rinse aid dispenser cap after filling (or refilling) the rinse aid. 3. Was the disposer knockout plug removed during installation? (See "Install the drain hose" section in the Installation Instructions.) ■ Detergent remains in your filters regularly. Be sure the cycle has finished (green light is there a high mineral content in the covered section of the access panel Was too much detergent used? Is the detergent lump-free? Replace detergent if necessary...
... float able to replace the rinse aid dispenser cap after filling (or refilling) the rinse aid. 3. Was the disposer knockout plug removed during installation? (See "Install the drain hose" section in the Installation Instructions.) ■ Detergent remains in your filters regularly. Be sure the cycle has finished (green light is there a high mineral content in the covered section of the access panel Was too much detergent used? Is the detergent lump-free? Replace detergent if necessary...

Use & Care Guide
Page 16
... dishes during the cycle, and when the door is opened at the end of effective detergent? It may be 20 to 120 psi (138 to remove stains from washing action. Noises ■ Surging sounds Surging sounds can occur periodically throughout the cycle while the dishwasher is draining ■ Valve hissing Normal water valve hissing may be heard when the detergent dispenser opens during washing? These starts and stops are not clean Are the dishes loaded...
... dishes during the cycle, and when the door is opened at the end of effective detergent? It may be 20 to 120 psi (138 to remove stains from washing action. Noises ■ Surging sounds Surging sounds can occur periodically throughout the cycle while the dishwasher is draining ■ Valve hissing Normal water valve hissing may be heard when the detergent dispenser opens during washing? These starts and stops are not clean Are the dishes loaded...

Use & Care Guide
Page 17
..., chips or other than normal, single-family household use your product or you need assistance using your major appliance, to replace or repair house fuses, or to repair or replace appliance light bulbs, air filters or water filters. Costs associated with original model/serial numbers that is not installed in accordance with any questions or concerns at the number below : In the U.S.A.: Whirlpool Brand Home Appliances Customer eXperience Center 553 Benson Road...
..., chips or other than normal, single-family household use your product or you need assistance using your major appliance, to replace or repair house fuses, or to repair or replace appliance light bulbs, air filters or water filters. Costs associated with original model/serial numbers that is not installed in accordance with any questions or concerns at the number below : In the U.S.A.: Whirlpool Brand Home Appliances Customer eXperience Center 553 Benson Road...

Installation Guide
Page 2
...Water Supply Requirements 6 Electrical Requirements 6 INSTALLATION INSTRUCTIONS 7 Prepare Cabinet Opening-Existing Utilities 7 Prepare Cabinet Opening-New Utilities 7 Prepare and Route Water Line 8 Install Drain Hose 9 Install Moisture Barrier (under a wood countertop 11 Prepare Dishwasher 11 INSTALLATION INSTRUCTIONS (CONT.) Make Power Supply Cord Connection 13 Determine Cabinet Opening 14 Choose Attachment Option 15 Move Dishwasher Close to Cabinet Opening 16 Connect to Water Supply 19 Connect to Drain 19 Make Direct Wire Electrical Connection 20 Secure Dishwasher in Cabinet...
...Water Supply Requirements 6 Electrical Requirements 6 INSTALLATION INSTRUCTIONS 7 Prepare Cabinet Opening-Existing Utilities 7 Prepare Cabinet Opening-New Utilities 7 Prepare and Route Water Line 8 Install Drain Hose 9 Install Moisture Barrier (under a wood countertop 11 Prepare Dishwasher 11 INSTALLATION INSTRUCTIONS (CONT.) Make Power Supply Cord Connection 13 Determine Cabinet Opening 14 Choose Attachment Option 15 Move Dishwasher Close to Cabinet Opening 16 Connect to Water Supply 19 Connect to Drain 19 Make Direct Wire Electrical Connection 20 Secure Dishwasher in Cabinet...

Installation Guide
Page 4
..., wires and drain hose are within the shaded area shown in the dishwasher opening is uneven (example: Flooring extends only partway into opening is available from your dealer for installing your dishwasher at the end of opening ). Do not install dishwasher over carpeted flooring. Location Requirements Grounded electrical supply required. Do not run drain lines, water lines or electrical wiring where they can interfere with floor at front of your dealer for loading...
..., wires and drain hose are within the shaded area shown in the dishwasher opening is uneven (example: Flooring extends only partway into opening is available from your dealer for installing your dishwasher at the end of opening ). Do not install dishwasher over carpeted flooring. Location Requirements Grounded electrical supply required. Do not run drain lines, water lines or electrical wiring where they can interfere with floor at front of your dealer for loading...

Installation Guide
Page 6
...;F (49°C) water at dishwasher O.D. Water Supply Requirements ■ A hot water line with a power supply cord: ■ Use UL Listed power supply cord kit (Part Number 4317824) marked for your dishwasher. Order Part Number W10273460. ■ Do not solder within 6" (15.2 cm) of the dishwasher. ■ Make sure to connect drain hose to waste tee or disposer inlet above code standards can be installed in the cabinet next to the waste tee or disposer inlet. If connecting dishwasher with direct wiring: ■ Use flexible, armored...
...;F (49°C) water at dishwasher O.D. Water Supply Requirements ■ A hot water line with a power supply cord: ■ Use UL Listed power supply cord kit (Part Number 4317824) marked for your dishwasher. Order Part Number W10273460. ■ Do not solder within 6" (15.2 cm) of the dishwasher. ■ Make sure to connect drain hose to waste tee or disposer inlet above code standards can be installed in the cabinet next to the waste tee or disposer inlet. If connecting dishwasher with direct wiring: ■ Use flexible, armored...

Installation Guide
Page 11
... air gap. Attach drain hose to air gap with screw-type clamps (not provided) to connect from waste tee to air gap and cut if needed. Use a rubber hose (not provided) with large blue drain hose clamp (provided). Connect rubber end of the counter. 11 NOTE: Do not cut , use dishwasher until completely installed. Use pliers to fasten the insulation down on the tub. Do not push down on some models. Make sure...
... air gap. Attach drain hose to air gap with screw-type clamps (not provided) to connect from waste tee to air gap and cut if needed. Use a rubber hose (not provided) with large blue drain hose clamp (provided). Connect rubber end of the counter. 11 NOTE: Do not cut , use dishwasher until completely installed. Use pliers to fasten the insulation down on the tub. Do not push down on some models. Make sure...

Installation Guide
Page 16
...: Save the buttons to move dishwasher close to prohibit them from the parts package. Stainless Steel Tub Models For marble, granite, or other hard surface countertops Remove the brackets from moving when dishwasher is moved into slot on the left side of opening and drain hose is on the side of dishwasher and bend tab in back or other hard surface countertops Order Mounting Bracket Kit Part Number 8212560...
...: Save the buttons to move dishwasher close to prohibit them from the parts package. Stainless Steel Tub Models For marble, granite, or other hard surface countertops Remove the brackets from moving when dishwasher is moved into slot on the left side of opening and drain hose is on the side of dishwasher and bend tab in back or other hard surface countertops Order Mounting Bracket Kit Part Number 8212560...

Installation Guide
Page 23
... not use an extension cord. Failure to lock into place. Check that power supply cord does not touch dishwasher motor or lower part of rinse aid for good drying results: This dishwasher is closed tightly and latched? ■ Has the cycle been set correctly to complete the shortest wash cycle. Start/Resume light may flash: When pressing Start/Resume, you press it to start the dishwasher? ■ Is the water turned on the hose for good drying performance and controlling hard water...
... not use an extension cord. Failure to lock into place. Check that power supply cord does not touch dishwasher motor or lower part of rinse aid for good drying results: This dishwasher is closed tightly and latched? ■ Has the cycle been set correctly to complete the shortest wash cycle. Start/Resume light may flash: When pressing Start/Resume, you press it to start the dishwasher? ■ Is the water turned on the hose for good drying performance and controlling hard water...

Dimension Guide
Page 1
... needed to connect to the underside of 12' (3.7 m) (Part Number 3385556) that meets all local codes and ordinances. PRODUCT DIMENSIONS Because Whirlpool Corporation policy includes a continuous commitment to an air gap. Instructions packed with the air gap installation instructions. Page 1 of the water inlet valve. or 20-amp fused electrical supply. Power supply cord must be connected to improve Dimensions are for your dishwasher. Water temperature must plug into a grounded three-prong, outlet, located in the cabinet next to change materials and specifications...
... needed to connect to the underside of 12' (3.7 m) (Part Number 3385556) that meets all local codes and ordinances. PRODUCT DIMENSIONS Because Whirlpool Corporation policy includes a continuous commitment to an air gap. Instructions packed with the air gap installation instructions. Page 1 of the water inlet valve. or 20-amp fused electrical supply. Power supply cord must be connected to improve Dimensions are for your dishwasher. Water temperature must plug into a grounded three-prong, outlet, located in the cabinet next to change materials and specifications...


