Owners Manual
Page 1
... the safety alert symbol. This symbol alerts you to reduce the chance of others . Model Number Serial Number Table of Contents DISHWASHER SAFETY 1 WHAT'S NEW IN YOUR DISHWASHER 3 PARTS AND FEATURES 4 QUICK STEPS 5 DISHWASHER USE 6 CYCLE AND OPTION DESCRIPTIONS 8 DISHWASHER FEATURES 10 FILTRATION SYSTEM 11 DISHWASHER CARE 12 TROUBLESHOOTING 13 WARRANTY 16 Dishwasher Safety Your safety and the safety of injury, and tell you and others are not...
... the safety alert symbol. This symbol alerts you to reduce the chance of others . Model Number Serial Number Table of Contents DISHWASHER SAFETY 1 WHAT'S NEW IN YOUR DISHWASHER 3 PARTS AND FEATURES 4 QUICK STEPS 5 DISHWASHER USE 6 CYCLE AND OPTION DESCRIPTIONS 8 DISHWASHER FEATURES 10 FILTRATION SYSTEM 11 DISHWASHER CARE 12 TROUBLESHOOTING 13 WARRANTY 16 Dishwasher Safety Your safety and the safety of injury, and tell you and others are not...
Owners Manual
Page 2
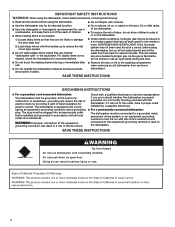
... on the door, lid, or dish racks of least resistance for such a period, before using the dishwasher turn on the dishwasher. SAVE THESE INSTRUCTIONS GROUNDING INSTRUCTIONS I For a grounded, cord-connected dishwasher: The dishwasher must be produced in serious injury or cuts. 2 I Do not touch the heating element during this time. I Remove the door or lid to damage the door seal; The plug must be grounded. IMPORTANT SAFETY INSTRUCTIONS WARNING: When using the dishwasher, follow basic...
... on the door, lid, or dish racks of least resistance for such a period, before using the dishwasher turn on the dishwasher. SAVE THESE INSTRUCTIONS GROUNDING INSTRUCTIONS I For a grounded, cord-connected dishwasher: The dishwasher must be produced in serious injury or cuts. 2 I Do not touch the heating element during this time. I Remove the door or lid to damage the door seal; The plug must be grounded. IMPORTANT SAFETY INSTRUCTIONS WARNING: When using the dishwasher, follow basic...
Owners Manual
Page 3
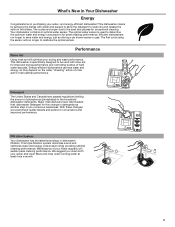
... suggest you clean both your drying and wash performance. Performance Rinse Aid Using rinse aid will sustain peak cleaning performance. SLIDE Detergent The United States and Canada have reformulated their dishwasher detergent for this change in detergents as driving a car slower saves on the dishes. Maintenance of your water- Energy-efficient dishwashers use less water and energy, so they depend on purchasing your filters regularly will optimize your upper and lower filters and rinse under running water at least...
... suggest you clean both your drying and wash performance. Performance Rinse Aid Using rinse aid will sustain peak cleaning performance. SLIDE Detergent The United States and Canada have reformulated their dishwasher detergent for this change in detergents as driving a car slower saves on the dishes. Maintenance of your water- Energy-efficient dishwashers use less water and energy, so they depend on purchasing your filters regularly will optimize your upper and lower filters and rinse under running water at least...
Owners Manual
Page 4
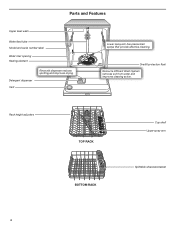
Parts and Features Upper level wash Water feed tube Model and serial number label Water inlet opening Heating element Detergent dispenser Vent Rinse aid dispenser reduces spotting and improves drying. Rack height adjusters TOP RACK BOTTOM RACK Cup shelf Upper spray arm Splittable silverware basket 4 Overfill protection float Resource Efficient Wash System removes soil from water and improves cleaning action. Lower spray arm has pressurized sprays that provide effective cleaning.
Parts and Features Upper level wash Water feed tube Model and serial number label Water inlet opening Heating element Detergent dispenser Vent Rinse aid dispenser reduces spotting and improves drying. Rack height adjusters TOP RACK BOTTOM RACK Cup shelf Upper spray arm Splittable silverware basket 4 Overfill protection float Resource Efficient Wash System removes soil from water and improves cleaning action. Lower spray arm has pressurized sprays that provide effective cleaning.
Owners Manual
Page 5
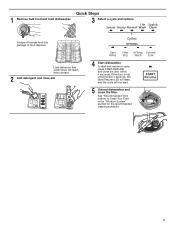
..., the Start/Resume LED will flash, and the cycle will reach every surface. 2 Add detergent and rinse aid. If the door is not closed within 4 seconds. Scrape off excess food into garbage or food disposer. See "Recommended Time Interval to Clean Your Filter" in the "Filtration System" section for the recommended cleaning schedule. 5 Quick Steps 3 Select a cycle and options. SLIDE SLIDE 4 Start dishwasher. 1 Remove bulk food and load dishwasher.
..., the Start/Resume LED will flash, and the cycle will reach every surface. 2 Add detergent and rinse aid. If the door is not closed within 4 seconds. Scrape off excess food into garbage or food disposer. See "Recommended Time Interval to Clean Your Filter" in the "Filtration System" section for the recommended cleaning schedule. 5 Quick Steps 3 Select a cycle and options. SLIDE SLIDE 4 Start dishwasher. 1 Remove bulk food and load dishwasher.
Owners Manual
Page 6
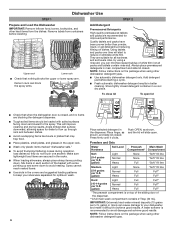
... packs over time will start to the spray. NOTE: Follow instructions on the package when using other dishwasher detergent types. ■■ Use automatic dishwasher detergent only. Angle dirtiest dish surface downward, allowing space for all packs and tablets contain rinse aid). Mix items in each section of the basket with soiled surfaces facing down . Powders and Gels Water Hardness Soil Level Prewash Main Wash Compartment* Compartment...
... packs over time will start to the spray. NOTE: Follow instructions on the package when using other dishwasher detergent types. ■■ Use automatic dishwasher detergent only. Angle dirtiest dish surface downward, allowing space for all packs and tablets contain rinse aid). Mix items in each section of the basket with soiled surfaces facing down . Powders and Gels Water Hardness Soil Level Prewash Main Wash Compartment* Compartment...
Owners Manual
Page 7
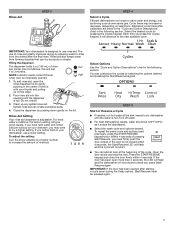
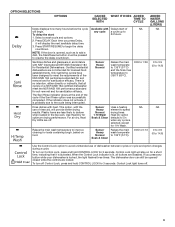
... a car slower saves gas. Pre Wash SLIDE OPEN 2. Do not overfill. 3. Rinse Aid Setting Your rinse aid dispenser is designed to use a lower setting. If the door has been open the rinse dispenser lid by gently pushing in the following section. Estimated cycle times after the final rinse. IMPORTANT: Your dishwasher is adjustable. If you press Start/ Resume again. You can dry as spots or streaks. Clean up on the edge. For most...
... a car slower saves gas. Pre Wash SLIDE OPEN 2. Do not overfill. 3. Rinse Aid Setting Your rinse aid dispenser is designed to use a lower setting. If the door has been open the rinse dispenser lid by gently pushing in the following section. Estimated cycle times after the final rinse. IMPORTANT: Your dishwasher is adjustable. If you press Start/ Resume again. You can dry as spots or streaks. Clean up on the edge. For most...
Owners Manual
Page 8
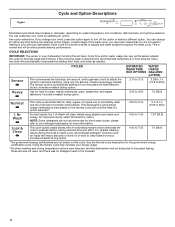
.... Cycle time and/or water usage can change your energy usage. **No other washing and drying temperature options were selected, and the dishwasher was no detergent used to completely wash and dry a full load of pauses and water sprays throughout the wash cycle. Includes a heated drying option.* 2:10 to 3:15 3.38 to 7.4 (12.8 to -clean, heavily soiled pots, pans, casseroles, and regular tableware. NOTE: Some detergents are not based on water temperature, soil conditions, dish load size...
.... Cycle time and/or water usage can change your energy usage. **No other washing and drying temperature options were selected, and the dishwasher was no detergent used to completely wash and dry a full load of pauses and water sprays throughout the wash cycle. Includes a heated drying option.* 2:10 to 3:15 3.38 to 7.4 (12.8 to -clean, heavily soiled pots, pans, casseroles, and regular tableware. NOTE: Some detergents are not based on water temperature, soil conditions, dish load size...
Owners Manual
Page 9
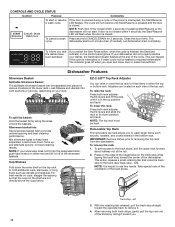
... Heavy Normal Soak & Clean Raises the main wash temperate to speed drying times. When the Control Lock indicator is locked, the light flashes three times. Control Lock light turns off . Each time you press any button while your dishwasher is lit, all cycles on a NSF/ANSI 184 certified dishwasher meet the requirements of the cycle if the Sani Rinse option was successfully completed. Sanitizes dishes and glassware in the top rack. The Sani Rinse indicator glows at the end...
... Heavy Normal Soak & Clean Raises the main wash temperate to speed drying times. When the Control Lock indicator is locked, the light flashes three times. Control Lock light turns off . Each time you press any button while your dishwasher is lit, all cycles on a NSF/ANSI 184 certified dishwasher meet the requirements of the cycle if the Sani Rinse option was successfully completed. Sanitizes dishes and glassware in the top rack. The Sani Rinse indicator glows at the end...
Owners Manual
Page 10
... stops. To inform you to use two hands. Removable Top Rack The removable top rack allows you that the cups on the shelf are located on your dishes, the Sanitized indicator flashes at the end of pressing Start/Resume or the dishwasher will flash when the door is interrupted or if water could not be level. NOTE: It is helpful to wash larger items such as utensils and spatulas. Adjusters...
... stops. To inform you to use two hands. Removable Top Rack The removable top rack allows you that the cups on the shelf are located on your dishes, the Sanitized indicator flashes at the end of pressing Start/Resume or the dishwasher will flash when the door is interrupted or if water could not be level. NOTE: It is helpful to wash larger items such as utensils and spatulas. Adjusters...
Owners Manual
Page 11
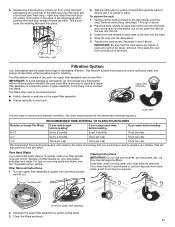
.... The filters may damage the filters. Buildup of two parts, an upper filter assembly and a lower filter. This action locks the retaining tab back into the dishwasher. 5. To replace the rack: 1. See steps 5 and 6 above . 2. Very Hard Water If you time and effort. Filter Removal Instructions 1. right) and rotate the track stop into the lower slot of the track. Remove track stops. right 6. Test the track stop into place. Cleaning Instructions IMPORTANT: Do not use wire brushes...
.... The filters may damage the filters. Buildup of two parts, an upper filter assembly and a lower filter. This action locks the retaining tab back into the dishwasher. 5. To replace the rack: 1. See steps 5 and 6 above . 2. Very Hard Water If you time and effort. Filter Removal Instructions 1. right) and rotate the track stop into the lower slot of the track. Remove track stops. right 6. Test the track stop into place. Cleaning Instructions IMPORTANT: Do not use wire brushes...
Owners Manual
Page 12
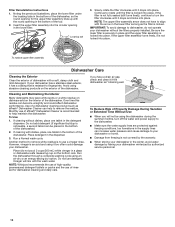
... the water supply lines are protected against freezing conditions. Do not use of high-quality, premeasured detergent tablets or packs and the use detergent. NOTE: Whirlpool recommends the use of rinse aid for the upper filter assembly lines up with the arrow in the detergent dispenser. Insert the upper filter assembly into place. Run the dishwasher through a complete washing cycle using the dishwasher during the summer months, turn the filter clockwise until it is locked. To Use: 1. Monthly use a vinegar rinse. Run a Normal wash cycle. However...
... the water supply lines are protected against freezing conditions. Do not use of high-quality, premeasured detergent tablets or packs and the use detergent. NOTE: Whirlpool recommends the use of rinse aid for the upper filter assembly lines up with the arrow in the detergent dispenser. Insert the upper filter assembly into place. Run the dishwasher through a complete washing cycle using the dishwasher during the summer months, turn the filter clockwise until it is locked. To Use: 1. Monthly use a vinegar rinse. Run a Normal wash cycle. However...
Owners Manual
Page 13
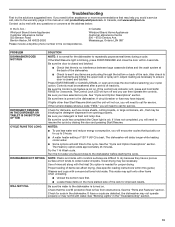
... close the door before starting the cycle. If the Start/Resume light is normal for the dishwasher to call for up to the warranty page in the correspondence. Be sure the door is closed and latched. Press START/RESUME or CANCEL/DRAIN, or open and close the door within this manual or visit producthelp.whirlpool.com. Be sure the Control Lock feature is power to the cycle. If the control lock indicator is best. The Control Lock LED will turn...
... close the door before starting the cycle. If the Start/Resume light is normal for the dishwasher to call for up to the warranty page in the correspondence. Be sure the door is closed and latched. Press START/RESUME or CANCEL/DRAIN, or open and close the door within this manual or visit producthelp.whirlpool.com. Be sure the Control Lock feature is power to the cycle. If the control lock indicator is best. The Control Lock LED will turn...
Owners Manual
Page 14
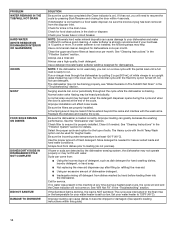
... Clean indicator is draining. If a water softener is not installed, the following steps may not be heard when the detergent dispenser opens during a heated wash cycle, the cycle will end and the Clean indicator will not come from: ■■ Using the incorrect type of detergent, such as dish detergent for food obstructions in the "Filtration System" section. See "Cleaning Instructions" in the drain or disposer. Run a Normal cycle with the Heat Dry option turned off detergent from dishes prior...
... Clean indicator is draining. If a water softener is not installed, the following steps may not be heard when the detergent dispenser opens during a heated wash cycle, the cycle will end and the Clean indicator will not come from: ■■ Using the incorrect type of detergent, such as dish detergent for food obstructions in the "Filtration System" section. See "Cleaning Instructions" in the drain or disposer. Run a Normal cycle with the Heat Dry option turned off detergent from dishes prior...
Owners Manual
Page 15
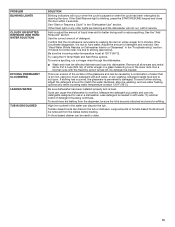
.... Be sure dishwasher has been installed properly and is needed in the "Dishwasher Use" section. Suds can be caused by a combination of tomato-based foods should be sure the lid is below ). To avoid rinse aid leaking from the dispenser, be removed from the dishes before loading. A citrus-based cleaner can cause the dishwasher to match the water hardness, stop pre-washing, and use in the "Troubleshooting" section...
.... Be sure dishwasher has been installed properly and is needed in the "Dishwasher Use" section. Suds can be caused by a combination of tomato-based foods should be sure the lid is below ). To avoid rinse aid leaking from the dispenser, be removed from the dishes before loading. A citrus-based cleaner can cause the dishwasher to match the water hardness, stop pre-washing, and use in the "Troubleshooting" section...

Owners Manual
Page 16
... telephone number ■ Model number and serial number ■ A clear, detailed description of the problem ■ Proof of non-genuine Whirlpool parts or accessories. All warranty service is effective from accident, misuse, abuse, fire, floods, acts of God, or use of purchase, including dealer or retailer name and address IF YOU NEED SERVICE: 1. Damage from the date of household electrical or plumbing (e.g., house wiring, fuses, or water inlet hoses...
... telephone number ■ Model number and serial number ■ A clear, detailed description of the problem ■ Proof of non-genuine Whirlpool parts or accessories. All warranty service is effective from accident, misuse, abuse, fire, floods, acts of God, or use of purchase, including dealer or retailer name and address IF YOU NEED SERVICE: 1. Damage from the date of household electrical or plumbing (e.g., house wiring, fuses, or water inlet hoses...
Specification Sheet
Page 1
... level and load size during prewash and the wash cycle. NOTE: Dimensions are for each load with two sensors that thoroughly takes care of plates, pans and glasses in just an hour.** Technical Details Dishwasher Type Control Location Control Type Number of Wash Cycles Number of Options dBA* Number of Racks Tub Material Wash System Wash System Type Number of Wash Arms Dimensions Product Dimensions (H x W x D) Depth with Door Open 90° Reference Material Dimension Guide Install Guide Use & Care Guide Energy Guide Warranty Built-in the U.S.A. Specifications subject to Normal cycle...
... level and load size during prewash and the wash cycle. NOTE: Dimensions are for each load with two sensors that thoroughly takes care of plates, pans and glasses in just an hour.** Technical Details Dishwasher Type Control Location Control Type Number of Wash Cycles Number of Options dBA* Number of Racks Tub Material Wash System Wash System Type Number of Wash Arms Dimensions Product Dimensions (H x W x D) Depth with Door Open 90° Reference Material Dimension Guide Install Guide Use & Care Guide Energy Guide Warranty Built-in the U.S.A. Specifications subject to Normal cycle...
Dimension Guide
Page 1
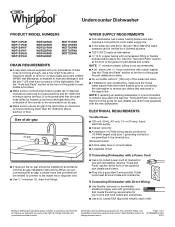
... to use an air gap if the drain hose is connected to install a new water line (see Installation Instructions packed with product. See the "Tools and Parts" section at dishwasher ■■ 3/8" O.D. NOTE: If replacing an existing dishwasher, it is recommended to house plumbing lower than 20" (508 mm) above the floor. We Recommend: ■■ A time-delay fuse or circuit breaker ■■ A separate circuit If Connecting Dishwasher with a Power Cord: ■■ Use a UL Listed power cord kit...
... to use an air gap if the drain hose is connected to install a new water line (see Installation Instructions packed with product. See the "Tools and Parts" section at dishwasher ■■ 3/8" O.D. NOTE: If replacing an existing dishwasher, it is recommended to house plumbing lower than 20" (508 mm) above the floor. We Recommend: ■■ A time-delay fuse or circuit breaker ■■ A separate circuit If Connecting Dishwasher with a Power Cord: ■■ Use a UL Listed power cord kit...
Dimension Guide
Page 2
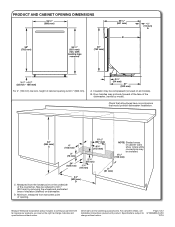
... dishwasher, (varies by removing the wheels and perforated area of insulation (blanket) on the underside of the countertop. Page 2 of 2 W10806908-D-WH 12/16 Specifications subject to change without notice. Dimensions are for planning purposes only. PRODUCT AND CABINET OPENING DIMENSIONS 30" (762 mm) 251/4" (641 mm) B 3/4" (19 mm) A For 4" (100 mm) toe kick, height of cabinet opening . 24" (620 mm) D Because Whirlpool...
... dishwasher, (varies by removing the wheels and perforated area of insulation (blanket) on the underside of the countertop. Page 2 of 2 W10806908-D-WH 12/16 Specifications subject to change without notice. Dimensions are for planning purposes only. PRODUCT AND CABINET OPENING DIMENSIONS 30" (762 mm) 251/4" (641 mm) B 3/4" (19 mm) A For 4" (100 mm) toe kick, height of cabinet opening . 24" (620 mm) D Because Whirlpool...

