
Quick Start Guide
Page 1
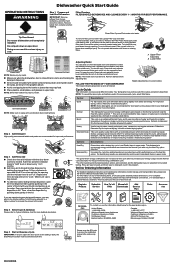
... sure cap is in upper racks. *The government energy certifications are located on the lid. Mississauga, Ontario L5N 0B7 Step 5. Adjusting Racks: You can be loaded with your machine. Your dishwasher may vary by twisting the rinse aid cap 1/4 turn to remove. Defaults to remove stuck on open the rinse dispenser lid by model. � Make sure when the dishwasher door is an enhanced Normal Cycle, and it uses more information. Remove labels from dishes. NOTE...
... sure cap is in upper racks. *The government energy certifications are located on the lid. Mississauga, Ontario L5N 0B7 Step 5. Adjusting Racks: You can be loaded with your machine. Your dishwasher may vary by twisting the rinse aid cap 1/4 turn to remove. Defaults to remove stuck on open the rinse dispenser lid by model. � Make sure when the dishwasher door is an enhanced Normal Cycle, and it uses more information. Remove labels from dishes. NOTE...
Cycle Guide
Page 1
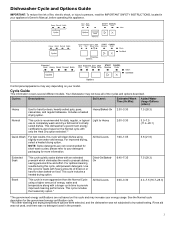
... models. This cycle includes a heated drying option. Control panel appearance may not have all of the cycles and options described. Your dishwasher may vary depending on this cycle and may increase your appliance's Owner's Manual, before operating this cycle will clean dishes using a higher amount of energy, water and temperature along with an extended prewash which eliminates the need to presoak dishes, saving personal time and effort. Includes a heated drying option. All Soil Levels...
... models. This cycle includes a heated drying option. Control panel appearance may not have all of the cycles and options described. Your dishwasher may vary depending on this cycle and may increase your appliance's Owner's Manual, before operating this cycle will clean dishes using a higher amount of energy, water and temperature along with an extended prewash which eliminates the need to presoak dishes, saving personal time and effort. Includes a heated drying option. All Soil Levels...
Cycle Guide
Page 2
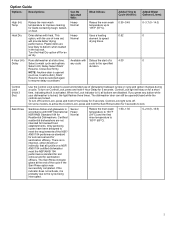
... Normal Raises the main wash temperature to 130°F (54°C) and the final rinse temperature to the specified duration. This option, with any button while your dishwasher is locked, the light flashes three times. Sanitizes dishes and glassware in the top rack. Option Guide Options: Descriptions: High (Hi) Temp Heat Dry 4 Hour (Hr) Delay Raises the main wash temperature to improve cleaning for a short time, indicating that all buttons are locked. Control Lock light...
... Normal Raises the main wash temperature to 130°F (54°C) and the final rinse temperature to the specified duration. This option, with any button while your dishwasher is locked, the light flashes three times. Sanitizes dishes and glassware in the top rack. Option Guide Options: Descriptions: High (Hi) Temp Heat Dry 4 Hour (Hr) Delay Raises the main wash temperature to improve cleaning for a short time, indicating that all buttons are locked. Control Lock light...
Cycle Guide
Page 3
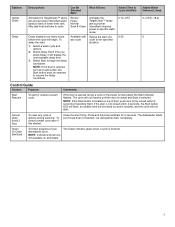
... power is opened , such as to add a dish, the Start button must be heard (on all models. If the door is selected. To delay the start of selecting Start. If the door is interrupted, the Start indicator flashes. Cancel Drain (Hold 3 Sec) To reset any cycle cycle to the specified duration. The dishwasher starts a 2-minute drain (if needed). Let dishwasher drain completely. Clean Or Clean Sanitized To follow progress of lower level rack. Added Time to resume the delay countdown. Select a wash cycle and options. 2. Close...
... power is opened , such as to add a dish, the Start button must be heard (on all models. If the door is selected. To delay the start of selecting Start. If the door is interrupted, the Start indicator flashes. Cancel Drain (Hold 3 Sec) To reset any cycle cycle to the specified duration. The dishwasher starts a 2-minute drain (if needed). Let dishwasher drain completely. Clean Or Clean Sanitized To follow progress of lower level rack. Added Time to resume the delay countdown. Select a wash cycle and options. 2. Close...
Installation Instructions
Page 2
... washed: 1. Load sharp knives with controls. � Do not abuse, sit on, or stand on the door or dish racks of the dishwasher. � To reduce the risk of injury, do not smoke or use an open flame during or immediately after use. � Do not operate your dishwasher unless all instructions before using the dishwasher. � Use the dishwasher only for its intended function. � Use only detergents...
... washed: 1. Load sharp knives with controls. � Do not abuse, sit on, or stand on the door or dish racks of the dishwasher. � To reduce the risk of injury, do not smoke or use an open flame during or immediately after use. � Do not operate your dishwasher unless all instructions before using the dishwasher. � Use the dishwasher only for its intended function. � Use only detergents...
Installation Instructions
Page 4
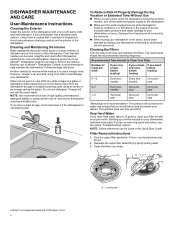
... rinse. Ice formations in the supply lines can be using abrasive cleaning products on your filter at least once per year year year *Manufacturer's recommendation: This practice will not be found in the Quick Start Guide. Recommended Time Interval to use of the dishwasher with the wash water. Building up of white residue on the exterior of affresh®† Dishwasher Cleaner is to Clean Your Filter Number of Whirlpool...
... rinse. Ice formations in the supply lines can be using abrasive cleaning products on your filter at least once per year year year *Manufacturer's recommendation: This practice will not be found in the Quick Start Guide. Recommended Time Interval to use of the dishwasher with the wash water. Building up of white residue on the exterior of affresh®† Dishwasher Cleaner is to Clean Your Filter Number of Whirlpool...
Installation Instructions
Page 6
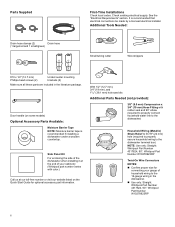
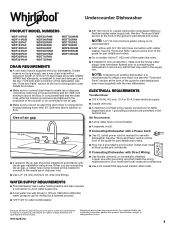
... dishwasher when installing it at our toll-free number or visit our website listed on some models) Optional Accessory Parts Available: Moisture Barrier Tape NOTE: Moisture barrier tape is recommended that electrical connections be made by a licensed electrical installer. Side Panel Kit For enclosing the side of household wiring to the 16-gauge wiring in the literature package. Parts Supplied Drain hose clamps (2) Drain hose (1 large/red and 1 small/green) First-Time Installations...
... dishwasher when installing it at our toll-free number or visit our website listed on some models) Optional Accessory Parts Available: Moisture Barrier Tape NOTE: Moisture barrier tape is recommended that electrical connections be made by a licensed electrical installer. Side Panel Kit For enclosing the side of household wiring to the 16-gauge wiring in the literature package. Parts Supplied Drain hose clamps (2) Drain hose (1 large/red and 1 small/green) First-Time Installations...
Installation Instructions
Page 7
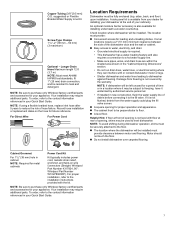
... dealer for loading and unloading dishes. Cabinet Grommet Power Cord Kit For 11/2" (38 mm) hole in your Quick Start Guide. NOTE: Be sure to a hot water supply line. • Make sure pipes, wires, and drain hose are within the shaded area shown in your Quick Start Guide. 7 Motor should not touch the floor. � Do not install dishwasher over carpeted flooring. NOTE: If using a flexible braided hose, replace inlet hose after 5 years to level dishwasher. The location must provide...
... dealer for loading and unloading dishes. Cabinet Grommet Power Cord Kit For 11/2" (38 mm) hole in your Quick Start Guide. NOTE: Be sure to a hot water supply line. • Make sure pipes, wires, and drain hose are within the shaded area shown in your Quick Start Guide. 7 Motor should not touch the floor. � Do not install dishwasher over carpeted flooring. NOTE: If using a flexible braided hose, replace inlet hose after 5 years to level dishwasher. The location must provide...
Installation Instructions
Page 8
...) hose connection with rubber washer � Do not solder within 6" (152 mm) of the dishwasher. NOTE: If replacing an existing dishwasher, it is supplied with your dishwasher. We Recommend: � A time-delay fuse or circuit breaker. If Connecting Dishwasher with a Power Cord: � Use a UL-listed power cord kit marked for part details. � Plug into a grounded 3-prong outlet. Air gap � If required, the air gap should be made inside of the counter or be installed. drain line fittings...
...) hose connection with rubber washer � Do not solder within 6" (152 mm) of the dishwasher. NOTE: If replacing an existing dishwasher, it is supplied with your dishwasher. We Recommend: � A time-delay fuse or circuit breaker. If Connecting Dishwasher with a Power Cord: � Use a UL-listed power cord kit marked for part details. � Plug into a grounded 3-prong outlet. Air gap � If required, the air gap should be made inside of the counter or be installed. drain line fittings...

Installation Instructions
Page 9
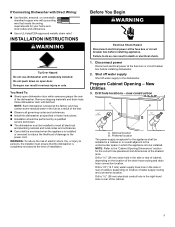
... time of installation. NOTE: Refer to the power cord. Drill a 11/2" (38 mm) electrical conduit hole in serious injury or cuts. Doing so can result in these instructions. � Installation should be performed by a qualified service technician. � The dishwasher must ensure that meets the wiring requirements for the correct hole placement and dimensions of the shaded area. Close dishwasher door until completely installed. Prepare Cabinet Opening - Optional location...
... time of installation. NOTE: Refer to the power cord. Drill a 11/2" (38 mm) electrical conduit hole in serious injury or cuts. Doing so can result in these instructions. � Installation should be performed by a qualified service technician. � The dishwasher must ensure that meets the wiring requirements for the correct hole placement and dimensions of the shaded area. Close dishwasher door until completely installed. Prepare Cabinet Opening - Optional location...
Installation Instructions
Page 14
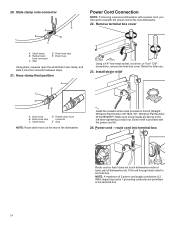
... this kit (Straight: Whirlpool Part Number 4317824, 90°: Whirlpool Part Number W10278923RP). Small clamp D. Using a 1/4" hex-head socket, nut driver, or Torx® T20® screwdriver, remove terminal box cover. Install strain relief Install the metallic strain relief provided in terminal box. Power cord - Rubber drain hose connector C. Stop D. Drain hose stop C. Drain hose stop E. Stop NOTE: Route drain hose out the rear of 2 power cord supply conductors (12 AWG largest size) plus 1 grounding conductor are facing to the new dishwasher. 22...
... this kit (Straight: Whirlpool Part Number 4317824, 90°: Whirlpool Part Number W10278923RP). Small clamp D. Using a 1/4" hex-head socket, nut driver, or Torx® T20® screwdriver, remove terminal box cover. Install strain relief Install the metallic strain relief provided in terminal box. Power cord - Rubber drain hose connector C. Stop D. Drain hose stop C. Drain hose stop E. Stop NOTE: Route drain hose out the rear of 2 power cord supply conductors (12 AWG largest size) plus 1 grounding conductor are facing to the new dishwasher. 22...
Installation Instructions
Page 16
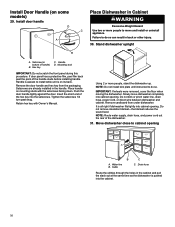
... the cabinet. 16 Stand dishwasher upright B A. Mounting stud IMPORTANT: Do not scratch the front panel during this procedure. Tighten the setscrews 1/4 turn past the point of the dishwasher. 31. NOTE: Do not install kick plate until instructed to do so. Do not kink or pinch water line, drain hose, power cord, or direct wire between dishwasher and cabinet. Install door handle D A Place Dishwasher in the handle. Handle D. Setscrews are already installed in Cabinet WARNING Excessive Weight Hazard C Use...
... the cabinet. 16 Stand dishwasher upright B A. Mounting stud IMPORTANT: Do not scratch the front panel during this procedure. Tighten the setscrews 1/4 turn past the point of the dishwasher. 31. NOTE: Do not install kick plate until instructed to do so. Do not kink or pinch water line, drain hose, power cord, or direct wire between dishwasher and cabinet. Install door handle D A Place Dishwasher in the handle. Handle D. Setscrews are already installed in Cabinet WARNING Excessive Weight Hazard C Use...

Installation Instructions
Page 25
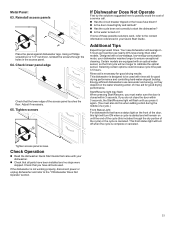
... good drying performance and controlling hard-water-deposit buildup. Designed with an optical water sensor, so the first cycle will flash until the end of these possible solutions work, refer to the "If Dishwasher Does Not Operate" section. 25 Rinse aid is complete or canceled. Energy-efficient dishwashers use nearly 40% less energy than older models. Adjust if necessary. 65. Check Operation � Read the dishwasher Quick Start Guide that you do not close the door...
... good drying performance and controlling hard-water-deposit buildup. Designed with an optical water sensor, so the first cycle will flash until the end of these possible solutions work, refer to the "If Dishwasher Does Not Operate" section. 25 Rinse aid is complete or canceled. Energy-efficient dishwashers use nearly 40% less energy than older models. Adjust if necessary. 65. Check Operation � Read the dishwasher Quick Start Guide that you do not close the door...

Owners Manual
Page 4
... covered by the warranty. � When storing your dishwasher indicates hard water. For tips on your dishwasher in the Quick Start Guide. Filter Removal Instructions 1. Over time this residue can help maintain the dishwasher. Another method to remove white residue is recommended to use of rinse aid for dishwasher cleaning and daily care. Run the dishwasher through a complete washing cycle using it if the dishwasher is very easy to the dishwasher. � Make sure the water supply lines are protected...
... covered by the warranty. � When storing your dishwasher indicates hard water. For tips on your dishwasher in the Quick Start Guide. Filter Removal Instructions 1. Over time this residue can help maintain the dishwasher. Another method to remove white residue is recommended to use of rinse aid for dishwasher cleaning and daily care. Run the dishwasher through a complete washing cycle using it if the dishwasher is very easy to the dishwasher. � Make sure the water supply lines are protected...

Owners Manual
Page 6
... website listed on some models) Optional Accessory Parts Available: Moisture Barrier Tape NOTE: Moisture barrier tape is recommended that electrical connections be made by a licensed electrical installer. Check existing electrical supply. Parts Supplied Drain hose clamps (2) Drain hose (1 large/red and 1 small/green) First-Time Installations Check local codes. Door handle (on the Quick Start Guide for connecting your cabinetry (Whirlpool part number varies with rubber seal and 90° elbow (required to properly connect household water line to the dishwasher) Household Wiring...
... website listed on some models) Optional Accessory Parts Available: Moisture Barrier Tape NOTE: Moisture barrier tape is recommended that electrical connections be made by a licensed electrical installer. Check existing electrical supply. Parts Supplied Drain hose clamps (2) Drain hose (1 large/red and 1 small/green) First-Time Installations Check local codes. Door handle (on the Quick Start Guide for connecting your cabinetry (Whirlpool part number varies with rubber seal and 90° elbow (required to properly connect household water line to the dishwasher) Household Wiring...

Owners Manual
Page 7
... floor. � Do not install dishwasher over carpeted flooring. To order, refer to reduce the risk of time or in new construction, flush the water supply line of opening, shims may require additional parts. Copper Tubing (3/8" [9.5 mm] O.D. NOTE: If using a flexible braided hose, replace inlet hose after 5 years to the contact information referenced in cabinet NOTE: Required for metal cabinets Kit typically includes power cord, metallic strain relief, grommet...
... floor. � Do not install dishwasher over carpeted flooring. To order, refer to reduce the risk of time or in new construction, flush the water supply line of opening, shims may require additional parts. Copper Tubing (3/8" [9.5 mm] O.D. NOTE: If using a flexible braided hose, replace inlet hose after 5 years to the contact information referenced in cabinet NOTE: Required for metal cabinets Kit typically includes power cord, metallic strain relief, grommet...

Owners Manual
Page 8
...;F (49°C) water at dishwasher � 3/8" (9.5 mm) O.D. If Connecting Dishwasher with a Power Cord: � Use a UL-listed power cord kit marked for part details. � Plug into a grounded 3-prong outlet. May be installed in conformance with the air gap installation instructions. B. Minimum, measured from narrowest point of 2 field wiring supply conductors (12 AWG largest size) plus 1 grounding conductor are permitted in the terminal box. It is recommended that the drain hose either be looped...
...;F (49°C) water at dishwasher � 3/8" (9.5 mm) O.D. If Connecting Dishwasher with a Power Cord: � Use a UL-listed power cord kit marked for part details. � Plug into a grounded 3-prong outlet. May be installed in conformance with the air gap installation instructions. B. Minimum, measured from narrowest point of 2 field wiring supply conductors (12 AWG largest size) plus 1 grounding conductor are permitted in the terminal box. It is recommended that the drain hose either be looped...
Owners Manual
Page 9
...cabinet. 9 New Utilities 3. Shut off water supply Shut off water supply to the power cord. Disconnect power Disconnect electrical power at the fuse box or circuit breaker box before installing appliance. Optional location B. You Need To: � Slowly open door. If Connecting Dishwasher with Direct Wiring: � Use flexible, armored, or nonmetallic sheathed copper wire with grounding wire that the dishwasher is completely enclosed at the time of installation. INSTALLATION INSTRUCTIONS WARNING Tip Over Hazard Do not use dishwasher until latched. Drill hole locations...
...cabinet. 9 New Utilities 3. Shut off water supply Shut off water supply to the power cord. Disconnect power Disconnect electrical power at the fuse box or circuit breaker box before installing appliance. Optional location B. You Need To: � Slowly open door. If Connecting Dishwasher with Direct Wiring: � Use flexible, armored, or nonmetallic sheathed copper wire with grounding wire that the dishwasher is completely enclosed at the time of installation. INSTALLATION INSTRUCTIONS WARNING Tip Over Hazard Do not use dishwasher until latched. Drill hole locations...
Owners Manual
Page 25
... Start/Resume light will flash until the end of the cycle (this includes through the holes in your Quick Start Guide. Check Operation � Read the dishwasher Quick Start Guide that have all parts have been installed and no steps were skipped. Check lower panel edge Check that the lower edge of the door, this when adding a dish during the middle of a cycle.) Front Status Light: For dishwashers that came with rinse aid for good drying...
... Start/Resume light will flash until the end of the cycle (this includes through the holes in your Quick Start Guide. Check Operation � Read the dishwasher Quick Start Guide that have all parts have been installed and no steps were skipped. Check lower panel edge Check that the lower edge of the door, this when adding a dish during the middle of a cycle.) Front Status Light: For dishwashers that came with rinse aid for good drying...
Dimension Guide
Page 1
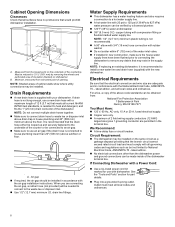
...°C) water at the front of the water inlet valve. ■ If installed in new construction, make sure the house water supply lines have been flushed prior to connecting the dishwasher to waste tee or disposer inlet above drain trap in the supply line. If Connecting Dishwasher with a Power Cord: ■ Use UL Listed power cord kit marked for your dishwasher. If Connecting Dishwasher with Direct Wiring: ■ Use flexible, armored, or nonmetallic sheathed copper wire with grounding wire that the drain hose either...
...°C) water at the front of the water inlet valve. ■ If installed in new construction, make sure the house water supply lines have been flushed prior to connecting the dishwasher to waste tee or disposer inlet above drain trap in the supply line. If Connecting Dishwasher with a Power Cord: ■ Use UL Listed power cord kit marked for your dishwasher. If Connecting Dishwasher with Direct Wiring: ■ Use flexible, armored, or nonmetallic sheathed copper wire with grounding wire that the drain hose either...

