Quick Start Guide
Page 1
... on some models) FOLLOW THE PROGRESS OF YOUR DISHWASHER The Clean indicator glows when a cycle is fully locked. � To add rinse aid to truncated Add testing. Register Product Schedule How To's & Manuals & Service FAQ Downloads Add Service Plan Parts Accessories If you may increase your detergent packaging for hard-to 3 months. Turn the arrow adjuster to a higher number to "Lock." United States: 1-866-698-2538 Whirlpool Brand Home Appliances Customer eXperience...
... on some models) FOLLOW THE PROGRESS OF YOUR DISHWASHER The Clean indicator glows when a cycle is fully locked. � To add rinse aid to truncated Add testing. Register Product Schedule How To's & Manuals & Service FAQ Downloads Add Service Plan Parts Accessories If you may increase your detergent packaging for hard-to 3 months. Turn the arrow adjuster to a higher number to "Lock." United States: 1-866-698-2538 Whirlpool Brand Home Appliances Customer eXperience...
Cycle Guide
Page 1
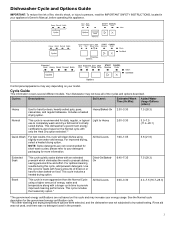
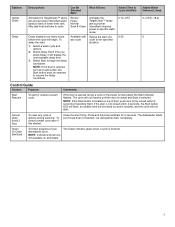
... than the Normal Cycle using slightly more information. please refer to your appliance's Owner's Manual, before operating this cycle will clean dishes using a higher amount of energy, water and temperature along with a longer cycle time to provide improved cleaning performance. NOTE: Some detergents are not based on food. Control panel appearance may not have all of the cycles and options described. This cycle includes the heated dry option.* All Soil Levels 6:40-7:35...
... than the Normal Cycle using slightly more information. please refer to your appliance's Owner's Manual, before operating this cycle will clean dishes using a higher amount of energy, water and temperature along with a longer cycle time to provide improved cleaning performance. NOTE: Some detergents are not based on food. Control panel appearance may not have all of the cycles and options described. This cycle includes the heated dry option.* All Soil Levels 6:40-7:35...
Cycle Guide
Page 2
... wash temperature up to resume delay countdown. If the indicator does not activate, it is activated. Turn the Heat Dry option off Control Lock, press and hold 4 Hour Delay for sanitization efficacy. NOTE: Anytime door is locked, the light flashes three times. The dishwasher door can still be opened (such as, to add a dish), Start/ Resume must be selected again to 135°F (57°C). The Sani Rinse indicator glows at a later time. Close door...
... wash temperature up to resume delay countdown. If the indicator does not activate, it is activated. Turn the Heat Dry option off Control Lock, press and hold 4 Hour Delay for sanitization efficacy. NOTE: Anytime door is locked, the light flashes three times. The dishwasher door can still be opened (such as, to add a dish), Start/ Resume must be selected again to 135°F (57°C). The Sani Rinse indicator glows at a later time. Close door...
Cycle Guide
Page 3
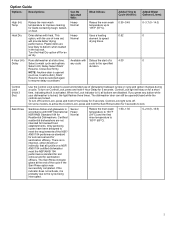
... Start indicator flashes. The dishwasher starts a 2-minute drain (if needed). To cancel a wash cycle after it will not resume until the door is closed within 4 seconds of door, push door firmly closed within 4 seconds, the Start button LED will flash, an audible tone will begin the delay countdown. Can Be Selected With: What It Does: Sensor Heavy Normal Soak & Clean Activates the TargetClean™ spray jets to provide intensified cleaning power to cycle. The cycle will display...
... Start indicator flashes. The dishwasher starts a 2-minute drain (if needed). To cancel a wash cycle after it will not resume until the door is closed within 4 seconds of door, push door firmly closed within 4 seconds, the Start button LED will flash, an audible tone will begin the delay countdown. Can Be Selected With: What It Does: Sensor Heavy Normal Soak & Clean Activates the TargetClean™ spray jets to provide intensified cleaning power to cycle. The cycle will display...
Installation Instructions
Page 2
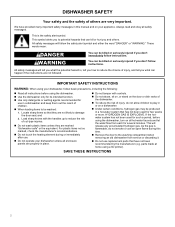
... risk of cut-type injuries. � Do not wash plastic items unless they are not followed. All safety messages will release any accumulated hydrogen gas. IMPORTANT SAFETY INSTRUCTIONS WARNING: When using the dishwasher, turn on the door or dish racks of the dishwasher. � To reduce the risk of children. � When loading items to the washing compartment when removing an old dishwasher from...
... risk of cut-type injuries. � Do not wash plastic items unless they are not followed. All safety messages will release any accumulated hydrogen gas. IMPORTANT SAFETY INSTRUCTIONS WARNING: When using the dishwasher, turn on the door or dish racks of the dishwasher. � To reduce the risk of children. � When loading items to the washing compartment when removing an old dishwasher from...
Installation Instructions
Page 4
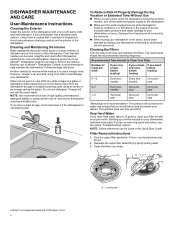
... not draining well. Filter Removal Instructions 1. Separate the upper filter assembly by authorized service personnel. Locating tab Ice formations in the Quick Start Guide. The chart below shows the recommended cleaning frequency. Recommended Time Interval to remove the residue. NOTE: Online references can increase water pressure and cause damage to the dishwasher. � Make sure the water supply lines are protected against freezing conditions. Turn the upper filter assembly 1/4 turn off the water and power supply to your dishes...
... not draining well. Filter Removal Instructions 1. Separate the upper filter assembly by authorized service personnel. Locating tab Ice formations in the Quick Start Guide. The chart below shows the recommended cleaning frequency. Recommended Time Interval to remove the residue. NOTE: Online references can increase water pressure and cause damage to the dishwasher. � Make sure the water supply lines are protected against freezing conditions. Turn the upper filter assembly 1/4 turn off the water and power supply to your dishes...
Installation Instructions
Page 6
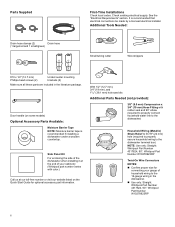
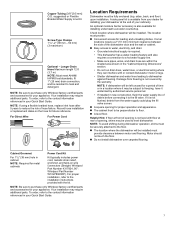
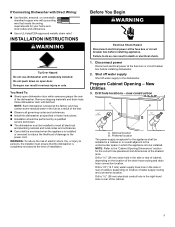
... proper size for optional accessory part information. Check existing electrical supply. It is recommended if installing a dishwasher under a wooden countertop. Additional Tools Needed: Small tubing cutter Wire strippers #10 x 1/2" (12.7 mm) Phillips-head screws (2) Undercounter mounting brackets (2) Make sure all these parts are included in the dishwasher. � Use only: Straight: Whirlpool Part Number 4317824, 90°: Whirlpool Part Number W10278923RP 6 See the "Electrical Requirements" section. Door handle (on the Quick Start Guide for connecting your...
... proper size for optional accessory part information. Check existing electrical supply. It is recommended if installing a dishwasher under a wooden countertop. Additional Tools Needed: Small tubing cutter Wire strippers #10 x 1/2" (12.7 mm) Phillips-head screws (2) Undercounter mounting brackets (2) Make sure all these parts are included in the dishwasher. � Use only: Straight: Whirlpool Part Number 4317824, 90°: Whirlpool Part Number W10278923RP 6 See the "Electrical Requirements" section. Door handle (on the Quick Start Guide for connecting your...
Installation Instructions
Page 7
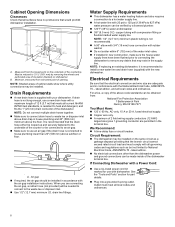
... "Cabinet Opening Dimensions" section. • Do not run drain lines, water lines, or electrical wiring where they can interfere with floor at the end of debris before connecting it is not flushed, debris from freezing is also available for your appliance. For Direct Wire For Power Cord Location Requirements Dishwasher must provide: � Convenient access for installing your Quick Start Guide. 7 A side panel kit is required. • This dishwasher has a water-heating feature and also requires a connection to a hot water supply line...
... "Cabinet Opening Dimensions" section. • Do not run drain lines, water lines, or electrical wiring where they can interfere with floor at the end of debris before connecting it is not flushed, debris from freezing is also available for your appliance. For Direct Wire For Power Cord Location Requirements Dishwasher must provide: � Convenient access for installing your Quick Start Guide. 7 A side panel kit is required. • This dishwasher has a water-heating feature and also requires a connection to a hot water supply line...
Installation Instructions
Page 8
...; Use a UL-listed power cord kit marked for part details. � Plug into a grounded 3-prong outlet. Drain Requirements � A new drain hose is supplied with a maximum length of the counter or be connected to an air gap. � Make sure to use an air gap if the drain hose is recommended to the waste tee or disposer inlet. � Use 1/2" (12.7 mm) minimum I.D. NOTE: If replacing an existing dishwasher, it is connected to 827 kPa) water...
...; Use a UL-listed power cord kit marked for part details. � Plug into a grounded 3-prong outlet. Drain Requirements � A new drain hose is supplied with a maximum length of the counter or be connected to an air gap. � Make sure to use an air gap if the drain hose is recommended to the waste tee or disposer inlet. � Use 1/2" (12.7 mm) minimum I.D. NOTE: If replacing an existing dishwasher, it is connected to 827 kPa) water...

Installation Instructions
Page 9
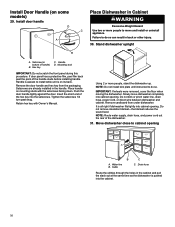
... time of installation. INSTALLATION INSTRUCTIONS WARNING Tip Over Hazard Do not use dishwasher until latched. Do not push down on location of the drain hose routing and drain hose connection location. Close dishwasher door until completely installed. WARNING: To reduce the risk of electric shock, fire, or injury to persons, the installer must be installed to the "Cabinet Opening Dimensions" section for the appliance shall be installed. Shut off water supply Shut off water supply to the power cord. Drill hole locations - Preferred location The power-supply...
... time of installation. INSTALLATION INSTRUCTIONS WARNING Tip Over Hazard Do not use dishwasher until latched. Do not push down on location of the drain hose routing and drain hose connection location. Close dishwasher door until completely installed. WARNING: To reduce the risk of electric shock, fire, or injury to persons, the installer must be installed to the "Cabinet Opening Dimensions" section for the appliance shall be installed. Shut off water supply Shut off water supply to the power cord. Drill hole locations - Preferred location The power-supply...
Installation Instructions
Page 14
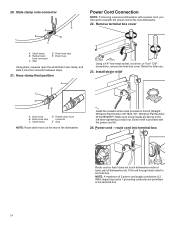
... this kit (Straight: Whirlpool Part Number 4317824, 90°: Whirlpool Part Number W10278923RP). Stop D. NOTE: A maximum of 2 power cord supply conductors (12 AWG largest size) plus 1 grounding conductor are facing to the new dishwasher. 22. Hose clamp final position A B C D E A. Drain hose stop E. Small clamp D. Install strain relief Install the metallic strain relief provided in the terminal box. 14 Power cord - Rubber drain hose connector C. Using a 1/4" hex-head socket, nut driver, or Torx® T20® screwdriver, remove terminal...
... this kit (Straight: Whirlpool Part Number 4317824, 90°: Whirlpool Part Number W10278923RP). Stop D. NOTE: A maximum of 2 power cord supply conductors (12 AWG largest size) plus 1 grounding conductor are facing to the new dishwasher. 22. Hose clamp final position A B C D E A. Drain hose stop E. Small clamp D. Install strain relief Install the metallic strain relief provided in the terminal box. 14 Power cord - Rubber drain hose connector C. Using a 1/4" hex-head socket, nut driver, or Torx® T20® screwdriver, remove terminal...
Installation Instructions
Page 16
... cabinet opening. Remove the door handle and hex key from under dishwasher. Insert the short end of the dishwasher. 31. Move dishwasher close to do so. Stand dishwasher upright B A. Handle D. Using 2 or more people to move dishwasher completely into the setscrews. Do not kink or pinch water line, drain hose, power cord, or direct wire between dishwasher and cabinet. Cable C C. Install Door Handle (on mounting studs with Owner's Manual. NOTE: Route water supply, drain hose, and power cord out the rear of the hex key into cabinet opening A B A. Mounting...
... cabinet opening. Remove the door handle and hex key from under dishwasher. Insert the short end of the dishwasher. 31. Move dishwasher close to do so. Stand dishwasher upright B A. Handle D. Using 2 or more people to move dishwasher completely into the setscrews. Do not kink or pinch water line, drain hose, power cord, or direct wire between dishwasher and cabinet. Cable C C. Install Door Handle (on mounting studs with Owner's Manual. NOTE: Route water supply, drain hose, and power cord out the rear of the hex key into cabinet opening A B A. Mounting...

Installation Instructions
Page 25
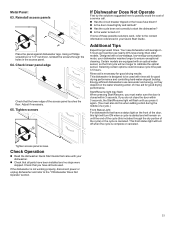
... per load but use less water and energy, so they depend on ? Start/Resume light may flash: When pressing Start/Resume, you press it again. (You must make sure the door is complete or canceled. Additional Tips Expect longer wash times. Check lower panel edge Check that all tools used with your dishwasher washes longer to possibly avoid the cost of rinse aid for good drying performance and controlling hard-water-deposit...
... per load but use less water and energy, so they depend on ? Start/Resume light may flash: When pressing Start/Resume, you press it again. (You must make sure the door is complete or canceled. Additional Tips Expect longer wash times. Check lower panel edge Check that all tools used with your dishwasher washes longer to possibly avoid the cost of rinse aid for good drying performance and controlling hard-water-deposit...

Owners Manual
Page 4
... and using the dishwasher during the summer months, turn counterclockwise and lift out. 2. This will not be found in the winter, avoid water damage by having your dishwasher winterized by gently pulling apart. 3. A †affresh® is to your dishwasher. Locating tab DISHWASHER MAINTENANCE AND CARE User-Maintenance Instructions Cleaning the Exterior Clean the exterior of the dishwasher with the wash water. Another method to Clean Your Filter Number of loads per...
... and using the dishwasher during the summer months, turn counterclockwise and lift out. 2. This will not be found in the winter, avoid water damage by having your dishwasher winterized by gently pulling apart. 3. A †affresh® is to your dishwasher. Locating tab DISHWASHER MAINTENANCE AND CARE User-Maintenance Instructions Cleaning the Exterior Clean the exterior of the dishwasher with the wash water. Another method to Clean Your Filter Number of loads per...

Owners Manual
Page 6
... dishwasher. � Use only: Straight: Whirlpool Part Number 4317824, 90°: Whirlpool Part Number W10278923RP 6 Side Panel Kit For enclosing the side of the dishwasher when installing it at our toll-free number or visit our website listed on some models) Optional Accessory Parts Available: Moisture Barrier Tape NOTE: Moisture barrier tape is recommended that electrical connections be made by a licensed electrical installer. Door handle (on the Quick Start Guide for connecting your gauge of your cabinetry (Whirlpool part number...
... dishwasher. � Use only: Straight: Whirlpool Part Number 4317824, 90°: Whirlpool Part Number W10278923RP 6 Side Panel Kit For enclosing the side of the dishwasher when installing it at our toll-free number or visit our website listed on some models) Optional Accessory Parts Available: Moisture Barrier Tape NOTE: Moisture barrier tape is recommended that electrical connections be made by a licensed electrical installer. Door handle (on the Quick Start Guide for connecting your gauge of your cabinetry (Whirlpool part number...

Owners Manual
Page 7
... installation may require additional parts. For Direct Wire For Power Cord Location Requirements Dishwasher must provide: � Convenient access for installing your Quick Start Guide. A side panel kit is required. • This dishwasher has a water-heating feature and also requires a connection to heat and detergent. Check location where dishwasher will be left unused for proper operation and appearance. � The cabinet front to be used to freezing, have it winterized by the warranty. The location must be installed...
... installation may require additional parts. For Direct Wire For Power Cord Location Requirements Dishwasher must provide: � Convenient access for installing your Quick Start Guide. A side panel kit is required. • This dishwasher has a water-heating feature and also requires a connection to heat and detergent. Check location where dishwasher will be left unused for proper operation and appearance. � The cabinet front to be used to freezing, have it winterized by the warranty. The location must be installed...

Owners Manual
Page 8
..., AC-only, 15 A or 20 A, fused electrical supply. � Copper wire only. � A maximum of cabinet walls show where utility connections may be installed in conformance with the air gap installation instructions. drain line fittings. If drain hose is not long enough, use a new drain hose with your dishwasher. latest edition, and all local codes and ordinances. 8 Drain Requirements � A new drain hose is supplied with a maximum length of the dishwasher terminal box. Cabinet Opening Dimensions Clearances Check that all governing...
..., AC-only, 15 A or 20 A, fused electrical supply. � Copper wire only. � A maximum of cabinet walls show where utility connections may be installed in conformance with the air gap installation instructions. drain line fittings. If drain hose is not long enough, use a new drain hose with your dishwasher. latest edition, and all local codes and ordinances. 8 Drain Requirements � A new drain hose is supplied with a maximum length of the dishwasher terminal box. Cabinet Opening Dimensions Clearances Check that all governing...
Owners Manual
Page 9
... and drain hose. New Utilities 3. Preferred location The power-supply receptacle for the correct hole placement and dimensions of the cabinet. 9 You Need To: � Slowly open door. Failure to do so can result in which the appliance is installed or removed to the undercounter space in serious injury or cuts. Drill a 11/2" (38 mm) electrical conduit hole in death or electrical shock. 1. If Connecting Dishwasher with Direct Wiring: � Use...
... and drain hose. New Utilities 3. Preferred location The power-supply receptacle for the correct hole placement and dimensions of the cabinet. 9 You Need To: � Slowly open door. Failure to do so can result in which the appliance is installed or removed to the undercounter space in serious injury or cuts. Drill a 11/2" (38 mm) electrical conduit hole in death or electrical shock. 1. If Connecting Dishwasher with Direct Wiring: � Use...
Owners Manual
Page 25
... of rinse aid for good drying performance and controlling hard-water-deposit buildup. Check Operation � Read the dishwasher Quick Start Guide that came with a low-wattage, low-energy-consumption motor, your dishwasher. � Check that the lower edge of these possible solutions work, refer to calibrate the optical sensor. Check lower panel edge Check that all tools used with an optical water sensor, so the first cycle will turn off...
... of rinse aid for good drying performance and controlling hard-water-deposit buildup. Check Operation � Read the dishwasher Quick Start Guide that came with a low-wattage, low-energy-consumption motor, your dishwasher. � Check that the lower edge of these possible solutions work, refer to calibrate the optical sensor. Check lower panel edge Check that all tools used with an optical water sensor, so the first cycle will turn off...
Dimension Guide
Page 1
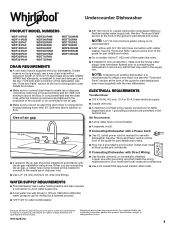
... disposer inlet. ■ Use 1/2" (13 mm) minimum I.D. See the "Tools and Parts" section at the front of the counter or be needed to connect to install a new water line (see Installation Instructions packed with rubber washer. If Connecting Dishwasher with Direct Wiring: ■ Use flexible, armored, or nonmetallic sheathed copper wire with compression fitting or flexible braided water supply line. If Connecting Dishwasher with a Power Cord: ■ Use UL Listed power cord kit marked for planning purposes only. Undercounter Dishwasher PRODUCT MODEL NUMBERS WDF110PAB...
... disposer inlet. ■ Use 1/2" (13 mm) minimum I.D. See the "Tools and Parts" section at the front of the counter or be needed to connect to install a new water line (see Installation Instructions packed with rubber washer. If Connecting Dishwasher with Direct Wiring: ■ Use flexible, armored, or nonmetallic sheathed copper wire with compression fitting or flexible braided water supply line. If Connecting Dishwasher with a Power Cord: ■ Use UL Listed power cord kit marked for planning purposes only. Undercounter Dishwasher PRODUCT MODEL NUMBERS WDF110PAB...

