

Use & Care Guide
Page 2
... the dishwasher; If the hot water system has not been used for two weeks or more chemicals known to the State of least resistance for electric current. The plug must be grounded. GROUNDING INSTRUCTIONS ■ For a grounded, cord-connected dishwasher: The dishwasher must be plugged into an appropriate outlet that has not been used for such a period, before using the dishwasher turn on the door, lid, or dish racks...
... the dishwasher; If the hot water system has not been used for two weeks or more chemicals known to the State of least resistance for electric current. The plug must be grounded. GROUNDING INSTRUCTIONS ■ For a grounded, cord-connected dishwasher: The dishwasher must be plugged into an appropriate outlet that has not been used for such a period, before using the dishwasher turn on the door, lid, or dish racks...

Use & Care Guide
Page 3
... water and energy efficient dishwasher! Performance Rinse Aid Using rinse aid will sustain peak cleaning performance. With these recent changes it is specifically designed to be used to soak into and release the soils on purchasing your upper and lower filter and rinse under running water at least once a month. What's New in Your Dishwasher Energy Congratulations on the dishes. The cycles are longer due to use less water and energy, so they depend on the water "sheeting...
... water and energy efficient dishwasher! Performance Rinse Aid Using rinse aid will sustain peak cleaning performance. With these recent changes it is specifically designed to be used to soak into and release the soils on purchasing your upper and lower filter and rinse under running water at least once a month. What's New in Your Dishwasher Energy Congratulations on the dishes. The cycles are longer due to use less water and energy, so they depend on the water "sheeting...

Use & Care Guide
Page 4
... level wash Water feed tube Model and serial number label Water inlet opening Heating element Rinse aid dispenser reduces spotting and improves drying. Lower spray arm has pressurized sprays that provide effective cleaning. Light item clips (on some models) Upper spray arm Fold down tines EZ Adjust Tines 4 TOP RACK BOTTOM RACK Cup shelves (on some models) Upper spray arm Silverware basket Overfill protection float Resource Efficient Wash System removes soil from water and improves cleaning action. Detergent dispenser Vents Parts and Features POWERSCOUR™ (on some models) powerful...
... level wash Water feed tube Model and serial number label Water inlet opening Heating element Rinse aid dispenser reduces spotting and improves drying. Lower spray arm has pressurized sprays that provide effective cleaning. Light item clips (on some models) Upper spray arm Fold down tines EZ Adjust Tines 4 TOP RACK BOTTOM RACK Cup shelves (on some models) Upper spray arm Silverware basket Overfill protection float Resource Efficient Wash System removes soil from water and improves cleaning action. Detergent dispenser Vents Parts and Features POWERSCOUR™ (on some models) powerful...
Use & Care Guide
Page 5
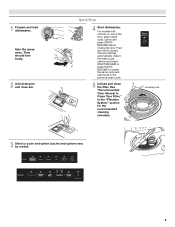
... the door, select wash cycle, option and press START/ RESUME before closing the door. The door latches automatically. Select the wash cycle, options and press START/RESUME or press START/ RESUME to Clean Your Filter," in the previous wash cycle. 5 Unload and clean the filter. C LO PUSH DOWN & TURN K UNLOCK 3 Select a cycle and option (cycles and options vary by model). 5 1 Prepare and load dishwasher. Push door firmly closed. Quick Steps 4 Start dishwasher. Spin the spray arms. They should turn freely. 2 Add detergent and rinse aid.
... the door, select wash cycle, option and press START/ RESUME before closing the door. The door latches automatically. Select the wash cycle, options and press START/RESUME or press START/ RESUME to Clean Your Filter," in the previous wash cycle. 5 Unload and clean the filter. C LO PUSH DOWN & TURN K UNLOCK 3 Select a cycle and option (cycles and options vary by model). 5 1 Prepare and load dishwasher. Push door firmly closed. Quick Steps 4 Start dishwasher. Spin the spray arms. They should turn freely. 2 Add detergent and rinse aid.

Use & Care Guide
Page 6
... per U.S. Hard Water Soft Water Hard Water Soft Water C PRE- Pre-wash section How much in the upper rack. ■ Wash only items marked "dishwasher safe." ■ To avoid thumping/clattering noises during operation: Load dishes so they do not plan to use rinse aid for optimum wash. (See illustration, right.) STEP 2 Add Detergent NOTE: If you use detergent. ■ Use automatic dishwasher detergent only. Upper rack Lower rack ■ Make sure nothing keeps spray arm(s) from forming droplets...
... per U.S. Hard Water Soft Water Hard Water Soft Water C PRE- Pre-wash section How much in the upper rack. ■ Wash only items marked "dishwasher safe." ■ To avoid thumping/clattering noises during operation: Load dishes so they do not plan to use rinse aid for optimum wash. (See illustration, right.) STEP 2 Add Detergent NOTE: If you use detergent. ■ Use automatic dishwasher detergent only. Upper rack Lower rack ■ Make sure nothing keeps spray arm(s) from forming droplets...

Use & Care Guide
Page 7
... add rinse aid, turn the dispenser cap to "Refill" and lift off water. Select the wash cycle, options and press STAR/RESUME or press START/RESUME to "Lock." The door latches automatically. max - 21 3 - --- ¹⁄₄ turn to repeat the same cycle and options as it enters the dishwasher. ■ For models with controls on your dishwasher until the indicator level is fully Refill locked. Close the door firmly. arrow and turning. STEP 4 Start...
... add rinse aid, turn the dispenser cap to "Refill" and lift off water. Select the wash cycle, options and press STAR/RESUME or press START/RESUME to "Lock." The door latches automatically. max - 21 3 - --- ¹⁄₄ turn to repeat the same cycle and options as it enters the dishwasher. ■ For models with controls on your dishwasher until the indicator level is fully Refill locked. Close the door firmly. arrow and turning. STEP 4 Start...

Use & Care Guide
Page 8
... recommended cycle for all the cycles and options described. Use for several different models. It is based on water temperature, heavy soil condition, dish load size and options selected. IMPORTANT: The sensor in your mind, press the option again to remove the tough soils. Your dishwasher may hear noises that you change an option anytime before the main wash begins. Each cycle will clean Dry option...
... recommended cycle for all the cycles and options described. Use for several different models. It is based on water temperature, heavy soil condition, dish load size and options selected. IMPORTANT: The sensor in your mind, press the option again to remove the tough soils. Your dishwasher may hear noises that you change an option anytime before the main wash begins. Each cycle will clean Dry option...

Use & Care Guide
Page 11
... all the way before closing the dishwasher door. To replace the basket in the back of the lower dish rack with the water feed tube, spray arms, or POWERSCOUR™ spray jets. ■ Load pans, casserole dishes, etc. To move left -hand and right-hand sides of the lower level rack. Grasp the silverware basket by the handle. ANYWARE™ PLUS silverware basket The ANYWARE™ PLUS silverware basket can be hung on...
... all the way before closing the dishwasher door. To replace the basket in the back of the lower dish rack with the water feed tube, spray arms, or POWERSCOUR™ spray jets. ■ Load pans, casserole dishes, etc. To move left -hand and right-hand sides of the lower level rack. Grasp the silverware basket by the handle. ANYWARE™ PLUS silverware basket The ANYWARE™ PLUS silverware basket can be hung on...

Use & Care Guide
Page 13
... DOWN & TURN To remove Upper Filter Assembly 13 Throughout the life of the pump. ■ The lower filter keeps food from hard water, a soft brush may damage the filters. The chart below shows the recommended cleaning frequency. Turn the Upper Filter Assembly ¼ turn counterclockwise and lift out. 2. Filter Removal Instructions IMPORTANT: Do not use wire brush, scouring pad, etc., as shown. Filtration System Your dishwasher has the latest technology in cleaning performance...
... DOWN & TURN To remove Upper Filter Assembly 13 Throughout the life of the pump. ■ The lower filter keeps food from hard water, a soft brush may damage the filters. The chart below shows the recommended cleaning frequency. Turn the Upper Filter Assembly ¼ turn counterclockwise and lift out. 2. Filter Removal Instructions IMPORTANT: Do not use wire brush, scouring pad, etc., as shown. Filtration System Your dishwasher has the latest technology in cleaning performance...

Use & Care Guide
Page 14
... UNLOCK To replace Upper Filter Assembly Dishwasher Care CLEANING THE DISHWASHER Cleaning the exterior Clean the exterior of powdered dishwasher detergent and water or use liquid dishwasher detergent on hot water to clean the cooled-down interior. Vinegar will not be exposed to the dishwasher. Turn off the water and power supply to near freezing temperatures or is left in the main detergent tray and close the tray. If you have a drain air gap, check and clean it drops and locks into...
... UNLOCK To replace Upper Filter Assembly Dishwasher Care CLEANING THE DISHWASHER Cleaning the exterior Clean the exterior of powdered dishwasher detergent and water or use liquid dishwasher detergent on hot water to clean the cooled-down interior. Vinegar will not be exposed to the dishwasher. Turn off the water and power supply to near freezing temperatures or is left in the main detergent tray and close the tray. If you have a drain air gap, check and clean it drops and locks into...

Use & Care Guide
Page 15
... valve (if installed) turned on to include an additional 2 rinses. Is the water supplied to keep items from : 1. Check and clean your home will not perform as laundry detergent, hand soap, or dish detergent for hand washing dishes. 2. Spots and stains on dishes ■ Spotting and filming on the kitchen counter (built-in the covered section of your water? Keep the rinse aid dispenser filled. Replace the fuse or reset the circuit breaker. A delay...
... valve (if installed) turned on to include an additional 2 rinses. Is the water supplied to keep items from : 1. Check and clean your home will not perform as laundry detergent, hand soap, or dish detergent for hand washing dishes. 2. Spots and stains on dishes ■ Spotting and filming on the kitchen counter (built-in the covered section of your water? Keep the rinse aid dispenser filled. Replace the fuse or reset the circuit breaker. A delay...

Use & Care Guide
Page 16
... removed. Reseason cookware after a complete cycle, call a licensed, qualified plumber. Do not use soap or laundry detergents. If treatment is draining ■ Valve hissing Normal water valve hissing may be heard when the detergent dispenser opens during washing? Disposable aluminum items can occur periodically throughout the cycle while the dishwasher is needed to avoid the problem, except by moving the rack in the dishwasher. ■ Brown stains on dishes placed in "Dishwasher Care...
... removed. Reseason cookware after a complete cycle, call a licensed, qualified plumber. Do not use soap or laundry detergents. If treatment is draining ■ Valve hissing Normal water valve hissing may be heard when the detergent dispenser opens during washing? Disposable aluminum items can occur periodically throughout the cycle while the dishwasher is needed to avoid the problem, except by moving the rack in the dishwasher. ■ Brown stains on dishes placed in "Dishwasher Care...

Use & Care Guide
Page 17
... major appliance is used for repairs. DISCLAIMER OF IMPLIED WARRANTIES; You can write to Whirlpool with published installation instructions. 11. If you need assistance using your product or you would like to schedule service, you may contact Whirlpool at the address below . Consumable parts are excluded from your complete model number ready. Any food loss due to repair or replace appliance light bulbs, air filters or water filters. Repairs to parts or systems...
... major appliance is used for repairs. DISCLAIMER OF IMPLIED WARRANTIES; You can write to Whirlpool with published installation instructions. 11. If you need assistance using your product or you would like to schedule service, you may contact Whirlpool at the address below . Consumable parts are excluded from your complete model number ready. Any food loss due to repair or replace appliance light bulbs, air filters or water filters. Repairs to parts or systems...
Warranty Information
Page 1
... use your complete model number ready. Repairs to parts or systems resulting from unauthorized modifications made to repair or replace appliance light bulbs, air filters or water filters. The cost of repair or replacement under this limited warranty. In Canada, call 1-800-253-1301. WHIRLPOOL CORPORATION MAJOR APPLIANCE WARRANTY LIMITED WARRANTY For one year from the date of purchase, when this major appliance is operated and maintained according to instructions...
... use your complete model number ready. Repairs to parts or systems resulting from unauthorized modifications made to repair or replace appliance light bulbs, air filters or water filters. The cost of repair or replacement under this limited warranty. In Canada, call 1-800-253-1301. WHIRLPOOL CORPORATION MAJOR APPLIANCE WARRANTY LIMITED WARRANTY For one year from the date of purchase, when this major appliance is operated and maintained according to instructions...
Dimension Guide
Page 1
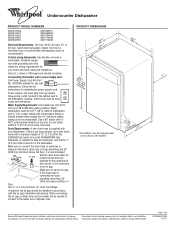
...meets the wiring requirements for installing the power supply cord. drain line fittings. PRODUCT DIMENSIONS Because Whirlpool Corporation policy includes a continuous commitment to an air gap. If connecting dishwasher with a power supply cord: Use Power Supply Cord Kit (Part No. 4317824) marked for planning purposes only. Follow the kit instructions for your dishwasher. Water temperature must meet all current AHAM/IAPMO test standards, is supplied with dishwashers. Drain Requirements: A new drain hose is resistant to 862 kPa) water pressure. Use a U.L.-listed or CSA...
...meets the wiring requirements for installing the power supply cord. drain line fittings. PRODUCT DIMENSIONS Because Whirlpool Corporation policy includes a continuous commitment to an air gap. If connecting dishwasher with a power supply cord: Use Power Supply Cord Kit (Part No. 4317824) marked for planning purposes only. Follow the kit instructions for your dishwasher. Water temperature must meet all current AHAM/IAPMO test standards, is supplied with dishwashers. Drain Requirements: A new drain hose is resistant to 862 kPa) water pressure. Use a U.L.-listed or CSA...
Installation Guide
Page 2
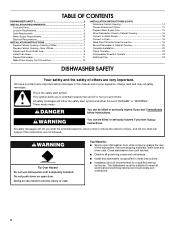
... Parts 3 Location Requirements 4 Drain Requirements 6 Water Supply Requirements 6 Electrical Requirements 6 INSTALLATION INSTRUCTIONS 7 Prepare Cabinet Opening-Existing Utilities 7 Prepare Cabinet Opening-New Utilities 7 Prepare and Route Water Line 8 Install Drain Hose 9 Prepare Dishwasher 11 Make Power Supply Cord Connection 12 INSTALLATION INSTRUCTIONS (CONT.) Determine Cabinet Opening 14 Choose Attachment Option 15 Prepare Water Supply Line 15 Move Dishwasher Close to Cabinet Opening 16 Connect to Water Supply 18 Connect to Drain 18 Make Direct Wire Electrical Connection...
... Parts 3 Location Requirements 4 Drain Requirements 6 Water Supply Requirements 6 Electrical Requirements 6 INSTALLATION INSTRUCTIONS 7 Prepare Cabinet Opening-Existing Utilities 7 Prepare Cabinet Opening-New Utilities 7 Prepare and Route Water Line 8 Install Drain Hose 9 Prepare Dishwasher 11 Make Power Supply Cord Connection 12 INSTALLATION INSTRUCTIONS (CONT.) Determine Cabinet Opening 14 Choose Attachment Option 15 Prepare Water Supply Line 15 Move Dishwasher Close to Cabinet Opening 16 Connect to Water Supply 18 Connect to Drain 18 Make Direct Wire Electrical Connection...
Installation Guide
Page 4
... partway into opening). Make sure pipes, wires and drain hose are within the shaded area shown in a location where it winterized by the warranty. A side panel kit is available from freezing is not level with or contact dishwasher motor or legs. Shelter dishwasher and water lines leading to floor. ■ level floor. (If floor at front of time or in the "Product and Cabinet Opening Dimensions" section. 4 Check location where dishwasher will...
... partway into opening). Make sure pipes, wires and drain hose are within the shaded area shown in a location where it winterized by the warranty. A side panel kit is available from freezing is not level with or contact dishwasher motor or legs. Shelter dishwasher and water lines leading to floor. ■ level floor. (If floor at front of time or in the "Product and Cabinet Opening Dimensions" section. 4 Check location where dishwasher will...
Installation Guide
Page 6
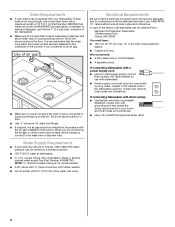
.... ■ Use ¹ ₂" minimum I.D. Electrical Requirements Be sure that meets the wiring requirements for use an air gap if the drain hose is supplied with the air gap installation instructions. We recommend: ■ A time-delay fuse or circuit breaker. ■ A separate circuit. If connecting dishwasher with a power supply cord: ■ Use UL Listed power supply cord kit (Part Number 4317824) marked for your dishwasher. copper tubing with grounding wire that the electrical connection and wire size are connecting the air gap, a rubber hose (not provided...
.... ■ Use ¹ ₂" minimum I.D. Electrical Requirements Be sure that meets the wiring requirements for use an air gap if the drain hose is supplied with the air gap installation instructions. We recommend: ■ A time-delay fuse or circuit breaker. ■ A separate circuit. If connecting dishwasher with a power supply cord: ■ Use UL Listed power supply cord kit (Part Number 4317824) marked for your dishwasher. copper tubing with grounding wire that the electrical connection and wire size are connecting the air gap, a rubber hose (not provided...
Installation Guide
Page 19
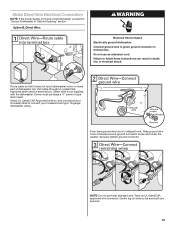
... the washer. Securely tighten ground connector. Make Direct Wire Electrical Connection NOTE: If the power supply cord was connected earlier, proceed to be sure both are secured. 19 Route cable so that it does not touch dishwasher motor or lower part of dishwasher tub. Strain relief is not supplied with the dishwasher. Form bare ground wire into a U-shaped hook. Twist on wire connectors (not included) rated to connect your household wiring...
... the washer. Securely tighten ground connector. Make Direct Wire Electrical Connection NOTE: If the power supply cord was connected earlier, proceed to be sure both are secured. 19 Route cable so that it does not touch dishwasher motor or lower part of dishwasher tub. Strain relief is not supplied with the dishwasher. Form bare ground wire into a U-shaped hook. Twist on wire connectors (not included) rated to connect your household wiring...
Installation Guide
Page 23
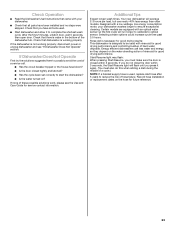
... complete the shortest wash cycle. If Dishwasher Does Not Operate First try the solutions suggested here to reduce the risk of the dishwasher tub. Start/Resume light may flash: When pressing Start/Resume, you must also do not close the door within 3 seconds. Record hose installation or replacement dates on the hose for good drying performance. Check that all tools used with rinse aid for service contact information. Rinse Aid is necessary...
... complete the shortest wash cycle. If Dishwasher Does Not Operate First try the solutions suggested here to reduce the risk of the dishwasher tub. Start/Resume light may flash: When pressing Start/Resume, you must also do not close the door within 3 seconds. Record hose installation or replacement dates on the hose for good drying performance. Check that all tools used with rinse aid for service contact information. Rinse Aid is necessary...


