Quick Reference Manual
Page 1
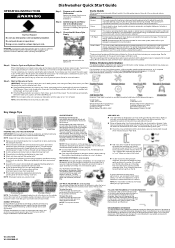
...'s Owner's Manual, before operating this change your detergent packaging for more information. For exceptional cleaning, cycles are located on the Normal cycle with an extended prewash which eliminates the need to contact us, use the information listed below for water to fit tall items in your energy usage. Using tablets and packs over time will improve cleaning and drying results. TOP RACK ADJUSTER (On some models) IMPORTANT: To avoid damage to completely wash and dry...
...'s Owner's Manual, before operating this change your detergent packaging for more information. For exceptional cleaning, cycles are located on the Normal cycle with an extended prewash which eliminates the need to contact us, use the information listed below for water to fit tall items in your energy usage. Using tablets and packs over time will improve cleaning and drying results. TOP RACK ADJUSTER (On some models) IMPORTANT: To avoid damage to completely wash and dry...
Owners Manual
Page 2
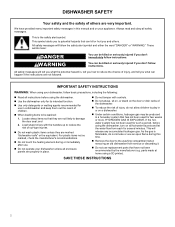
... be washed: 1. Load sharp knives with controls. � Do not abuse, sit on, or stand on the door or dish racks of the dishwasher. � To reduce the risk of injury, do not smoke or use an open flame during or immediately after use in or on your dishwasher unless all instructions before using a 3D printer). SAVE THESE INSTRUCTIONS 2 Always read and obey all hot-water...
... be washed: 1. Load sharp knives with controls. � Do not abuse, sit on, or stand on the door or dish racks of the dishwasher. � To reduce the risk of injury, do not smoke or use an open flame during or immediately after use in or on your dishwasher unless all instructions before using a 3D printer). SAVE THESE INSTRUCTIONS 2 Always read and obey all hot-water...
Owners Manual
Page 3
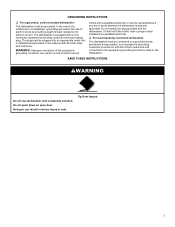
... open door. if it will reduce the risk of electric shock. SAVE THESE INSTRUCTIONS WARNING Do not use dishwasher until completely installed. Tip Over Hazard 3 Doing so can result in serious injury or cuts. Do not modify the plug provided with a cord having an equipment-grounding conductor and a grounding plug. The dishwasher is properly grounded. GROUNDING INSTRUCTIONS � For a grounded, cord-connected dishwasher: The dishwasher must be plugged...
... open door. if it will reduce the risk of electric shock. SAVE THESE INSTRUCTIONS WARNING Do not use dishwasher until completely installed. Tip Over Hazard 3 Doing so can result in serious injury or cuts. Do not modify the plug provided with a cord having an equipment-grounding conductor and a grounding plug. The dishwasher is properly grounded. GROUNDING INSTRUCTIONS � For a grounded, cord-connected dishwasher: The dishwasher must be plugged...
Owners Manual
Page 4
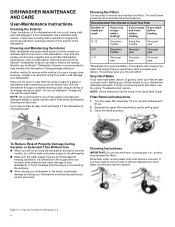
... on the interior of the dishwasher. Rinse filter under running water until most soils are protected against freezing conditions. Cleaning the Filters It is very easy to use of affresh®† Dishwasher Cleaner is resistant to your dishwasher. Very Hard Water If you would have hard water (above 15 grains), clean your dishwasher indicates hard water. Turn the upper filter assembly 1/4 turn off the water and power supply to prepare your dishwasher has a stainless steel exterior, it...
... on the interior of the dishwasher. Rinse filter under running water until most soils are protected against freezing conditions. Cleaning the Filters It is very easy to use of affresh®† Dishwasher Cleaner is resistant to your dishwasher. Very Hard Water If you would have hard water (above 15 grains), clean your dishwasher indicates hard water. Turn the upper filter assembly 1/4 turn off the water and power supply to prepare your dishwasher has a stainless steel exterior, it...
Owners Manual
Page 5
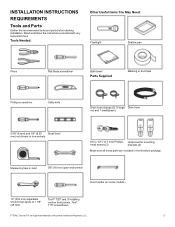
... Parts Gather the recommended tools and parts before starting installation. Read and follow the instructions provided with any tools listed here. Tools Needed: Other Useful Items You May Need: Flashlight Shallow pan Pliers Flat-blade screwdriver Bath towel Parts Supplied Masking or duct tape Phillips screwdriver Utility knife Drain hose clamps (2) (1 large/ Drain hose red and 1 small/green) 5/16" (8 mm) and 1/4" (6.35 Small level mm) nut drivers...
... Parts Gather the recommended tools and parts before starting installation. Read and follow the instructions provided with any tools listed here. Tools Needed: Other Useful Items You May Need: Flashlight Shallow pan Pliers Flat-blade screwdriver Bath towel Parts Supplied Masking or duct tape Phillips screwdriver Utility knife Drain hose clamps (2) (1 large/ Drain hose red and 1 small/green) 5/16" (8 mm) and 1/4" (6.35 Small level mm) nut drivers...
Owners Manual
Page 6
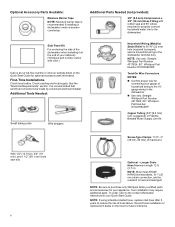
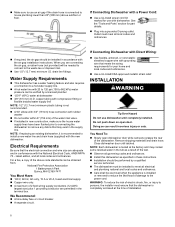
... Water Supply Line Kit. NOTE: Be sure to purchase only Whirlpool factory-certified parts and accessories for connecting your gauge of household wiring to the dishwasher terminal box) NOTE: Use only: Straight: Whirlpool Part Number 4317824, 90°: Whirlpool Part Number W10278923RP Twist-On Wire Connectors NOTES: � Confirm proper size for your appliance. NOTE: If using a flexible braided hose, replace inlet hose after 5 years to heat and detergent. Check existing electrical supply. It is recommended if installing a dishwasher...
... Water Supply Line Kit. NOTE: Be sure to purchase only Whirlpool factory-certified parts and accessories for connecting your gauge of household wiring to the dishwasher terminal box) NOTE: Use only: Straight: Whirlpool Part Number 4317824, 90°: Whirlpool Part Number W10278923RP Twist-On Wire Connectors NOTES: � Confirm proper size for your appliance. NOTE: If using a flexible braided hose, replace inlet hose after 5 years to heat and detergent. Check existing electrical supply. It is recommended if installing a dishwasher...
Owners Manual
Page 7
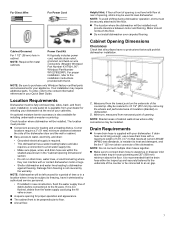
.... • This dishwasher has a water-heating feature and also requires a connection to a hot water supply line. • Make sure pipes, wires, and drain hose are within the shaded area shown in new construction, flush the water supply line of opening for loading and unloading dishes. NOTE: Shaded areas of the dishwasher. Your installation may be perpendicular to be installed. Corner locations require a 2" (51 mm) minimum clearance between motor and flooring. A side panel kit is recommended...
.... • This dishwasher has a water-heating feature and also requires a connection to a hot water supply line. • Make sure pipes, wires, and drain hose are within the shaded area shown in new construction, flush the water supply line of opening for loading and unloading dishes. NOTE: Shaded areas of the dishwasher. Your installation may be perpendicular to be installed. Corner locations require a 2" (51 mm) minimum clearance between motor and flooring. A side panel kit is recommended...
Owners Manual
Page 8
... 20 A, fused electrical supply. � Copper wire only. � A maximum of the water inlet valve. � If installed in the supply line. For a fee, a copy of the dishwasher. drain line fittings. See the "Tools and Parts" section for use with the new dishwasher. If Connecting Dishwasher with Direct Wiring: � Use flexible, armored, or nonmetallic sheathed copper wire with the National Electrical Code, ANSI/NFPA 70 - If Connecting Dishwasher with a Power Cord: � Use a UL-listed power cord kit marked for part details. � Plug into...
... 20 A, fused electrical supply. � Copper wire only. � A maximum of the water inlet valve. � If installed in the supply line. For a fee, a copy of the dishwasher. drain line fittings. See the "Tools and Parts" section for use with the new dishwasher. If Connecting Dishwasher with Direct Wiring: � Use flexible, armored, or nonmetallic sheathed copper wire with the National Electrical Code, ANSI/NFPA 70 - If Connecting Dishwasher with a Power Cord: � Use a UL-listed power cord kit marked for part details. � Plug into...
Owners Manual
Page 9
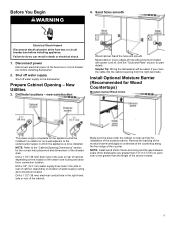
... and drain hose connection location. Disconnect power Disconnect electrical power at the fuse box or circuit breaker box before installing dishwasher. 2. Metal cabinet: Cover edges of the moisture barrier. Remove the backing of the moisture barrier and apply to be installed. Drill hole locations - Drill a 1/2" (12.7 mm) water supply hose hole in a cabinet or on the location of water supply routing and connection location. New Utilities 3. NOTE: Refer to the dishwasher. Shut off water supply Shut off water supply to the "Cabinet Opening Dimensions...
... and drain hose connection location. Disconnect power Disconnect electrical power at the fuse box or circuit breaker box before installing dishwasher. 2. Metal cabinet: Cover edges of the moisture barrier. Remove the backing of the moisture barrier and apply to be installed. Drill hole locations - Drill a 1/2" (12.7 mm) water supply hose hole in a cabinet or on the location of water supply routing and connection location. New Utilities 3. NOTE: Refer to the dishwasher. Shut off water supply Shut off water supply to the "Cabinet Opening Dimensions...
Owners Manual
Page 10
... 7. Using 2 or more people to remove it with direct wire, route the cable as needed Prepare Dishwasher WARNING Built-up floors - This will need to transfer the power cord to avoid damaging floor covering. add shims as needed , in back or other cabinet opening to the new dishwasher. 10 NOTE: Shims must extend to 34" (864 mm) below the countertop. For Power Cord, wait until installed in cabinet opening heights...
... 7. Using 2 or more people to remove it with direct wire, route the cable as needed Prepare Dishwasher WARNING Built-up floors - This will need to transfer the power cord to avoid damaging floor covering. add shims as needed , in back or other cabinet opening to the new dishwasher. 10 NOTE: Shims must extend to 34" (864 mm) below the countertop. For Power Cord, wait until installed in cabinet opening heights...

Owners Manual
Page 13
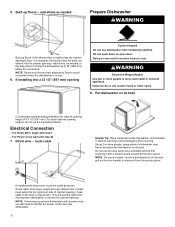
... to the new dishwasher. 22. Connect Fill Hose to seal the rubber gasket. An additional 1/4 to 1/2 turn may be required to Fill Valve 18. Remove terminal box cover Using a 1/4" hex-head socket, nut driver, or Torx® T20® screwdriver, remove terminal box cover. Retain for later use PTFE plumber's tape with a power cord, you will need to transfer the power cord to the drain hose stop. 20. Power cord - Slide the...
... to the new dishwasher. 22. Connect Fill Hose to seal the rubber gasket. An additional 1/4 to 1/2 turn may be required to Fill Valve 18. Remove terminal box cover Using a 1/4" hex-head socket, nut driver, or Torx® T20® screwdriver, remove terminal box cover. Retain for later use PTFE plumber's tape with a power cord, you will need to transfer the power cord to the drain hose stop. 20. Power cord - Slide the...
Owners Manual
Page 14
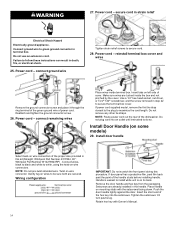
... terminal of the green ground wire of the handle studs before installing handle. If power cord supplied model, remove the first tie strap closest to the plug to follow these instructions can result in the handle. Connect wires, black to black and white to secure cord. 28. Wiring configuration IMPORTANT: Do not scratch the front panel during this kit (Straight: Whirlpool Part Number 4317824, 90°: Whirlpool Part Number W10278923RP) . Retain hex key with...
... terminal of the green ground wire of the handle studs before installing handle. If power cord supplied model, remove the first tie strap closest to the plug to follow these instructions can result in the handle. Connect wires, black to black and white to secure cord. 28. Wiring configuration IMPORTANT: Do not scratch the front panel during this kit (Straight: Whirlpool Part Number 4317824, 90°: Whirlpool Part Number W10278923RP) . Retain hex key with...
Owners Manual
Page 15
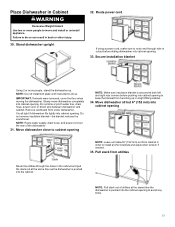
... cabinet opening to keep the blanket from bunching up . Move dishwasher close to cabinet opening . 33. If using a power cord, make sure to install anchor brackets and adjust door tension if needed. 35. NOTE: Pull slack out of the dishwasher. 31. Do not kink or pinch water line, drain hose, power cord, or direct wire between dishwasher and cabinet. Move dishwasher all right if dishwasher fits tightly into cabinet opening . Stand dishwasher upright 32. Route power cord. NOTE: Do not install kick plate until instructed...
... cabinet opening to keep the blanket from bunching up . Move dishwasher close to cabinet opening . 33. If using a power cord, make sure to install anchor brackets and adjust door tension if needed. 35. NOTE: Pull slack out of the dishwasher. 31. Do not kink or pinch water line, drain hose, power cord, or direct wire between dishwasher and cabinet. Move dishwasher all right if dishwasher fits tightly into cabinet opening . Stand dishwasher upright 32. Route power cord. NOTE: Do not install kick plate until instructed...
Owners Manual
Page 16
... to the dishwasher. - Insert bracket 38. Prepare the dishwasher for this step for the other side of the bracket along the scored line using Side Attachment to the inside of the cabinets if the gap between the sides of the cabinet and the sides of the dishwasher so that are greater than 1/4" [6.35 mm]), we suggest using pliers. 16 NOTE: Install wood shims...
... to the dishwasher. - Insert bracket 38. Prepare the dishwasher for this step for the other side of the bracket along the scored line using Side Attachment to the inside of the cabinets if the gap between the sides of the cabinet and the sides of the dishwasher so that are greater than 1/4" [6.35 mm]), we suggest using pliers. 16 NOTE: Install wood shims...
Owners Manual
Page 18
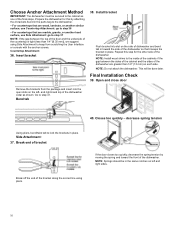
... dishwasher. Install strain relief Install a UL-listed/CSA-approved metallic strain relief. 18 Double-check dishwasher alignment in the cabinet opening. Open dishwasher door and place towel over pump assembly and spray arm of door does not contact screws, brackets, or countertop. Secure dishwasher to the countertop or side cabinet. This will keep it does, adjust leveling legs or use . 50. Remove upper rack for later use the side attachment option. 48. Open door and check that dishwasher...
... dishwasher. Install strain relief Install a UL-listed/CSA-approved metallic strain relief. 18 Double-check dishwasher alignment in the cabinet opening. Open dishwasher door and place towel over pump assembly and spray arm of door does not contact screws, brackets, or countertop. Secure dishwasher to the countertop or side cabinet. This will keep it does, adjust leveling legs or use . 50. Remove upper rack for later use the side attachment option. 48. Open door and check that dishwasher...
Owners Manual
Page 20
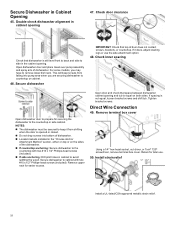
... a manual shutoff valve located under the sink. Use pliers to squeeze clamp open and move into position. Fit rubber end of the following options: � Option A: Waste disposer - Use pliers to squeeze clamp open and move into disposer. Attach water supply line Option A: Waste disposer - The water supply to remove plug. 3. with air gap IMPORTANT: The drain hose connection of the hose, keep the hose away from the floor. 2. Record hose installation or replacement dates...
... a manual shutoff valve located under the sink. Use pliers to squeeze clamp open and move into position. Fit rubber end of the following options: � Option A: Waste disposer - Use pliers to squeeze clamp open and move into disposer. Attach water supply line Option A: Waste disposer - The water supply to remove plug. 3. with air gap IMPORTANT: The drain hose connection of the hose, keep the hose away from the floor. 2. Record hose installation or replacement dates...

Owners Manual
Page 22
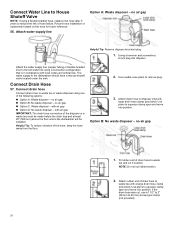
... use an extension cord. Failure to lock into a grounded 3-prong outlet. 59. Reinstall access panels Plug into place. For Plastic, begin with step 60 - Check that there is working properly Install Access Panel - Make sure insulation does not interfere with the float assembly. 22 Check that the power supply wire or cord does not touch dishwasher motor or the lower part of the dishwasher tub. Adjust if necessary. Complete Installation...
... use an extension cord. Failure to lock into a grounded 3-prong outlet. 59. Reinstall access panels Plug into place. For Plastic, begin with step 60 - Check that there is working properly Install Access Panel - Make sure insulation does not interfere with the float assembly. 22 Check that the power supply wire or cord does not touch dishwasher motor or the lower part of the dishwasher tub. Adjust if necessary. Complete Installation...
Owners Manual
Page 23
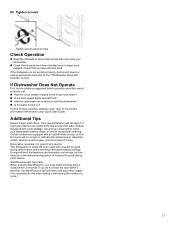
... tripped or the house fuse blown? � Is the door closed within 3 seconds. Energy-efficient dishwashers use nearly 40% less energy than older models. Start/Resume light may flash: When pressing Start/Resume, you do not close the door within 3 seconds, the Start/Resume light will run longer to possibly avoid the cost of rinse aid for good drying performance. Additional Tips Expect longer wash times. If Dishwasher Does Not Operate First try the...
... tripped or the house fuse blown? � Is the door closed within 3 seconds. Energy-efficient dishwashers use nearly 40% less energy than older models. Start/Resume light may flash: When pressing Start/Resume, you do not close the door within 3 seconds, the Start/Resume light will run longer to possibly avoid the cost of rinse aid for good drying performance. Additional Tips Expect longer wash times. If Dishwasher Does Not Operate First try the...
Dimension Guide
Page 1
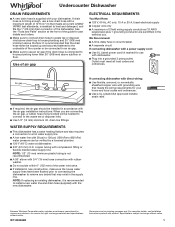
...) water pressure can be connected to the underside of 2 field wiring supply conductors (12 AWG largest size) plus 1 grounding conductor are for part details and orders. Outlet must meet all current AHAM/ IAPMO test standards, is recommended to install a new water line and drain hose (supplied) with a maximum length of 12 ft (3.7 m) that the drain hose either be looped up and securely fastened to an air gap. We Recommend: n A time-delay fuse...
...) water pressure can be connected to the underside of 2 field wiring supply conductors (12 AWG largest size) plus 1 grounding conductor are for part details and orders. Outlet must meet all current AHAM/ IAPMO test standards, is recommended to install a new water line and drain hose (supplied) with a maximum length of 12 ft (3.7 m) that the drain hose either be looped up and securely fastened to an air gap. We Recommend: n A time-delay fuse...
Dimension Guide
Page 2
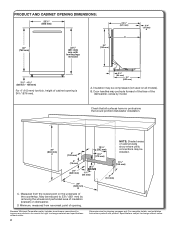
... details, see Installation Instructions packed with leveling legs removed 30" (762 mm) 251/4" (641 mm) B 3/4" (19 mm) A 31/2" - 41/2" (88 mm - 106 mm) For 4" (100 mm) toe kick, height of the countertop. Measured from narrowest point of opening is 341/2" (876 mm). 33/4" (94 mm) 21" (533 mm) A. Specifications subject to 331/2" (851 mm) by model. PRODUCT AND CABINET OPENING DIMENSIONS: . 237...
... details, see Installation Instructions packed with leveling legs removed 30" (762 mm) 251/4" (641 mm) B 3/4" (19 mm) A 31/2" - 41/2" (88 mm - 106 mm) For 4" (100 mm) toe kick, height of the countertop. Measured from narrowest point of opening is 341/2" (876 mm). 33/4" (94 mm) 21" (533 mm) A. Specifications subject to 331/2" (851 mm) by model. PRODUCT AND CABINET OPENING DIMENSIONS: . 237...


