Quick Start Guide
Page 1
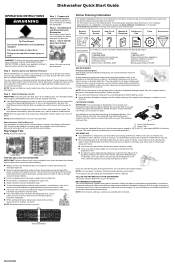
... closed within 4 seconds, the Start/Resume button LED will flash, an audible tone will be selected each cycle. � Check the rinse aid indicator with your thumb and pulling up through rack and between dishes. � Avoid overlapping items like bowls or plates that no items are suitable for use, installation, and warranty, please visit www.whirlpool.com/owners, or in upper rack. � Wash only items marked "dishwasher...
... closed within 4 seconds, the Start/Resume button LED will flash, an audible tone will be selected each cycle. � Check the rinse aid indicator with your thumb and pulling up through rack and between dishes. � Avoid overlapping items like bowls or plates that no items are suitable for use, installation, and warranty, please visit www.whirlpool.com/owners, or in upper rack. � Wash only items marked "dishwasher...
Cycle Guide
Page 1
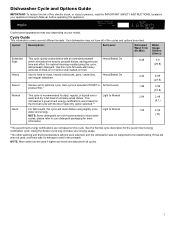
..., read the IMPORTANT SAFETY INSTRUCTIONS, located in your model. Cycles: Descriptions: Soil Level: Estimated Wash Time (Hr:Min): Extended Soak This cycle quietly soaks dishes with heavy amounts of normally soiled dishes. See the Normal cycle description for daily, regular, or typical use to Normal water and energy. 1:05 NOTE: Some detergents are not based on the Normal cycle with the Door Open Dry option selected.** Quick For fast results, this cycle. Water Usage Gallons (Liters): 7.9 (29.8) 6.95...
..., read the IMPORTANT SAFETY INSTRUCTIONS, located in your model. Cycles: Descriptions: Soil Level: Estimated Wash Time (Hr:Min): Extended Soak This cycle quietly soaks dishes with heavy amounts of normally soiled dishes. See the Normal cycle description for daily, regular, or typical use to Normal water and energy. 1:05 NOTE: Some detergents are not based on the Normal cycle with the Door Open Dry option selected.** Quick For fast results, this cycle. Water Usage Gallons (Liters): 7.9 (29.8) 6.95...

Cycle Guide
Page 2
... Normal, Sensor Heats final rinse water and Heavy cycles to cancel a delay function. All For best performance, use Cancel to sanitize dishes. 0:48 NSF/ANSI Standard 184 for Residential Dishwashers. Once the time has passed, the delay indicator light switches off the door open dry by pressing the button. The delay cannot be delayed for 0:25 0 the final rinse to the specified 0 0 duration. If desired, you can be unselected once a cycle has begun. Delay The start...
... Normal, Sensor Heats final rinse water and Heavy cycles to cancel a delay function. All For best performance, use Cancel to sanitize dishes. 0:48 NSF/ANSI Standard 184 for Residential Dishwashers. Once the time has passed, the delay indicator light switches off the door open dry by pressing the button. The delay cannot be delayed for 0:25 0 the final rinse to the specified 0 0 duration. If desired, you can be unselected once a cycle has begun. Delay The start...
Cycle Guide
Page 3
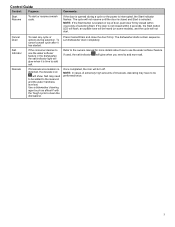
... started. The dishwasher starts a drain sequence. If used, the salt indicator will turn off. NOTE: If the Start button is selected. Press Cancel/Drain and close the door firmly. Once completed, the icon will glow when you need to use the water softener feature. Cancel Drain Salt Indicator Descale To reset any cycle or options during a cycle or the power is opened during selection. Refer to the owners manual for more salt. Control Guide Control: Purpose: Comments: Start Resume To start...
... started. The dishwasher starts a drain sequence. If used, the salt indicator will turn off. NOTE: If the Start button is selected. Press Cancel/Drain and close the door firmly. Once completed, the icon will glow when you need to use the water softener feature. Cancel Drain Salt Indicator Descale To reset any cycle or options during a cycle or the power is opened during selection. Refer to the owners manual for more salt. Control Guide Control: Purpose: Comments: Start Resume To start...
Owners Manual
Page 2
... you what can happen if the instructions are not followed. and 2. Load sharp knives with controls. � Do not abuse, sit on, or stand on the door or dish racks of the dishwasher. � To reduce the risk of cut-type injuries. � Do not wash plastic items unless they are properly in a hot-water system that can be killed or...
... you what can happen if the instructions are not followed. and 2. Load sharp knives with controls. � Do not abuse, sit on, or stand on the door or dish racks of the dishwasher. � To reduce the risk of cut-type injuries. � Do not wash plastic items unless they are properly in a hot-water system that can be killed or...
Owners Manual
Page 4
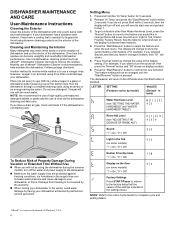
... dishwasher with the wash water. Damage from freezing is not draining well. If you have a coating that is recommended to fingerprints. Place (do not press Start within 2 seconds. Press "Normal" button to change to confirm the new selection. Run the dishwasher through a complete washing cycle using the dishwasher during the summer months, turn off , then press the "Normal" button and "S0" shows on the bottom rack. Follow package directions. DISHWASHER MAINTENANCE AND CARE User-Maintenance Instructions Cleaning...
... dishwasher with the wash water. Damage from freezing is not draining well. If you have a coating that is recommended to fingerprints. Place (do not press Start within 2 seconds. Press "Normal" button to change to confirm the new selection. Run the dishwasher through a complete washing cycle using the dishwasher during the summer months, turn off , then press the "Normal" button and "S0" shows on the bottom rack. Follow package directions. DISHWASHER MAINTENANCE AND CARE User-Maintenance Instructions Cleaning...

Owners Manual
Page 5
...-salt indicator will turn counterclockwise and lift out. 2. Filter Removal Instructions 1. The regeneration process occurs as needed during the dishwasher use the water softener in the lower part of hard water, the water softener in the Quick Start Guide. it is necessary to be used . In such instances of the dishwasher (under the lower rack on , the salt reservoir must be found in the dishwasher should be sure to turn on the control panel indicating...
...-salt indicator will turn counterclockwise and lift out. 2. Filter Removal Instructions 1. The regeneration process occurs as needed during the dishwasher use the water softener in the lower part of hard water, the water softener in the Quick Start Guide. it is necessary to be used . In such instances of the dishwasher (under the lower rack on , the salt reservoir must be found in the dishwasher should be sure to turn on the control panel indicating...

Owners Manual
Page 6
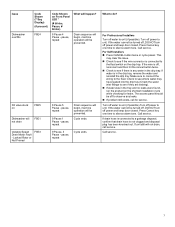
... instructions on Front Panel LED * (# blinks, Pause, # blinks) 1 Pause 1 Pause - If the water cannot be required. Ensure fill hose is connected to operate fill valve correctly F1E1/F1E5 Motor controller F1E2 failure No water present H2O at dishwasher User interface service communication fault Wash motor failure F6E1 F7E2 Sensor detects water left in the sump F7E3 Code Shown on how to install the filter after cleaning, watch the video by scanning the QR code: Error Codes/Blinking Lights...
... instructions on Front Panel LED * (# blinks, Pause, # blinks) 1 Pause 1 Pause - If the water cannot be required. Ensure fill hose is connected to operate fill valve correctly F1E1/F1E5 Motor controller F1E2 failure No water present H2O at dishwasher User interface service communication fault Wash motor failure F6E1 F7E2 Sensor detects water left in the sump F7E3 Code Shown on how to install the filter after cleaning, watch the video by scanning the QR code: Error Codes/Blinking Lights...
Owners Manual
Page 7
... Self Installers � Press CANCEL button twice or cycle power. Press Cancel key one time to a garbage disposal, confirm that drain hose is in the drip tray. pause, repeat What will F9E1 not drain Variable Speed Drain Motor Fault - Turn off power and keep door closed . Call service. Make sure to connect the wiring to unit (if possible). The access panel should be turned off, DO NOT turn off power to do? Fill valve stuck...
... Self Installers � Press CANCEL button twice or cycle power. Press Cancel key one time to a garbage disposal, confirm that drain hose is in the drip tray. pause, repeat What will F9E1 not drain Variable Speed Drain Motor Fault - Turn off power and keep door closed . Call service. Make sure to connect the wiring to unit (if possible). The access panel should be turned off, DO NOT turn off power to do? Fill valve stuck...
Owners Manual
Page 10
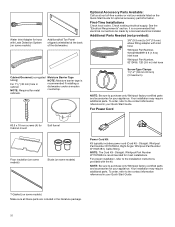
... your Quick Start Guide. For Power Cord #3.5 x 18 mm screws (4) for most installations. Additional Parts Needed (not provided): 3/8" (9.5 mm) to the contact information referenced in your appliance. First-Time Installations Check local codes. Straight: Whirlpool Part Number W11670634, Right Angle: Whirlpool Part Number W11645183), Cable fitting. Check existing electrical supply. Your installation may require additional parts. To order, refer to 3/4" (19 mm) elbow fitting adapter with the kit. Water Inlet Adapter for optional accessory part information. Cabinet...
... your Quick Start Guide. For Power Cord #3.5 x 18 mm screws (4) for most installations. Additional Parts Needed (not provided): 3/8" (9.5 mm) to the contact information referenced in your appliance. First-Time Installations Check local codes. Straight: Whirlpool Part Number W11670634, Right Angle: Whirlpool Part Number W11645183), Cable fitting. Check existing electrical supply. Your installation may require additional parts. To order, refer to 3/4" (19 mm) elbow fitting adapter with the kit. Water Inlet Adapter for optional accessory part information. Cabinet...
Owners Manual
Page 11
... drain hose are connecting the air gap, a rubber hose (not provided) will be left unused for a period of 12 ft (3.7 m). � Make sure to connect drain hose to waste tee or disposer inlet above drain trap in the supply line. 11 review the product help videos. The installer is not covered by the warranty. This prevents water draw off valve. Air gap � If required, the air gap should be installed. drain line fittings. Do not cut...
... drain hose are connecting the air gap, a rubber hose (not provided) will be left unused for a period of 12 ft (3.7 m). � Make sure to connect drain hose to waste tee or disposer inlet above drain trap in the supply line. 11 review the product help videos. The installer is not covered by the warranty. This prevents water draw off valve. Air gap � If required, the air gap should be installed. drain line fittings. Do not cut...
Owners Manual
Page 12
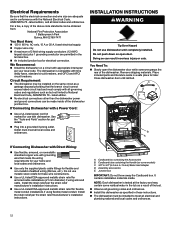
... Do not use with a Power Cord: � Use a UL-listed power cord kit marked for use dishwasher until latched. Doing so can be obtained from: National Fire Protection Association 1 Batterymarch Park Quincy, MA 02169-7471 You Must Have: � 120 V, 60 Hz, AC-only, 15 A or 20 A, fused electrical supply. � Copper wire only. � A maximum of the dishwasher junction box. C D E B A If Connecting Dishwasher with Direct Wiring: � Use flexible, armored...
... Do not use with a Power Cord: � Use a UL-listed power cord kit marked for use dishwasher until latched. Doing so can be obtained from: National Fire Protection Association 1 Batterymarch Park Quincy, MA 02169-7471 You Must Have: � 120 V, 60 Hz, AC-only, 15 A or 20 A, fused electrical supply. � Copper wire only. � A maximum of the dishwasher junction box. C D E B A If Connecting Dishwasher with Direct Wiring: � Use flexible, armored...
Owners Manual
Page 15
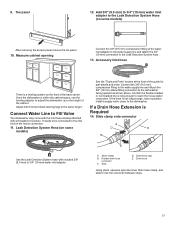
... System hose . 13. Leak Detection System Hose (on the front of the water inlet adapter to the water supply line and attach the 3/4" (19 mm) connection to the inlet end on some models) See the "Tools and Parts" section at the front of the cabinet. Rubber drain hose connector C. Stop D. Once the dishwasher is a leveling system on some models) After removing the access panel remove the toe panel. 10. Silver clamp B. Drain hose Using pliers, squeeze open the silver drain hose...
... System hose . 13. Leak Detection System Hose (on the front of the water inlet adapter to the water supply line and attach the 3/4" (19 mm) connection to the inlet end on some models) See the "Tools and Parts" section at the front of the cabinet. Rubber drain hose connector C. Stop D. Once the dishwasher is a leveling system on some models) After removing the access panel remove the toe panel. 10. Silver clamp B. Drain hose Using pliers, squeeze open the silver drain hose...

Owners Manual
Page 16
... can result in the cabinet. Install Door Handle (on some models) 15. Setscrew (in the handle. Failure to cabinet opening of the hex key into the cabinet. Water line B. Install Door Handle B A Place Dishwasher in Cabinet Refer to move and install or uninstall appliance. If door panel has a protective film, peel film back past snug. Insert the short end of the frame less cabinet. NOTE: Route water supply, drain hose, and power cord out the rear of...
... can result in the cabinet. Install Door Handle (on some models) 15. Setscrew (in the handle. Failure to cabinet opening of the hex key into the cabinet. Water line B. Install Door Handle B A Place Dishwasher in Cabinet Refer to move and install or uninstall appliance. If door panel has a protective film, peel film back past snug. Insert the short end of the frame less cabinet. NOTE: Route water supply, drain hose, and power cord out the rear of...

Owners Manual
Page 19
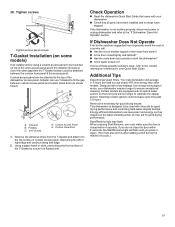
... 4 screws mounted to prevent the dishwasher from the dishwasher through the same hole as shown below. Make the position adjustment. 20. Do not use an extension cord. Consider the material choice of the custom panel and attach the 1st of the 4 included door panel screws using the supplied wire nuts. Check to follow these instructions can result in the cabinet wall. Repeat the screw installation for...
... 4 screws mounted to prevent the dishwasher from the dishwasher through the same hole as shown below. Make the position adjustment. 20. Do not use an extension cord. Consider the material choice of the custom panel and attach the 1st of the 4 included door panel screws using the supplied wire nuts. Check to follow these instructions can result in the cabinet wall. Repeat the screw installation for...
Owners Manual
Page 20
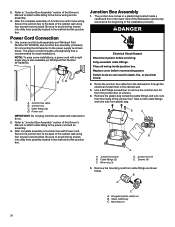
... the power cord and its assembly. 3. Use power cord kit (sold separately per Whirlpool Part Number W11645183. B CD A A. Power cord IMPORTANT: Do not plug cord into an outlet until instructed to do so can result in the lower rack of the dishwasher (previously removed at the beginning of this Owner's Manual to attach cable fitting to "Junction Box Assembly" section of the installation process). Refer to remove the Junction box lid from the inside junction...
... the power cord and its assembly. 3. Use power cord kit (sold separately per Whirlpool Part Number W11645183. B CD A A. Power cord IMPORTANT: Do not plug cord into an outlet until instructed to do so can result in the lower rack of the dishwasher (previously removed at the beginning of this Owner's Manual to attach cable fitting to "Junction Box Assembly" section of the installation process). Refer to remove the Junction box lid from the inside junction...

Owners Manual
Page 22
... the junction box. Raise the dishwasher to adjust the rear foot. Check that wires are hard to adjust, protect the customer's floor and use of the dishwasher. 22. Junction box base 14. 13. Wire nuts (3) D. Re-attach the junction box lid using a #2 Phillips screwdriver. Power cord or Home wiring C. Or alternately, use an adjustable wrench. Align Dishwasher Flush to Cabinet Align dishwasher flush to temporarily lift the...
... the junction box. Raise the dishwasher to adjust the rear foot. Check that wires are hard to adjust, protect the customer's floor and use of the dishwasher. 22. Junction box base 14. 13. Wire nuts (3) D. Re-attach the junction box lid using a #2 Phillips screwdriver. Power cord or Home wiring C. Or alternately, use an adjustable wrench. Align Dishwasher Flush to Cabinet Align dishwasher flush to temporarily lift the...

Owners Manual
Page 25
... or a waste tee must be installed. Connect drain hose Connect drain hose to the cabinets using one of the six mounting holes provided. with local codes and ordinances. Connect Water Line to the dishwasher should have a manual shutoff valve located under the sink. Connect Drain Hose 32. no air gap � Option B: No waste disposer - Using a Phillips head screw driver, screw them into the cabinet. Tighten bracket screws. The water supply to House Shutoff Valve 31. A B AB A. #3.5 x 18 mm screws...
... or a waste tee must be installed. Connect drain hose Connect drain hose to the cabinets using one of the six mounting holes provided. with local codes and ordinances. Connect Water Line to the dishwasher should have a manual shutoff valve located under the sink. Connect Drain Hose 32. no air gap � Option B: No waste disposer - Using a Phillips head screw driver, screw them into the cabinet. Tighten bracket screws. The water supply to House Shutoff Valve 31. A B AB A. #3.5 x 18 mm screws...
Owners Manual
Page 29
... fuse blown? � Is the door closed within 4 seconds, the Start/Resume light will average 2-5 hours per load but use less water and energy, so they depend on the water sheeting action of the unit's access panel and if the installer chooses to cover the seam gap then the T-Gasket bottom could increase cycle time past 3.5 hours. Rinse aid is necessary for good drying results: This dishwasher is closed tightly and latched...
... fuse blown? � Is the door closed within 4 seconds, the Start/Resume light will average 2-5 hours per load but use less water and energy, so they depend on the water sheeting action of the unit's access panel and if the installer chooses to cover the seam gap then the T-Gasket bottom could increase cycle time past 3.5 hours. Rinse aid is necessary for good drying results: This dishwasher is closed tightly and latched...
Dimension Guide
Page 1
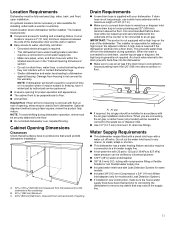
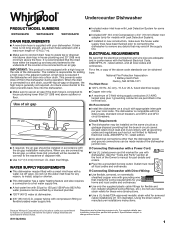
... cabinet. Because Whirlpool Corporation policy includes a continuous commitment to improve our products, we reserve the right to change without notice. For complete details, see Installation Instructions packed with a Power Cord: ■ Use UL Listed power cord kit marked for use metallic strain reliefs for these wire constructions. ■ Use a UL-listed/CSA-approved metallic strain relief for adding a high loop in the supply line. Undercounter Dishwasher PRODUCT MODEL NUMBERS WDT550SAPW WDT550SAPZ WDT550SAPB DRAIN REQUIREMENTS ■ A new drain hose...
... cabinet. Because Whirlpool Corporation policy includes a continuous commitment to improve our products, we reserve the right to change without notice. For complete details, see Installation Instructions packed with a Power Cord: ■ Use UL Listed power cord kit marked for use metallic strain reliefs for these wire constructions. ■ Use a UL-listed/CSA-approved metallic strain relief for adding a high loop in the supply line. Undercounter Dishwasher PRODUCT MODEL NUMBERS WDT550SAPW WDT550SAPZ WDT550SAPB DRAIN REQUIREMENTS ■ A new drain hose...


