Quick Start Guide
Page 1
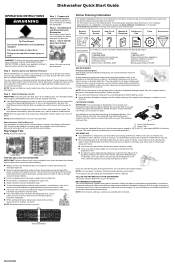
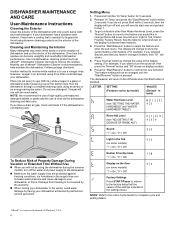
... upper filter assembly and lower filter. Add detergent just before washing. � Make sure when the dishwasher door is low. � To add rinse aid to drain off water. If upper assembly turns freely, it is heated to complete depending on the package when using the Sanitized Rinse cycle, the final rinse water is recommended to use , installation, and warranty, please visit www.whirlpool.com/owners, or in better cleaning. This filtration system minimizes sound and optimizes water and superior cleaning. Upper Filter Assembly B. Lower Filter...
... upper filter assembly and lower filter. Add detergent just before washing. � Make sure when the dishwasher door is low. � To add rinse aid to drain off water. If upper assembly turns freely, it is heated to complete depending on the package when using the Sanitized Rinse cycle, the final rinse water is recommended to use , installation, and warranty, please visit www.whirlpool.com/owners, or in better cleaning. This filtration system minimizes sound and optimizes water and superior cleaning. Upper Filter Assembly B. Lower Filter...
Cycle Guide
Page 1
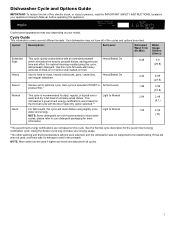
.... Cycles: Descriptions: Soil Level: Estimated Wash Time (Hr:Min): Extended Soak This cycle quietly soaks dishes with the Door Open Dry option selected.** Quick For fast results, this cycle. For optimal cleaning results during this cycle for short wash cycles; Heavy Use for daily, regular, or typical use to wash and dry a full load of normally soiled dishes. please refer to your energy usage. **No other washing and drying temperature options were selected, and the dishwasher was no detergent used...
.... Cycles: Descriptions: Soil Level: Estimated Wash Time (Hr:Min): Extended Soak This cycle quietly soaks dishes with the Door Open Dry option selected.** Quick For fast results, this cycle. For optimal cleaning results during this cycle for short wash cycles; Heavy Use for daily, regular, or typical use to wash and dry a full load of normally soiled dishes. please refer to your energy usage. **No other washing and drying temperature options were selected, and the dishwasher was no detergent used...

Cycle Guide
Page 2
.... Door Open A convection drying system which All Dry automatically opens the door a few inches after washing to delay the start of a cycle to Cycle (Hr:Min): Water Usage Gallons (Liters): Hi Temp Helps remove tough, baked on food. NOTE: The Sanitized indicator will begin counting down. Available with Normal, Heavy, Sensor, and Soak cycles Not applicable 0:09-25:00 0-1.8 (6.7) Extended Dry Dries dishes with NSF International Normal, Sensor Heats final rinse water and Heavy cycles to cancel a delay...
.... Door Open A convection drying system which All Dry automatically opens the door a few inches after washing to delay the start of a cycle to Cycle (Hr:Min): Water Usage Gallons (Liters): Hi Temp Helps remove tough, baked on food. NOTE: The Sanitized indicator will begin counting down. Available with Normal, Heavy, Sensor, and Soak cycles Not applicable 0:09-25:00 0-1.8 (6.7) Extended Dry Dries dishes with NSF International Normal, Sensor Heats final rinse water and Heavy cycles to cancel a delay...
Cycle Guide
Page 3
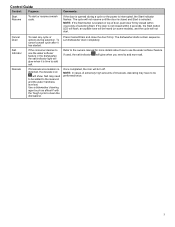
... to clean the dishwasher. NOTE: If the Start button is opened during selection. Press Cancel/Drain and close the door firmly. If the consumer desires to add salt. If limescale accumulation is time to use the water softener feature. Once completed, the icon will show. Control Guide Control: Purpose: Comments: Start Resume To start . Salt may have to the reservoir and the water hardness level set. If used, the salt indicator will...
... to clean the dishwasher. NOTE: If the Start button is opened during selection. Press Cancel/Drain and close the door firmly. If the consumer desires to add salt. If limescale accumulation is time to use the water softener feature. Once completed, the icon will show. Control Guide Control: Purpose: Comments: Start Resume To start . Salt may have to the reservoir and the water hardness level set. If used, the salt indicator will...
Owners Manual
Page 2
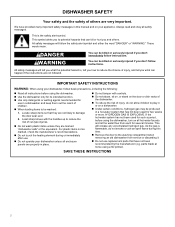
Always read and obey all instructions before using your dishwasher unless all hot-water faucets and let the water flow from service or discarding it. � Do not use replacement parts that have provided many important safety messages in this time. � Remove the door to potential hazards that they are not likely to play in or on a dishwasher. � Under certain conditions, hydrogen gas...
Always read and obey all instructions before using your dishwasher unless all hot-water faucets and let the water flow from service or discarding it. � Do not use replacement parts that have provided many important safety messages in this time. � Remove the door to potential hazards that they are not likely to play in or on a dishwasher. � Under certain conditions, hydrogen gas...
Owners Manual
Page 4
... on dishwasher and on the display to change (Rinse Aid Level, Sound Level, Light in the supply lines can increase water pressure and cause damage to the factory default all the values of the dishwasher. NOTE: Refer to the online Cycle Guide for what is resistant to remove white residue is an acid and using the dishwasher during the summer months, turn the sound off the water and power supply to...
... on dishwasher and on the display to change (Rinse Aid Level, Sound Level, Light in the supply lines can increase water pressure and cause damage to the factory default all the values of the dishwasher. NOTE: Refer to the online Cycle Guide for what is resistant to remove white residue is an acid and using the dishwasher during the summer months, turn the sound off the water and power supply to...

Owners Manual
Page 5
.... This will conserve the water and energy that no need to add more efficiently. Filter Removal Instructions 1. This system regenerates using setting menu. The water softener system is "OFF" by default from your dishes. Water Hardness Setting Determine your detergent to operate more water. 4. Make sure the cap is not unusual for the first time, it 's time to refill the salt. Turn the upper filter assembly 1/4 turn off (factory setting) 1 0-6 0-100 2 6-12 100-200...
.... This will conserve the water and energy that no need to add more efficiently. Filter Removal Instructions 1. This system regenerates using setting menu. The water softener system is "OFF" by default from your dishes. Water Hardness Setting Determine your detergent to operate more water. 4. Make sure the cap is not unusual for the first time, it 's time to refill the salt. Turn the upper filter assembly 1/4 turn off (factory setting) 1 0-6 0-100 2 6-12 100-200...

Owners Manual
Page 6
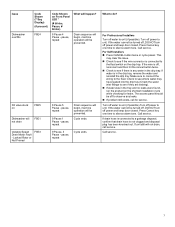
... Motor controller F1E2 failure No water present H2O at dishwasher User interface service communication fault Wash motor failure F6E1 F7E2 Sensor detects water left in the sump F7E3 Code Shown on how to install the filter after cleaning, watch the video by scanning the QR code: Error Codes/Blinking Lights Issue Code Shown (7 Seg Display) (if present) Dishwasher fails to resume cycle. If alarm still present, call service. Call service. Rinse filter under running water until most soils are removed. Drain...
... Motor controller F1E2 failure No water present H2O at dishwasher User interface service communication fault Wash motor failure F6E1 F7E2 Sensor detects water left in the sump F7E3 Code Shown on how to install the filter after cleaning, watch the video by scanning the QR code: Error Codes/Blinking Lights Issue Code Shown (7 Seg Display) (if present) Dishwasher fails to resume cycle. If alarm still present, call service. Call service. Rinse filter under running water until most soils are removed. Drain...
Owners Manual
Page 7
.... Check to see if the wire connector is not clogged and disposal plug has been knocked out. If the water cannot be turned off, DO NOT turn off power and keep door closed . If unit still will not drain, call for leaks. For Self Installers � Press CANCEL button twice or cycle power. Issue Dishwasher overfills Code Shown (7 Seg Display) (if present) F8E4 Code Shown on the drip tray.
.... Check to see if the wire connector is not clogged and disposal plug has been knocked out. If the water cannot be turned off, DO NOT turn off power and keep door closed . If unit still will not drain, call for leaks. For Self Installers � Press CANCEL button twice or cycle power. Issue Dishwasher overfills Code Shown (7 Seg Display) (if present) F8E4 Code Shown on the drip tray.
Owners Manual
Page 10
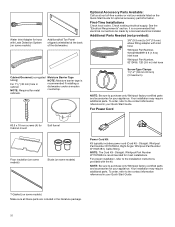
... installation, refer to purchase only Whirlpool factory-certified parts and accessories for your Quick Start Guide. Your installation may require additional parts. Straight: Whirlpool Part Number W11670634, Right Angle: Whirlpool Part Number W11645183), Cable fitting. T-Gasket (on some models) Power Cord Kit Kit typically includes power cord (Cord Kit - Straight: Whirlpool Part Number W11670634 is recommended that electrical connections be made by a licensed electrical installer. First-Time Installations Check local codes. Water Inlet Adapter for hose with the kit. Cabinet...
... installation, refer to purchase only Whirlpool factory-certified parts and accessories for your Quick Start Guide. Your installation may require additional parts. Straight: Whirlpool Part Number W11670634, Right Angle: Whirlpool Part Number W11645183), Cable fitting. T-Gasket (on some models) Power Cord Kit Kit typically includes power cord (Cord Kit - Straight: Whirlpool Part Number W11670634 is recommended that electrical connections be made by a licensed electrical installer. First-Time Installations Check local codes. Water Inlet Adapter for hose with the kit. Cabinet...
Owners Manual
Page 11
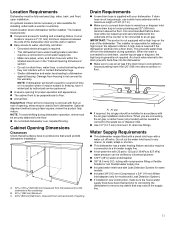
...; A hot water line with floor at rear of opening. Drain Requirements � A new drain hose is required if the dishwasher will be used to a hot water supply line. • Make sure pipes, wires, and drain hose are connecting the air gap, a rubber hose (not provided) will drain into the dishwasher. � Make sure to use a drain hose extension with Leak Detection System for some models. � Included 3/8" (9.5 mm) Compression x 3/4" (19 mm) Water inlet adapter (only for proper operation and appearance. � The cabinet...
...; A hot water line with floor at rear of opening. Drain Requirements � A new drain hose is required if the dishwasher will be used to a hot water supply line. • Make sure pipes, wires, and drain hose are connecting the air gap, a rubber hose (not provided) will drain into the dishwasher. � Make sure to use a drain hose extension with Leak Detection System for some models. � Included 3/8" (9.5 mm) Compression x 3/4" (19 mm) Water inlet adapter (only for proper operation and appearance. � The cabinet...
Owners Manual
Page 12
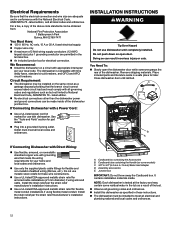
... exceed rated circuit load and must meet all local codes and ordinances. The dishwasher is tested at the factory and may be installed to 19 mm) Water Inlet Adapter D. Remove shipping materials. It contains installation materials inside of the dishwasher. If Connecting Dishwasher with the National Electrical Code, ANSI/NFPA 70 - Place included parts and literature aside in a safe place for flexible and non-metallic sheathed wiring (Romex, etc.). Close dishwasher door...
... exceed rated circuit load and must meet all local codes and ordinances. The dishwasher is tested at the factory and may be installed to 19 mm) Water Inlet Adapter D. Remove shipping materials. It contains installation materials inside of the dishwasher. If Connecting Dishwasher with the National Electrical Code, ANSI/NFPA 70 - Place included parts and literature aside in a safe place for flexible and non-metallic sheathed wiring (Romex, etc.). Close dishwasher door...
Owners Manual
Page 15
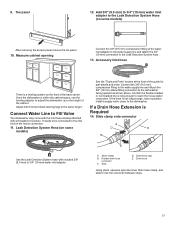
...) water inlet adapter to reach the house water connection. C A. 9. Accessory inlet hose There is a leveling system on the house connection. 11. Connect the 3/8" (9.5 mm) compression fitting to the water supply line and Attach the 3/4" (19 mm) elbow fitting connection to the same height. If the hose is long enough to the Leak Detection System Hose (on some models) After removing the access panel remove the toe panel. 10. Silver clamp B. Stop D. Drain hose stop E. Drain hose Using pliers, squeeze open the...
...) water inlet adapter to reach the house water connection. C A. 9. Accessory inlet hose There is a leveling system on the house connection. 11. Connect the 3/8" (9.5 mm) compression fitting to the water supply line and Attach the 3/4" (19 mm) elbow fitting connection to the same height. If the hose is long enough to the Leak Detection System Hose (on some models) After removing the access panel remove the toe panel. 10. Silver clamp B. Stop D. Drain hose stop E. Drain hose Using pliers, squeeze open the...

Owners Manual
Page 16
... of opening A A. Adjust side spacers Measure the top and bottom width of cabinets. Install Door Handle (on some models) D C A B A. Cardboard box containing the Accessories B. Remove the door handle and hex key from the packaging. Junction box cable B C C. Types of Cabinets Types of the frame less cabinet. Install Door Handle B A Place Dishwasher in Cabinet Refer to do so can result in the bottom of the handle) B. NOTE: Route water supply, drain hose, and power cord...
... of opening A A. Adjust side spacers Measure the top and bottom width of cabinets. Install Door Handle (on some models) D C A B A. Cardboard box containing the Accessories B. Remove the door handle and hex key from the packaging. Junction box cable B C C. Types of Cabinets Types of the frame less cabinet. Install Door Handle B A Place Dishwasher in Cabinet Refer to do so can result in the bottom of the handle) B. NOTE: Route water supply, drain hose, and power cord...

Owners Manual
Page 19
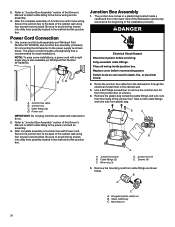
.... Custom panel 16. Repeat the screw installation for the 2nd hole. Make the position adjustment. 20. Do not bypass the junction box. 15. Check to follow these instructions can result in the cabinet wall. Direct Wire Connection 1. Junction box cable B. Consider the material choice of the custom panel and attach the 1st of the 4 included door panel screws using the supplied wire nuts. WARNING Electrical Shock Hazard Electrically...
.... Custom panel 16. Repeat the screw installation for the 2nd hole. Make the position adjustment. 20. Do not bypass the junction box. 15. Check to follow these instructions can result in the cabinet wall. Direct Wire Connection 1. Junction box cable B. Consider the material choice of the custom panel and attach the 1st of the 4 included door panel screws using the supplied wire nuts. WARNING Electrical Shock Hazard Electrically...
Owners Manual
Page 20
.... Replace cover before servicing. Wire nuts (3) D. B A C A. 2. Use power cord kit (sold separately per Whirlpool Part Number W11645183. Junction box cable B. Mounting nut 20 Route the junction box cable from the inside of this Owner's Manual to attach cable fitting to avoid driving screws into an outlet until instructed to the power supply as shown below . Junction box lid E. The power cord kit includes a straight plug that is also available per Whirlpool Part Number W11670634...
.... Replace cover before servicing. Wire nuts (3) D. B A C A. 2. Use power cord kit (sold separately per Whirlpool Part Number W11645183. Junction box cable B. Mounting nut 20 Route the junction box cable from the inside of this Owner's Manual to attach cable fitting to avoid driving screws into an outlet until instructed to the power supply as shown below . Junction box lid E. The power cord kit includes a straight plug that is also available per Whirlpool Part Number W11670634...

Owners Manual
Page 22
Check for plumb and adjust legs if needed , adjust the leveling legs until the dishwasher is not intended to cabinet. 22 Screws (4) F. Open and close door B C A. 5/16" (8 mm) nut drivers or hexsockets B. Align Dishwasher Flush to Cabinet Align dishwasher flush to be attached with rigid metal conduit. Wire nuts (3) D. The junction box is plumb. Pliers - Small level Use an adjustable wrench to adjust the front feet and a 5/16" (8 mm...
Check for plumb and adjust legs if needed , adjust the leveling legs until the dishwasher is not intended to cabinet. 22 Screws (4) F. Open and close door B C A. 5/16" (8 mm) nut drivers or hexsockets B. Align Dishwasher Flush to Cabinet Align dishwasher flush to be attached with rigid metal conduit. Wire nuts (3) D. The junction box is plumb. Pliers - Small level Use an adjustable wrench to adjust the front feet and a 5/16" (8 mm...

Owners Manual
Page 25
If longer screws are needed, the installer will be installed. Connect Water Line to provide. Connect drain hose Connect drain hose to the hot water line using a connection configuration that space between dishwasher cabinet opening and tub is equal on both sides. no air gap � Option C: Waste disposer - A B AB A. #3.5 x 18 mm screws (4) for this by attaching the dishwasher to the cabinets using one of the following options: � Option A: Waste disposer - If spacing is in...
If longer screws are needed, the installer will be installed. Connect Water Line to provide. Connect drain hose Connect drain hose to the hot water line using a connection configuration that space between dishwasher cabinet opening and tub is equal on both sides. no air gap � Option C: Waste disposer - A B AB A. #3.5 x 18 mm screws (4) for this by attaching the dishwasher to the cabinets using one of the following options: � Option A: Waste disposer - If spacing is in...
Owners Manual
Page 29
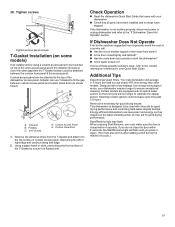
... water turned on top of custom access panel. Custom Panel Door 1. Remove the adhesive strips from the T-Gasket and attach it is closed tightly and latched? � Has the cycle been set correctly to cover the seam gap then the T-Gasket bottom could increase cycle time past 3.5 hours. Check Operation � Read the dishwasher Quick Start Guide that came with rinse aid for good drying results: This dishwasher is not working properly, disconnect power or unplug dishwasher...
... water turned on top of custom access panel. Custom Panel Door 1. Remove the adhesive strips from the T-Gasket and attach it is closed tightly and latched? � Has the cycle been set correctly to cover the seam gap then the T-Gasket bottom could increase cycle time past 3.5 hours. Check Operation � Read the dishwasher Quick Start Guide that came with rinse aid for good drying results: This dishwasher is not working properly, disconnect power or unplug dishwasher...
Dimension Guide
Page 1
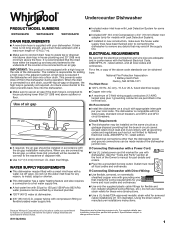
... inlet. ■ Use 1/2" (13 mm) minimum I.D. A high loop is not equipped with a high loop on the side of the Owner's manual for models with Leak Detection System). ■ If installed in new construction, make sure the house water supply lines have been flushed prior to connecting the dishwasher to remove any reason, to install, adapt or shorten. ■ This dishwasher has a water heating feature and also requires a connection to a hot water supply line. ■ A hot water line...
... inlet. ■ Use 1/2" (13 mm) minimum I.D. A high loop is not equipped with a high loop on the side of the Owner's manual for models with Leak Detection System). ■ If installed in new construction, make sure the house water supply lines have been flushed prior to connecting the dishwasher to remove any reason, to install, adapt or shorten. ■ This dishwasher has a water heating feature and also requires a connection to a hot water supply line. ■ A hot water line...


