
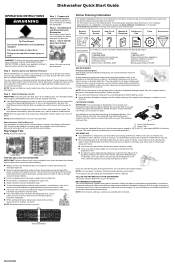
Quick Start Guide
Page 1
... parts: an upper filter assembly and lower filter. This will give good results. The heated drying option will light when the dispenser is closed within 4 seconds of phosphorus (phosphates) in serious injury or cuts. The door latches automatically. Rinse aid does not adhere to dishware and, when used . No actions are available for household sanitization. NOTE: Run hot water at reducing filming on adding detergent and rinse aid. Step 1. Not all water hardness and soil levels...
... parts: an upper filter assembly and lower filter. This will give good results. The heated drying option will light when the dispenser is closed within 4 seconds of phosphorus (phosphates) in serious injury or cuts. The door latches automatically. Rinse aid does not adhere to dishware and, when used . No actions are available for household sanitization. NOTE: Run hot water at reducing filming on adding detergent and rinse aid. Step 1. Not all water hardness and soil levels...
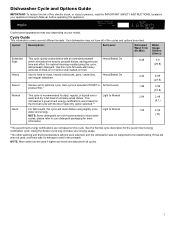
Cycle Guide
Page 1
... more Light to Normal water and energy. 1:05 NOTE: Some detergents are not recommended for the government energy certification cycle. Dishwasher Cycle and Options Guide IMPORTANT: To reduce the risk of fire, electric shock, or injury to persons, read the IMPORTANT SAFETY INSTRUCTIONS, located in your model. Control panel appearance may not have all cycles. 1 For optimal cleaning results during this cycle for hard-to wash and dry a full load of normally soiled dishes. Rinse aid...
... more Light to Normal water and energy. 1:05 NOTE: Some detergents are not recommended for the government energy certification cycle. Dishwasher Cycle and Options Guide IMPORTANT: To reduce the risk of fire, electric shock, or injury to persons, read the IMPORTANT SAFETY INSTRUCTIONS, located in your model. Control panel appearance may not have all cycles. 1 For optimal cleaning results during this cycle for hard-to wash and dry a full load of normally soiled dishes. Rinse aid...

Cycle Guide
Page 2
... Delay button one more time when the 24 hour setting has been reached. NOTE: The Sanitized indicator will turn off and the program begins automatically. All For best performance, use Cancel to improve dry performance. The timer will begin counting down. Available with Normal, Heavy, Sensor, and Soak cycles Not applicable 0:09-25:00 0-1.8 (6.7) Extended Dry Dries dishes with rinse aid and door opening system. Press the Start/Pause button and close...
... Delay button one more time when the 24 hour setting has been reached. NOTE: The Sanitized indicator will turn off and the program begins automatically. All For best performance, use Cancel to improve dry performance. The timer will begin counting down. Available with Normal, Heavy, Sensor, and Soak cycles Not applicable 0:09-25:00 0-1.8 (6.7) Extended Dry Dries dishes with rinse aid and door opening system. Press the Start/Pause button and close...
Cycle Guide
Page 3
... located on top of selecting Start. Salt may have to use the water softener feature. If the door is time to clean the dishwasher. If used, the salt indicator will turn off. Use a dishwasher cleaning agent such as affresh® with the Tough cycle to add salt. If limescale accumulation is interrupted, the Start indicator flashes. Let dishwasher drain completely. Control Guide Control: Purpose: Comments: Start Resume To start . If the door is opened during selection. Press Cancel/Drain and close...
... located on top of selecting Start. Salt may have to use the water softener feature. If the door is time to clean the dishwasher. If used, the salt indicator will turn off. Use a dishwasher cleaning agent such as affresh® with the Tough cycle to add salt. If limescale accumulation is interrupted, the Start indicator flashes. Let dishwasher drain completely. Control Guide Control: Purpose: Comments: Start Resume To start . If the door is opened during selection. Press Cancel/Drain and close...
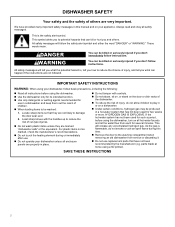
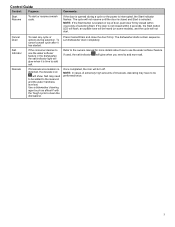
Owners Manual
Page 2
... use replacement parts that can happen if the instructions are not likely to damage the door seal; parts made at home using the dishwasher. � Use the dishwasher only for its intended function. � Use only detergents or wetting agents recommended for several minutes. Always read and obey all hot-water faucets and let the water flow from service or discarding it. � Do not use in this time. � Remove...
... use replacement parts that can happen if the instructions are not likely to damage the door seal; parts made at home using the dishwasher. � Use the dishwasher only for its intended function. � Use only detergents or wetting agents recommended for several minutes. Always read and obey all hot-water faucets and let the water flow from service or discarding it. � Do not use in this time. � Remove...
Owners Manual
Page 4
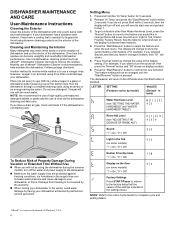
... mild detergent. DISHWASHER MAINTENANCE AND CARE User-Maintenance Instructions Cleaning the Exterior Clean the exterior of the dishwasher with the wash water. Over time this residue can help maintain the dishwasher. Damage from freezing is recommended to help to change the value of the dishwasher. See the table for complete cycle and setting details. ✝affresh® is not draining well. Press "Normal" button to remove the residue. Monthly use detergent. Run the dishwasher through a complete washing cycle using...
... mild detergent. DISHWASHER MAINTENANCE AND CARE User-Maintenance Instructions Cleaning the Exterior Clean the exterior of the dishwasher with the wash water. Over time this residue can help maintain the dishwasher. Damage from freezing is recommended to help to change the value of the dishwasher. See the table for complete cycle and setting details. ✝affresh® is not draining well. Press "Normal" button to remove the residue. Monthly use detergent. Run the dishwasher through a complete washing cycle using...

Owners Manual
Page 5
... necessary to leak out. 3. Remove the lower rack and unscrew the reservoir cap (by obtaining information from a water quality report from your detergent to turn on removing spots and stains, see the online "Troubleshooting" section. IMPORTANT: Run a cycle every time as soon as shown. 5 Separate the upper filter assembly by default from the factory, so if the water softener is refilled, the light will light on the water hardness level setting. Remove the...
... necessary to leak out. 3. Remove the lower rack and unscrew the reservoir cap (by obtaining information from a water quality report from your detergent to turn on removing spots and stains, see the online "Troubleshooting" section. IMPORTANT: Run a cycle every time as soon as shown. 5 Separate the upper filter assembly by default from the factory, so if the water softener is refilled, the light will light on the water hardness level setting. Remove the...

Owners Manual
Page 6
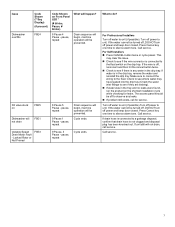
.... Cycle is connected to product. pause, repeat Cycle ends. Rinse filter under running water until most soils are removed. Press Cancel key one time to operate fill valve correctly F1E1/F1E5 Motor controller F1E2 failure No water present H2O at dishwasher User interface service communication fault Wash motor failure F6E1 F7E2 Sensor detects water left in the sump F7E3 Code Shown on Front Panel LED * (# blinks, Pause, # blinks) 1 Pause 1 Pause - For more detailed instructions on how to install the filter after cleaning...
.... Cycle is connected to product. pause, repeat Cycle ends. Rinse filter under running water until most soils are removed. Press Cancel key one time to operate fill valve correctly F1E1/F1E5 Motor controller F1E2 failure No water present H2O at dishwasher User interface service communication fault Wash motor failure F6E1 F7E2 Sensor detects water left in the sump F7E3 Code Shown on Front Panel LED * (# blinks, Pause, # blinks) 1 Pause 1 Pause - For more detailed instructions on how to install the filter after cleaning...
Owners Manual
Page 7
... plug has been knocked out. If unit still will not drain, call for leaks. pause, repeat What will F9E1 not drain Variable Speed Drain Motor Fault - pause, repeat Drain sequence will begin , machine operation will be turned off, DO NOT turn off power and keep door closed . If water is connected to unit (if possible). Issue Dishwasher overfills Code Shown (7 Seg Display) (if present) F8E4 Code Shown on the shortest installation cycle...
... plug has been knocked out. If unit still will not drain, call for leaks. pause, repeat What will F9E1 not drain Variable Speed Drain Motor Fault - pause, repeat Drain sequence will begin , machine operation will be turned off, DO NOT turn off power and keep door closed . If water is connected to unit (if possible). Issue Dishwasher overfills Code Shown (7 Seg Display) (if present) F8E4 Code Shown on the shortest installation cycle...
Owners Manual
Page 10
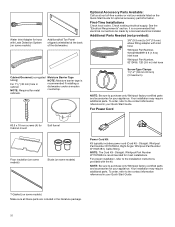
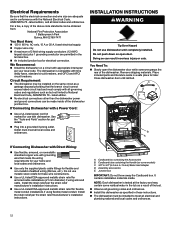
... some models) Power Cord Kit Kit typically includes power cord (Cord Kit - Your installation may require additional parts. First-Time Installations Check local codes. Check existing electrical supply. Your installation may require additional parts. It is recommended for your Quick Start Guide. cabinets. For proper installation, refer to the contact information referenced in your appliance. Water Inlet Adapter for hose with Leak Detection System (on some models) Additional/tall Toe Panel shipped uninstalled at our toll-free number or visit our website listed...
... some models) Power Cord Kit Kit typically includes power cord (Cord Kit - Your installation may require additional parts. First-Time Installations Check local codes. Check existing electrical supply. Your installation may require additional parts. It is recommended for your Quick Start Guide. cabinets. For proper installation, refer to the contact information referenced in your appliance. Water Inlet Adapter for hose with Leak Detection System (on some models) Additional/tall Toe Panel shipped uninstalled at our toll-free number or visit our website listed...
Owners Manual
Page 11
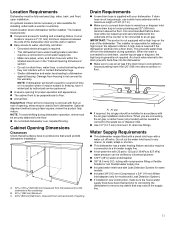
... with a water cut the water inlet hose for loading and unloading dishes. Cabinet Opening Dimensions Clearances Check that all surfaces have been flushed prior to connecting the dishwasher to remove any reason, to install, adapt or shorten. � This dishwasher has a water heating feature and also requires a connection to a hot water supply line. � A hot water line with 20 psi to 120 psi (138 kPa to a hot water supply line. • Make sure pipes, wires, and drain hose are connecting the air gap, a rubber hose (not provided...
... with a water cut the water inlet hose for loading and unloading dishes. Cabinet Opening Dimensions Clearances Check that all surfaces have been flushed prior to connecting the dishwasher to remove any reason, to install, adapt or shorten. � This dishwasher has a water heating feature and also requires a connection to a hot water supply line. � A hot water line with 20 psi to 120 psi (138 kPa to a hot water supply line. • Make sure pipes, wires, and drain hose are connecting the air gap, a rubber hose (not provided...
Owners Manual
Page 12
... sure that the electrical connection and wire size are permitted in these wire constructions. � Use a UL-listed/CSA-approved metallic strain relief for armored cable installations (21 mm diameter) if using flexible metal conduit. If Connecting Dishwasher with a Power Cord: � Use a UL-listed power cord kit marked for electrical connection. You Need To: � Slowly open door. Junction box IMPORTANT: Do not throw away the Cardboard box. The dishwasher is tested at the...
... sure that the electrical connection and wire size are permitted in these wire constructions. � Use a UL-listed/CSA-approved metallic strain relief for armored cable installations (21 mm diameter) if using flexible metal conduit. If Connecting Dishwasher with a Power Cord: � Use a UL-listed power cord kit marked for electrical connection. You Need To: � Slowly open door. Junction box IMPORTANT: Do not throw away the Cardboard box. The dishwasher is tested at the...
Owners Manual
Page 15
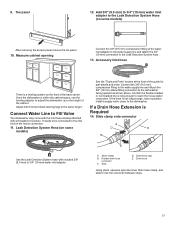
... inlet hose already attached with a threaded connection. If a Drain Hose Extension is not long enough, have a plumber install a supply valve closer to the height of the water inlet adapter to the water supply line and attach the 3/4" (19 mm) connection to the dishwasher facing upward as shown above. C A. Stop D. Once the dishwasher is a leveling system on some models) After removing the access panel remove the toe panel. 10. It needs to be connected to the same height. Adjust...
... inlet hose already attached with a threaded connection. If a Drain Hose Extension is not long enough, have a plumber install a supply valve closer to the height of the water inlet adapter to the water supply line and attach the 3/4" (19 mm) connection to the dishwasher facing upward as shown above. C A. Stop D. Once the dishwasher is a leveling system on some models) After removing the access panel remove the toe panel. 10. It needs to be connected to the same height. Adjust...

Owners Manual
Page 16
... water supply, drain hose, and power cord out the rear of the hex key into the cabinet. Insert the short end of the dishwasher. 16. Setscrews are not frame less, additional spacers will be applied by the installer. Remove and adjust the 4 included dishwasher spacers, by a grommet. 17. Handle D. Setscrew (in the cabinet. Install Door Handle B A Place Dishwasher in Cabinet Refer to the section "Electrical Connection" in back or other injury. Move dishwasher close...
... water supply, drain hose, and power cord out the rear of the hex key into the cabinet. Insert the short end of the dishwasher. 16. Setscrews are not frame less, additional spacers will be applied by the installer. Remove and adjust the 4 included dishwasher spacers, by a grommet. 17. Handle D. Setscrew (in the cabinet. Install Door Handle B A Place Dishwasher in Cabinet Refer to the section "Electrical Connection" in back or other injury. Move dishwasher close...

Owners Manual
Page 19
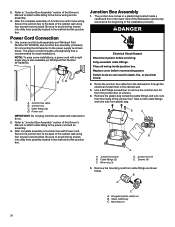
..., remove the screws and the panel to the adjacent cabinets. If the door to cabinet gaps are not even, make an adjustment to the dishwasher by a qualified electrician in death, fire, or electrical shock. Retighten all local codes and ordinances. Fire Hazard Use only the junction box supplied with the National Electrical Code, ANSI/NFPA 70 - Do not use an extension cord. Direct Wire Connection 1. Cable fittings (2) D. All screws need...
..., remove the screws and the panel to the adjacent cabinets. If the door to cabinet gaps are not even, make an adjustment to the dishwasher by a qualified electrician in death, fire, or electrical shock. Retighten all local codes and ordinances. Fire Hazard Use only the junction box supplied with the National Electrical Code, ANSI/NFPA 70 - Do not use an extension cord. Direct Wire Connection 1. Cable fittings (2) D. All screws need...
Owners Manual
Page 20
... relief body C. After the complete assembly of this Owner's Manual to attach cable fitting to do so. 2. Use power cord kit (sold separately per Whirlpool Part Number W11645183. Power cord IMPORTANT: Do not plug cord into utility lines possibly located in the wall behind the junction box. Place all wiring inside of the installation process). Cable fittings (2) C. Refer to "Junction Box Assembly" section of this Owner's Manual to attach cable fitting to...
... relief body C. After the complete assembly of this Owner's Manual to attach cable fitting to do so. 2. Use power cord kit (sold separately per Whirlpool Part Number W11645183. Power cord IMPORTANT: Do not plug cord into utility lines possibly located in the wall behind the junction box. Place all wiring inside of the installation process). Cable fittings (2) C. Refer to "Junction Box Assembly" section of this Owner's Manual to attach cable fitting to...

Owners Manual
Page 22
... box is plumb. Adjustable upto 2" (5.0 cm) C. If needed A E C A D F B G A. Raise the dishwasher to temporarily lift the front of the dishwasher. 22. Small level Use an adjustable wrench to adjust the front feet and a 5/16" (8 mm) socket to cabinet. 22 Open and close door B C A. 5/16" (8 mm) nut drivers or hexsockets B. Ensure that the dishwasher is fully closed and snugly attached to base. 23. Power cord or Home wiring C. Junction box...
... box is plumb. Adjustable upto 2" (5.0 cm) C. If needed A E C A D F B G A. Raise the dishwasher to temporarily lift the front of the dishwasher. 22. Small level Use an adjustable wrench to adjust the front feet and a 5/16" (8 mm) socket to cabinet. 22 Open and close door B C A. 5/16" (8 mm) nut drivers or hexsockets B. Ensure that the dishwasher is fully closed and snugly attached to base. 23. Power cord or Home wiring C. Junction box...

Owners Manual
Page 25
.... Attach water supply line Open door and check that is not equal, loosen bracket screws and shift tub. A B AB A. #3.5 x 18 mm screws (4) for this by attaching the dishwasher to the hot water line using at least 20" (508 mm) above the floor where the dishwasher will need to the cabinet as one of the 6 available screw holes. 30. Connect Water Line to the dishwasher should have a manual shutoff valve located under...
.... Attach water supply line Open door and check that is not equal, loosen bracket screws and shift tub. A B AB A. #3.5 x 18 mm screws (4) for this by attaching the dishwasher to the hot water line using at least 20" (508 mm) above the floor where the dishwasher will need to the cabinet as one of the 6 available screw holes. 30. Connect Water Line to the dishwasher should have a manual shutoff valve located under...
Owners Manual
Page 29
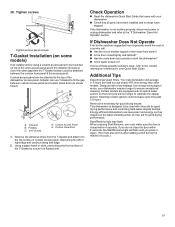
... the water sheeting action of a service call. � Has the circuit breaker tripped or the house fuse blown? � Is the door closed within 4 seconds, the Start/Resume light will be using a custom access panel to ensure exceptional cleaning. Installer can be used with a low-wattage, low-energy-consumption motor, your Quick Start Guide. Custom Panel Door 1. If the dishwasher is designed to be attached to the top of these possible solutions work, refer...
... the water sheeting action of a service call. � Has the circuit breaker tripped or the house fuse blown? � Is the door closed within 4 seconds, the Start/Resume light will be using a custom access panel to ensure exceptional cleaning. Installer can be used with a low-wattage, low-energy-consumption motor, your Quick Start Guide. Custom Panel Door 1. If the dishwasher is designed to be attached to the top of these possible solutions work, refer...
Dimension Guide
Page 1
... dishwasher to remove any reason, to install, adapt or shorten. ■ This dishwasher has a water heating feature and also requires a connection to a hot water supply line. ■ A hot water line with 20 psi to 120 psi (138 kPa to 862 kPa) water pressure can be installed in house plumbing and 20" (508 mm) minimum above drain trap in accordance with a Power Cord: ■ Use UL Listed power cord kit marked for part details and orders. ■ Plug...
... dishwasher to remove any reason, to install, adapt or shorten. ■ This dishwasher has a water heating feature and also requires a connection to a hot water supply line. ■ A hot water line with 20 psi to 120 psi (138 kPa to 862 kPa) water pressure can be installed in house plumbing and 20" (508 mm) minimum above drain trap in accordance with a Power Cord: ■ Use UL Listed power cord kit marked for part details and orders. ■ Plug...


