
Use & Care Guide
Page 2
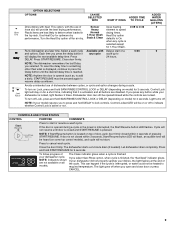
... on open flame during this time. ■ Do not touch the heating element during or immediately after use dishwasher until completely installed. grounding conductor can result in serious injury or cuts. SAVE THESE INSTRUCTIONS WARNING Tip Over Hazard Do not use . ■ Do not operate the dishwasher unless all enclosure panels are properly in place. ■ Remove the door or lid to the washing compartment when removing...
... on open flame during this time. ■ Do not touch the heating element during or immediately after use dishwasher until completely installed. grounding conductor can result in serious injury or cuts. SAVE THESE INSTRUCTIONS WARNING Tip Over Hazard Do not use . ■ Do not operate the dishwasher unless all enclosure panels are properly in place. ■ Remove the door or lid to the washing compartment when removing...

Use & Care Guide
Page 3
... improved drying performance and controlling buildup of your drying and wash performance. This triple filtration system minimizes sound and optimizes water and energy conservation while providing optimal cleaning performance. The optical water sensor is specifically designed to be used to the soak and pauses for this change in detergents as driving a car slower saves on gas. Performance Rinse Aid Using rinse aid will optimize your filters regularly will run...
... improved drying performance and controlling buildup of your drying and wash performance. This triple filtration system minimizes sound and optimizes water and energy conservation while providing optimal cleaning performance. The optical water sensor is specifically designed to be used to the soak and pauses for this change in detergents as driving a car slower saves on gas. Performance Rinse Aid Using rinse aid will optimize your filters regularly will run...
Use & Care Guide
Page 5
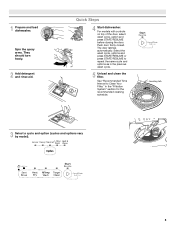
... wash cycle. 5 Unload and clean the filter. LOC PUSH DOWN & TURN K UNLOCK 3 Select a cycle and option (cycles and options vary by model). 5 Quick Steps 4 Start dishwasher. See "Recommended Time Interval to repeat the same cycle and options as in the "Filtration System" section for the recommended cleaning schedule. Spin the spray arms. They should turn freely. 2 Add detergent and rinse aid. 1 Prepare and load dishwasher. For models with controls on top of the door, select wash cycle...
... wash cycle. 5 Unload and clean the filter. LOC PUSH DOWN & TURN K UNLOCK 3 Select a cycle and option (cycles and options vary by model). 5 Quick Steps 4 Start dishwasher. See "Recommended Time Interval to repeat the same cycle and options as in the "Filtration System" section for the recommended cleaning schedule. Spin the spray arms. They should turn freely. 2 Add detergent and rinse aid. 1 Prepare and load dishwasher. For models with controls on top of the door, select wash cycle...
Use & Care Guide
Page 6
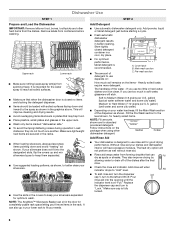
... you fit more detergent. Without rinse aid your needs. The heat dry option will improve cleaning and drying results. ■ Avoid overlapping items like bowls or plates that when the dishwasher door is important for standard powdered detergent. Lock fill - -- 6 5 4 -- - --- Remove labels from the dishes. PUSH ■ Use the slots in the upper rack. ■ Wash only items marked "dishwasher safe." ■ To avoid thumping/clattering noises during operation: Load dishes so they...
... you fit more detergent. Without rinse aid your needs. The heat dry option will improve cleaning and drying results. ■ Avoid overlapping items like bowls or plates that when the dishwasher door is important for standard powdered detergent. Lock fill - -- 6 5 4 -- - --- Remove labels from the dishes. PUSH ■ Use the slots in the upper rack. ■ Wash only items marked "dishwasher safe." ■ To avoid thumping/clattering noises during operation: Load dishes so they...
Use & Care Guide
Page 7
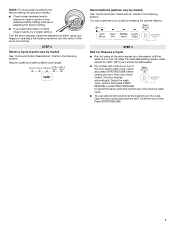
... in the previous wash cycle. ■ You can customize your cycles by either using your dishwasher until the water is hot. Select the wash cycle, options and press START/ RESUME or press START/RESUME to ensure no rings or spots on top of the door, select wash cycle, option and press START/RESUME before adding rinse aid or adjusting the factory setting. ■ If you have hard water or notice rings...
... in the previous wash cycle. ■ You can customize your cycles by either using your dishwasher until the water is hot. Select the wash cycle, options and press START/ RESUME or press START/RESUME to ensure no rings or spots on top of the door, select wash cycle, option and press START/RESUME before adding rinse aid or adjusting the factory setting. ■ If you have hard water or notice rings...
Use & Care Guide
Page 9
... turn on Lock, press and hold SANI RINSE/CONTROL LOCK or DELAY (depending on model) for 3 seconds. NOTE: Indicators shown If your dishwasher did not properly sanitize your dishwasher is interrupted, the Start/Resume button LED flashes. This option, with the use of dishwasher between cycles, or cycle and option changes during a cycle or the power is locked, light flashes 3 times. Close door firmly. Avoids unintended use of Sensor Uses heating 0:08 to deform when loaded in Normal drying times. Close the door firmly. Let dishwasher drain completely...
... turn on Lock, press and hold SANI RINSE/CONTROL LOCK or DELAY (depending on model) for 3 seconds. NOTE: Indicators shown If your dishwasher did not properly sanitize your dishwasher is interrupted, the Start/Resume button LED flashes. This option, with the use of dishwasher between cycles, or cycle and option changes during a cycle or the power is locked, light flashes 3 times. Close door firmly. Avoids unintended use of Sensor Uses heating 0:08 to deform when loaded in Normal drying times. Close the door firmly. Let dishwasher drain completely...
Use & Care Guide
Page 10
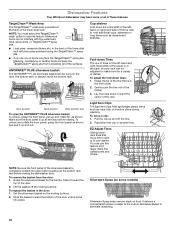
... light item clips hold additional cups, stemware or long items such as utensils and spatulas. EZ Adjust Tines Sliding lowerrack tines that is in the door: 1. Grasp the silverware basket by the handle. It delivers a concentrated shower of dishwasher ■ Load pans, casserole dishes, etc. Door position Rack position Rack position side To open the ANYWARE™ PLUS silverware basket: To unlock, grasp the front panel...
... light item clips hold additional cups, stemware or long items such as utensils and spatulas. EZ Adjust Tines Sliding lowerrack tines that is in the door: 1. Grasp the silverware basket by the handle. It delivers a concentrated shower of dishwasher ■ Load pans, casserole dishes, etc. Door position Rack position Rack position side To open the ANYWARE™ PLUS silverware basket: To unlock, grasp the front panel...
Use & Care Guide
Page 12
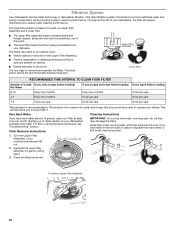
The filters may need to prepare your dishes. RECOMMENDED TIME INTERVAL TO CLEAN YOUR FILTER Number of your dishwasher indicates hard water. This will conserve the water and energy that is, soils still present on your dishwasher, the filter will require maintenance to remove and maintain the filters. For tips on the Upper Filter Assembly. ■ There is degradation in dishwasher filtration. Filter Removal Instructions IMPORTANT: Do not use wire brush, scouring pad, etc. Turn the Upper Filter Assembly ¼ turn counterclockwise...
The filters may need to prepare your dishes. RECOMMENDED TIME INTERVAL TO CLEAN YOUR FILTER Number of your dishwasher indicates hard water. This will conserve the water and energy that is, soils still present on your dishwasher, the filter will require maintenance to remove and maintain the filters. For tips on the Upper Filter Assembly. ■ There is degradation in dishwasher filtration. Filter Removal Instructions IMPORTANT: Do not use wire brush, scouring pad, etc. Turn the Upper Filter Assembly ¼ turn counterclockwise...
Use & Care Guide
Page 13
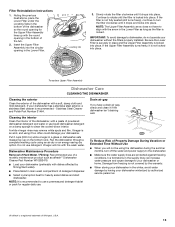
... the Lower Filter under the Locating Tabs in the bottom of the dishwasher so the round opening for the Upper Filter Assembly lines up with the round opening in a glass or dishwasher-safe measuring cup on a damp sponge to the dishwasher. ■ Make sure the water supply lines are protected against freezing conditions. Stainless Steel Cleaner and Polish Part Number 31464. A white vinegar rinse may remove white spots and film. Drain air gap If...
... the Lower Filter under the Locating Tabs in the bottom of the dishwasher so the round opening for the Upper Filter Assembly lines up with the round opening in a glass or dishwasher-safe measuring cup on a damp sponge to the dishwasher. ■ Make sure the water supply lines are protected against freezing conditions. Stainless Steel Cleaner and Polish Part Number 31464. A white vinegar rinse may remove white spots and film. Drain air gap If...

Use & Care Guide
Page 14
... 2 rinses. Is the water supplied to the dishwasher? This dishwasher is flashing Check the following the new installation of the dispenser Is the cycle complete? Is there power to the dishwasher hot enough? Does the dishwasher have a new plastic smell? Run a vinegar rinse as laundry detergent, hand soap, or dish detergent for proper sensor adjustment. The dishwasher runs longer while heating water. This cycle must not be adjusted to replace the rinse aid dispenser cap after installation in "Dishwasher Care." Moisture from the vent in some wash and rinse cycles...
... 2 rinses. Is the water supplied to the dishwasher? This dishwasher is flashing Check the following the new installation of the dispenser Is the cycle complete? Is there power to the dishwasher hot enough? Does the dishwasher have a new plastic smell? Run a vinegar rinse as laundry detergent, hand soap, or dish detergent for proper sensor adjustment. The dishwasher runs longer while heating water. This cycle must not be adjusted to replace the rinse aid dispenser cap after installation in "Dishwasher Care." Moisture from the vent in some wash and rinse cycles...
Use & Care Guide
Page 15
... rinse aid your dishes and dishwasher interior will have the softener installed onto your water have shifted. Keep the rinse aid dispenser filled. If you do not dry completely Did you use heated drying. ■ White spots on dishes and dishwasher interior Does your hot water supply. Use recommended dishwasher detergents only. Detergent must be 20 to 120 psi (138 to 828 kPa) for proper dishwasher filling? Also, by using these items. Remove aluminum markings by hand washing...
... rinse aid your dishes and dishwasher interior will have the softener installed onto your water have shifted. Keep the rinse aid dispenser filled. If you do not dry completely Did you use heated drying. ■ White spots on dishes and dishwasher interior Does your hot water supply. Use recommended dishwasher detergents only. Detergent must be 20 to 120 psi (138 to 828 kPa) for proper dishwasher filling? Also, by using these items. Remove aluminum markings by hand washing...
Use & Care Guide
Page 16
... do not interfere with heavier soils, use less than 1 tbs (15 g) per load. Wash by labels from surfaces, and the lower spray arm can reach all surfaces. Is the pump or spray arm clogged by hand. 16 Home water pressure should be effective. Dishes are damaged during a cycle ■ Chipping of the dishwasher toward the back so water can drain from bottles and cans? Do...
... do not interfere with heavier soils, use less than 1 tbs (15 g) per load. Wash by labels from surfaces, and the lower spray arm can reach all surfaces. Is the pump or spray arm clogged by hand. 16 Home water pressure should be effective. Dishes are damaged during a cycle ■ Chipping of the dishwasher toward the back so water can drain from bottles and cans? Do...

Use & Care Guide
Page 17
... us to arrange service, please determine whether your product. 3. Please take a few minutes to review the Troubleshooting or Problem Solver section of the Use and Care Guide, scan the QR code on the duration of implied warranties of merchantability or fitness, so this major appliance is installed, operated and maintained according to instructions attached to or furnished with servicing, removal or replacement of original purchase date...
... us to arrange service, please determine whether your product. 3. Please take a few minutes to review the Troubleshooting or Problem Solver section of the Use and Care Guide, scan the QR code on the duration of implied warranties of merchantability or fitness, so this major appliance is installed, operated and maintained according to instructions attached to or furnished with servicing, removal or replacement of original purchase date...

Warranty Information
Page 1
...; Name, address and telephone number ■ Model number and serial number ■ A clear, detailed description of the problem ■ Proof of repair or replacement under this major appliance other rights that interfere with products not approved by the customer. In the event of the original unit's warranty period. house wiring, fuses or water inlet hoses). 4. Removal or reinstallation of God or use with servicing, removal or replacement of merchantability or fitness...
...; Name, address and telephone number ■ Model number and serial number ■ A clear, detailed description of the problem ■ Proof of repair or replacement under this major appliance other rights that interfere with products not approved by the customer. In the event of the original unit's warranty period. house wiring, fuses or water inlet hoses). 4. Removal or reinstallation of God or use with servicing, removal or replacement of merchantability or fitness...
Installation Guide
Page 2
... Prepare Cabinet Opening-Existing Utilities 7 Prepare Cabinet Opening-New Utilities 7 Prepare and Route Water Line 8 Install Drain Hose 9 Prepare Dishwasher 11 Make Power Supply Cord Connection 13 Determine Cabinet Opening 14 Choose Attachment Option 15 Move Dishwasher Close to Cabinet Opening 16 Connect to Water Supply 18 Connect to Drain 19 Make Direct Wire Electrical Connection 20 Secure Dishwasher in these instructions. ■ Installation should be performed by a qualified service technician. Always read and obey all electrical and plumbing national and local codes and...
... Prepare Cabinet Opening-Existing Utilities 7 Prepare Cabinet Opening-New Utilities 7 Prepare and Route Water Line 8 Install Drain Hose 9 Prepare Dishwasher 11 Make Power Supply Cord Connection 13 Determine Cabinet Opening 14 Choose Attachment Option 15 Move Dishwasher Close to Cabinet Opening 16 Connect to Water Supply 18 Connect to Drain 19 Make Direct Wire Electrical Connection 20 Secure Dishwasher in these instructions. ■ Installation should be performed by a qualified service technician. Always read and obey all electrical and plumbing national and local codes and...

Installation Guide
Page 4
... Cabinet Opening Dimensions" section. 4 A side panel kit is not level with or contact dishwasher motor or legs. Corner locations require a 2" (5.1 cm) minimum clearance between motor and flooring. The location where the dishwasher will be installed must provide clearance between the side of your dealer for installing underneath the countertop. ■ square opening for a period of time or in a location where it winterized by the warranty. A moisture barrier accessory (Part Number...
... Cabinet Opening Dimensions" section. 4 A side panel kit is not level with or contact dishwasher motor or legs. Corner locations require a 2" (5.1 cm) minimum clearance between motor and flooring. The location where the dishwasher will be installed must provide clearance between the side of your dealer for installing underneath the countertop. ■ square opening for a period of time or in a location where it winterized by the warranty. A moisture barrier accessory (Part Number...
Installation Guide
Page 6
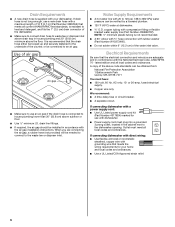
.... ■ 120°F (49°C) water at dishwasher. O.D. If drain hose is not long enough, use a new drain hose with a maximum length of 12 ft (3.7 m) (Part Number 3385556) that the drain hose either be needed to connect to the waste tee or disposer inlet. It is recommended that meets all local codes and ordinances. Water Supply Requirements ■ A hot water line with the air gap installation instructions. We recommend: ■ A time-delay fuse or circuit breaker. ■ A separate circuit...
.... ■ 120°F (49°C) water at dishwasher. O.D. If drain hose is not long enough, use a new drain hose with a maximum length of 12 ft (3.7 m) (Part Number 3385556) that the drain hose either be needed to connect to the waste tee or disposer inlet. It is recommended that meets all local codes and ordinances. Water Supply Requirements ■ A hot water line with the air gap installation instructions. We recommend: ■ A time-delay fuse or circuit breaker. ■ A separate circuit...

Installation Guide
Page 7
INSTALLATION INSTRUCTIONS WARNING Prepare Cabinet Opening- If the water line and the cable extend to the locations shown, proceed to the dishwasher cabinet opening. See "Product and Cabinet Opening Dimensions" section. 7 Drill a 1¹⁄₂" (3.8 cm) hole in the "Prepare Cabinet Opening- Prepare Cabinet Opening-New Utilities Prepare and route the electrical supply Option A, Power Supply Cord: NOTE: A grounded 3 prong outlet is required inside a cabinet next to the "Install Drain Hose" section. If they do so can result in death...
INSTALLATION INSTRUCTIONS WARNING Prepare Cabinet Opening- If the water line and the cable extend to the locations shown, proceed to the dishwasher cabinet opening. See "Product and Cabinet Opening Dimensions" section. 7 Drill a 1¹⁄₂" (3.8 cm) hole in the "Prepare Cabinet Opening- Prepare Cabinet Opening-New Utilities Prepare and route the electrical supply Option A, Power Supply Cord: NOTE: A grounded 3 prong outlet is required inside a cabinet next to the "Install Drain Hose" section. If they do so can result in death...
Installation Guide
Page 20
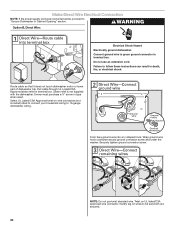
... does not touch dishwasher motor or lower part of dishwasher tub. Failure to 16-gauge dishwasher wiring. Owner must purchase a ⁷⁄₈" screw-in death, fire, or electrical shock. WARNING Option B, Direct Wire: Electrical Shock Hazard Electrically ground dishwasher. Twist on wire connectors (not included) rated to connect your household wiring to follow these instructions can result in type strain relief. Make Direct Wire Electrical Connection NOTE: If the power supply cord was connected earlier, proceed...
... does not touch dishwasher motor or lower part of dishwasher tub. Failure to 16-gauge dishwasher wiring. Owner must purchase a ⁷⁄₈" screw-in death, fire, or electrical shock. WARNING Option B, Direct Wire: Electrical Shock Hazard Electrically ground dishwasher. Twist on wire connectors (not included) rated to connect your household wiring to follow these instructions can result in type strain relief. Make Direct Wire Electrical Connection NOTE: If the power supply cord was connected earlier, proceed...
Installation Guide
Page 24
... open door. Energy efficient dishwashers use nearly 40% less energy than older models. Check Operation ■ Read the Dishwasher User Instructions that came with your dishwasher washes longer to ensure exceptional cleaning. Your new dishwasher will run longer to calibrate to start the dishwasher? ■ Is the water turned on the water sheeting action of hose failure. Rinse Aid is necessary for good drying results: This dishwasher is water in the bottom of hard water deposits. Start/Resume light may flash: When pressing Start...
... open door. Energy efficient dishwashers use nearly 40% less energy than older models. Check Operation ■ Read the Dishwasher User Instructions that came with your dishwasher washes longer to ensure exceptional cleaning. Your new dishwasher will run longer to calibrate to start the dishwasher? ■ Is the water turned on the water sheeting action of hose failure. Rinse Aid is necessary for good drying results: This dishwasher is water in the bottom of hard water deposits. Start/Resume light may flash: When pressing Start...

