
Installation Guide
Page 2
... service technician. TABLE OF CONTENTS DISHWASHER SAFETY 2 INSTALLATION REQUIREMENTS 3 Tools and Parts 3 Location Requirements 4 Drain Requirements 6 Water Supply Requirements 6 Electrical Requirements 6 INSTALLATION INSTRUCTIONS 7 Prepare Cabinet Opening- Existing Utilities 7 Prepare Cabinet Opening-New Utilities 7 Prepare and Route Water Line 8 Install Drain Hose 9 Prepare Dishwasher 11 Make Power Supply Cord Connection 12 Determine Cabinet Opening 14 Choose Attachment Option 15 Prepare Water Supply Line 15 Move Dishwasher Close to Cabinet Opening 16 Connect to Water...
... service technician. TABLE OF CONTENTS DISHWASHER SAFETY 2 INSTALLATION REQUIREMENTS 3 Tools and Parts 3 Location Requirements 4 Drain Requirements 6 Water Supply Requirements 6 Electrical Requirements 6 INSTALLATION INSTRUCTIONS 7 Prepare Cabinet Opening- Existing Utilities 7 Prepare Cabinet Opening-New Utilities 7 Prepare and Route Water Line 8 Install Drain Hose 9 Prepare Dishwasher 11 Make Power Supply Cord Connection 12 Determine Cabinet Opening 14 Choose Attachment Option 15 Prepare Water Supply Line 15 Move Dishwasher Close to Cabinet Opening 16 Connect to Water...
Installation Guide
Page 4
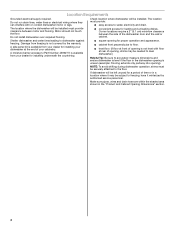
... not run drain lines, water lines or electrical wiring where they can interfere with floor at rear of time or in a location where it may be subject to accurately measure dimensions and ensure dishwasher is level if the floor in the "Product and Cabinet Opening Dimensions" section. 4 Do not install dishwasher over carpeted flooring. ■ convenient access for proper operation and appearance. ■ cabinet front perpendicular to the floor. A side panel kit...
... not run drain lines, water lines or electrical wiring where they can interfere with floor at rear of time or in a location where it may be subject to accurately measure dimensions and ensure dishwasher is level if the floor in the "Product and Cabinet Opening Dimensions" section. 4 Do not install dishwasher over carpeted flooring. ■ convenient access for proper operation and appearance. ■ cabinet front perpendicular to the floor. A side panel kit...
Installation Guide
Page 6
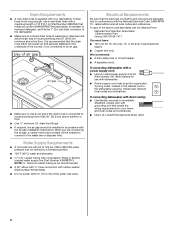
... or flexible braided water supply line (Part Number 4396897RP). Outlet must meet all local codes and ordinances. drain line fittings. ■ If required, the air gap should be installed in accordance with dishwasher. ■ Power supply cord must plug into a grounded 3 prong outlet, located in the cabinet next to the dishwasher opening. A copy of the water inlet valve. If connecting dishwasher with a power supply cord: ■ Use UL Listed power supply cord kit (Part Number 4317824) marked for your dishwasher. Drain Requirements ■ A new drain hose is supplied with 20 to...
... or flexible braided water supply line (Part Number 4396897RP). Outlet must meet all local codes and ordinances. drain line fittings. ■ If required, the air gap should be installed in accordance with dishwasher. ■ Power supply cord must plug into a grounded 3 prong outlet, located in the cabinet next to the dishwasher opening. A copy of the water inlet valve. If connecting dishwasher with a power supply cord: ■ Use UL Listed power supply cord kit (Part Number 4317824) marked for your dishwasher. Drain Requirements ■ A new drain hose is supplied with 20 to...

Installation Guide
Page 7
... the instructions in the "Prepare Cabinet Opening- If the water line and the cable extend to the locations shown, proceed to the dishwasher cabinet opening. If they do so can result in cabinet side or rear. Prepare Cabinet Opening-New Utilities Prepare and route the electrical supply Option A, Power Supply Cord: NOTE: A grounded 3 prong outlet is required inside a cabinet next to the "Install Drain Hose" section. Existing Utilities Electrical Shock Hazard Disconnect electrical power at the fuse...
... the instructions in the "Prepare Cabinet Opening- If the water line and the cable extend to the locations shown, proceed to the dishwasher cabinet opening. If they do so can result in cabinet side or rear. Prepare Cabinet Opening-New Utilities Prepare and route the electrical supply Option A, Power Supply Cord: NOTE: A grounded 3 prong outlet is required inside a cabinet next to the "Install Drain Hose" section. Existing Utilities Electrical Shock Hazard Disconnect electrical power at the fuse...

Installation Guide
Page 11
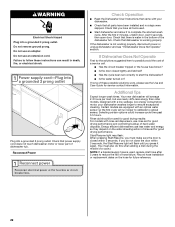
... not use dishwasher until installed in serious injury or cuts. Failure to air gap and cut ribbed section. 2. Connect rubber end of the tub. If the drain hose was cut, use door panel as a worktable without first covering with air gap Prepare Dishwasher WARNING 1. Be sure to air gap. Attach drain hose to air gap with screw-type clamps (not provided) to connect from waste tee to fasten the insulation down on open and move and install dishwasher...
... not use dishwasher until installed in serious injury or cuts. Failure to air gap and cut ribbed section. 2. Connect rubber end of the tub. If the drain hose was cut, use door panel as a worktable without first covering with air gap Prepare Dishwasher WARNING 1. Be sure to air gap. Attach drain hose to air gap with screw-type clamps (not provided) to connect from waste tee to fasten the insulation down on open and move and install dishwasher...

Installation Guide
Page 16
... should be adjusted. Attach such that water line is facing upward as it from moving the spring end toward the front of the dishwasher. Move Dishwasher Close to Cabinet Opening Check that the ³⁄₄" connection is on left side of opening and drain hose is near the center of the cabinet opening . †®TEFLON is moved into the cabinet opening . Move dishwasher close the door a few times. Slide...
... should be adjusted. Attach such that water line is facing upward as it from moving the spring end toward the front of the dishwasher. Move Dishwasher Close to Cabinet Opening Check that the ³⁄₄" connection is on left side of opening and drain hose is near the center of the cabinet opening . †®TEFLON is moved into the cabinet opening . Move dishwasher close the door a few times. Slide...

Installation Guide
Page 19
... clockwise around ground connector screw and under the washer. Twist on UL listed/CSA approved wire connector. Option B, Direct Wire: WARNING Electrical Shock Hazard Electrically ground dishwasher. NOTE: Do not pre-twist stranded wire. Securely tighten ground connector screw. Do not use an extension cord. Form bare ground wire into a U-shaped hook. Make Direct Wire Electrical Connection NOTE: If the power supply cord was connected earlier, proceed to 16-gauge...
... clockwise around ground connector screw and under the washer. Twist on UL listed/CSA approved wire connector. Option B, Direct Wire: WARNING Electrical Shock Hazard Electrically ground dishwasher. NOTE: Do not pre-twist stranded wire. Securely tighten ground connector screw. Do not use an extension cord. Form bare ground wire into a U-shaped hook. Make Direct Wire Electrical Connection NOTE: If the power supply cord was connected earlier, proceed to 16-gauge...
Installation Guide
Page 22
... fuse blown? ■ Is the door closed within 3 seconds, the Start/Resume light will run longer to calibrate to reduce the risk of a cycle.) NOTE: If a braided supply hose is working properly, disconnect power or unplug dishwasher and see the Use and Care Guide for future reference. 22 Check that all tools used , replace inlet hose after 5 years to optical sensor. Your new dishwasher will average 2-3 hours per load, but use an adapter. Record hose installation...
... fuse blown? ■ Is the door closed within 3 seconds, the Start/Resume light will run longer to calibrate to reduce the risk of a cycle.) NOTE: If a braided supply hose is working properly, disconnect power or unplug dishwasher and see the Use and Care Guide for future reference. 22 Check that all tools used , replace inlet hose after 5 years to optical sensor. Your new dishwasher will average 2-3 hours per load, but use an adapter. Record hose installation...

Use & Care Guide
Page 2
...; Remove the door or lid to the equipment-grounding terminal or lead on open flame during this time. ■ Do not touch the heating element during or immediately after use. ■ Do not operate the dishwasher unless all hot water faucets and let the water flow from service or discarding it will release any accumulated hydrogen gas. SAVE THESE INSTRUCTIONS GROUNDING INSTRUCTIONS ■ For a grounded, cord-connected dishwasher...
...; Remove the door or lid to the equipment-grounding terminal or lead on open flame during this time. ■ Do not touch the heating element during or immediately after use. ■ Do not operate the dishwasher unless all hot water faucets and let the water flow from service or discarding it will release any accumulated hydrogen gas. SAVE THESE INSTRUCTIONS GROUNDING INSTRUCTIONS ■ For a grounded, cord-connected dishwasher...
Use & Care Guide
Page 5
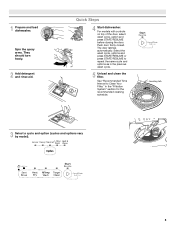
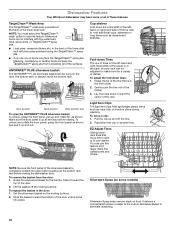
... recommended cleaning schedule. Quick Steps 4 Start dishwasher. For models with controls on top of the door, select wash cycle, option and press START/RESUME before closing the door. Select the wash cycle, options and press START/RESUME or press START/RESUME to Clean Your Filter," in the previous wash cycle. 5 Unload and clean the filter. The door latches automatically. Spin the spray arms. They should turn freely. 2 Add detergent and rinse aid. LOC PUSH DOWN & TURN K UNLOCK 3 Select a cycle and option (cycles and...
... recommended cleaning schedule. Quick Steps 4 Start dishwasher. For models with controls on top of the door, select wash cycle, option and press START/RESUME before closing the door. Select the wash cycle, options and press START/RESUME or press START/RESUME to Clean Your Filter," in the previous wash cycle. 5 Unload and clean the filter. The door latches automatically. Spin the spray arms. They should turn freely. 2 Add detergent and rinse aid. LOC PUSH DOWN & TURN K UNLOCK 3 Select a cycle and option (cycles and...
Use & Care Guide
Page 6
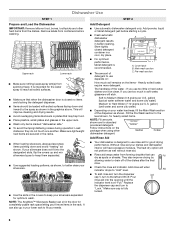
... drain off . Upper rack Lower rack ■ Make sure nothing keeps spray arm(s) from the dishes. Make sure lightweight load items are for optimum wash. max - 21 3 - --- 6 They also improve drying by allowing water to use too little in better cleaning. Add powder, liquid or tablet detergent just before washing. Replace the dispenser cap and turn to better clean your dishes and dishwasher interior will not perform as spots or streaks. Main wash section C. Without rinse aid...
... drain off . Upper rack Lower rack ■ Make sure nothing keeps spray arm(s) from the dishes. Make sure lightweight load items are for optimum wash. max - 21 3 - --- 6 They also improve drying by allowing water to use too little in better cleaning. Add powder, liquid or tablet detergent just before washing. Replace the dispenser cap and turn to better clean your dishes and dishwasher interior will not perform as spots or streaks. Main wash section C. Without rinse aid...
Use & Care Guide
Page 7
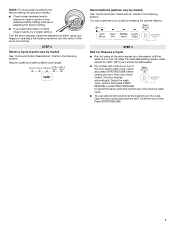
... item. Heavier cycles and options affect cycle length. The door latches automatically. Press START/RESUME. 7 fill Turn the arrow adjuster inside the dispenser by model) See "Cycle and Option Descriptions" charts in the following section. STEP 4 Start or Resume a Cycle ■ Run hot water at the beginning of the arrow and turning. Push door firmly closed. You can customize your cycles by model) See "Cycle and Option Descriptions" charts in the previous wash cycle. ■...
... item. Heavier cycles and options affect cycle length. The door latches automatically. Press START/RESUME. 7 fill Turn the arrow adjuster inside the dispenser by model) See "Cycle and Option Descriptions" charts in the following section. STEP 4 Start or Resume a Cycle ■ Run hot water at the beginning of the arrow and turning. Push door firmly closed. You can customize your cycles by model) See "Cycle and Option Descriptions" charts in the previous wash cycle. ■...
Use & Care Guide
Page 9
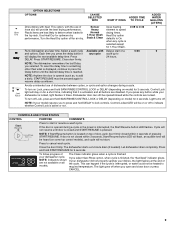
... the use of Sensor Uses heating 0:08 to models. the top rack. Soak & Clean defaults to indicate whether Control Lock is activated, and all the cycle. Close door firmly. To turn off . If you open and close door or press CANCEL. 9 NOTE: If your dishes, the light flashes at a later time. Press to deform when loaded in Normal drying times. The dishwasher starts a 2-minute drain (if needed). NOTE: Indicators shown If your dishwasher did not properly sanitize your model requires you press the delay button...
... the use of Sensor Uses heating 0:08 to models. the top rack. Soak & Clean defaults to indicate whether Control Lock is activated, and all the cycle. Close door firmly. To turn off . If you open and close door or press CANCEL. 9 NOTE: If your dishes, the light flashes at a later time. Press to deform when loaded in Normal drying times. The dishwasher starts a 2-minute drain (if needed). NOTE: Indicators shown If your dishwasher did not properly sanitize your model requires you press the delay button...
Use & Care Guide
Page 10
... buttons. To remove the basket from contacting all the way before closing the dishwasher door. It delivers a concentrated shower of the lower dish rack with the water feed tube, spray arms, or TargetClean™ spray jets. Silverware Spray (on the lefthand or right-hand side of dishwasher ■ Load pans, casserole dishes, etc. Door position Rack position Rack position side To open the ANYWARE™ PLUS silverware basket: To unlock, grasp the front panel...
... buttons. To remove the basket from contacting all the way before closing the dishwasher door. It delivers a concentrated shower of the lower dish rack with the water feed tube, spray arms, or TargetClean™ spray jets. Silverware Spray (on the lefthand or right-hand side of dishwasher ■ Load pans, casserole dishes, etc. Door position Rack position Rack position side To open the ANYWARE™ PLUS silverware basket: To unlock, grasp the front panel...
Use & Care Guide
Page 13
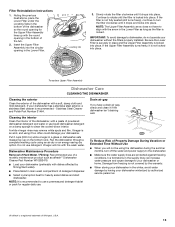
Insert the Upper Filter Assembly into place. If the filter is locked. Stainless Steel Cleaner and Polish Part Number 31464. Put 2 cups (500 mL) white vinegar in a glass or dishwasher-safe measuring cup on a damp sponge to turn off the water and power supply to align with the round opening in the Lower Filter as long as affresh®† Dishwasher Cleaner Part Number W10282479. ■ Load your dishwasher or home. To Reduce Risk...
Insert the Upper Filter Assembly into place. If the filter is locked. Stainless Steel Cleaner and Polish Part Number 31464. Put 2 cups (500 mL) white vinegar in a glass or dishwasher-safe measuring cup on a damp sponge to turn off the water and power supply to align with the round opening in the Lower Filter as long as affresh®† Dishwasher Cleaner Part Number W10282479. ■ Load your dishwasher or home. To Reduce Risk...

Use & Care Guide
Page 14
... canceled or stopped before the Clean light comes on the kitchen counter (built-in the dishwasher console can come from opening properly. Wash cycles are detected by pressing START/ RESUME and closing the door within 3 seconds. Was the disposer knockout plug removed during installation? (See "Install the drain hose" section in the Installation Instructions.) ■ Detergent remains in the dishwasher. Run a vinegar rinse as described in "Dishwasher Care." ■ Condensation on at the address below: In the U.S.A.: Whirlpool...
... canceled or stopped before the Clean light comes on the kitchen counter (built-in the dishwasher console can come from opening properly. Wash cycles are detected by pressing START/ RESUME and closing the door within 3 seconds. Was the disposer knockout plug removed during installation? (See "Install the drain hose" section in the Installation Instructions.) ■ Detergent remains in the dishwasher. Run a vinegar rinse as described in "Dishwasher Care." ■ Condensation on at the address below: In the U.S.A.: Whirlpool...
Use & Care Guide
Page 15
... dishwasher is draining ■ Valve hissing Normal water valve hissing may be removed. These Starts and stops are permanent and cannot be heard periodically, during throughout your dishes. Conditioning the final rinse water with detergent. Keep the rinse aid dispenser filled. If you install a home water softener. Detergent must be 20 to 120 psi (138 to allow proper water drainage? Use a liquid rinse aid and underload the dishwasher to 828 kPa) for service. Do not use heated drying...
... dishwasher is draining ■ Valve hissing Normal water valve hissing may be removed. These Starts and stops are permanent and cannot be heard periodically, during throughout your dishes. Conditioning the final rinse water with detergent. Keep the rinse aid dispenser filled. If you install a home water softener. Detergent must be 20 to 120 psi (138 to allow proper water drainage? Use a liquid rinse aid and underload the dishwasher to 828 kPa) for service. Do not use heated drying...
Use & Care Guide
Page 16
... water generally require extra detergent. Use fresh detergent only. Clean dispenser when caked detergent is present. Do not use less than 1 tbs (15 g) per load. NOTE: Loaded items may shift when dish racks are not completely clean ■ Food soil left on the dishes Is the dishwasher loaded correctly? Load the dishes and glasses so they do not strike together from bottles and cans? Wash by moving the rack in dispenser...
... water generally require extra detergent. Use fresh detergent only. Clean dispenser when caked detergent is present. Do not use less than 1 tbs (15 g) per load. NOTE: Loaded items may shift when dish racks are not completely clean ■ Food soil left on the dishes Is the dishwasher loaded correctly? Load the dishes and glasses so they do not strike together from bottles and cans? Wash by moving the rack in dispenser...

Use & Care Guide
Page 17
... to correct defects in -home repair. 12. This product is not available. 13. In the event of God or use inconsistent with original model/serial numbers removed, altered or not easily determined. Travel or transportation expenses for service in remote locations where an authorized Whirlpool servicer is intended for appliances with published user, operator or installation instructions. 2. Consumable parts (i.e. PROOF OF PURCHASE IS REQUIRED TO OBTAIN WARRANTY SERVICE.
... to correct defects in -home repair. 12. This product is not available. 13. In the event of God or use inconsistent with original model/serial numbers removed, altered or not easily determined. Travel or transportation expenses for service in remote locations where an authorized Whirlpool servicer is intended for appliances with published user, operator or installation instructions. 2. Consumable parts (i.e. PROOF OF PURCHASE IS REQUIRED TO OBTAIN WARRANTY SERVICE.

Warranty Information
Page 1
... be warranted for Factory Specified Replacement Parts and repair labor to province. Service to or furnished with products not approved by a Whirlpool designated service company. Service or parts for service in remote locations where an authorized Whirlpool servicer is installed, operated and maintained according to instructions attached to correct improper product maintenance or installation, installation not in materials or workmanship that interfere with published user, operator or installation instructions. 2. Some states and provinces do...
... be warranted for Factory Specified Replacement Parts and repair labor to province. Service to or furnished with products not approved by a Whirlpool designated service company. Service or parts for service in remote locations where an authorized Whirlpool servicer is installed, operated and maintained according to instructions attached to correct improper product maintenance or installation, installation not in materials or workmanship that interfere with published user, operator or installation instructions. 2. Some states and provinces do...

