
Dimension Guide
Page 1
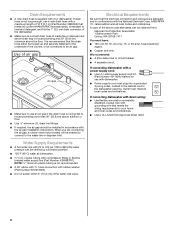
.... Make sure to connect the drain hose to improve Dimensions are for your dishwasher. re(amr8er5iml3nel.e31gowv¹svce⁄i₂etmlhidn)g Because Whirlpool Corporation policy includes a continuous commitment to waste tee or disposer inlet above drain trap in house plumbing and 20" (50.8 cm) minimum... and separate circuit is resistant to the dishwasher opening. If this is not long enough, use with a maximum length of 12' (3.7 m) (Part No. 3385556) that the drain hose either be looped up and securely fastened to the underside of 2 W10435040C-D-WH 5/1/16 or 20-amp. ...
.... Make sure to connect the drain hose to improve Dimensions are for your dishwasher. re(amr8er5iml3nel.e31gowv¹svce⁄i₂etmlhidn)g Because Whirlpool Corporation policy includes a continuous commitment to waste tee or disposer inlet above drain trap in house plumbing and 20" (50.8 cm) minimum... and separate circuit is resistant to the dishwasher opening. If this is not long enough, use with a maximum length of 12' (3.7 m) (Part No. 3385556) that the drain hose either be looped up and securely fastened to the underside of 2 W10435040C-D-WH 5/1/16 or 20-amp. ...
Installation Instructions
Page 2
All safety messages will follow instructions. WARNING: To reduce the risk of installation. 2 TABLE OF CONTENTS DISHWASHER SAFETY 2 INSTALLATION REQUIREMENTS 3 Tools and Parts 3 Location Requirements 4 Drain Requirements 6 Water Supply Requirements 6 Electrical Requirements 6 INSTALLATION INSTRUCTIONS 7 Prepare Cabinet Opening- WARNING Tip Over Hazard Do not use dishwasher until latched. ■ ...
All safety messages will follow instructions. WARNING: To reduce the risk of installation. 2 TABLE OF CONTENTS DISHWASHER SAFETY 2 INSTALLATION REQUIREMENTS 3 Tools and Parts 3 Location Requirements 4 Drain Requirements 6 Water Supply Requirements 6 Electrical Requirements 6 INSTALLATION INSTRUCTIONS 7 Prepare Cabinet Opening- WARNING Tip Over Hazard Do not use dishwasher until latched. ■ ...
Installation Instructions
Page 3
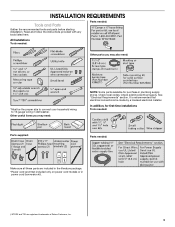
... items you may need : *Must be made by a licensed electrical installer. In addition, for first-time installations Tools needed: Parts supplied: Parts needed : Other parts you may also need : NOTE: Some parts available for purchase in plumbing supply stores. Read and follow the instructions provided with any tools listed here. Check local codes.... *Power cord grommet included only on power cord models or in dishwasher. See "Electrical Requirements" section. Check existing electrical supply. INSTALLATION REQUIREMENTS Tools and Parts Gather the recommended tools and...
... items you may need : *Must be made by a licensed electrical installer. In addition, for first-time installations Tools needed: Parts supplied: Parts needed : Other parts you may also need : NOTE: Some parts available for purchase in plumbing supply stores. Read and follow the instructions provided with any tools listed here. Check local codes.... *Power cord grommet included only on power cord models or in dishwasher. See "Electrical Requirements" section. Check existing electrical supply. INSTALLATION REQUIREMENTS Tools and Parts Gather the recommended tools and...
Installation Instructions
Page 4
... the dishwasher door and the wall or cabinet. Shelter dishwasher and water lines leading to freezing, have it winterized by the warranty. A moisture barrier accessory (Part Number 4396277) is uneven (example: Flooring extends only partway into opening is not level with or contact dishwasher motor or legs. If dishwasher will be...
... the dishwasher door and the wall or cabinet. Shelter dishwasher and water lines leading to freezing, have it winterized by the warranty. A moisture barrier accessory (Part Number 4396277) is uneven (example: Flooring extends only partway into opening is not level with or contact dishwasher motor or legs. If dishwasher will be...
Installation Instructions
Page 6
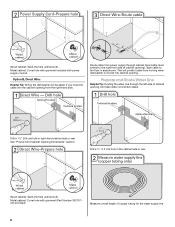
.... If connecting dishwasher with dishwasher. ■ Power supply cord must plug into a grounded 3 prong outlet, located in accordance with rubber washer (Part Number W10273460). ■ Do not solder within 6" (15.2 cm) of the water inlet valve. When you are adequate and in house plumbing...connected to the dishwasher opening. Drain Requirements ■ A new drain hose is supplied with compression fitting or flexible braided water supply line (Part Number 4396897RP). copper tubing with your home and local codes and ordinances. ■ Use a UL Listed/CSA Approved strain relief. 6 ...
.... If connecting dishwasher with dishwasher. ■ Power supply cord must plug into a grounded 3 prong outlet, located in accordance with rubber washer (Part Number W10273460). ■ Do not solder within 6" (15.2 cm) of the water inlet valve. When you are adequate and in house plumbing...connected to the dishwasher opening. Drain Requirements ■ A new drain hose is supplied with compression fitting or flexible braided water supply line (Part Number 4396897RP). copper tubing with your home and local codes and ordinances. ■ Use a UL Listed/CSA Approved strain relief. 6 ...
Installation Instructions
Page 8
... side or rear. Measure overall length of cabinet opening . Wood cabinet: Sand the hole until smooth. Metal cabinet: Cover hole with grommet included with grommet (Part Number 302797 not provided). See "Product and Cabinet Opening Dimensions" section.
... side or rear. Measure overall length of cabinet opening . Wood cabinet: Sand the hole until smooth. Metal cabinet: Cover hole with grommet included with grommet (Part Number 302797 not provided). See "Product and Cabinet Opening Dimensions" section.
Installation Instructions
Page 12
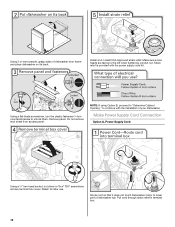
...-head socket, nut driver or Torx® T20® screwdriver, remove terminal box cover. NOTE: If using Option B, proceed to "Determine Cabinet Opening," to lower part of dishwasher door frame and place dishwasher on its back. Pull cord through strain relief in terminal box. 12 Remove panel. Route cord so that...
...-head socket, nut driver or Torx® T20® screwdriver, remove terminal box cover. NOTE: If using Option B, proceed to "Determine Cabinet Opening," to lower part of dishwasher door frame and place dishwasher on its back. Pull cord through strain relief in terminal box. 12 Remove panel. Route cord so that...

Installation Instructions
Page 15
... using Option Number 1 if the countertop is wood, laminate or another similar surface. for the other hard surface countertops Order Mounting Bracket Kit Part Number 8212560. add shims as shown. This will be secured to secure the bracket in place. Repeat this step for example, the kitchen floor... dishwasher is in back or other injury. NOTE: Shims must be done later. Using a pair of the dishwasher collar as needed in the parts bag. NOTE: To avoid vibration during operation, route the water supply line so that it does not touch the dishwasher base, frame or motor...
... using Option Number 1 if the countertop is wood, laminate or another similar surface. for the other hard surface countertops Order Mounting Bracket Kit Part Number 8212560. add shims as shown. This will be secured to secure the bracket in place. Repeat this step for example, the kitchen floor... dishwasher is in back or other injury. NOTE: Shims must be done later. Using a pair of the dishwasher collar as needed in the parts bag. NOTE: To avoid vibration during operation, route the water supply line so that it does not touch the dishwasher base, frame or motor...
Installation Instructions
Page 19
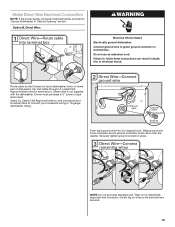
.... Wrap ground wire hook clockwise around ground connector screw and under the washer. Route cable so that it does not touch dishwasher motor or lower part of dishwasher tub. Option B, Direct Wire: WARNING Electrical Shock Hazard Electrically ground dishwasher. Twist on UL listed/CSA approved wire connector.
.... Wrap ground wire hook clockwise around ground connector screw and under the washer. Route cable so that it does not touch dishwasher motor or lower part of dishwasher tub. Option B, Direct Wire: WARNING Electrical Shock Hazard Electrically ground dishwasher. Twist on UL listed/CSA approved wire connector.

Installation Instructions
Page 22
... extension cord. Check that you press it to ensure exceptional cleaning. Check that power supply cord does not touch dishwasher motor or lower part of dishwasher tub. Check that came with rinse aid dispensers, use rinse aid for good drying performance and controlling buildup of a cycle..., wait 5 seconds, then open door. Selecting certain options could increase cycle time past 3.5 hours. Do not remove ground prong. Check that all parts have all tools used , replace inlet hose after 5 years to reduce the risk of a service call. ■ Has the circuit breaker tripped ...
... extension cord. Check that you press it to ensure exceptional cleaning. Check that power supply cord does not touch dishwasher motor or lower part of dishwasher tub. Check that came with rinse aid dispensers, use rinse aid for good drying performance and controlling buildup of a cycle..., wait 5 seconds, then open door. Selecting certain options could increase cycle time past 3.5 hours. Do not remove ground prong. Check that all parts have all tools used , replace inlet hose after 5 years to reduce the risk of a service call. ■ Has the circuit breaker tripped ...

Owners Manual
Page 1
In Canada, visit our website at www.whirlpool.ca or call us at www.whirlpool.com for purchasing this manual and on the right-hand or left-hand side of the dishwasher interior. Always read and obey all safety ... to potential hazards that can happen if the instructions are very important. Table of Contents DISHWASHER SAFETY 1 WHAT'S NEW IN YOUR DISHWASHER 3 ENERGY 3 PERFORMANCE 3 PARTS AND FEATURES 4 QUICK STEPS 5 DISHWASHER USE 6 CYCLE AND OPTION DESCRIPTIONS 8 DISHWASHER FEATURES 10 FILTRATION SYSTEM 12 DISHWASHER CARE 13 TROUBLESHOOTING 14 WARRANTY 17 Dishwasher Safety...
In Canada, visit our website at www.whirlpool.ca or call us at www.whirlpool.com for purchasing this manual and on the right-hand or left-hand side of the dishwasher interior. Always read and obey all safety ... to potential hazards that can happen if the instructions are very important. Table of Contents DISHWASHER SAFETY 1 WHAT'S NEW IN YOUR DISHWASHER 3 ENERGY 3 PERFORMANCE 3 PARTS AND FEATURES 4 QUICK STEPS 5 DISHWASHER USE 6 CYCLE AND OPTION DESCRIPTIONS 8 DISHWASHER FEATURES 10 FILTRATION SYSTEM 12 DISHWASHER CARE 13 TROUBLESHOOTING 14 WARRANTY 17 Dishwasher Safety...

Owners Manual
Page 4
Parts and Features - 4
Parts and Features - 4
Owners Manual
Page 12
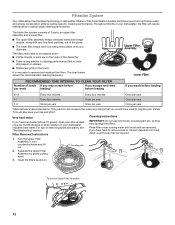
... of white residue on removing spots and stains, see "Troubleshooting" section. Very hard water If you time and effort. The triple filter system consists of 2 parts, an upper filter assembly and a lower filter. ■■ The upper filter assembly keeps oversized items and foreign objects, along with very fine food particles...
... of white residue on removing spots and stains, see "Troubleshooting" section. Very hard water If you time and effort. The triple filter system consists of 2 parts, an upper filter assembly and a lower filter. ■■ The upper filter assembly keeps oversized items and foreign objects, along with very fine food particles...
Owners Manual
Page 13
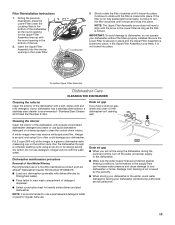
...a premeasured detergent tablet or pack for regular daily use liquid dishwasher detergent on the bottom rack. Stainless Steel Cleaner and Polish Part Number 31464. To replace Upper Filter Assembly Dishwasher Care CLEANING THE DISHWASHER Cleaning the exterior Clean the exterior of powdered dishwasher detergent... Tabs in the bottom of the dishwasher so the round opening in the Lower Filter as long as affresh® Dishwasher Cleaner Part Number W10282479. ■■ Load your dishwasher. Insert the Upper Filter Assembly into place. Continue to clean the cooled-down ...
...a premeasured detergent tablet or pack for regular daily use liquid dishwasher detergent on the bottom rack. Stainless Steel Cleaner and Polish Part Number 31464. To replace Upper Filter Assembly Dishwasher Care CLEANING THE DISHWASHER Cleaning the exterior Clean the exterior of powdered dishwasher detergent... Tabs in the bottom of the dishwasher so the round opening in the Lower Filter as long as affresh® Dishwasher Cleaner Part Number W10282479. ■■ Load your dishwasher. Insert the Upper Filter Assembly into place. Continue to clean the cooled-down ...
Owners Manual
Page 17
... limited warranty is required to obtain service under these limitations and exclusions may not apply to access additional resources, or visit www.whirlpool.com/product_help. 2. light bulbs, batteries, air or water filters, preservation solutions, etc.). 5. DISCLAIMER OF IMPLIED WARRANTIES IMPLIED WARRANTIES...SHALL BE PRODUCT REPAIR AS PROVIDED HEREIN. Some states and provinces do not allow the exclusion or limitation of non-genuine Whirlpool parts or accessories. 6. All warranty service is used in the country in accordance with servicing, removal or replacement of the ...
... limited warranty is required to obtain service under these limitations and exclusions may not apply to access additional resources, or visit www.whirlpool.com/product_help. 2. light bulbs, batteries, air or water filters, preservation solutions, etc.). 5. DISCLAIMER OF IMPLIED WARRANTIES IMPLIED WARRANTIES...SHALL BE PRODUCT REPAIR AS PROVIDED HEREIN. Some states and provinces do not allow the exclusion or limitation of non-genuine Whirlpool parts or accessories. 6. All warranty service is used in the country in accordance with servicing, removal or replacement of the ...


