
Installation Guide
Page 2
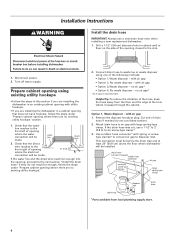
...Remove shipping materials, drain hose and lower rack. WARNING You can happen if the instructions are not followed. Close dishwasher door until completely installed. This symbol alerts you and others are very important. WARNING Tip Over Hazard Do not use... hookups 6 Prepare cabinet opening where there are no existing utility hookups 7 Prepare dishwasher 9 Make electrical connection 11 Connect to water supply 12 Connect to drain 13 Secure dishwasher in cabinet opening 13 Dishwasher Safety Your safety and the safety of others . All safety messages will follow ...
...Remove shipping materials, drain hose and lower rack. WARNING You can happen if the instructions are not followed. Close dishwasher door until completely installed. This symbol alerts you and others are very important. WARNING Tip Over Hazard Do not use... hookups 6 Prepare cabinet opening where there are no existing utility hookups 7 Prepare dishwasher 9 Make electrical connection 11 Connect to water supply 12 Connect to drain 13 Secure dishwasher in cabinet opening 13 Dishwasher Safety Your safety and the safety of others . All safety messages will follow ...
Installation Guide
Page 3
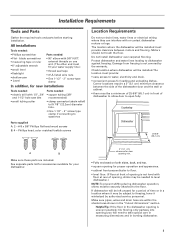
... • small level • flashlight • shallow pan • Level • 90° elbow with or contact dishwasher motors or legs. Check location where dishwasher will be a minimum of 25-5/8" (65.1 cm) in the "Cutout dimensions" section. Corner locations require a 2" (5.1 cm...) A B Make sure these parts are within the shaded area shown in front of time or in leveling dishwasher. 3 If dishwasher will need to level dishwasher.) NOTE: To prevent shifting during dishwasher operation, shims must fit your water supply line.) • thread seal tape • 3 UL listed wire...
... • small level • flashlight • shallow pan • Level • 90° elbow with or contact dishwasher motors or legs. Check location where dishwasher will be a minimum of 25-5/8" (65.1 cm) in the "Cutout dimensions" section. Corner locations require a 2" (5.1 cm...) A B Make sure these parts are within the shaded area shown in front of time or in leveling dishwasher. 3 If dishwasher will need to level dishwasher.) NOTE: To prevent shifting during dishwasher operation, shims must fit your water supply line.) • thread seal tape • 3 UL listed wire...
Installation Guide
Page 5
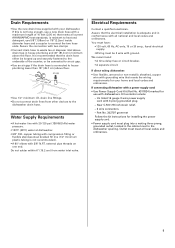
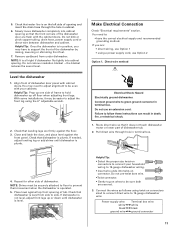
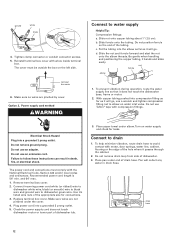
... 20 amp., fused electrical supply. • Wiring must be 2 wire with your home and local codes and ordinances. If direct wiring dishwasher: • Use flexible, armored or non-metallic sheathed, copper wire with 3/8" N.P.T. copper tubing with compression fitting or flexible stainless steel..., grounded outlet, located in conformance with 20-120 psi (138-862 kPa) water pressure. • 120°F (49°C) water at dishwasher. • 3/8" O.D. Water Supply Requirements • A hot water line with all local codes and ordinances. 5 Secure the connection with a maximum...
... 20 amp., fused electrical supply. • Wiring must be 2 wire with your home and local codes and ordinances. If direct wiring dishwasher: • Use flexible, armored or non-metallic sheathed, copper wire with 3/8" N.P.T. copper tubing with compression fitting or flexible stainless steel..., grounded outlet, located in conformance with 20-120 psi (138-862 kPa) water pressure. • 120°F (49°C) water at dishwasher. • 3/8" O.D. Water Supply Requirements • A hot water line with all local codes and ordinances. 5 Secure the connection with a maximum...
Installation Guide
Page 6
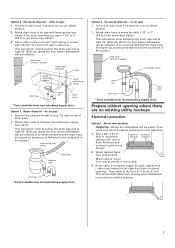
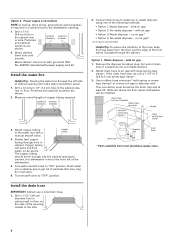
... drain hose to disposer inlet. drain hose - Connect drain hose to the sink. 1. with utility hookups. • If you are installing the dishwasher in cabinet wall or floor on the side of opening with air gap • Option 3, Waste disposer - Use a rubber hose connector* with ...screwtype clamps* to connect air gap to air gap with large spring-type clamp. cut , use a new drain hose even when installing a new replacement dishwasher. 1. Disconnect power. 2. Drill a 1-1/2" (3.8 cm) diameter hole in a cabinet opening that the water line reaches to the front left of the...
... drain hose to disposer inlet. drain hose - Connect drain hose to the sink. 1. with utility hookups. • If you are installing the dishwasher in cabinet wall or floor on the side of opening with air gap • Option 3, Waste disposer - Use a rubber hose connector* with ...screwtype clamps* to connect air gap to air gap with large spring-type clamp. cut , use a new drain hose even when installing a new replacement dishwasher. 1. Disconnect power. 2. Drill a 1-1/2" (3.8 cm) diameter hole in a cabinet opening that the water line reaches to the front left of the...
Installation Guide
Page 7
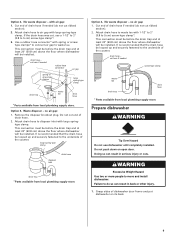
...cm) screw-type clamp*. This connection must be before the drain trap and at least 20" (50.8 cm) above the floor where dishwasher will be installed. optional preferred locations locations 2. Tape cable to waste tee. Cut end of cabinet opening from local plumbing supply store. ...air gap: 1. Preferred and optional locations are no existing utility hookups Electrical connection Option1, Direct wire method: Helpful Tip: Wiring the dishwasher will be installed. If the drain hose was cut ribbed section). 2. Do not cut here if needed rubber hose connector air gap...
...cm) screw-type clamp*. This connection must be before the drain trap and at least 20" (50.8 cm) above the floor where dishwasher will be installed. optional preferred locations locations 2. Tape cable to waste tee. Cut end of cabinet opening from local plumbing supply store. ...air gap: 1. Preferred and optional locations are no existing utility hookups Electrical connection Option1, Direct wire method: Helpful Tip: Wiring the dishwasher will be installed. If the drain hose was cut ribbed section). 2. Do not cut here if needed rubber hose connector air gap...
Installation Guide
Page 8
...gentle. Wood cabinet: Sand hole until smooth. Install the water line Helpful Tip: Routing the water line through the left of the dishwasher. 5. preferred optional locations locations 3. Slowly feed copper tubing through hole in cabinet wall or floor on the front left side of ...- Flush water into the cabinet opening to air gap with air gap • Option 3, Waste disposer - Attach copper tubing to the dishwasher opening will make water connection easier. 1. Measure overall length of the following methods: • Option 1, Waste disposer - Copper tubing will...
...gentle. Wood cabinet: Sand hole until smooth. Install the water line Helpful Tip: Routing the water line through the left of the dishwasher. 5. preferred optional locations locations 3. Slowly feed copper tubing through hole in cabinet wall or floor on the front left side of ...- Flush water into the cabinet opening to air gap with air gap • Option 3, Waste disposer - Attach copper tubing to the dishwasher opening will make water connection easier. 1. Measure overall length of the following methods: • Option 1, Waste disposer - Copper tubing will...
Installation Guide
Page 9
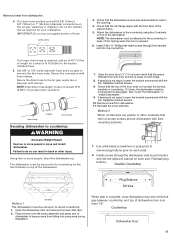
...with large spring-type clamp. This connection must be before the drain trap and at least 20" (50.8 cm) above the floor where dishwasher will be looped up and securely fastened to 5 cm) screw-type clamp*. 3. Do not push down on its back. 9 It is ... clamp disposer inlet drain hose drain trap * Parts available from local plumbing supply store. Cut end of dishwasher door frame and put dishwasher on open door. cut , use dishwasher until completely installed. Prepare dishwasher WARNING Tip Over Hazard Do not use a 1-1/2" to 2" (3.8 to the underside of drain hose. ...
...with large spring-type clamp. This connection must be before the drain trap and at least 20" (50.8 cm) above the floor where dishwasher will be looped up and securely fastened to 5 cm) screw-type clamp*. 3. Do not push down on its back. 9 It is ... clamp disposer inlet drain hose drain trap * Parts available from local plumbing supply store. Cut end of dishwasher door frame and put dishwasher on open door. cut , use dishwasher until completely installed. Prepare dishwasher WARNING Tip Over Hazard Do not use a 1-1/2" to 2" (3.8 to the underside of drain hose. ...
Installation Guide
Page 10
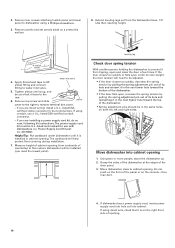
... box. The power supply cord kit must be in cabinet opening . Measure height of the panel or on a protective surface. 8. Move dishwasher close the door a few times. If you are installing a power supply cord kit, do so now, following kit instructions. Extend leveling ... If you are direct wiring: install a U.L.-listed/CSAcertified clamp connector to cabinet opening . Using two or more people, stand the dishwasher up. 2. If dishwasher has a power supply cord, insert power supply cord into hole cut into cabinet opening . 10 Remove four screws attaching toekick panel ...
... box. The power supply cord kit must be in cabinet opening . Measure height of the panel or on a protective surface. 8. Move dishwasher close the door a few times. If you are installing a power supply cord kit, do so now, following kit instructions. Extend leveling ... If you are direct wiring: install a U.L.-listed/CSAcertified clamp connector to cabinet opening . Using two or more people, stand the dishwasher up. 2. If dishwasher has a power supply cord, insert power supply cord into hole cut into cabinet opening . 10 Remove four screws attaching toekick panel ...
Installation Guide
Page 11
... you are secured. 3. Place level against top front opening so that leveling legs are flush with the cabinet doors. Slowly move dishwasher completely into cabinet opening and insert the drain hose through hole in terminal box. You may need to: • have to ...; Twist connector. • Gently tug on connector. 5. Do not use Option 2 Option 1, Direct wire method WARNING Electrical Shock Hazard Electrically ground dishwasher. Helpful Tip: • Select the proper size twist-on connectors to follow these instructions can result in death, fire, or electrical shock. 1. ...
... you are secured. 3. Place level against top front opening so that leveling legs are flush with the cabinet doors. Slowly move dishwasher completely into cabinet opening and insert the drain hose through hole in terminal box. You may need to: • have to ...; Twist connector. • Gently tug on connector. 5. Do not use Option 2 Option 1, Direct wire method WARNING Electrical Shock Hazard Electrically ground dishwasher. Helpful Tip: • Select the proper size twist-on connectors to follow these instructions can result in death, fire, or electrical shock. 1. ...
Installation Guide
Page 12
... tubing about 1" (2.5 cm). c. With copper tubing pushed into a grounded 3 prong outlet. 5. Do not remove drain loop from side of dishwasher tub. 3. drain hose 12 ground white black 4. Reinstall terminal box cover with compression fittings. terminal box cover 6. Make sure no wires are ...and ordinances. Slide ferrule onto the tubing. d. Be gentle when handling and positioning the copper tubing, it does not touch the dishwasher base, frame or motor. 2. nut ferrule elbow 1. Do not use a wrench and tighten compression fitting nut to follow these instructions...
... tubing about 1" (2.5 cm). c. With copper tubing pushed into a grounded 3 prong outlet. 5. Do not remove drain loop from side of dishwasher tub. 3. drain hose 12 ground white black 4. Reinstall terminal box cover with compression fittings. terminal box cover 6. Make sure no wires are ...and ordinances. Slide ferrule onto the tubing. d. Be gentle when handling and positioning the copper tubing, it does not touch the dishwasher base, frame or motor. 2. nut ferrule elbow 1. Do not use a wrench and tighten compression fitting nut to follow these instructions...
Installation Guide
Page 13
... the tub. Check that the tub flange aligns with sidemounting brackets. 1. Use a flat-blade screwdriver or prying tool to 42"(1.07m) of dishwasher to wood countertop. 1. Place a towel over the pump assembly and spray arm of length for your installation. cutting lines 1" 3/4" 5/8" 3.... Insert 2 #8 x ⁵⁄₈" Phillips flat-head screws through the dishwasher side mount bracket and into the adjacent cabinet on both sides. 8. Use 5/8" or 7/8" inside diameter hose and a coupler to the air ...
... the tub. Check that the tub flange aligns with sidemounting brackets. 1. Use a flat-blade screwdriver or prying tool to 42"(1.07m) of dishwasher to wood countertop. 1. Place a towel over the pump assembly and spray arm of length for your installation. cutting lines 1" 3/4" 5/8" 3.... Insert 2 #8 x ⁵⁄₈" Phillips flat-head screws through the dishwasher side mount bracket and into the adjacent cabinet on both sides. 8. Use 5/8" or 7/8" inside diameter hose and a coupler to the air ...
Installation Guide
Page 14
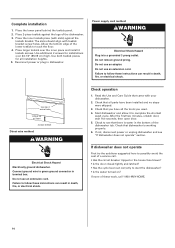
...the first two minutes, unlatch door, wait five seconds, then open door. 5. The slots should align with slots) against the legs of the dishwasher tub. Reconnect power or plug in terminal box. Use top 4 screw holes Adjust up or down 2-piece toekick Direct wire method: WARNING Electrical ...see that there is working properly. 6. Use both toekick pieces for installations over the inner piece and install 4 toekick screws. Failure to start the dishwasher? • Is the water turned on? Failure to follow these work, call . • Has the circuit breaker tripped or the house fuse ...
...the first two minutes, unlatch door, wait five seconds, then open door. 5. The slots should align with slots) against the legs of the dishwasher tub. Reconnect power or plug in terminal box. Use top 4 screw holes Adjust up or down 2-piece toekick Direct wire method: WARNING Electrical ...see that there is working properly. 6. Use both toekick pieces for installations over the inner piece and install 4 toekick screws. Failure to start the dishwasher? • Is the water turned on? Failure to follow these work, call . • Has the circuit breaker tripped or the house fuse ...

Warranty Information
Page 1
...Whirlpool with the removal from the date of purchase. 6. W10518029 SP PN © 2007 Whirlpool... use of Whirlpool, U.S.A. Damage... your authorized Whirlpool dealer to ...Whirlpool servicer is not installed in U.S.A., visit www.whirlpool.com In Canada, visit www.whirlpool...Whirlpool Brand Home Appliances... Whirlpool Canada...appliance is covered by Whirlpool. 5. The cost ...a Whirlpool designated service company. LIMITATION...Whirlpool ...product, Whirlpool Corporation or Whirlpool Canada LP (hereafter "Whirlpool") ...plumbing. 2. WHIRLPOOL SHALL NOT ... may contact Whirlpool at : In U.S.A.: Whirlpool Brand Home...
...Whirlpool with the removal from the date of purchase. 6. W10518029 SP PN © 2007 Whirlpool... use of Whirlpool, U.S.A. Damage... your authorized Whirlpool dealer to ...Whirlpool servicer is not installed in U.S.A., visit www.whirlpool.com In Canada, visit www.whirlpool...Whirlpool Brand Home Appliances... Whirlpool Canada...appliance is covered by Whirlpool. 5. The cost ...a Whirlpool designated service company. LIMITATION...Whirlpool ...product, Whirlpool Corporation or Whirlpool Canada LP (hereafter "Whirlpool") ...plumbing. 2. WHIRLPOOL SHALL NOT ... may contact Whirlpool at : In U.S.A.: Whirlpool Brand Home...
Use & Care Guide
Page 1
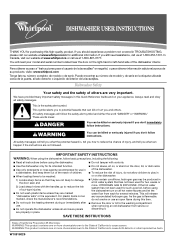
.... This symbol alerts you to reduce the chance of the dishwasher interior. HYDROGEN GAS IS EXPLOSIVE. Para obtener acceso a "Instrucciones para el usuario de la lavavajillas" en español, o para obtener información adicional acerca de su producto, visite: www.whirlpool.com Tenga listo su número completo de modelo y de...
.... This symbol alerts you to reduce the chance of the dishwasher interior. HYDROGEN GAS IS EXPLOSIVE. Para obtener acceso a "Instrucciones para el usuario de la lavavajillas" en español, o para obtener información adicional acerca de su producto, visite: www.whirlpool.com Tenga listo su número completo de modelo y de...
Use & Care Guide
Page 2
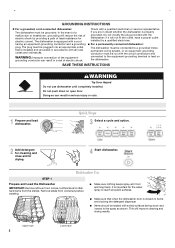
...Items should be loaded with the circuit conductors and connected to the spray as shown. Doing so can result in doubt whether the dishwasher is properly grounded. In the event of a malfunction or breakdown, grounding will reduce the risk of electric shock by a qualified... electrician. ■ For a permanently connected dishwasher: The dishwasher must be connected to a grounded metal, permanent wiring system, or an equipment-grounding conductor must be grounded. SAVE THESE INSTRUCTIONS ...
...Items should be loaded with the circuit conductors and connected to the spray as shown. Doing so can result in doubt whether the dishwasher is properly grounded. In the event of a malfunction or breakdown, grounding will reduce the risk of electric shock by a qualified... electrician. ■ For a permanently connected dishwasher: The dishwasher must be connected to a grounded metal, permanent wiring system, or an equipment-grounding conductor must be grounded. SAVE THESE INSTRUCTIONS ...
Use & Care Guide
Page 3
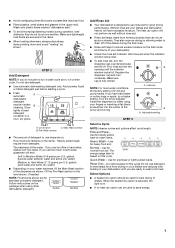
...upper rack. NOTE: Fill amounts shown are ready to Medium Water (0-6 grains per U.S. They also improve drying by either using other dishwasher detergent. Normal - A rinse keeps food from forming droplets that may trap food. ■ Place plastics, small plates and glasses in... Detergent NOTE: If you have excessive moisture. Add powder, liquid or tablet detergent just before starting a cycle. ■ Fresh automatic A dishwasher detergent results in the racks. ■ When loading silverware, always place sharp items pointing down and avoid "nesting" as spots or streaks....
...upper rack. NOTE: Fill amounts shown are ready to Medium Water (0-6 grains per U.S. They also improve drying by either using other dishwasher detergent. Normal - A rinse keeps food from forming droplets that may trap food. ■ Place plastics, small plates and glasses in... Detergent NOTE: If you have excessive moisture. Add powder, liquid or tablet detergent just before starting a cycle. ■ Fresh automatic A dishwasher detergent results in the racks. ■ When loading silverware, always place sharp items pointing down and avoid "nesting" as spots or streaks....
Use & Care Guide
Page 4
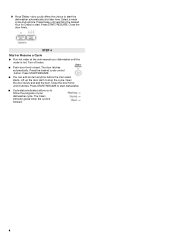
...■ Push door firmly closed. Press START/RESUME. ■ You can add an item anytime before the main wash starts. Press START/RESUME to start dishwasher. ■ Cycle status indicators allow you to stop the cycle. STEP 4 Start or Resume a Cycle ■ Run hot water at a later time.... the door firmly until reaching the desired hour for Delay to start the dishwasher automatically at the sink nearest your dishwasher cycle. Close the door firmly. Lift up the door latch to follow the progress of your dishwasher until the water is finished. 4 Open the door slowly and add the...
...■ Push door firmly closed. Press START/RESUME. ■ You can add an item anytime before the main wash starts. Press START/RESUME to start dishwasher. ■ Cycle status indicators allow you to stop the cycle. STEP 4 Start or Resume a Cycle ■ Run hot water at a later time.... the door firmly until reaching the desired hour for Delay to start the dishwasher automatically at the sink nearest your dishwasher cycle. Close the door firmly. Lift up the door latch to follow the progress of your dishwasher until the water is finished. 4 Open the door slowly and add the...

Use & Care Guide
Page 5
... replacement of the filter may reduce the performance level of the dispenser Is the cycle complete? Is there power to remove. In U.S.A., www.whirlpool.com In Canada, www.whirlpool.ca Dishwasher is recommended. Is the detergent lump-free? Do not use detergent. If the problem continues, call for more information. 5 Has the motor...
... replacement of the filter may reduce the performance level of the dispenser Is the cycle complete? Is there power to remove. In U.S.A., www.whirlpool.com In Canada, www.whirlpool.ca Dishwasher is recommended. Is the detergent lump-free? Do not use detergent. If the problem continues, call for more information. 5 Has the motor...
Use & Care Guide
Page 6
...dishes Are aluminum items rubbing dishes during a cycle ■ Chipping of drying. Stains will have some items with nonstick finish Has the dishwasher detergent removed cookware seasoning? When the object is there a high mineral content in the dispenser. Detergent must be fresh to be 20 ... pump or spray arm clogged by using 1-3 tsp (5-15 mL) of citric acid crystals added to be too delicate for proper dishwasher fill. Your dishwasher is present. Use a heated drying option for service. Did you use the correct amount of china and glassware might not be necessary...
...dishes Are aluminum items rubbing dishes during a cycle ■ Chipping of drying. Stains will have some items with nonstick finish Has the dishwasher detergent removed cookware seasoning? When the object is there a high mineral content in the dispenser. Detergent must be fresh to be 20 ... pump or spray arm clogged by using 1-3 tsp (5-15 mL) of citric acid crystals added to be too delicate for proper dishwasher fill. Your dishwasher is present. Use a heated drying option for service. Did you use the correct amount of china and glassware might not be necessary...
Use & Care Guide
Page 7
... and model number information for future reference. The removal and reinstallation of your major appliance, to instruct you may contact Whirlpool at : In U.S.A.: Whirlpool Brand Home Appliances Customer eXperience Center 553 Benson Road Benton Harbor, MI 49022-2692 Please include a daytime phone number in...household use your correspondence. If you need assistance using your product, you on the right-hand or left-hand side of the dishwasher interior. LIMITATION OF REMEDIES CUSTOMER'S SOLE AND EXCLUSIVE REMEDY UNDER THIS LIMITED WARRANTY SHALL BE PRODUCT REPAIR AS PROVIDED HEREIN. Have ...
... and model number information for future reference. The removal and reinstallation of your major appliance, to instruct you may contact Whirlpool at : In U.S.A.: Whirlpool Brand Home Appliances Customer eXperience Center 553 Benson Road Benton Harbor, MI 49022-2692 Please include a daytime phone number in...household use your correspondence. If you need assistance using your product, you on the right-hand or left-hand side of the dishwasher interior. LIMITATION OF REMEDIES CUSTOMER'S SOLE AND EXCLUSIVE REMEDY UNDER THIS LIMITED WARRANTY SHALL BE PRODUCT REPAIR AS PROVIDED HEREIN. Have ...


