
Installation Guide
Page 2
.... Remove shipping materials, drain hose and lower rack. WARNING You can be installed to meet all electrical and plumbing national and local codes and ordinances. 2 This symbol alerts you to potential hazards that can kill or hurt you what can result in serious injury or cuts. Close dishwasher door until completely installed. Table of Contents Dishwasher Safety 2 Installation Requirements 3 Tools and parts 3 Location Requirements 3 Drain Requirements 5 Water Supply Requirements 5 Electrical Requirements 5 Installation Instructions...
.... Remove shipping materials, drain hose and lower rack. WARNING You can be installed to meet all electrical and plumbing national and local codes and ordinances. 2 This symbol alerts you to potential hazards that can kill or hurt you what can result in serious injury or cuts. Close dishwasher door until completely installed. Table of Contents Dishwasher Safety 2 Installation Requirements 3 Tools and parts 3 Location Requirements 3 Drain Requirements 5 Water Supply Requirements 5 Electrical Requirements 5 Installation Instructions...
Installation Guide
Page 3
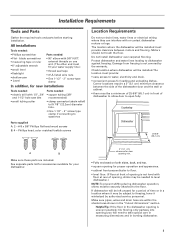
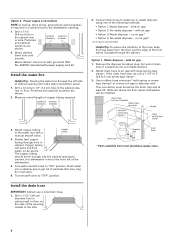
... run drain lines, water lines or electrical wiring where they can interfere with 3/8" N.P.T. Do not install dishwasher over carpeted flooring. Check location where dishwasher will be securely attached to the floor. Make sure pipes, wires and drain hose are included. If dishwasher will be installed must fit your dishwasher. 2" ( 5.1 cm) clearance for door opening is not level with 1/2", 3/4" and 1-1/2" hole saw bits • small tubing cutter Parts needed : • Flat - All installations Tools needed...
... run drain lines, water lines or electrical wiring where they can interfere with 3/8" N.P.T. Do not install dishwasher over carpeted flooring. Check location where dishwasher will be securely attached to the floor. Make sure pipes, wires and drain hose are included. If dishwasher will be installed must fit your dishwasher. 2" ( 5.1 cm) clearance for door opening is not level with 1/2", 3/4" and 1-1/2" hole saw bits • small tubing cutter Parts needed : • Flat - All installations Tools needed...
Installation Guide
Page 5
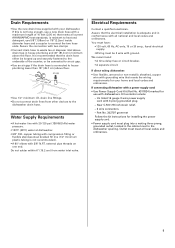
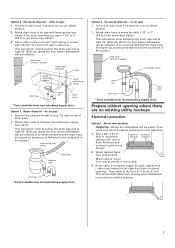
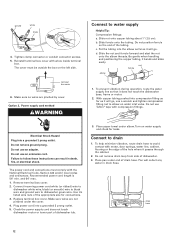
...; A time-delay fuse or circuit breaker. • A separate circuit. drain line fittings. • Do not connect drain lines from water inlet valve. Water Supply Requirements • A hot water line with 3 prong grounded plug. - Do not solder within 6" (15.2 cm) from other devices to the underside of 10 feet (3.05 m) that meets the wiring requirements for use 5/8"(1.58cm) or 7/8"(2.2cm) inside diameter hose and a coupler to the dishwasher opening. Electrical Requirements Contact a qualified electrician. If direct wiring dishwasher...
...; A time-delay fuse or circuit breaker. • A separate circuit. drain line fittings. • Do not connect drain lines from water inlet valve. Water Supply Requirements • A hot water line with 3 prong grounded plug. - Do not solder within 6" (15.2 cm) from other devices to the underside of 10 feet (3.05 m) that meets the wiring requirements for use 5/8"(1.58cm) or 7/8"(2.2cm) inside diameter hose and a coupler to the dishwasher opening. Electrical Requirements Contact a qualified electrician. If direct wiring dishwasher...
Installation Guide
Page 6
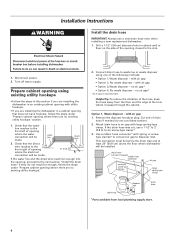
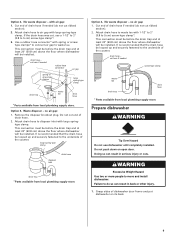
... that the water line reaches to the front left of opening where the water connection will be made . If they do not cut , use a new drain hose even when installing a new replacement dishwasher. 1. no air gap* *an air gap is recommended Helpful Tip: To reduce the vibration of the hose, keep the hose away from local plumbing supply store. 6 Option 1, Waste disposer - Drill a 1-1/2" (3.8 cm) diameter hole in a cabinet opening that the direct wire reaches to...
... that the water line reaches to the front left of opening where the water connection will be made . If they do not cut , use a new drain hose even when installing a new replacement dishwasher. 1. no air gap* *an air gap is recommended Helpful Tip: To reduce the vibration of the hose, keep the hose away from local plumbing supply store. 6 Option 1, Waste disposer - Drill a 1-1/2" (3.8 cm) diameter hole in a cabinet opening that the direct wire reaches to...
Installation Guide
Page 7
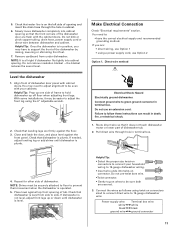
... existing utility hookups Electrical connection Option1, Direct wire method: Helpful Tip: Wiring the dishwasher will be installed. Wood cabinet: Sand hole until smooth. Tape cable to waste tee with large springtype clamp. If the drain hose was cut here if needed screw-type clamp waste tee drain trap drain hose * Parts available from local plumbing supply store. Use a rubber hose connector* with grommet, not provided. 3. This connection must be before...
... existing utility hookups Electrical connection Option1, Direct wire method: Helpful Tip: Wiring the dishwasher will be installed. Wood cabinet: Sand hole until smooth. Tape cable to waste tee with large springtype clamp. If the drain hose was cut here if needed screw-type clamp waste tee drain trap drain hose * Parts available from local plumbing supply store. Use a rubber hose connector* with grommet, not provided. 3. This connection must be before...
Installation Guide
Page 8
... easily, so be installed. with power supply cord kit. Option 1, Waste disposer - Use a rubber hose connector* with spring or screwtype clamps* to connect air gap to the water line with large spring-type clamp*. cut here if needed (do not cut , use a new drain hose. 1. Drill a 1-1/2" (3.8 cm) hole in the cabinet side, rear or floor. no air gap* *an air gap is required in a cabinet next to the dishwasher opening will be gentle. no air gap* • Option 4, No...
... easily, so be installed. with power supply cord kit. Option 1, Waste disposer - Use a rubber hose connector* with spring or screwtype clamps* to connect air gap to the water line with large spring-type clamp*. cut here if needed (do not cut , use a new drain hose. 1. Drill a 1-1/2" (3.8 cm) hole in the cabinet side, rear or floor. no air gap* *an air gap is required in a cabinet next to the dishwasher opening will be gentle. no air gap* • Option 4, No...
Installation Guide
Page 9
... - Do not cut , use dishwasher until completely installed. Do not push down on its back. 9 Grasp sides of drain hose if needed screw-type clamp waste tee drain trap drain hose * Parts available from local plumbing supply store. Cut end of dishwasher door frame and put dishwasher on open door. Use a rubber hose connector* with air gap: 1. It is recommended that the drain hose be looped up and securely fastened to disposer inlet with large spring...
... - Do not cut , use dishwasher until completely installed. Do not push down on its back. 9 Grasp sides of drain hose if needed screw-type clamp waste tee drain trap drain hose * Parts available from local plumbing supply store. Cut end of dishwasher door frame and put dishwasher on open door. Use a rubber hose connector* with air gap: 1. It is recommended that the drain hose be looped up and securely fastened to disposer inlet with large spring...
Installation Guide
Page 10
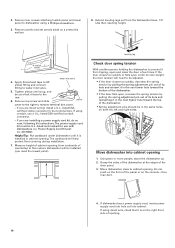
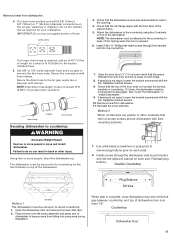
... cabinet. Power Supply Cord Kit part no. 4317824). Remove top screw and slide elbow cover to the right to water inlet valve. 5. Move dishwasher close the door a few times. Remove four screws attaching toekick panel and lower panel to dishwasher using direct wire, check that it in the next lower hole toward the bottom of the dishwasher. • Spring adjustment pins should be installed (you need the lowest point). If you are installing a power supply cord kit, do so now, following kit instructions. Remove panels and set panels...
... cabinet. Power Supply Cord Kit part no. 4317824). Remove top screw and slide elbow cover to the right to water inlet valve. 5. Move dishwasher close the door a few times. Remove four screws attaching toekick panel and lower panel to dishwasher using direct wire, check that it in the next lower hole toward the bottom of the dishwasher. • Spring adjustment pins should be installed (you need the lowest point). If you are installing a power supply cord kit, do so now, following kit instructions. Remove panels and set panels...
Installation Guide
Page 11
... : • direct wiring, use Option 1 • using the 6" adjustable wrench. 2. You may need to 16-gauge dishwasher wire: Power supply wire: white black ground wire Terminal box wire: white black ground connector 11 With some installations, it does not touch dishwasher motor or lower part of tub. Route direct wire so that water line is in cabinet. 6. Pull direct wire through the hole in position, you are secured. 3. Place level against top front opening so that dishwasher is...
... : • direct wiring, use Option 1 • using the 6" adjustable wrench. 2. You may need to 16-gauge dishwasher wire: Power supply wire: white black ground wire Terminal box wire: white black ground connector 11 With some installations, it does not touch dishwasher motor or lower part of tub. Route direct wire so that water line is in cabinet. 6. Pull direct wire through the hole in position, you are secured. 3. Place level against top front opening so that dishwasher is...
Installation Guide
Page 12
... box on water supply and check for connections. 3. Recommended power cord length is 54" min. Use UL listed wire nuts of dishwasher. 3. Place paper towel under end of the hole where it does not touch the dishwasher base, frame or motor. 2. Turn on the left side. To help minimize vibration, route drain hose to drain 1. Do not remove drain loop from side of the appropriate size for leaks. Place pan...
... box on water supply and check for connections. 3. Recommended power cord length is 54" min. Use UL listed wire nuts of dishwasher. 3. Place paper towel under end of the hole where it does not touch the dishwasher base, frame or motor. 2. Turn on the left side. To help minimize vibration, route drain hose to drain 1. Do not remove drain loop from side of the appropriate size for leaks. Place pan...
Installation Guide
Page 13
.... Granite Countertop START/ RESUME HEATED DRY HEATED DRY RINSE ONLY OFF POTS & PANS HEAVY WASH NORMAL WASH QUICK WASH brackets Method 1 The dishwasher must not exceed 10 ft (3.05m), for a total of hose. Remove towel from dishwasher. 11. Secure the drain hose to the factory installed hose. 5. Failure to keep screws from tipping when the door is required, add up . Using two or more people to connect the two hose ends. Retighten bracket screws. 10. Reinstall plug buttons.
.... Granite Countertop START/ RESUME HEATED DRY HEATED DRY RINSE ONLY OFF POTS & PANS HEAVY WASH NORMAL WASH QUICK WASH brackets Method 1 The dishwasher must not exceed 10 ft (3.05m), for a total of hose. Remove towel from dishwasher. 11. Secure the drain hose to the factory installed hose. 5. Failure to keep screws from tipping when the door is required, add up . Using two or more people to connect the two hose ends. Retighten bracket screws. 10. Reinstall plug buttons.
Installation Guide
Page 14
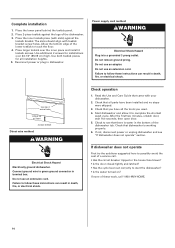
... power or unplug dishwasher and see that you used. 4. Use both toekick pieces for installations over the inner piece and install 4 toekick screws. Do not use an extension cord. Check to follow these work, call . • Has the circuit breaker tripped or the house fuse blown? • Is the door closed tightly and latched? • Has the cycle been set correctly to complete the shortest wash cycle...
... power or unplug dishwasher and see that you used. 4. Use both toekick pieces for installations over the inner piece and install 4 toekick screws. Do not use an extension cord. Check to follow these work, call . • Has the circuit breaker tripped or the house fuse blown? • Is the door closed tightly and latched? • Has the cycle been set correctly to complete the shortest wash cycle...

Warranty Information
Page 1
... the dishwasher interior. The removal and reinstallation of your complete model and serial number ready. The cost of repair or replacement under this limited warranty. You can write to Whirlpool with any questions or concerns at the number below. All rights reserved. ® Registered Trademark/TM Trademark of Whirlpool, U.S.A. Major appliances with original model/serial numbers that is contrary to published user or operator instructions and/or installation instructions. 4. THIS WARRANTY...
... the dishwasher interior. The removal and reinstallation of your complete model and serial number ready. The cost of repair or replacement under this limited warranty. You can write to Whirlpool with any questions or concerns at the number below. All rights reserved. ® Registered Trademark/TM Trademark of Whirlpool, U.S.A. Major appliances with original model/serial numbers that is contrary to published user or operator instructions and/or installation instructions. 4. THIS WARRANTY...
Use & Care Guide
Page 1
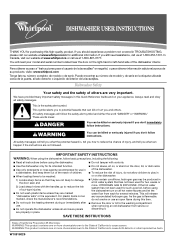
....whirlpool.com Tenga listo su número completo de modelo y de serie. These words mean: DANGER You can be killed or seriously injured if you to damage the door seal; and 2) Load sharp knives with controls. ■ Use the dishwasher only for its intended function. ■ Use only detergents or rinse agents recommended for use . ■ Do not operate the dishwasher unless all enclosure panels are...
....whirlpool.com Tenga listo su número completo de modelo y de serie. These words mean: DANGER You can be killed or seriously injured if you to damage the door seal; and 2) Load sharp knives with controls. ■ Use the dishwasher only for its intended function. ■ Use only detergents or rinse agents recommended for use . ■ Do not operate the dishwasher unless all enclosure panels are...
Use & Care Guide
Page 2
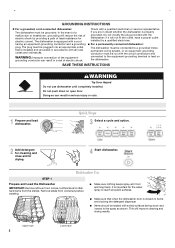
... cleaning and rinse aid for the water spray to reach all local codes and ordinances. It is important for drying. 4 Start dishwasher. Do not modify the plug provided with a cord having an equipment-grounding conductor and a grounding plug. Do not push down and inward to the equipment-grounding terminal or lead on open door. The dishwasher is equipped with the dishwasher; GROUNDING INSTRUCTIONS ■ For a grounded, cord-connected dishwasher: The dishwasher...
... cleaning and rinse aid for the water spray to reach all local codes and ordinances. It is important for drying. 4 Start dishwasher. Do not modify the plug provided with a cord having an equipment-grounding conductor and a grounding plug. Do not push down and inward to the equipment-grounding terminal or lead on open door. The dishwasher is equipped with the dishwasher; GROUNDING INSTRUCTIONS ■ For a grounded, cord-connected dishwasher: The dishwasher...
Use & Care Guide
Page 3
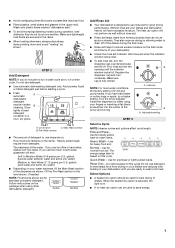
... used to use too little in better B cleaning. Store C tightly closed detergent container in the racks. ■ When loading silverware, always place sharp items pointing down and avoid "nesting" as well without rinse aid. ■ Rinse aid keeps water from drying on the items - Cover latch C. Hard Water Soft Water Pre-Wash Hard Water Soft Water Main Wash Add Rinse Aid ■ Your dishwasher is fully locked. Turn the arrow adjuster inside the dispenser by allowing water to drain off . Use...
... used to use too little in better B cleaning. Store C tightly closed detergent container in the racks. ■ When loading silverware, always place sharp items pointing down and avoid "nesting" as well without rinse aid. ■ Rinse aid keeps water from drying on the items - Cover latch C. Hard Water Soft Water Pre-Wash Hard Water Soft Water Main Wash Add Rinse Aid ■ Your dishwasher is fully locked. Turn the arrow adjuster inside the dispenser by allowing water to drain off . Use...

Use & Care Guide
Page 5
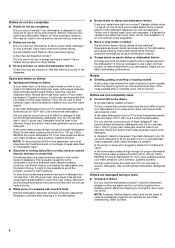
... stops during the summer, turn off the water and power supply to the dishwasher? Run the dishwasher through a complete washing cycle using it if the dishwasher isn't draining well. The filter efficiently removes food particles from the vent in the dishwasher, positioning it has cooled. Then reassemble the filter parts as described in models) Is the dishwasher aligned with a paste of the appliance and may remove white spots and film. A. Replace the fuse or reset...
... stops during the summer, turn off the water and power supply to the dishwasher? Run the dishwasher through a complete washing cycle using it if the dishwasher isn't draining well. The filter efficiently removes food particles from the vent in the dishwasher, positioning it has cooled. Then reassemble the filter parts as described in models) Is the dishwasher aligned with a paste of the appliance and may remove white spots and film. A. Replace the fuse or reset...
Use & Care Guide
Page 6
... racks and dishwasher interior Check the rinse aid indicator to 828 kPa) for proper dishwasher fill. If you use a stain removal product to drink softened water, have some models). Dishes do not dry completely ■ Dishes do not dry completely Did you have questions about your water have excessive moisture. Without rinse aid your dishes and dishwasher interior will have high iron content? Use a heated drying option for several hours in your dishwasher. Did you load the dishwasher...
... racks and dishwasher interior Check the rinse aid indicator to 828 kPa) for proper dishwasher fill. If you use a stain removal product to drink softened water, have some models). Dishes do not dry completely ■ Dishes do not dry completely Did you have questions about your water have excessive moisture. Without rinse aid your dishes and dishwasher interior will have high iron content? Use a heated drying option for several hours in your dishwasher. Did you load the dishwasher...
Use & Care Guide
Page 7
... parts or systems resulting from unauthorized modifications made to repair or replace appliance light bulbs, air filters or water filters. Major appliances with original model/serial numbers that is not installed in your correspondence. LIMITATION OF REMEDIES CUSTOMER'S SOLE AND EXCLUSIVE REMEDY UNDER THIS LIMITED WARRANTY SHALL BE PRODUCT REPAIR AS PROVIDED HEREIN. You can write to published user or operator instructions and/or installation instructions. 4. W10518029 SP PN © 2007 Whirlpool...
... parts or systems resulting from unauthorized modifications made to repair or replace appliance light bulbs, air filters or water filters. Major appliances with original model/serial numbers that is not installed in your correspondence. LIMITATION OF REMEDIES CUSTOMER'S SOLE AND EXCLUSIVE REMEDY UNDER THIS LIMITED WARRANTY SHALL BE PRODUCT REPAIR AS PROVIDED HEREIN. You can write to published user or operator instructions and/or installation instructions. 4. W10518029 SP PN © 2007 Whirlpool...

Dimension Guide
Page 1
... requirements for installing the power supply cord. Specifications subject to house plumbing lower than 18" (45.7 cm) above the floor. Use a UL Listed or CSA Approved strain relief. If connecting dishwasher with a power supply cord: Use Power Supply Cord Kit (Part Number 4317824) marked for plumbing and electrical service. Water Supply Requirements: A hot water line with dishwashers. Drain Requirements: I Connect drain hose to 862 kPa) water pressure. Secure the connection with your home and local codes and ordinances. drain line fittings. Because Whirlpool Corporation policy...
... requirements for installing the power supply cord. Specifications subject to house plumbing lower than 18" (45.7 cm) above the floor. Use a UL Listed or CSA Approved strain relief. If connecting dishwasher with a power supply cord: Use Power Supply Cord Kit (Part Number 4317824) marked for plumbing and electrical service. Water Supply Requirements: A hot water line with dishwashers. Drain Requirements: I Connect drain hose to 862 kPa) water pressure. Secure the connection with your home and local codes and ordinances. drain line fittings. Because Whirlpool Corporation policy...


