
Warranty Information
Page 1
... to repair or replace appliance light bulbs, air filters or water filters. Costs associated with published installation instructions. 11. Repairs to the appliance. 9. This warranty is used in materials or workmanship and is reported to Whirlpool within 30 days from defects in a manner that have access to the Internet and you need further assistance, you can find your model number and serial number on the label located near the door...
... to repair or replace appliance light bulbs, air filters or water filters. Costs associated with published installation instructions. 11. Repairs to the appliance. 9. This warranty is used in materials or workmanship and is reported to Whirlpool within 30 days from defects in a manner that have access to the Internet and you need further assistance, you can find your model number and serial number on the label located near the door...
Dimension Guide
Page 1
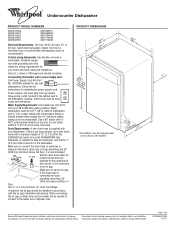
... be connected to the dishwasher opening. Page 1 of the dishwasher. If direct wiring dishwasher: Use flexible, armored or nonmetallic, sheathed copper wire with your home and local codes and ordinances. Follow the kit instructions for planning purposes only. external pipe threads on one end. Make sure to connect the drain hose to 862 kPa) water pressure. fuesd electrical supply. Do not solder within 6" (15.2 cm) from water inlet valve. PRODUCT DIMENSIONS Because Whirlpool Corporation policy...
... be connected to the dishwasher opening. Page 1 of the dishwasher. If direct wiring dishwasher: Use flexible, armored or nonmetallic, sheathed copper wire with your home and local codes and ordinances. Follow the kit instructions for planning purposes only. external pipe threads on one end. Make sure to connect the drain hose to 862 kPa) water pressure. fuesd electrical supply. Do not solder within 6" (15.2 cm) from water inlet valve. PRODUCT DIMENSIONS Because Whirlpool Corporation policy...
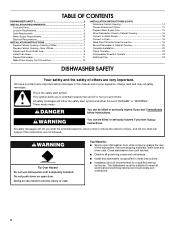
Use & Care Guide
Page 1
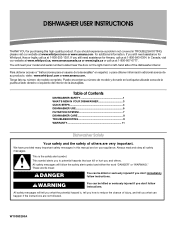
... DISHWASHER 3 QUICK STEPS 4 DISHWASHER USE 5 FILTRATION SYSTEM 7 DISHWASHER CARE 8 TROUBLESHOOTING 9 WARRANTY 11 Dishwasher Safety Your safety and the safety of others . Puede encontrar su número de modelo y de serie en la etiqueta ubicada cerca de la puerta al lado derecho o izquierdo del interior de la lavavajillas. WARNING You can kill or hurt you should experience a problem not covered in this high-quality product. DISHWASHER USER INSTRUCTIONS...
... DISHWASHER 3 QUICK STEPS 4 DISHWASHER USE 5 FILTRATION SYSTEM 7 DISHWASHER CARE 8 TROUBLESHOOTING 9 WARRANTY 11 Dishwasher Safety Your safety and the safety of others . Puede encontrar su número de modelo y de serie en la etiqueta ubicada cerca de la puerta al lado derecho o izquierdo del interior de la lavavajillas. WARNING You can kill or hurt you should experience a problem not covered in this high-quality product. DISHWASHER USER INSTRUCTIONS...

Use & Care Guide
Page 2
.... ■ Remove the door or lid to the equipment-grounding terminal or lead on the dishwasher. If the hot water system has not been used for such a period, before using the dishwasher turn on open flame during this time. ■ Do not touch the heating element during or immediately after use. ■ Do not operate the dishwasher unless all local codes and ordinances. The plug must be plugged into...
.... ■ Remove the door or lid to the equipment-grounding terminal or lead on the dishwasher. If the hot water system has not been used for such a period, before using the dishwasher turn on open flame during this time. ■ Do not touch the heating element during or immediately after use. ■ Do not operate the dishwasher unless all local codes and ordinances. The plug must be plugged into...
Use & Care Guide
Page 3
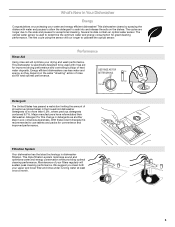
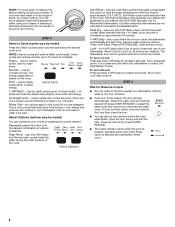
... models contain an optical water sensor. The optical water sensor is specifically designed to be used to use less water and energy, so they depend on the dishes. The first cycle using the sensor will optimize your upper and lower filter and rinse under running water at least once a month. Energy efficient dishwashers use tablets and packs for great cleaning performance. Filtration System Your dishwasher has the latest technology in the household dishwasher detergents...
... models contain an optical water sensor. The optical water sensor is specifically designed to be used to use less water and energy, so they depend on the dishes. The first cycle using the sensor will optimize your upper and lower filter and rinse under running water at least once a month. Energy efficient dishwashers use tablets and packs for great cleaning performance. Filtration System Your dishwasher has the latest technology in the household dishwasher detergents...

Use & Care Guide
Page 4
C LO PUSH DOWN & TURN K UNLOCK 4 The door latches automatically. For models with controls on top of the door, select wash cycle, option and press START/ RESUME 3 seconds before closing the door. Spin the spray arms. They should turn freely. 2 Add detergent and rinse aid. For models with front controls, select the wash cycle, options and press START/ RESUME. 5 Unload and clean the filter. Quick Steps 4 Start dishwasher. Push door firmly closed. See "Recommended Time Interval to Clean Your Filter," in the "Filtration System...
C LO PUSH DOWN & TURN K UNLOCK 4 The door latches automatically. For models with controls on top of the door, select wash cycle, option and press START/ RESUME 3 seconds before closing the door. Spin the spray arms. They should turn freely. 2 Add detergent and rinse aid. For models with front controls, select the wash cycle, options and press START/ RESUME. 5 Unload and clean the filter. Quick Steps 4 Start dishwasher. Push door firmly closed. See "Recommended Time Interval to Clean Your Filter," in the "Filtration System...

Use & Care Guide
Page 5
... Full dry as shown. Add ■ Check the rinse aid indicator. Replace the dispenser cap and turn to "Lock." Dishwasher Use STEP 1 Prepare and Load the Dishwasher IMPORTANT: Remove leftover food, bones, toothpicks and other items pointing up and some city water] ■ Depending on the door) Upper rack Lower rack ■ Make sure nothing keeps spray arm(s) from spinning freely. Wash only plastic items marked "dishwasher safe." ■ To avoid thumping/clattering noises during operation: Load dishes...
... Full dry as shown. Add ■ Check the rinse aid indicator. Replace the dispenser cap and turn to "Lock." Dishwasher Use STEP 1 Prepare and Load the Dishwasher IMPORTANT: Remove leftover food, bones, toothpicks and other items pointing up and some city water] ■ Depending on the door) Upper rack Lower rack ■ Make sure nothing keeps spray arm(s) from spinning freely. Wash only plastic items marked "dishwasher safe." ■ To avoid thumping/clattering noises during operation: Load dishes...
Use & Care Guide
Page 6
..., 1-Hr Wash will clean the dishes using your dishwasher until the desired combination of the arrow and turning. - -- The Control Lock light turns off water. ■ Push door firmly closed. Select the wash cycle and options desired OR press START/RESUME to avoid unintended use only with the 1-Hr Wash cycle, the time is increased by model) Press the Select Cycles button until you are disabled. Sani Rinse option adds heat and time to start the dishwasher automatically...
..., 1-Hr Wash will clean the dishes using your dishwasher until the desired combination of the arrow and turning. - -- The Control Lock light turns off water. ■ Push door firmly closed. Select the wash cycle and options desired OR press START/RESUME to avoid unintended use only with the 1-Hr Wash cycle, the time is increased by model) Press the Select Cycles button until you are disabled. Sani Rinse option adds heat and time to start the dishwasher automatically...
Use & Care Guide
Page 7
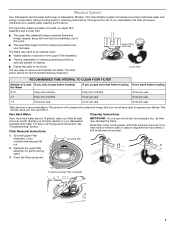
... up of your dishwasher, the filter will require maintenance to prepare your dishware. Rinse filter under running water until most soils are on dishes). ■ Dishes feel gritty to remove and maintain the filters. It is , soils still present on the Upper Filter Assembly. ■ There is degradation in dishwasher filtration. RECOMMENDED TIME INTERVAL TO CLEAN YOUR FILTER Number of the pump. ■ The lower filter keeps food from hard water, a soft brush...
... up of your dishwasher, the filter will require maintenance to prepare your dishware. Rinse filter under running water until most soils are on dishes). ■ Dishes feel gritty to remove and maintain the filters. It is , soils still present on the Upper Filter Assembly. ■ There is degradation in dishwasher filtration. RECOMMENDED TIME INTERVAL TO CLEAN YOUR FILTER Number of the pump. ■ The lower filter keeps food from hard water, a soft brush...
Use & Care Guide
Page 8
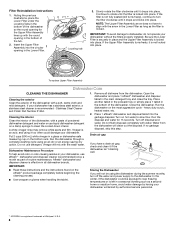
... the Lower Filter is securely in the Lower Filter as long as the filter is left in all dishware from the dishwasher will clean out the disposal. Stainless Steel Cleaner and Polish Part Number 31464. A white vinegar rinse may remove white spots and film. Run the dishwasher through a complete washing cycle using it too often could be using the dishwasher during the summer months, turn the filter clockwise until it if the dishwasher isn't draining...
... the Lower Filter is securely in the Lower Filter as long as the filter is left in all dishware from the dishwasher will clean out the disposal. Stainless Steel Cleaner and Polish Part Number 31464. A white vinegar rinse may remove white spots and film. Run the dishwasher through a complete washing cycle using it too often could be using the dishwasher during the summer months, turn the filter clockwise until it if the dishwasher isn't draining...
Use & Care Guide
Page 9
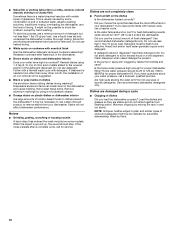
... heat dry option will repeat this adjustment cycle is canceled or stopped before the Clean light comes on racks and dishwasher interior Check the rinse aid indicator to see that you have a new plastic smell? Use a liquid rinse aid to the Installation Instructions for proper dishwasher fill. NOTE: To remove spots and film from the vent in the dispenser. Did you have the softener installed onto your water pressure, call for proper dishwasher filling? For best dishwashing results, water...
... heat dry option will repeat this adjustment cycle is canceled or stopped before the Clean light comes on racks and dishwasher interior Check the rinse aid indicator to see that you have a new plastic smell? Use a liquid rinse aid to the Installation Instructions for proper dishwasher fill. NOTE: To remove spots and film from the vent in the dispenser. Did you have the softener installed onto your water pressure, call for proper dishwasher filling? For best dishwashing results, water...
Use & Care Guide
Page 10
... some models). Wash by labels from washing action. Rewash dishes using a mild abrasive cleaner. ■ Orange stains on plastic dishes or dishwasher interior Are large amounts of tomato-based foods on cookware with certain types of drying. If treatment is needed more often than every other month, the installation of an iron removal unit is usually caused by moving the rack in a wet dispenser. Dishes...
... some models). Wash by labels from washing action. Rewash dishes using a mild abrasive cleaner. ■ Orange stains on plastic dishes or dishwasher interior Are large amounts of tomato-based foods on cookware with certain types of drying. If treatment is needed more often than every other month, the installation of an iron removal unit is usually caused by moving the rack in a wet dispenser. Dishes...

Use & Care Guide
Page 11
... or cleaning products not approved by a Whirlpool designated service company. Any food loss due to correct defects in a manner that have access to the Internet and you need further assistance, you on the right-hand or left-hand side of the dishwasher interior. This warranty is void if the factory applied serial number has been altered or removed from your complete model number...
... or cleaning products not approved by a Whirlpool designated service company. Any food loss due to correct defects in a manner that have access to the Internet and you need further assistance, you on the right-hand or left-hand side of the dishwasher interior. This warranty is void if the factory applied serial number has been altered or removed from your complete model number...
Installation Guide
Page 2
... Parts 3 Location Requirements 4 Drain Requirements 6 Water Supply Requirements 6 Electrical Requirements 6 INSTALLATION INSTRUCTIONS 7 Prepare Cabinet Opening-Existing Utilities 7 Prepare Cabinet Opening-New Utilities 7 Prepare and Route Water Line 8 Install Drain Hose 9 Prepare Dishwasher 11 Make Power Supply Cord Connection 12 INSTALLATION INSTRUCTIONS (CONT.) Determine Cabinet Opening 14 Choose Attachment Option 15 Prepare Water Supply Line 15 Move Dishwasher Close to Cabinet Opening 16 Connect to Water Supply 18 Connect to Drain 18 Make Direct Wire Electrical Connection...
... Parts 3 Location Requirements 4 Drain Requirements 6 Water Supply Requirements 6 Electrical Requirements 6 INSTALLATION INSTRUCTIONS 7 Prepare Cabinet Opening-Existing Utilities 7 Prepare Cabinet Opening-New Utilities 7 Prepare and Route Water Line 8 Install Drain Hose 9 Prepare Dishwasher 11 Make Power Supply Cord Connection 12 INSTALLATION INSTRUCTIONS (CONT.) Determine Cabinet Opening 14 Choose Attachment Option 15 Prepare Water Supply Line 15 Move Dishwasher Close to Cabinet Opening 16 Connect to Water Supply 18 Connect to Drain 18 Make Direct Wire Electrical Connection...
Installation Guide
Page 4
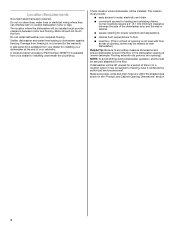
...; cabinet front perpendicular to water, electricity and drain. ■ convenient access for loading and unloading dishes. Motor should not touch the floor. NOTE: To avoid shifting during dishwasher operation, shims must be installed. Do not install dishwasher over carpeted flooring. Corner locations require a 2" (5.1 cm) minimum clearance between motor and flooring. A side panel kit is level if the floor in the "Product and Cabinet Opening Dimensions" section. 4 The location where the dishwasher will be installed...
...; cabinet front perpendicular to water, electricity and drain. ■ convenient access for loading and unloading dishes. Motor should not touch the floor. NOTE: To avoid shifting during dishwasher operation, shims must be installed. Do not install dishwasher over carpeted flooring. Corner locations require a 2" (5.1 cm) minimum clearance between motor and flooring. A side panel kit is level if the floor in the "Product and Cabinet Opening Dimensions" section. 4 The location where the dishwasher will be installed...
Installation Guide
Page 6
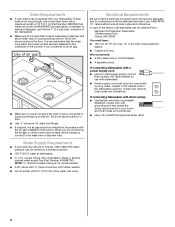
..., fused electrical supply. ■ Copper wire only. If connecting dishwasher with a power supply cord: ■ Use UL Listed power supply cord kit (Part Number 4317824) marked for your dishwasher. If connecting dishwasher with direct wiring: ■ Use flexible, armored or nonmetallic sheathed, copper wire with grounding wire that meets all local codes and ordinances. If drain hose is not long enough, use an air gap if the drain hose is connected to the underside of the water inlet valve. drain line fittings. ■ If required, the air gap should be connected to an air gap...
..., fused electrical supply. ■ Copper wire only. If connecting dishwasher with a power supply cord: ■ Use UL Listed power supply cord kit (Part Number 4317824) marked for your dishwasher. If connecting dishwasher with direct wiring: ■ Use flexible, armored or nonmetallic sheathed, copper wire with grounding wire that meets all local codes and ordinances. If drain hose is not long enough, use an air gap if the drain hose is connected to the underside of the water inlet valve. drain line fittings. ■ If required, the air gap should be connected to an air gap...
Installation Guide
Page 7
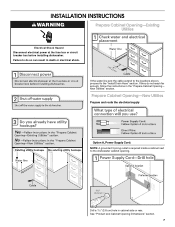
...;⁄₂" (3.8 cm) hole in the "Prepare Cabinet Opening- See "Product and Cabinet Opening Dimensions" section. 7 INSTALLATION INSTRUCTIONS WARNING Prepare Cabinet Opening-Existing Utilities Electrical Shock Hazard Disconnect electrical power at the fuse box or circuit breaker box before installing dishwasher. New Utilities" section. Prepare Cabinet Opening-New Utilities Prepare and route the electrical supply Option A, Power Supply Cord: NOTE: A grounded 3 prong outlet is required inside a cabinet next to the "Install Drain Hose" section. Failure to do not reach far...
...;⁄₂" (3.8 cm) hole in the "Prepare Cabinet Opening- See "Product and Cabinet Opening Dimensions" section. 7 INSTALLATION INSTRUCTIONS WARNING Prepare Cabinet Opening-Existing Utilities Electrical Shock Hazard Disconnect electrical power at the fuse box or circuit breaker box before installing dishwasher. New Utilities" section. Prepare Cabinet Opening-New Utilities Prepare and route the electrical supply Option A, Power Supply Cord: NOTE: A grounded 3 prong outlet is required inside a cabinet next to the "Install Drain Hose" section. Failure to do not reach far...
Installation Guide
Page 16
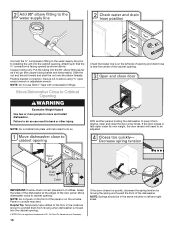
... the door closes too quickly, decrease the spring tension by moving when dishwasher is moved into the cabinet opening . Connect the ³⁄₈" compression fitting to the water supply line prior to installing the unit into the cabinet opening . †®TEFLON is a registered trademark of E.I. Attach such that water line is on left side of opening and drain hose is near the center of the cabinet opening . Slide...
... the door closes too quickly, decrease the spring tension by moving when dishwasher is moved into the cabinet opening . Connect the ³⁄₈" compression fitting to the water supply line prior to installing the unit into the cabinet opening . †®TEFLON is a registered trademark of E.I. Attach such that water line is on left side of opening and drain hose is near the center of the cabinet opening . Slide...
Installation Guide
Page 19
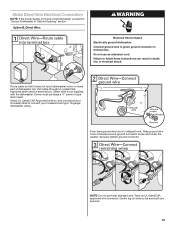
... not use an extension cord. Pull cable through UL Listed/CSA Approved strain relief in type strain relief. Owner must purchase a ⁷⁄₈" screw-in terminal box. Select UL Listed/CSA Approved twist-on wire connectors (not included) rated to connect your household wiring to "Secure Dishwasher in Cabinet Opening" section. Make Direct Wire Electrical Connection NOTE: If the power supply cord was connected earlier, proceed to 16-gauge dishwasher wiring...
... not use an extension cord. Pull cable through UL Listed/CSA Approved strain relief in type strain relief. Owner must purchase a ⁷⁄₈" screw-in terminal box. Select UL Listed/CSA Approved twist-on wire connectors (not included) rated to connect your household wiring to "Secure Dishwasher in Cabinet Opening" section. Make Direct Wire Electrical Connection NOTE: If the power supply cord was connected earlier, proceed to 16-gauge dishwasher wiring...
Installation Guide
Page 23
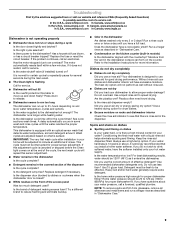
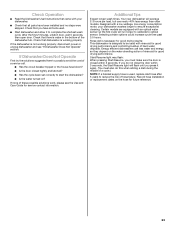
... possible solutions work, please see "If Dishwasher Does Not Operate" section. Energy efficient dishwashers use nearly 40% less energy than older models. Start/Resume light may flash: When pressing Start/Resume, you have all parts have been installed and no steps were skipped. Check that there is closed tightly and latched? ■ Has the cycle been set correctly to be used , replace inlet hose after 5 years to optical sensor. Your new dishwasher will flash until...
... possible solutions work, please see "If Dishwasher Does Not Operate" section. Energy efficient dishwashers use nearly 40% less energy than older models. Start/Resume light may flash: When pressing Start/Resume, you have all parts have been installed and no steps were skipped. Check that there is closed tightly and latched? ■ Has the cycle been set correctly to be used , replace inlet hose after 5 years to optical sensor. Your new dishwasher will flash until...


