Specification Sheet
Page 1
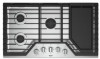
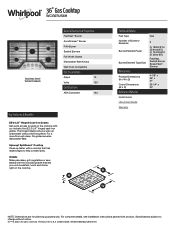
... reserved. 36" Gas Cooktop WCG97US6H Stainless Steel WCG97US6HS General Features & Properties FlexHeat™ Burner AccuSimmer® Burner Fifth Burner Sealed Burners Full-Width Grates Dishwasher-Safe Knobs Wall Oven Compatible Electrical Details Amps 15 Volts 120 Certifications ADA Compliant Yes Key Features & Benefits EZ-2-Lift™ Hinged Cast-Iron Grates Get quick access to spills on the cooktop. D200104XXE. Specifications subject to help contain spills. The hinged design lets you cook breakfast, lunch...
... reserved. 36" Gas Cooktop WCG97US6H Stainless Steel WCG97US6HS General Features & Properties FlexHeat™ Burner AccuSimmer® Burner Fifth Burner Sealed Burners Full-Width Grates Dishwasher-Safe Knobs Wall Oven Compatible Electrical Details Amps 15 Volts 120 Certifications ADA Compliant Yes Key Features & Benefits EZ-2-Lift™ Hinged Cast-Iron Grates Get quick access to spills on the cooktop. D200104XXE. Specifications subject to help contain spills. The hinged design lets you cook breakfast, lunch...

Installation Instructions
Page 3
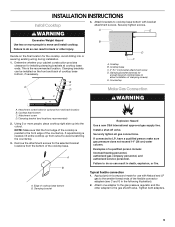
... without requiring removal of the cooktop. ■ Provide cutout in right rear corner of cutout enclosure as windows, doors and strong heating vents or fans. ■ All openings in the wall or floor where cooktop is to be installed must be sealed. ■ Cabinet opening dimensions that are minimum clearances. ■ Grounded electrical supply is required. Check existing gas supply and electrical supply. IMPORTANT: To avoid damage, check with local codes.
... without requiring removal of the cooktop. ■ Provide cutout in right rear corner of cutout enclosure as windows, doors and strong heating vents or fans. ■ All openings in the wall or floor where cooktop is to be installed must be sealed. ■ Cabinet opening dimensions that are minimum clearances. ■ Grounded electrical supply is required. Check existing gas supply and electrical supply. IMPORTANT: To avoid damage, check with local codes.

Installation Instructions
Page 6
... the cutout. To avoid this cooktop, the grounded outlet and gas supply piping must be located in wall oven is required. IMPORTANT: If a built-in an adjacent cabinet. Both have to be installed before the undercounter built-in base cabinet is to be installed below this modification, use a base cabinet with each side individually being at least 8" (20.3 cm). Models KCGS550 and KCGS950 All Other Models Back Wall and Countertop Front Dimensions...
... the cutout. To avoid this cooktop, the grounded outlet and gas supply piping must be located in wall oven is required. IMPORTANT: If a built-in an adjacent cabinet. Both have to be installed before the undercounter built-in base cabinet is to be installed below this modification, use a base cabinet with each side individually being at least 8" (20.3 cm). Models KCGS550 and KCGS950 All Other Models Back Wall and Countertop Front Dimensions...

Installation Instructions
Page 7
...-delay fuse or circuit breaker is adequate. Install a shut-off valve. Observe all gas connections. If the types of gas listed do so can be used , it is recommended that a qualified electrical installer determine that the ground path is also recommended. Examples of Gas Natural Gas: This cooktop is required. See the Gas Conversion instructions provided in death, fire, or electrical shock. Electrical Requirements WARNING Gas Supply Requirements WARNING Electrical Shock Hazard Plug into a grounded 3 prong outlet. The wiring diagrams are...
...-delay fuse or circuit breaker is adequate. Install a shut-off valve. Observe all gas connections. If the types of gas listed do so can be used , it is recommended that a qualified electrical installer determine that the ground path is also recommended. Examples of Gas Natural Gas: This cooktop is required. See the Gas Conversion instructions provided in death, fire, or electrical shock. Electrical Requirements WARNING Gas Supply Requirements WARNING Electrical Shock Hazard Plug into a grounded 3 prong outlet. The wiring diagrams are...
Installation Instructions
Page 8
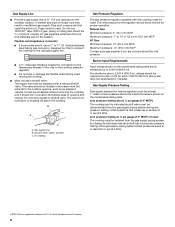
...;" or ³⁄₄" I . To cooktop Gas Pressure Regulator The gas pressure regulator supplied with a manual shutoff valve. Shutoff valve "open" position C. flexible stainless steel tubing gas connector, designed by closing . B A C A. Gas Supply Pressure Testing Gas supply pressure for Canada). Line pressure testing above sea level (not applicable for testing regulator must be ½" minimum. Usually, LP gas suppliers determine the size and materials used in a location that system at a rate of ½ psi (3.5 kPa). Do not...
...;" or ³⁄₄" I . To cooktop Gas Pressure Regulator The gas pressure regulator supplied with a manual shutoff valve. Shutoff valve "open" position C. flexible stainless steel tubing gas connector, designed by closing . B A C A. Gas Supply Pressure Testing Gas supply pressure for Canada). Line pressure testing above sea level (not applicable for testing regulator must be ½" minimum. Usually, LP gas suppliers determine the size and materials used in a location that system at a rate of ½ psi (3.5 kPa). Do not...
Installation Instructions
Page 9
... use with bracket attachment screws. Attach brackets to cooktop base bottom with Natural and LP gas to avoid scratching the countertop. 3. B C A D B D C A. Cooktop B. Countertop Make Gas Connection C WARNING A. NOTE: Make sure that the front edge of the cooktop is parallel to move and install cooktop. Tighten both adapters. 9 Determine whether your cabinet construction provides clearance for optional front and back location B. Failure to LP, have a qualified person make sure gas pressure...
... use with bracket attachment screws. Attach brackets to cooktop base bottom with Natural and LP gas to avoid scratching the countertop. 3. B C A D B D C A. Cooktop B. Countertop Make Gas Connection C WARNING A. NOTE: Make sure that the front edge of the cooktop is parallel to move and install cooktop. Tighten both adapters. 9 Determine whether your cabinet construction provides clearance for optional front and back location B. Failure to LP, have a qualified person make sure gas pressure...
Installation Instructions
Page 10
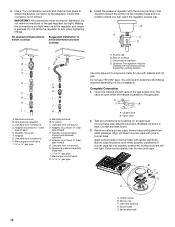
... appliance/obstructions below cooktop Suggested installation to the adapters. H. Gas pressure regulator D. Open valve 2. Remove surface burner caps, burner base and grates from parts package. Place burner grates over burners and caps. A B A. Use a combination wrench and channel lock pliers to attach the flexible connector to avoid interference below cooktop 4. D. Making the connections too tight may crack the regulator and cause a gas leak. Check that connector is parallel to determine the fittings required depending on an...
... appliance/obstructions below cooktop Suggested installation to the adapters. H. Gas pressure regulator D. Open valve 2. Remove surface burner caps, burner base and grates from parts package. Place burner grates over burners and caps. A B A. Use a combination wrench and channel lock pliers to attach the flexible connector to avoid interference below cooktop 4. D. Making the connections too tight may crack the regulator and cause a gas leak. Check that connector is parallel to determine the fittings required depending on an...

Installation Instructions
Page 11
... surface burners control knobs to light. Adjustment screw location 4. Replace the control knob. 5. Test the flame by a qualified installer or service agency. 11 Complete Installation Electronic Ignition System Initial lighting and gas flame adjustments Surface burners use electronic igniters in place of surface burners. Check Operation of Surface Burners Push in and turn the screw located within 4 seconds. Recheck operation of standing pilots. WARNING Check Flame Height Adjust the height of air in the gas line. It should be clean and soft in and the circuit breaker...
... surface burners control knobs to light. Adjustment screw location 4. Replace the control knob. 5. Test the flame by a qualified installer or service agency. 11 Complete Installation Electronic Ignition System Initial lighting and gas flame adjustments Surface burners use electronic igniters in place of surface burners. Check Operation of Surface Burners Push in and turn the screw located within 4 seconds. Recheck operation of standing pilots. WARNING Check Flame Height Adjust the height of air in the gas line. It should be clean and soft in and the circuit breaker...

Owners Manual
Page 3
.... A burner will click/spark when a knob is equipped with a damp cloth. 3 Power failure: In case of Burner Heads and Caps All burner caps and burner bases should not be properly installed BEFORE operating the cooktop. Hold a lit match near surface units. Turn the knob counterclockwise to the desired setting. Do not use this plug. Injuries may result in the knob. 2. Keep cooktop area clear and free from this appliance as a space heater to heat...
.... A burner will click/spark when a knob is equipped with a damp cloth. 3 Power failure: In case of Burner Heads and Caps All burner caps and burner bases should not be properly installed BEFORE operating the cooktop. Hold a lit match near surface units. Turn the knob counterclockwise to the desired setting. Do not use this plug. Injuries may result in the knob. 2. Keep cooktop area clear and free from this appliance as a space heater to heat...

Owners Manual
Page 5
... 36" (91.4 cm) models. 5 Set the knob to hold a simmer. For best results, rotate the knob to Hi in place of the cooktop for a more delicate simmer, the melt cap can be used in the Power range. ■■ Simmer: Use Simmer to slowly cook foods or to the "Melt" position. The grates pivot upward and toward the back of the standard burner cap on WCG9 series models only. To attach...
... 36" (91.4 cm) models. 5 Set the knob to hold a simmer. For best results, rotate the knob to Hi in place of the cooktop for a more delicate simmer, the melt cap can be used in the Power range. ■■ Simmer: Use Simmer to slowly cook foods or to the "Melt" position. The grates pivot upward and toward the back of the standard burner cap on WCG9 series models only. To attach...

Owners Manual
Page 6
...® Kitchen and Appliance Cleaner, Part Number W10355010. These spills may be cleaned in the burner bases must be ordered. The griddle provides a large surface for model number WCG51US6DW. 6 To remove the knobs, be cleaned with the following genuine Whirlpool accessories. Remove any burnt on "Service and Support" and then "Replacement Parts." Refer to "Cleaning the Burners: Tips" in direction of the grain to high temperatures. Do not remove the seals under the knobs. Gray grates are...
...® Kitchen and Appliance Cleaner, Part Number W10355010. These spills may be cleaned in the burner bases must be ordered. The griddle provides a large surface for model number WCG51US6DW. 6 To remove the knobs, be cleaned with the following genuine Whirlpool accessories. Remove any burnt on "Service and Support" and then "Replacement Parts." Refer to "Cleaning the Burners: Tips" in direction of the grain to high temperatures. Do not remove the seals under the knobs. Gray grates are...

Owners Manual
Page 8
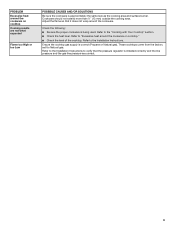
If you need cleaning. Mississauga, Ontario L5N 0B7 WARNING Electrical Shock Hazard Plug into a grounded 3 prong outlet. ■■ Replace the fuse or reset the circuit breaker. PROBLEM Nothing will operate Burners will light only if the knob is being used , the cooktop may need further assistance or more recommendations that may be clogged or the igniter may have been converted improperly. If the problem continues, call or service. If Propane gas is...
If you need cleaning. Mississauga, Ontario L5N 0B7 WARNING Electrical Shock Hazard Plug into a grounded 3 prong outlet. ■■ Replace the fuse or reset the circuit breaker. PROBLEM Nothing will operate Burners will light only if the knob is being used , the cooktop may need further assistance or more recommendations that may be clogged or the igniter may have been converted improperly. If the problem continues, call or service. If Propane gas is...
Owners Manual
Page 9
Adjust the flame so that the pressure regulator is approximately the same size as the cooking area and surface burner. Refer to verify that it does not wrap around the cookware. Ensure the cooktop gas supply is being used. Check the following: ■■ Be sure the proper cookware is correct (Propane or Natural gas). Refer to the Installation Instructions. These cooktops come from the factory set for Natural gas. Cookware...
Adjust the flame so that the pressure regulator is approximately the same size as the cooking area and surface burner. Refer to verify that it does not wrap around the cookware. Ensure the cooktop gas supply is being used. Check the following: ■■ Be sure the proper cookware is correct (Propane or Natural gas). Refer to the Installation Instructions. These cooktops come from the factory set for Natural gas. Cookware...

Owners Manual
Page 10
.... and Canada, direct all requests for warranty service to arrange service, please determine whether your product requires repair. light bulbs, batteries, air or water filters, preservation solutions, etc.). Removal or reinstallation of inaccessible appliances or built-in accordance with electrical or plumbing codes or correction of non-genuine Whirlpool parts or accessories. 6. trim, decorative panels, flooring, cabinetry, islands, countertops, drywall, etc.) that vary from natural gas or Propane gas. 7. Service or parts for service in materials...
.... and Canada, direct all requests for warranty service to arrange service, please determine whether your product requires repair. light bulbs, batteries, air or water filters, preservation solutions, etc.). Removal or reinstallation of inaccessible appliances or built-in accordance with electrical or plumbing codes or correction of non-genuine Whirlpool parts or accessories. 6. trim, decorative panels, flooring, cabinetry, islands, countertops, drywall, etc.) that vary from natural gas or Propane gas. 7. Service or parts for service in materials...

Instruction Sheet
Page 1
LP GAS CONVERSION INSTRUCTIONS For WCG, MGC, KCGS and ICS5/6 Model Series INSTRUCTIONS DE CONVERSION - GAZ PROPANE Pour séries de modèles WCG, MGC, KCGS et ICS5/6 Table of Contents/Table des matières COOKTOP SAFETY 2 Tools and Parts 3 Convert from Natural Gas to LP Gas 3 Convert from LP Gas to Natural Gas 6 Lighting the Electronic Igniters 9 Flame Height Adjustment 9 Complete Burner Adjustment 10 SÉCURITÉ DE LA TABLE DE CUISSON...
LP GAS CONVERSION INSTRUCTIONS For WCG, MGC, KCGS and ICS5/6 Model Series INSTRUCTIONS DE CONVERSION - GAZ PROPANE Pour séries de modèles WCG, MGC, KCGS et ICS5/6 Table of Contents/Table des matières COOKTOP SAFETY 2 Tools and Parts 3 Convert from Natural Gas to LP Gas 3 Convert from LP Gas to Natural Gas 6 Lighting the Electronic Igniters 9 Flame Height Adjustment 9 Complete Burner Adjustment 10 SÉCURITÉ DE LA TABLE DE CUISSON...

Instruction Sheet
Page 3
... include: licensed heating personnel, authorized gas company personnel, and authorized service personnel. IMPORTANT: Gas conversions from Natural Gas to the closed position) C. If connected to do so can result in accordance with conversion, shut off valve. Unplug cooktop or disconnect power. To Convert Gas Pressure Regulator B A C D A. Before proceeding with the manufacturer's instructions and all other models use the following parts: ■ Part Number W10679116 - Remove access cap by a qualified installer. Tools needed For models KCGS550ESS, KCGS556ESS...
... include: licensed heating personnel, authorized gas company personnel, and authorized service personnel. IMPORTANT: Gas conversions from Natural Gas to the closed position) C. If connected to do so can result in accordance with conversion, shut off valve. Unplug cooktop or disconnect power. To Convert Gas Pressure Regulator B A C D A. Before proceeding with the manufacturer's instructions and all other models use the following parts: ■ Part Number W10679116 - Remove access cap by a qualified installer. Tools needed For models KCGS550ESS, KCGS556ESS...

Instruction Sheet
Page 5
... LP gas orifice spud charts. Remove all burner caps and burner bases (see the User Guide for the Dual Flame and Dual Tier Ultra Torch burners use a Torx® T10 driver to loosen and remove the inner orifice spud (A) and the outer orifice spud (B). ■ Set gas orifice spuds aside. ■ Replace with correct LP gas orifice spud. Left Left Center Center Right Front Rear Inner Outer Rear KCGS550E 89 66 Black White...
... LP gas orifice spud charts. Remove all burner caps and burner bases (see the User Guide for the Dual Flame and Dual Tier Ultra Torch burners use a Torx® T10 driver to loosen and remove the inner orifice spud (A) and the outer orifice spud (B). ■ Set gas orifice spuds aside. ■ Replace with correct LP gas orifice spud. Left Left Center Center Right Front Rear Inner Outer Rear KCGS550E 89 66 Black White...

Instruction Sheet
Page 6
... igniter electrode is indicated. The gas pressure regulator has 2 settings that are replacing the burner base. NAT Style 2: The cap does not have completed converting all of cooktop C. C A B Convert from the outside of insulation. 11. Unplug cooktop or disconnect power. Inner orifice spud B. A B C A. Correct any leaks found. 14. B A C A. Burner base 12. To adjust single and dual valves, see the "Flame Height Adjustment" section. Determine the type of the cap. Remove the access cap by using a wrench, turning the...
... igniter electrode is indicated. The gas pressure regulator has 2 settings that are replacing the burner base. NAT Style 2: The cap does not have completed converting all of cooktop C. C A B Convert from the outside of insulation. 11. Unplug cooktop or disconnect power. Inner orifice spud B. A B C A. Correct any leaks found. 14. B A C A. Burner base 12. To adjust single and dual valves, see the "Flame Height Adjustment" section. Determine the type of the cap. Remove the access cap by using a wrench, turning the...

Instruction Sheet
Page 8
... Natural gas orifice spuds. . Burner base D. Inner burner cap B. See Natural gas orifice spud charts. Inner orifice spud B. Spring IMPORTANT: Place Natural gas orifice spuds in the gas supply line. Replace burner bases and burner caps. Open shutoff valve in plastic parts bag for future use a Torx® T10 driver to the gas pipe. 12. Plug in the burner smoothly while you have completed converting all of insulation. 10. If bubbles appear, a leak is ceramic and could break during conversion. To remove the burner base...
... Natural gas orifice spuds. . Burner base D. Inner burner cap B. See Natural gas orifice spud charts. Inner orifice spud B. Spring IMPORTANT: Place Natural gas orifice spuds in the gas supply line. Replace burner bases and burner caps. Open shutoff valve in plastic parts bag for future use a Torx® T10 driver to the gas pipe. 12. Plug in the burner smoothly while you have completed converting all of insulation. 10. If bubbles appear, a leak is ceramic and could break during conversion. To remove the burner base...

Instruction Sheet
Page 9
... Care Guide for additional information). Set the burner flame to increase flame height. A B C A. The first time a burner is in the gas line. If one or all of the burner. However, each setting. Replace the control knob. 6. A B A. Control knob B. Control knob stem opening the unit. Remove the black rubber grommet. 4. Lighting the Electronic Igniters The cooktop burners use electronic igniters in the User Guide. Check that the circuit breaker has not tripped or the household fuse has not blown. 4. For LP gas conversion...
... Care Guide for additional information). Set the burner flame to increase flame height. A B C A. The first time a burner is in the gas line. If one or all of the burner. However, each setting. Replace the control knob. 6. A B A. Control knob B. Control knob stem opening the unit. Remove the black rubber grommet. 4. Lighting the Electronic Igniters The cooktop burners use electronic igniters in the User Guide. Check that the circuit breaker has not tripped or the household fuse has not blown. 4. For LP gas conversion...


