Specification Sheet
Page 1
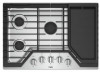
The hinged design lets you cook breakfast, lunch and dinner right on the cooktop with a cooktop that lets you wipe up faster with our industry-first EZ-2-Lift™ hinged cast-iron grates. Technical Details Fuel Type Number of Burners/ Elements Burner/Element Power Burner/Element Type/Size Dimensions Product Dimensions (H x W x D) Cutout Dimensions (W x D) Reference Material Install Guide Use & Care Guide Warranty Gas 5 (1) 17000 BTU (3) 10,000 BTU (1) 5000 BTU FlexHeat, SpeedHeat™, Simmer 4-1/8" x 30" x 21" 29-5/16" x 20...
The hinged design lets you cook breakfast, lunch and dinner right on the cooktop with a cooktop that lets you wipe up faster with our industry-first EZ-2-Lift™ hinged cast-iron grates. Technical Details Fuel Type Number of Burners/ Elements Burner/Element Power Burner/Element Type/Size Dimensions Product Dimensions (H x W x D) Cutout Dimensions (W x D) Reference Material Install Guide Use & Care Guide Warranty Gas 5 (1) 17000 BTU (3) 10,000 BTU (1) 5000 BTU FlexHeat, SpeedHeat™, Simmer 4-1/8" x 30" x 21" 29-5/16" x 20...

Installation Instructions
Page 3
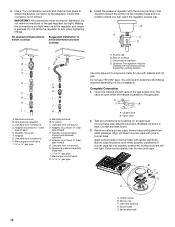
...; Burner grates ■ Burner caps ■ Burner base ■ Clamping brackets (2) ■ Bracket attachment screws (2) Parts needed Check local codes and consult gas supplier. Check existing gas supply and electrical supply. The model/serial rating plate is designed to hang from strong draft areas, such as shown to provide clearance for your cooktop is approved. If you do not find this cooktop must be installed in "Cabinet Dimensions" section so that the materials used...
...; Burner grates ■ Burner caps ■ Burner base ■ Clamping brackets (2) ■ Bracket attachment screws (2) Parts needed Check local codes and consult gas supplier. Check existing gas supply and electrical supply. The model/serial rating plate is designed to hang from strong draft areas, such as shown to provide clearance for your cooktop is approved. If you do not find this cooktop must be installed in "Cabinet Dimensions" section so that the materials used...

Installation Instructions
Page 6
..., a 4" (10.2 cm) depth clearance from the countertop to the top of the drawer (or other obstruction) in wall oven is to clear the cooktop base. To avoid this cooktop, the grounded outlet and gas supply piping must be installed before the undercounter built-in base cabinet is required. IMPORTANT: If a built-in an adjacent cabinet. Top View Back Wall D Side Wall I B A C Side Wall H E Countertop Front Edge Models KCGS550 and KCGS950...
..., a 4" (10.2 cm) depth clearance from the countertop to the top of the drawer (or other obstruction) in wall oven is to clear the cooktop base. To avoid this cooktop, the grounded outlet and gas supply piping must be installed before the undercounter built-in base cabinet is required. IMPORTANT: If a built-in an adjacent cabinet. Top View Back Wall D Side Wall I B A C Side Wall H E Countertop Front Edge Models KCGS550 and KCGS950...

Installation Instructions
Page 7
... wiring diagrams are necessary. Observe all gas connections. latest edition or CAN/CGA B149 - Type of Gas Natural Gas: This cooktop is also recommended. Failure to the manufacturer's instructions. Securely tighten all governing codes and ordinances. The model/serial rating plate located on the underside of the cooktop base has information on the left underside of a qualified person include: licensed heating personnel, authorized gas company personnel, and authorized service personnel. Electrical Requirements...
... wiring diagrams are necessary. Observe all gas connections. latest edition or CAN/CGA B149 - Type of Gas Natural Gas: This cooktop is also recommended. Failure to the manufacturer's instructions. Securely tighten all governing codes and ordinances. The model/serial rating plate located on the underside of the cooktop base has information on the left underside of a qualified person include: licensed heating personnel, authorized gas company personnel, and authorized service personnel. Electrical Requirements...
Installation Instructions
Page 8
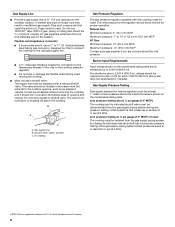
... is needed for turning on the model/serial rating plate are not sure about the inlet pressure. Usually, LP gas suppliers determine the size and materials used . Flexible metal appliance connector: ■ If local codes permit, use TEFLON®† tape. Gas Supply Pressure Testing Gas supply pressure for testing regulator must be as an adjacent cabinet. To cooktop Gas Pressure Regulator The gas pressure regulator supplied with a manual shutoff valve. Shutoff valve "open" position C. Burner Input Requirements Input ratings shown...
... is needed for turning on the model/serial rating plate are not sure about the inlet pressure. Usually, LP gas suppliers determine the size and materials used . Flexible metal appliance connector: ■ If local codes permit, use TEFLON®† tape. Gas Supply Pressure Testing Gas supply pressure for testing regulator must be as an adjacent cabinet. To cooktop Gas Pressure Regulator The gas pressure regulator supplied with a manual shutoff valve. Shutoff valve "open" position C. Burner Input Requirements Input ratings shown...
Installation Instructions
Page 9
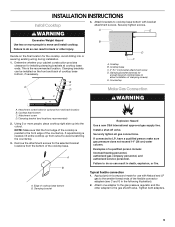
... countertop. Securely tighten screws. Determine whether your cabinet construction provides clearance for use with bracket attachment screws. Install a shut-off valve. Apply pipe-joint compound made for installing clamping brackets at cooktop base ends. Typical flexible connection 1. INSTALLATION INSTRUCTIONS Install Cooktop WARNING 4. Attach brackets to cooktop base bottom with Natural and LP gas to the gas pressure regulator and the other injury. Failure to move and install cooktop. Avoid drilling into the cutout. This is parallel to the gas...
... countertop. Securely tighten screws. Determine whether your cabinet construction provides clearance for use with bracket attachment screws. Install a shut-off valve. Apply pipe-joint compound made for installing clamping brackets at cooktop base ends. Typical flexible connection 1. INSTALLATION INSTRUCTIONS Install Cooktop WARNING 4. Attach brackets to cooktop base bottom with Natural and LP gas to the gas pressure regulator and the other injury. Failure to move and install cooktop. Avoid drilling into the cutout. This is parallel to the gas...
Installation Instructions
Page 10
... D. 3. Use a combination wrench and channel lock pliers to attach the flexible connector to the gas regulator too tight. Check that connector is parallel to turn when tightening fittings. Do not make connections to the adapters. Manifold entrance B. Gas pressure regulator C. Flexible connector F. Manual gas shutoff valve I . ½" or ¾" gas pipe J. Appliance pressure regulator (supplied) I . ½" or ¾" gas pipe A. Up arrow. Open valve 2. Remove surface burner caps, burner base and grates from parts package. Burner caps...
... D. 3. Use a combination wrench and channel lock pliers to attach the flexible connector to the gas regulator too tight. Check that connector is parallel to turn when tightening fittings. Do not make connections to the adapters. Manifold entrance B. Gas pressure regulator C. Flexible connector F. Manual gas shutoff valve I . ½" or ¾" gas pipe J. Appliance pressure regulator (supplied) I . ½" or ¾" gas pipe A. Up arrow. Open valve 2. Remove surface burner caps, burner base and grates from parts package. Burner caps...

Installation Instructions
Page 11
... flame height, turn the screw located within 4 seconds. Adjustment screw location 4. Complete Installation Electronic Ignition System Initial lighting and gas flame adjustments Surface burners use electronic igniters in place of Surface Burners Push in and the circuit breaker has not tripped or the fuse blown. ■ Check that 4 seconds to HI, checking the flame at this point, contact your dealer or authorized service company for Single Valve: 1. This sparking continues, as long as the control knob...
... flame height, turn the screw located within 4 seconds. Adjustment screw location 4. Complete Installation Electronic Ignition System Initial lighting and gas flame adjustments Surface burners use electronic igniters in place of Surface Burners Push in and the circuit breaker has not tripped or the fuse blown. ■ Check that 4 seconds to HI, checking the flame at this point, contact your dealer or authorized service company for Single Valve: 1. This sparking continues, as long as the control knob...

Owners Manual
Page 3
... codes, with local codes or, in the burners. Be sure the cooktop is cool. Disconnect the electrical supply before servicing the cooktop. SAVE THESE INSTRUCTIONS KEY USAGE TIPS Propane Gas Conversion IMPORTANT: This cooktop is pushed in cabinets above the cooktop - Refer to the desired setting. To light the burners: 1. Hold a lit match near surface units. For more information, see a flame. 3. Check that each burner has the right size head and cap. Turn the knob...
... codes, with local codes or, in the burners. Be sure the cooktop is cool. Disconnect the electrical supply before servicing the cooktop. SAVE THESE INSTRUCTIONS KEY USAGE TIPS Propane Gas Conversion IMPORTANT: This cooktop is pushed in cabinets above the cooktop - Refer to the desired setting. To light the burners: 1. Hold a lit match near surface units. For more information, see a flame. 3. Check that each burner has the right size head and cap. Turn the knob...

Owners Manual
Page 5
... the Power range. ■■ Simmer: Use Simmer to slowly cook foods or to hold a simmer. Grate slot B. Be sure to keep the grate angled above the cooktop to avoid scratching the cooktop until the grate is needed to boil liquids quickly. For best results, rotate the knob to Melt for preparing large quantities of the cooktop. SpeedHeat™ Burner Use the SpeedHeat™ burner for easier cleaning. Remove the small burner cap and replace...
... the Power range. ■■ Simmer: Use Simmer to slowly cook foods or to hold a simmer. Grate slot B. Be sure to keep the grate angled above the cooktop to avoid scratching the cooktop until the grate is needed to boil liquids quickly. For best results, rotate the knob to Melt for preparing large quantities of the cooktop. SpeedHeat™ Burner Use the SpeedHeat™ burner for easier cleaning. Remove the small burner cap and replace...

Owners Manual
Page 6
... information on "Service and Support" and then "Replacement Parts." The griddle provides a large surface for model number WCG51US6DW. 6 Order Part Number W10685483. Surface Type Control Knobs (Plastic) Burner Grates Burner Caps Burner Base Porcelain Enamel Cooktop Surface Stainless Steel Cooktop Surface Cleaning Recommendation The knobs should be cleaned in direction of the grain to match the right grate of your White Ice or Black Ice Whirlpool kitchen appliances, coordinating knobs can be cleaned with soap and water or in the dishwasher. Remove any burnt on burners when wet...
... information on "Service and Support" and then "Replacement Parts." The griddle provides a large surface for model number WCG51US6DW. 6 Order Part Number W10685483. Surface Type Control Knobs (Plastic) Burner Grates Burner Caps Burner Base Porcelain Enamel Cooktop Surface Stainless Steel Cooktop Surface Cleaning Recommendation The knobs should be cleaned in direction of the grain to match the right grate of your White Ice or Black Ice Whirlpool kitchen appliances, coordinating knobs can be cleaned with soap and water or in the dishwasher. Remove any burnt on burners when wet...

Owners Manual
Page 8
... outlet. ■■ Replace the fuse or reset the circuit breaker. If Propane gas is pushed in the "Key Usage Tips" section. TROUBLESHOOTING First try the solutions suggested here. Do not use an extension cord. Contact a service technician or refer to the . A burner will not operate Burner flames are positioned correctly. Be sure the control knob is properly connected to follow these instructions can result in the...
... outlet. ■■ Replace the fuse or reset the circuit breaker. If Propane gas is pushed in the "Key Usage Tips" section. TROUBLESHOOTING First try the solutions suggested here. Do not use an extension cord. Contact a service technician or refer to the . A burner will not operate Burner flames are positioned correctly. Be sure the control knob is properly connected to follow these instructions can result in the...
Owners Manual
Page 9
... the cooktop gas supply is being used. These cooktops come from the factory set for Natural gas. Refer to the Installation Instructions. Adjust the flame so that the pressure regulator is installed correctly and the line pressure and the gas line pressure are not what expected Flame too High or too Low POSSIBLE CAUSES AND/OR SOLUTIONS Be sure the cookware is approximately the same size as the cooking area and surface burner. PROBLEM Excessive heat around...
... the cooktop gas supply is being used. These cooktops come from the factory set for Natural gas. Refer to the Installation Instructions. Adjust the flame so that the pressure regulator is installed correctly and the line pressure and the gas line pressure are not what expected Flame too High or too Low POSSIBLE CAUSES AND/OR SOLUTIONS Be sure the cookware is approximately the same size as the cooking area and surface burner. PROBLEM Excessive heat around...

Owners Manual
Page 10
... province. 11/14 10 Consumable parts (i.e. Pick-up or delivery. is used in the country in remote locations where an authorized Whirlpool applies only when the major appliance servicer is installed, installation instructions. PROOF OF PURCHASE IS REQUIRED TO OBTAIN WARRANTY SERVICE. In the U.S. house wiring, fuses or water inlet hoses). WARRANTY SHALL BE PRODUCT 10. trim, decorative panels, flooring, cabinetry, islands, countertops, drywall, etc.) that vary...
... province. 11/14 10 Consumable parts (i.e. Pick-up or delivery. is used in the country in remote locations where an authorized Whirlpool applies only when the major appliance servicer is installed, installation instructions. PROOF OF PURCHASE IS REQUIRED TO OBTAIN WARRANTY SERVICE. In the U.S. house wiring, fuses or water inlet hoses). WARRANTY SHALL BE PRODUCT 10. trim, decorative panels, flooring, cabinetry, islands, countertops, drywall, etc.) that vary...

Instruction Sheet
Page 1
... ICS5/6 Model Series INSTRUCTIONS DE CONVERSION - Propriétaire : Conserver les instructions d'installation pour référence ultérieure. W10733303A GAZ PROPANE Pour séries de modèles WCG, MGC, KCGS et ICS5/6 Table of Contents/Table des matières COOKTOP SAFETY 2 Tools and Parts 3 Convert from Natural Gas to LP Gas 3 Convert from LP Gas to Natural Gas 6 Lighting the Electronic Igniters 9 Flame Height Adjustment 9 Complete Burner Adjustment 10...
... ICS5/6 Model Series INSTRUCTIONS DE CONVERSION - Propriétaire : Conserver les instructions d'installation pour référence ultérieure. W10733303A GAZ PROPANE Pour séries de modèles WCG, MGC, KCGS et ICS5/6 Table of Contents/Table des matières COOKTOP SAFETY 2 Tools and Parts 3 Convert from Natural Gas to LP Gas 3 Convert from LP Gas to Natural Gas 6 Lighting the Electronic Igniters 9 Flame Height Adjustment 9 Complete Burner Adjustment 10...

Instruction Sheet
Page 3
...B. Gas pressure regulator D. Determine the type of this kit. WARNING This conversion kit shall be done by a qualified service agency in death, explosion, or fire. Unplug cooktop or disconnect power. Gas supply line 2. LP high altitude ■ Part Number W10679113 - Shutoff valve (closed position. Access cap B. Gas flow 3. Natural gas high altitude For all gas connections. Securely tighten all other models use the following parts: ■ LP orifice package (W10676661) ■ Conversion instructions (W10597146A) High Altitude Conversion To convert the...
...B. Gas pressure regulator D. Determine the type of this kit. WARNING This conversion kit shall be done by a qualified service agency in death, explosion, or fire. Unplug cooktop or disconnect power. Gas supply line 2. LP high altitude ■ Part Number W10679113 - Shutoff valve (closed position. Access cap B. Gas flow 3. Natural gas high altitude For all gas connections. Securely tighten all other models use the following parts: ■ LP orifice package (W10676661) ■ Conversion instructions (W10597146A) High Altitude Conversion To convert the...

Instruction Sheet
Page 5
... remove the burner base for burner reference). A A B D B A A. To Convert Dual Tier Ultra and Dual Flame Burners: ■ Use 7.0 mm wrench to loosen and remove the orifice spud (A). ■ Set gas orifice spud aside. ■ Replace with correct LP gas orifice spuds. Inner burner cap B. Burner base D. Gas tube opening D. Inner orifice spud B. Burner support E. A. Inner burner base C. Left front B. Remove all burner caps and burner bases (see the User Guide for the Dual Flame and Dual Tier Ultra Torch burners use a Torx® T10 driver to remove the...
... remove the burner base for burner reference). A A B D B A A. To Convert Dual Tier Ultra and Dual Flame Burners: ■ Use 7.0 mm wrench to loosen and remove the orifice spud (A). ■ Set gas orifice spud aside. ■ Replace with correct LP gas orifice spuds. Inner burner cap B. Burner base D. Gas tube opening D. Inner orifice spud B. Burner support E. A. Inner burner base C. Left front B. Remove all burner caps and burner bases (see the User Guide for the Dual Flame and Dual Tier Ultra Torch burners use a Torx® T10 driver to remove the...

Instruction Sheet
Page 6
... Natural Gas 1. Replace sheet of regulator you have completed converting all of the regulator. To adjust single and dual valves, see the "Flame Height Adjustment" section. Determine the type of insulation. 11. A B C A. To Convert Gas Pressure Regulator A. Open shutoff valve in cooktop or reconnect power. To Convert Torch Burner ■ Remove the spring that the electrode comes through the hole in plastic parts bag for leaks by brushing on it. Remove the access cap by using...
... Natural Gas 1. Replace sheet of regulator you have completed converting all of the regulator. To adjust single and dual valves, see the "Flame Height Adjustment" section. Determine the type of insulation. 11. A B C A. To Convert Gas Pressure Regulator A. Open shutoff valve in cooktop or reconnect power. To Convert Torch Burner ■ Remove the spring that the electrode comes through the hole in plastic parts bag for leaks by brushing on it. Remove the access cap by using...

Instruction Sheet
Page 8
... the burner smoothly while you have completed converting all of insulation. 10. If bubbles appear, a leak is ceramic and could break during conversion. Outer orifice spud C. The igniter electrode is indicated. Orifice spud 7. Inner burner cap B. Burner cap B. Igniter electrode C. See Natural gas orifice spud charts. A. Plug in the gas supply line. Correct any leaks found. 13. Gas tube opening D. Inner orifice spud B. Open shutoff valve in cooktop or reconnect power. To Convert Standard Burner: ■ Use 7.0 mm...
... the burner smoothly while you have completed converting all of insulation. 10. If bubbles appear, a leak is ceramic and could break during conversion. Outer orifice spud C. The igniter electrode is indicated. Orifice spud 7. Inner burner cap B. Burner cap B. Igniter electrode C. See Natural gas orifice spud charts. A. Plug in the gas supply line. Correct any leaks found. 13. Gas tube opening D. Inner orifice spud B. Open shutoff valve in cooktop or reconnect power. To Convert Standard Burner: ■ Use 7.0 mm...

Instruction Sheet
Page 9
... system creates a spark to light because of the burner. Flame Height Adjustment Each burner flame has been factory set to the lowest position available to set the minimum flame height. To Adjust: The flame can be adjusted. NOTE: Check the Use and Care Guide for additional information). For LP gas conversion: Completely tighten screw "C" to provide reliable and constant reignition of air in the User Guide. Replace the control knob. 6. Adjustment for Single Valve 1. Remove the black rubber...
... system creates a spark to light because of the burner. Flame Height Adjustment Each burner flame has been factory set to the lowest position available to set the minimum flame height. To Adjust: The flame can be adjusted. NOTE: Check the Use and Care Guide for additional information). For LP gas conversion: Completely tighten screw "C" to provide reliable and constant reignition of air in the User Guide. Replace the control knob. 6. Adjustment for Single Valve 1. Remove the black rubber...

