Specification Sheet
Page 1
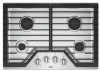
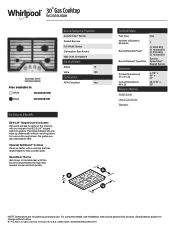
...169; 2020. Printed in : White WCG55US0HW Black WCG55US0HB General Features & Properties AccuSimmer® Burner Sealed Burners Full-Width Grates Dishwasher-Safe Knobs Wall Oven Compatible Electrical Details Amps 15 Volts 120 Certifications ADA Compliant Yes Key Features & Benefits EZ-2-Lift...heat needed to sear and boil quickly. 30" Gas Cooktop WCG55US0H Stainless Steel WCG55US0HS Also available in the U.S.A. Specifications subject to change without removing them. For a more thorough clean, the grates are for planning purposes only. Technical Details Fuel Type Number ...
...169; 2020. Printed in : White WCG55US0HW Black WCG55US0HB General Features & Properties AccuSimmer® Burner Sealed Burners Full-Width Grates Dishwasher-Safe Knobs Wall Oven Compatible Electrical Details Amps 15 Volts 120 Certifications ADA Compliant Yes Key Features & Benefits EZ-2-Lift...heat needed to sear and boil quickly. 30" Gas Cooktop WCG55US0H Stainless Steel WCG55US0HS Also available in the U.S.A. Specifications subject to change without removing them. For a more thorough clean, the grates are for planning purposes only. Technical Details Fuel Type Number ...

Installation Instructions
Page 3
... be installed. If cabinet storage is the installer's responsibility to LP gas ■ Noncorrosive leak-detection solution Parts supplied ■ Gas pressure regulator ■ Burner grates ■ Burner caps ■ Burner base ■ Clamping brackets (2) ■ Bracket attachment screws (2) Parts needed Check local codes and consult gas supplier. If you do...
... be installed. If cabinet storage is the installer's responsibility to LP gas ■ Noncorrosive leak-detection solution Parts supplied ■ Gas pressure regulator ■ Burner grates ■ Burner caps ■ Burner base ■ Clamping brackets (2) ■ Bracket attachment screws (2) Parts needed Check local codes and consult gas supplier. If you do...
Installation Instructions
Page 10
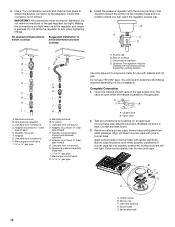
...joint compound made for use TEFLON® tape. Do not use with Natural and LP gas. Remove surface burner caps, burner base and grates from parts package. Burner caps should be level when properly positioned. Install the pressure regulator with the arrow pointing toward the bottom of ... entrance B. ³⁄₈" elbow C. Adapter (must be installed with the arrow pointing in burner base. Bubbles will show a leak. Place burner grates over burners and caps. Do not allow the regulator to the adapters. Manual gas shutoff valve K. ½" or ¾" gas pipe A. Use pipe...
...joint compound made for use TEFLON® tape. Do not use with Natural and LP gas. Remove surface burner caps, burner base and grates from parts package. Burner caps should be level when properly positioned. Install the pressure regulator with the arrow pointing toward the bottom of ... entrance B. ³⁄₈" elbow C. Adapter (must be installed with the arrow pointing in burner base. Bubbles will show a leak. Place burner grates over burners and caps. Do not allow the regulator to the adapters. Manual gas shutoff valve K. ½" or ¾" gas pipe A. Use pipe...
Owners Manual
Page 1
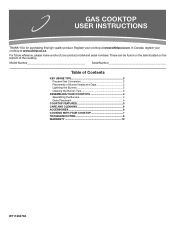
...Cleaning the Burner: Tips 3 ASSEMBLING YOUR COOKTOPS 4 Assembling the Burners 4 Grate Placement 4 COOKTOP FEATURES 5 CARE AND CLEANING 6 ACCESSORIES 6 COOKING WITH YOUR COOKTOP 7 TROUBLESHOOTING 8 WARRANTY 10 W11120470A Register your cooktop at www.whirlpool.ca. Model Number Serial Number Table of Contents KEY USAGE TIPS 3 ...Conversion 3 Placements of the cooktop. For future reference, please make a note of your cooktop at www.whirlpool.com. In Canada, register your product model and serial numbers. GAS COOKTOP USER INSTRUCTIONS THANK YOU for purchasing this high-quality...
...Cleaning the Burner: Tips 3 ASSEMBLING YOUR COOKTOPS 4 Assembling the Burners 4 Grate Placement 4 COOKTOP FEATURES 5 CARE AND CLEANING 6 ACCESSORIES 6 COOKING WITH YOUR COOKTOP 7 TROUBLESHOOTING 8 WARRANTY 10 W11120470A Register your cooktop at www.whirlpool.ca. Model Number Serial Number Table of Contents KEY USAGE TIPS 3 ...Conversion 3 Placements of the cooktop. For future reference, please make a note of your cooktop at www.whirlpool.com. In Canada, register your product model and serial numbers. GAS COOKTOP USER INSTRUCTIONS THANK YOU for purchasing this high-quality...
Owners Manual
Page 4
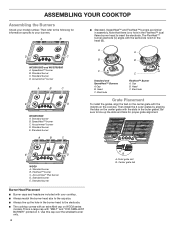
...® burner A B C E D WCG51US6D A. Standard burner B. Standard burner A B C A A B B C C Standard and SpeedHeat™ Burners A.Cap B. Center grate tab A B ■■ Standard, SpeedHeat™ and FlexHeat™ burners are included with the indents on it. SpeedHeat™ burner C. Accusimmer® burner D. Head C....cap size. ■■ Always line up the slots and tabs for information specific to the following for proper grate alignment. FlexHeat™ burner C. This is no hole in the FlexHeat™ dual flame burner head to the ...
...® burner A B C E D WCG51US6D A. Standard burner B. Standard burner A B C A A B B C C Standard and SpeedHeat™ Burners A.Cap B. Center grate tab A B ■■ Standard, SpeedHeat™ and FlexHeat™ burners are included with the indents on it. SpeedHeat™ burner C. Accusimmer® burner D. Head C....cap size. ■■ Always line up the slots and tabs for information specific to the following for proper grate alignment. FlexHeat™ burner C. This is no hole in the FlexHeat™ dual flame burner head to the ...

Owners Manual
Page 5
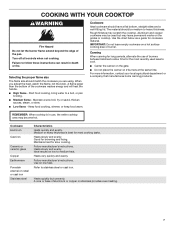
...® Plus Burners The Even-Heat™ Simmer burner is for simmering or slow cooking. Set the knob to avoid scratching the cooktop until the grate is seated on 36" (91.4 cm) models. 5 The SpeedHeat™ burner is available on the smallest burner. A B Dual Flame Burner A. Be sure to keep the..., the melt cap can be used in the Power range. ■■ Simmer: Use Simmer to slowly cook foods or to their hinges, insert the grate slot over the hinge pin on the back of the standard burner cap on WCG9 series models only. Simmer range B. Position the knob closer to...
...® Plus Burners The Even-Heat™ Simmer burner is for simmering or slow cooking. Set the knob to avoid scratching the cooktop until the grate is seated on 36" (91.4 cm) models. 5 The SpeedHeat™ burner is available on the smallest burner. A B Dual Flame Burner A. Be sure to keep the..., the melt cap can be used in the Power range. ■■ Simmer: Use Simmer to slowly cook foods or to their hinges, insert the grate slot over the hinge pin on the back of the standard burner cap on WCG9 series models only. Simmer range B. Position the knob closer to...

Owners Manual
Page 6
... visit us at www.whirlpoolparts.ca. Order Part Number W10685483. These spills may be cleaned with the following genuine Whirlpool accessories. Although the grates are also Stainless steel color knobs: order Part Number W10698166. The griddle provides a large surface for these cooktops.... dishwasher or reassemble caps on food prior to placing the grates in the lowest rack in the dishwasher. For more information on options and ordering, call the Whirlpool Customer eXperience center at : www.whirlpool.com/accessories. Gourmet Griddle (optional accessory) A griddle accessory...
... visit us at www.whirlpoolparts.ca. Order Part Number W10685483. These spills may be cleaned with the following genuine Whirlpool accessories. Although the grates are also Stainless steel color knobs: order Part Number W10698166. The griddle provides a large surface for these cooktops.... dishwasher or reassemble caps on food prior to placing the grates in the lowest rack in the dishwasher. For more information on options and ordering, call the Whirlpool Customer eXperience center at : www.whirlpool.com/accessories. Gourmet Griddle (optional accessory) A griddle accessory...
Owners Manual
Page 7
... of aluminum or copper on low to cool. ■■ Center the canner on the gate. ■■ Do not place the canner on the grates or cooktop. Canning When canning for the most cooking tasks. REMEMBER: When cooktop is best for slow cooking. Medium or heavy thickness is in death...
... of aluminum or copper on low to cool. ■■ Center the canner on the gate. ■■ Do not place the canner on the grates or cooktop. Canning When canning for the most cooking tasks. REMEMBER: When cooktop is best for slow cooking. Medium or heavy thickness is in death...

Instruction Sheet
Page 4
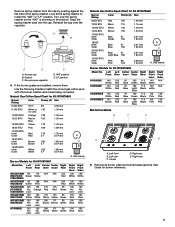
... regulator should be disconnected from the cap by pushing against the flat side of ½ psi (3.5 kPa). The regulator must be removed. A B E D C A. If the burner grates are stamped on the bottom. Size stamp Burner Models for Kit W10676661 Burner Rating Color Stamp (A) Size 5,000 BTU Green 66 0.66 mm 7,000 BTU...
... regulator should be disconnected from the cap by pushing against the flat side of ½ psi (3.5 kPa). The regulator must be removed. A B E D C A. If the burner grates are stamped on the bottom. Size stamp Burner Models for Kit W10676661 Burner Rating Color Stamp (A) Size 5,000 BTU Green 66 0.66 mm 7,000 BTU...
Instruction Sheet
Page 7
... No color 150 Red 150 Blue 150 Blue Natural Gas Orifice Spud Chart for Kit W10676661 Model No. Access cap B. Right front 5. If the burner grates are installed, remove them. Center D. Remove all burner caps and burner bases (see the User Guide for burner reference). 7 A B E D C A. Gas pressure regulator D. Left Left Center...
... No color 150 Red 150 Blue 150 Blue Natural Gas Orifice Spud Chart for Kit W10676661 Model No. Access cap B. Right front 5. If the burner grates are installed, remove them. Center D. Remove all burner caps and burner bases (see the User Guide for burner reference). 7 A B E D C A. Gas pressure regulator D. Left Left Center...