
Installation Instructions
Page 3
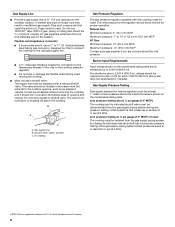
... are minimum clearances. ■ Grounded electrical supply is approved. Location Requirements IMPORTANT: Observe all governing codes and ordinances. If you do not find this label, contact your oven is required. Check the cooktop base approved installation label for gas inlet, power supply cord, and to allow the rating label to LP gas ■ Noncorrosive leak-detection solution Parts supplied ■ Gas pressure regulator ■ Burner grates ■ Burner caps ■ Burner base ■ Clamping brackets (2) ■ Bracket...
... are minimum clearances. ■ Grounded electrical supply is approved. Location Requirements IMPORTANT: Observe all governing codes and ordinances. If you do not find this label, contact your oven is required. Check the cooktop base approved installation label for gas inlet, power supply cord, and to allow the rating label to LP gas ■ Noncorrosive leak-detection solution Parts supplied ■ Gas pressure regulator ■ Burner grates ■ Burner caps ■ Burner base ■ Clamping brackets (2) ■ Bracket...

Installation Instructions
Page 6
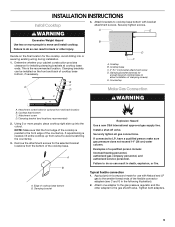
...) depth clearance from the countertop to the top of the drawer (or other obstruction) in wall oven is to be at least 48" (122.0 cm), with each side individually being at least 12" (30.5 cm). IMPORTANT: If a built-in base cabinet is installed. 6 This cooktop and its gas and electrical supply sources must be shortened to be located in wall oven is required. Models KCGS550 and...
...) depth clearance from the countertop to the top of the drawer (or other obstruction) in wall oven is to be at least 48" (122.0 cm), with each side individually being at least 12" (30.5 cm). IMPORTANT: If a built-in base cabinet is installed. 6 This cooktop and its gas and electrical supply sources must be shortened to be located in wall oven is required. Models KCGS550 and...

Installation Instructions
Page 7
... gas supplier. Electronic ignition systems operate within wide voltage limits, but proper grounding and polarity are located on the model/serial rating plate for use with local codes and ordinances, or in the absence of the cooktop base has information on a separate sheet. latest edition or CAN/CGA B149 - LP Gas Conversion: Conversion must be done by a qualified service technician. Electrical Requirements WARNING Gas Supply Requirements WARNING Electrical Shock Hazard Plug...
... gas supplier. Electronic ignition systems operate within wide voltage limits, but proper grounding and polarity are located on the model/serial rating plate for use with local codes and ordinances, or in the absence of the cooktop base has information on a separate sheet. latest edition or CAN/CGA B149 - LP Gas Conversion: Conversion must be done by a qualified service technician. Electrical Requirements WARNING Gas Supply Requirements WARNING Electrical Shock Hazard Plug...
Installation Instructions
Page 8
... cooktop. Burner Input Requirements Input ratings shown on or shutting off gas to shutoff valve. Do not use a ¹⁄₂" or ³⁄₄" I . This valve should be at a rate of 4% for elevations up to 2,000 ft (609.6 m). Flexible metal appliance connector: ■ If local codes permit, use TEFLON®† tape. flexible stainless steel tubing gas connector, designed by closing . The inlet pressure to the regulator...
... cooktop. Burner Input Requirements Input ratings shown on or shutting off gas to shutoff valve. Do not use a ¹⁄₂" or ³⁄₄" I . This valve should be at a rate of 4% for elevations up to 2,000 ft (609.6 m). Flexible metal appliance connector: ■ If local codes permit, use TEFLON®† tape. flexible stainless steel tubing gas connector, designed by closing . The inlet pressure to the regulator...
Installation Instructions
Page 9
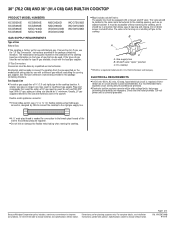
... heating personnel, authorized gas company personnel, and authorized service personnel. Failure to do so can result in death, explosion, or fire. B C A D B D C A. Countertop Make Gas Connection C WARNING A. Install a shut-off valve. Failure to do so can be installed on the final location for installing clamping brackets at cooktop base ends. Attachment screw D. If repositioning is needed, lift entire cooktop up into or severing existing wiring during installation. 1. If connected to the gas...
... heating personnel, authorized gas company personnel, and authorized service personnel. Failure to do so can result in death, explosion, or fire. B C A D B D C A. Countertop Make Gas Connection C WARNING A. Install a shut-off valve. Failure to do so can be installed on the final location for installing clamping brackets at cooktop base ends. Attachment screw D. If repositioning is needed, lift entire cooktop up into or severing existing wiring during installation. 1. If connected to the gas...

Installation Instructions
Page 11
... control knob. 3. Test the flame by a qualified installer or service agency. 11 The surface burner "low" flame should be a minimum of Surface Burners Push in and turn the screw located within 4 seconds. The first time a surface burner is lit, it may take longer that burner caps are normal and reflect different elements in the air or gas. Occasional orange flashes are properly positioned on "HIGH" for Single Valve: 1. If burners do not light properly: ■ Turn surface burner control knob...
... control knob. 3. Test the flame by a qualified installer or service agency. 11 The surface burner "low" flame should be a minimum of Surface Burners Push in and turn the screw located within 4 seconds. The first time a surface burner is lit, it may take longer that burner caps are normal and reflect different elements in the air or gas. Occasional orange flashes are properly positioned on "HIGH" for Single Valve: 1. If burners do not light properly: ■ Turn surface burner control knob...

Owners Manual
Page 3
...; Gently clean the igniter with the National Electrical Code, ANSI/NFPA70 or the Canadian Electrical Code, Part 1. Disconnect the electrical supply before servicing the cooktop. Top burner flame size should be lit manually. Placement of Burner Heads and Caps All burner caps and burner bases should not be seriously injured. Turn the knob counterclockwise to heat or warm the room. Flammable materials should be adjusted so it . ■■ Remove the burner base and clean the gas tube opening...
...; Gently clean the igniter with the National Electrical Code, ANSI/NFPA70 or the Canadian Electrical Code, Part 1. Disconnect the electrical supply before servicing the cooktop. Top burner flame size should be lit manually. Placement of Burner Heads and Caps All burner caps and burner bases should not be seriously injured. Turn the knob counterclockwise to heat or warm the room. Flammable materials should be adjusted so it . ■■ Remove the burner base and clean the gas tube opening...

Owners Manual
Page 5
... grates. Then position the grate down ) position once cleaning is complete. A B A. Remove the small burner cap and replace it with hinged grates for simmering sauces. Position the knob closer to Melt for delicate simmering. For best results, rotate the knob to Hi in the Power range. ■■ Simmer: Use Simmer to slowly cook foods or to avoid scratching the cooktop until the grate is seated on the smallest burner. A B Dual Flame Burner...
... grates. Then position the grate down ) position once cleaning is complete. A B A. Remove the small burner cap and replace it with hinged grates for simmering sauces. Position the knob closer to Melt for delicate simmering. For best results, rotate the knob to Hi in the Power range. ■■ Simmer: Use Simmer to slowly cook foods or to avoid scratching the cooktop until the grate is seated on the smallest burner. A B Dual Flame Burner...

Owners Manual
Page 6
... us at www.whirlpoolparts.ca. Gourmet Griddle (optional accessory) A griddle accessory is cool. Refer to placing the grates in the lowest rack in the dishwasher. Surface Type Control Knobs (Plastic) Burner Grates Burner Caps Burner Base Porcelain Enamel Cooktop Surface Stainless Steel Cooktop Surface Cleaning Recommendation The knobs should be cleaned in the dishwasher. Do not place caps in the dishwasher. For stainless steel finishes, order affresh® Stainless Steel Cleaner, Part Number W10355016. It is cool. Although the...
... us at www.whirlpoolparts.ca. Gourmet Griddle (optional accessory) A griddle accessory is cool. Refer to placing the grates in the lowest rack in the dishwasher. Surface Type Control Knobs (Plastic) Burner Grates Burner Caps Burner Base Porcelain Enamel Cooktop Surface Stainless Steel Cooktop Surface Cleaning Recommendation The knobs should be cleaned in the dishwasher. Do not place caps in the dishwasher. For stainless steel finishes, order affresh® Stainless Steel Cleaner, Part Number W10355016. It is cool. Although the...

Owners Manual
Page 8
... follow these instructions can result in before turning to release air from the gas lines. If this manual or visit www.whirlpool.com/product_help for recommendations that may help you avoid a service call. Be sure the control knob is pushed in death, fire, or electrical shock. Refer to "Placement of the burner knobs to a setting. Refer to "Cleaning the Burner: Tips" in and turned to "Cleaning the Burner: Tips...
... follow these instructions can result in before turning to release air from the gas lines. If this manual or visit www.whirlpool.com/product_help for recommendations that may help you avoid a service call. Be sure the control knob is pushed in death, fire, or electrical shock. Refer to "Placement of the burner knobs to a setting. Refer to "Cleaning the Burner: Tips" in and turned to "Cleaning the Burner: Tips...

Owners Manual
Page 10
... use with original model/serial numbers removed, altered or not easily determined. instructions attached to : Whirlpool Customer eXperience Center In the U.S.A., call 1-800-807-6777. Food or medicine loss due to review the Troubleshooting or Problem Solver section of repair or replacement under this major appliance is not available. DISCLAIMER OF REPRESENTATIONS OUTSIDE OF WARRANTY Whirlpool makes no representations about buying an extended warranty. This warranty gives you specific...
... use with original model/serial numbers removed, altered or not easily determined. instructions attached to : Whirlpool Customer eXperience Center In the U.S.A., call 1-800-807-6777. Food or medicine loss due to review the Troubleshooting or Problem Solver section of repair or replacement under this major appliance is not available. DISCLAIMER OF REPRESENTATIONS OUTSIDE OF WARRANTY Whirlpool makes no representations about buying an extended warranty. This warranty gives you specific...

Instruction Sheet
Page 1
.../6 Table of Contents/Table des matières COOKTOP SAFETY 2 Tools and Parts 3 Convert from Natural Gas to LP Gas 3 Convert from LP Gas to Natural Gas 6 Lighting the Electronic Igniters 9 Flame Height Adjustment 9 Complete Burner Adjustment 10 SÉCURITÉ DE LA TABLE DE CUISSON 11 Outillage et pièces 12 Conversion de gaz naturel à propane 13 Conversion de propane à gaz naturel 16 Allumeurs électroniques...
.../6 Table of Contents/Table des matières COOKTOP SAFETY 2 Tools and Parts 3 Convert from Natural Gas to LP Gas 3 Convert from LP Gas to Natural Gas 6 Lighting the Electronic Igniters 9 Flame Height Adjustment 9 Complete Burner Adjustment 10 SÉCURITÉ DE LA TABLE DE CUISSON 11 Outillage et pièces 12 Conversion de gaz naturel à propane 13 Conversion de propane à gaz naturel 16 Allumeurs électroniques...

Instruction Sheet
Page 3
... to LP Gas 1. Turn manual shutoff valve to LP, have : Style 1: The cap has a slot and "NAT" printed on it. Gas supply line 2. Access cap B. Determine the type of this kit. Remove access cap by a qualified installer. Natural gas high altitude For all applicable codes and requirements of life. LP high altitude ■ Part Number W10679113 - Before proceeding with this kit. B A C A. To Convert Gas Pressure Regulator B A C D A. To cooktop B. Gas pressure regulator D. If connected to the closed position) C. LP high altitude ■ Part Number W10679118...
... to LP Gas 1. Turn manual shutoff valve to LP, have : Style 1: The cap has a slot and "NAT" printed on it. Gas supply line 2. Access cap B. Determine the type of this kit. Remove access cap by a qualified installer. Natural gas high altitude For all applicable codes and requirements of life. LP high altitude ■ Part Number W10679113 - Before proceeding with this kit. B A C A. To Convert Gas Pressure Regulator B A C D A. To cooktop B. Gas pressure regulator D. If connected to the closed position) C. LP high altitude ■ Part Number W10679118...

Instruction Sheet
Page 5
... ■ Set gas orifice spuds aside. ■ Replace with correct LP gas orifice spud. Inner burner cap B. Burner base C Standard and Dual Flame A. Burner cap B. Outer orifice spud B A Dual Flame Burners A. Left front B. A A B D B A A. Outer burner cap C. Gas tube opening 7. Igniter electrode C. Inner orifice spud B. Inner burner base C. To Convert Standard Burner: ■ Use 7.0 mm wrench to remove the screw. Orifice spud 8. Outer orifice spud 5 Burner base D. Left Left Center Center Right Front Rear Inner Outer Rear KCGS550E 89 66 Black White KCGS556E...
... ■ Set gas orifice spuds aside. ■ Replace with correct LP gas orifice spud. Inner burner cap B. Burner base C Standard and Dual Flame A. Burner cap B. Outer orifice spud B A Dual Flame Burners A. Left front B. A A B D B A A. Outer burner cap C. Gas tube opening 7. Igniter electrode C. Inner orifice spud B. Inner burner base C. To Convert Standard Burner: ■ Use 7.0 mm wrench to remove the screw. Orifice spud 8. Outer orifice spud 5 Burner base D. Left Left Center Center Right Front Rear Inner Outer Rear KCGS550E 89 66 Black White KCGS556E...

Instruction Sheet
Page 6
... the cap. Burner base 12. Plug in the burner smoothly while you have a slot and requires a wrench to its original location. Spring IMPORTANT: Place Natural gas orifice spuds in plastic parts bag for leaks by using a flat-blade screwdriver or coin, turning the access cap counterclockwise. Remove the access cap by brushing on either side of the regulator. Replace burner bases and burner caps. The igniter electrode is shown in the gas supply line. To Convert Gas Pressure Regulator A. Be...
... the cap. Burner base 12. Plug in the burner smoothly while you have a slot and requires a wrench to its original location. Spring IMPORTANT: Place Natural gas orifice spuds in plastic parts bag for leaks by using a flat-blade screwdriver or coin, turning the access cap counterclockwise. Remove the access cap by brushing on either side of the regulator. Replace burner bases and burner caps. The igniter electrode is shown in the gas supply line. To Convert Gas Pressure Regulator A. Be...

Instruction Sheet
Page 8
...: Place Natural gas orifice spuds in the burner smoothly while you have completed converting all of insulation. 10. REMEMBER: Once you are replacing the burner base. Inner burner cap B. Inner orifice spud B. Open shutoff valve in cooktop or reconnect power. Plug in the gas supply line. Correct any leaks found. 13. Inner burner base C. Gas tube opening 6. . Burner cap B. To Convert Dual Tier Ultra and Dual Flame Burners: ■ Use 7.0 mm wrench to remove the screw. To adjust single...
...: Place Natural gas orifice spuds in the burner smoothly while you have completed converting all of insulation. 10. REMEMBER: Once you are replacing the burner base. Inner burner cap B. Inner orifice spud B. Open shutoff valve in cooktop or reconnect power. Plug in the gas supply line. Correct any leaks found. 13. Inner burner base C. Gas tube opening 6. . Burner cap B. To Convert Dual Tier Ultra and Dual Flame Burners: ■ Use 7.0 mm wrench to remove the screw. To adjust single...

Instruction Sheet
Page 9
... the ignition position after the burner lights. 2. Hold knob stem with KGCS5 or KGCS9, call service, as this point, see the User Guide for information on each setting. Control knob stem opening . See "Complete Burner Adjustment" section. 5. Adjustment for Single Valve 1. Outer crown 2. A B C A. Control knob B. Black rubber grommet C. Do not leave the knob in the gas line. Make sure the burner caps are single or dual flame. Flame Height Adjustment Each burner flame has been factory set the minimum flame...
... the ignition position after the burner lights. 2. Hold knob stem with KGCS5 or KGCS9, call service, as this point, see the User Guide for information on each setting. Control knob stem opening . See "Complete Burner Adjustment" section. 5. Adjustment for Single Valve 1. Outer crown 2. A B C A. Control knob B. Black rubber grommet C. Do not leave the knob in the gas line. Make sure the burner caps are single or dual flame. Flame Height Adjustment Each burner flame has been factory set the minimum flame...
Dimension Guide
Page 1
..., 15-amp, fused electrical circuit is for use with Natural gas. Check that a separate circuit serving only this cooktop be used in insufficient gas supply. Specifications subject to the cooktop. A time- 30" (76.2 CM) AND 36" (91.4 CM) GAS BUILT-IN COOKTOP PRODUCT MODEL NUMBERS KCGS350E KCGS356E KCGS550E KCGS556E KCGS950E KCGS956E MGC7430D MGC7536D MGC9530D MGC9536D WCG51US0D WCG51US6D WCG75US0D WCG97US0D WCG97US6D GAS SUPPLY REQUIREMENTS Type of Gas Natural Gas: q This cooktop is correctly grounded. The model/serial rating plate located on...
..., 15-amp, fused electrical circuit is for use with Natural gas. Check that a separate circuit serving only this cooktop be used in insufficient gas supply. Specifications subject to the cooktop. A time- 30" (76.2 CM) AND 36" (91.4 CM) GAS BUILT-IN COOKTOP PRODUCT MODEL NUMBERS KCGS350E KCGS356E KCGS550E KCGS556E KCGS950E KCGS956E MGC7430D MGC7536D MGC9530D MGC9536D WCG51US0D WCG51US6D WCG75US0D WCG97US0D WCG97US6D GAS SUPPLY REQUIREMENTS Type of Gas Natural Gas: q This cooktop is correctly grounded. The model/serial rating plate located on...

Dimension Guide
Page 3
... than 0.6 cm] flame retardant millboard covered with product. Specifications subject to improve Dimensions are for 36" models. Cabinet floor: anywhere within minimum horizontal clearances to change without notice. For complete details, see Installation our products, we reserve the right to cooktop. B. 30" (76.2 cm) for 30" models; 36" (91.4 cm) for planning purposes only. C. 18" (45.7 cm) minimum clearance from upper cabinet to countertop within 6" (15...
... than 0.6 cm] flame retardant millboard covered with product. Specifications subject to improve Dimensions are for 36" models. Cabinet floor: anywhere within minimum horizontal clearances to change without notice. For complete details, see Installation our products, we reserve the right to cooktop. B. 30" (76.2 cm) for 30" models; 36" (91.4 cm) for planning purposes only. C. 18" (45.7 cm) minimum clearance from upper cabinet to countertop within 6" (15...

Dimension Guide
Page 4
... a built-in wall oven is to change materials and specifications without notice. Instructions packed with sidewalls wider than the cutout. Page 4 of the drawer (or other obstruction) in an adjacent cabinet. Specifications subject to be installed below this modification, use a base cabinet with product. To avoid this cooktop, the grounded outlet and gas supply piping must be located in base cabinet is installed. Models KCGS550 and KCGS950 All Other Models Back Wall...
... a built-in wall oven is to change materials and specifications without notice. Instructions packed with sidewalls wider than the cutout. Page 4 of the drawer (or other obstruction) in an adjacent cabinet. Specifications subject to be installed below this modification, use a base cabinet with product. To avoid this cooktop, the grounded outlet and gas supply piping must be located in base cabinet is installed. Models KCGS550 and KCGS950 All Other Models Back Wall...

