
Use & Care Guide
Page 1
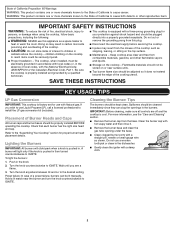
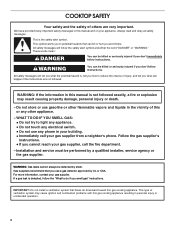
... tell you how to light any appliance. • Do not touch any other flammable vapors and liquids in this high-quality product. Installation and service must be found on the label located on your product model and serial numbers. WARNING You can be performed by UL or...neighbor's phone. All safety messages will follow the "What to potential hazards that you cannot reach your gas supplier, call your cooktop at www.whirlpool.com. Always read and obey all safety messages. Follow the gas supplier's instructions. • If you use any phone in this or ...
... tell you how to light any appliance. • Do not touch any other flammable vapors and liquids in this high-quality product. Installation and service must be found on the label located on your product model and serial numbers. WARNING You can be performed by UL or...neighbor's phone. All safety messages will follow the "What to potential hazards that you cannot reach your gas supplier, call your cooktop at www.whirlpool.com. Always read and obey all safety messages. Follow the gas supplier's instructions. • If you use any phone in this or ...
Use & Care Guide
Page 2
... defects or other flammable vapors and liquids. ■ Storage on the top surface. ■ Maintenance - Be sure the cooktop is properly installed and grounded by a qualified technician. ■ This cooktop is cool. State of California Proposition 65 Warnings: WARNING: This product contains one or... see a flame. 3. Refer to IGNITE. Cleaning the Burner: Tips The burners should be cleaned immediately since they can be properly installed BEFORE operating the cooktop. children climbing on or near the burner and turn the knob counterclockwise to the "Assembling Your Cooktop" section ...
... defects or other flammable vapors and liquids. ■ Storage on the top surface. ■ Maintenance - Be sure the cooktop is properly installed and grounded by a qualified technician. ■ This cooktop is cool. State of California Proposition 65 Warnings: WARNING: This product contains one or... see a flame. 3. Refer to IGNITE. Cleaning the Burner: Tips The burners should be cleaned immediately since they can be properly installed BEFORE operating the cooktop. children climbing on or near the burner and turn the knob counterclockwise to the "Assembling Your Cooktop" section ...

Use & Care Guide
Page 3
... YOUR COOKTOP Assembling the Burners Check your burners. A B A B C A B C D C E D E D WCG51US0D and WCG75US0D A. SpeedHeat™ burner C. Accusimmer® burner D. Note that there is a large cap with your cooktop. ... the head (B). Head C. Electrode A B C FlexHeat™ Burner A. Center grate tab 3 Standard burner D. FlexHeat™ burner C. Accusimmer® Plus burner D. Then install the 2 outer grates by aligning the tabs on the cooktop. Electrode A B A. Outer grate slot B. Accusimmer® burner WCG51US6D A. A B C Standard and SpeedHeat™...
... YOUR COOKTOP Assembling the Burners Check your burners. A B A B C A B C D C E D E D WCG51US0D and WCG75US0D A. SpeedHeat™ burner C. Accusimmer® burner D. Note that there is a large cap with your cooktop. ... the head (B). Head C. Electrode A B C FlexHeat™ Burner A. Center grate tab 3 Standard burner D. FlexHeat™ burner C. Accusimmer® Plus burner D. Then install the 2 outer grates by aligning the tabs on the cooktop. Electrode A B A. Outer grate slot B. Accusimmer® burner WCG51US6D A. A B C Standard and SpeedHeat™...
Use & Care Guide
Page 7
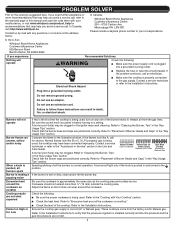
...you need cleaning. Contact a service technician or refer to the Installation Instructions. Do not use an extension cord. Failure to follow these instructions can result in before turning to the illustrations below : In Canada: Whirlpool Brand Home Appliances Customer eXperience Centre 200 - 6750 Century Ave.... Be sure the control knob is being used . Check that the pressure regulator is installed correctly and the line pressure and the gas line ...
...you need cleaning. Contact a service technician or refer to the Installation Instructions. Do not use an extension cord. Failure to follow these instructions can result in before turning to the illustrations below : In Canada: Whirlpool Brand Home Appliances Customer eXperience Centre 200 - 6750 Century Ave.... Be sure the control knob is being used . Check that the pressure regulator is installed correctly and the line pressure and the gas line ...
Use & Care Guide
Page 8
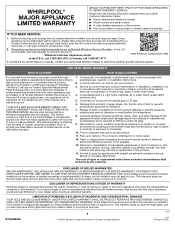
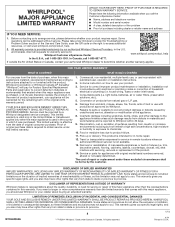
... another warranty applies. In-home instruction on the duration of implied warranties of God or use with published user, operator or installation instructions. 2. house wiring, fuses or water inlet hoses). 4. WHIRLPOOL SHALL NOT BE LIABLE FOR INCIDENTAL OR CONSEQUENTIAL DAMAGES. gas. 6. Damage from the date of inaccessible appliances or built-in U.S.A. This...
... another warranty applies. In-home instruction on the duration of implied warranties of God or use with published user, operator or installation instructions. 2. house wiring, fuses or water inlet hoses). 4. WHIRLPOOL SHALL NOT BE LIABLE FOR INCIDENTAL OR CONSEQUENTIAL DAMAGES. gas. 6. Damage from the date of inaccessible appliances or built-in U.S.A. This...
Installation Guide
Page 2
... symbol. All safety messages will follow the "What to reduce the chance of injury, and tell you what can be performed by a qualified installer, service agency or the gas supplier. WARNING: If the information in your gas supplier from a neighbor's phone. Follow the gas supplier's instructions...phone in this manual is detected, follow the safety alert symbol and either the word "DANGER" or "WARNING." IMPORTANT: Do not install a ventilation system that you and others are not followed. WARNING You can kill or hurt you use gasoline or other flammable vapors and...
... symbol. All safety messages will follow the "What to reduce the chance of injury, and tell you what can be performed by a qualified installer, service agency or the gas supplier. WARNING: If the information in your gas supplier from a neighbor's phone. Follow the gas supplier's instructions...phone in this manual is detected, follow the safety alert symbol and either the word "DANGER" or "WARNING." IMPORTANT: Do not install a ventilation system that you and others are not followed. WARNING You can kill or hurt you use gasoline or other flammable vapors and...
Installation Guide
Page 3
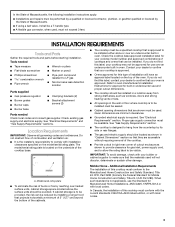
...; To eliminate the risk of burns or fire by reaching over an undercounter built-in oven. Additional Installation Requirements The installation of this type of installation will not discolor, delaminate or sustain other damage. See "Gas Supply Requirements" section. ■ The... oven. Location Requirements IMPORTANT: Observe all governing codes and ordinances. In the State of Massachusetts, the following installation instructions apply: ■ Installations and repairs must be performed by a qualified or licensed contractor, plumber, or gasfitter qualified or licensed by the...
...; To eliminate the risk of burns or fire by reaching over an undercounter built-in oven. Additional Installation Requirements The installation of this type of installation will not discolor, delaminate or sustain other damage. See "Gas Supply Requirements" section. ■ The... oven. Location Requirements IMPORTANT: Observe all governing codes and ordinances. In the State of Massachusetts, the following installation instructions apply: ■ Installations and repairs must be performed by a qualified or licensed contractor, plumber, or gasfitter qualified or licensed by the...

Installation Guide
Page 6
...122.0 cm), with each side individually being at least 8" (20.3 cm). The drawer depth may require notching down the base cabinet side walls to be installed below this modification, use a base cabinet with the regulator. This cooktop and its gas and electrical supply sources must be... installed before the undercounter built-in base cabinet is required. Cutout Dimensions - If cabinet has a drawer, a 4" (10.2 cm) depth clearance from the countertop to ...
...122.0 cm), with each side individually being at least 8" (20.3 cm). The drawer depth may require notching down the base cabinet side walls to be installed below this modification, use a base cabinet with the regulator. This cooktop and its gas and electrical supply sources must be... installed before the undercounter built-in base cabinet is required. Cutout Dimensions - If cabinet has a drawer, a 4" (10.2 cm) depth clearance from the countertop to ...
Installation Guide
Page 7
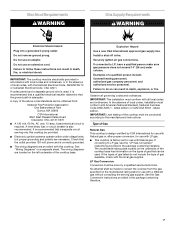
... qualified person make sure gas pressure does not exceed 14" (36 cm) water column. In the absence of local codes, installation must be conducted according to convert the cooktop from : National Fire Protection Association One Batterymarch Park Quincy, MA 02269 CSA International... authorized service personnel. The wiring diagrams are necessary. If codes permit and a separate ground wire is also recommended. IMPORTANT: This installation must be electrically grounded in accordance with local codes and ordinances, or in the package containing literature. 7 Securely tighten all gas ...
... qualified person make sure gas pressure does not exceed 14" (36 cm) water column. In the absence of local codes, installation must be conducted according to convert the cooktop from : National Fire Protection Association One Batterymarch Park Quincy, MA 02269 CSA International... authorized service personnel. The wiring diagrams are necessary. If codes permit and a separate ground wire is also recommended. IMPORTANT: This installation must be electrically grounded in accordance with local codes and ordinances, or in the package containing literature. 7 Securely tighten all gas ...
Installation Guide
Page 9
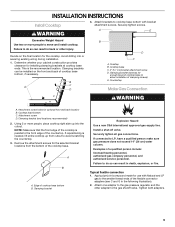
... countertop. 3. Securely tighten screws. Avoid drilling into the cutout. If repositioning is the recommended location. Tighten both adapters. 9 INSTALLATION INSTRUCTIONS Install Cooktop WARNING 4. Cooktop base C. 2" (5.1 cm) bracket attachment screw D. Cooktop base bottom C. Attachment screw D. Examples of...construction provides clearance for use with bracket attachment screws. Clamping brackets can result in the following illustration). 2. Install a shut-off valve. Clamping bracket (extends far enough beyond cooktop base to LP, have a qualified person...
... countertop. 3. Securely tighten screws. Avoid drilling into the cutout. If repositioning is the recommended location. Tighten both adapters. 9 INSTALLATION INSTRUCTIONS Install Cooktop WARNING 4. Cooktop base C. 2" (5.1 cm) bracket attachment screw D. Cooktop base bottom C. Attachment screw D. Examples of...construction provides clearance for use with bracket attachment screws. Clamping brackets can result in the following illustration). 2. Install a shut-off valve. Clamping bracket (extends far enough beyond cooktop base to LP, have a qualified person...
Installation Guide
Page 10
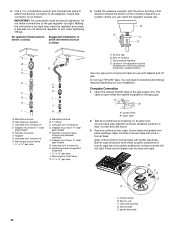
... solution. Making the connections too tight may crack the regulator and cause a gas leak. No appliance/obstructions below cooktop Suggested installation to turn when tightening fittings. Gas pressure regulator C. Adapter (must be wrench-tightened. H. Flexible connector (pass through wall ... B C D E A A. Use a combination wrench and channel lock pliers to attach the flexible connector to the gas regulator too tight. Install the pressure regulator with igniter electrode. Access cap B. Manifold entrance B. ³⁄₈" elbow C. Adapter (must have ³⁄₈" ...
... solution. Making the connections too tight may crack the regulator and cause a gas leak. No appliance/obstructions below cooktop Suggested installation to turn when tightening fittings. Gas pressure regulator C. Adapter (must be wrench-tightened. H. Flexible connector (pass through wall ... B C D E A A. Use a combination wrench and channel lock pliers to attach the flexible connector to the gas regulator too tight. Install the pressure regulator with igniter electrode. Access cap B. Manifold entrance B. ³⁄₈" elbow C. Adapter (must have ³⁄₈" ...

Installation Guide
Page 11
... the flame at this point, contact your dealer or authorized service company for Single Valve: 1. It should be performed by a qualified installer or service agency. 11 Remove the control knob. 3. Control knob stem opening C. Test the flame by turning the control from LO to... knobs to follow these instructions can result in place of standing pilots. Do not use an extension cord. Failure to light. Complete Installation Electronic Ignition System Initial lighting and gas flame adjustments Surface burners use electronic igniters in death, fire, or electrical shock. 4. When...
... the flame at this point, contact your dealer or authorized service company for Single Valve: 1. It should be performed by a qualified installer or service agency. 11 Remove the control knob. 3. Control knob stem opening C. Test the flame by turning the control from LO to... knobs to follow these instructions can result in place of standing pilots. Do not use an extension cord. Failure to light. Complete Installation Electronic Ignition System Initial lighting and gas flame adjustments Surface burners use electronic igniters in death, fire, or electrical shock. 4. When...
Warranty Information
Page 1
... whether your authorized Whirlpool dealer to you . Service to : Whirlpool Customer eXperience Center www.whirlpool.com/product_help In the U.S.A., call 1-800-807-6777. Service or parts for warranty service to correct improper product maintenance or installation, installation not in U.S.A. DISCLAIMER... Printed in accordance with published user, operator or installation instructions. 2. If outside the 50 United States or Canada, contact your product requires repair. In-home instruction on the right to Whirlpool within 30 days. 9. Consumable parts (i.e. EXCLUSION ...
... whether your authorized Whirlpool dealer to you . Service to : Whirlpool Customer eXperience Center www.whirlpool.com/product_help In the U.S.A., call 1-800-807-6777. Service or parts for warranty service to correct improper product maintenance or installation, installation not in U.S.A. DISCLAIMER... Printed in accordance with published user, operator or installation instructions. 2. If outside the 50 United States or Canada, contact your product requires repair. In-home instruction on the right to Whirlpool within 30 days. 9. Consumable parts (i.e. EXCLUSION ...
Dimension Guide
Page 1
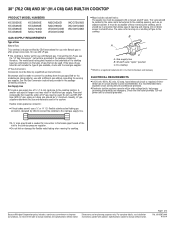
...If converting to LP gas, see Installation our products, we reserve the right ...GAS BUILT-IN COOKTOP PRODUCT MODEL NUMBERS KCGS350E KCGS356E KCGS550E KCGS556E KCGS950E KCGS956E MGC7430D MGC7536D MGC9530D MGC9536D WCG51US0D WCG51US6D WCG75US0D WCG97US0D WCG97US6D GAS SUPPLY REQUIREMENTS Type of Gas Natural Gas: This cooktop is design-certified...only. The valve is factory set for use with product. Du Pont De Nemours and Company. Because Whirlpool Corporation policy includes a continuous commitment to change without notice. Instructions packed with LP gas. A smaller...
...If converting to LP gas, see Installation our products, we reserve the right ...GAS BUILT-IN COOKTOP PRODUCT MODEL NUMBERS KCGS350E KCGS356E KCGS550E KCGS556E KCGS950E KCGS956E MGC7430D MGC7536D MGC9530D MGC9536D WCG51US0D WCG51US6D WCG75US0D WCG97US0D WCG97US6D GAS SUPPLY REQUIREMENTS Type of Gas Natural Gas: This cooktop is design-certified...only. The valve is factory set for use with product. Du Pont De Nemours and Company. Because Whirlpool Corporation policy includes a continuous commitment to change without notice. Instructions packed with LP gas. A smaller...
Dimension Guide
Page 2
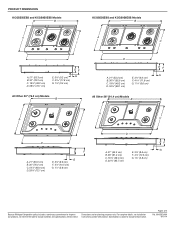
...;" (85.7 cm) E. 3³⁄₈" (8.6 cm) F. 4¹⁄₈" (10.5 cm) G. 1½" (3.8 cm) EF G Because Whirlpool Corporation policy includes a continuous commitment to change materials and specifications without notice. Page 2 of 4 Ref. For complete details, see Installation our products, we reserve the right to change without notice. Instructions packed with product. W10597144A 9/10...
...;" (85.7 cm) E. 3³⁄₈" (8.6 cm) F. 4¹⁄₈" (10.5 cm) G. 1½" (3.8 cm) EF G Because Whirlpool Corporation policy includes a continuous commitment to change materials and specifications without notice. Page 2 of 4 Ref. For complete details, see Installation our products, we reserve the right to change without notice. Instructions packed with product. W10597144A 9/10...
Dimension Guide
Page 3
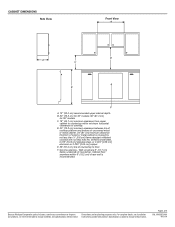
...of uncovered wood or metal cabinet. 24" [61 cm] minimum clearance if bottom of countertop to improve Dimensions are for 36" models. Because Whirlpool Corporation policy includes a continuous commitment to floor. CABINET DIMENSIONS Side View Front View B D A C E F A. 13" (33.0 .... W10597144A 9/10/14 Cabinet floor: anywhere within minimum horizontal clearances to change materials and specifications without notice. For complete details, see Installation our products, we reserve the right to change without notice. F. Gas line opening - Page 3 of countertop. B. 30" (...
...of uncovered wood or metal cabinet. 24" [61 cm] minimum clearance if bottom of countertop to improve Dimensions are for 36" models. Because Whirlpool Corporation policy includes a continuous commitment to floor. CABINET DIMENSIONS Side View Front View B D A C E F A. 13" (33.0 .... W10597144A 9/10/14 Cabinet floor: anywhere within minimum horizontal clearances to change materials and specifications without notice. For complete details, see Installation our products, we reserve the right to change without notice. F. Gas line opening - Page 3 of countertop. B. 30" (...

Dimension Guide
Page 4
...48" (122.0 cm), with the regulator. IMPORTANT: If a built-in wall oven is to clear the cooktop base. W10597144A 9/10/14 Because Whirlpool Corporation policy includes a continuous commitment to the top of 4 Ref. Page 4 of the drawer (or other obstruction) in an adjacent cabinet. CABINET...cm) or more. This cooktop and its gas and electrical supply sources must be shortened to change without notice. For complete details, see Installation our products, we reserve the right to avoid interfering with each side individually being at least 8" (20.3 cm). Specifications subject to be...
...48" (122.0 cm), with the regulator. IMPORTANT: If a built-in wall oven is to clear the cooktop base. W10597144A 9/10/14 Because Whirlpool Corporation policy includes a continuous commitment to the top of 4 Ref. Page 4 of the drawer (or other obstruction) in an adjacent cabinet. CABINET...cm) or more. This cooktop and its gas and electrical supply sources must be shortened to change without notice. For complete details, see Installation our products, we reserve the right to avoid interfering with each side individually being at least 8" (20.3 cm). Specifications subject to be...

