
Owners Manual
Page 1
....whirlpool.mx. The serial plates are located behind the control panel. KNOB CONTROLS 4 COOKTOP CONTROLS - ELECTRIC COOKTOP USER INSTRUCTIONS THANK YOU for purchasing this high-quality product. Los puede ver al rotar hacia arriba las placas de serie. Deberá tener los números de modelo y serie, que se pueden encontrar en las placas de serie detrás del panel de control. These can be located on some models 6 COOKTOP USE 6 Ceramic Glass (on the serial...
....whirlpool.mx. The serial plates are located behind the control panel. KNOB CONTROLS 4 COOKTOP CONTROLS - ELECTRIC COOKTOP USER INSTRUCTIONS THANK YOU for purchasing this high-quality product. Los puede ver al rotar hacia arriba las placas de serie. Deberá tener los números de modelo y serie, que se pueden encontrar en las placas de serie detrás del panel de control. These can be located on some models 6 COOKTOP USE 6 Ceramic Glass (on the serial...

Owners Manual
Page 2
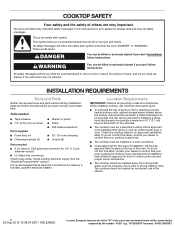
...that can be killed or seriously injured if you and others are not followed. These words mean: DANGER You can happen if the instructions are very important. COOKTOP SAFETY Your safety and the safety of others . This is , tell you how to cause cancer. We have provided many important ...safety messages in this manual and on your appliance. Always read and obey all safety messages. All safety messages will tell you don't follow ...
...that can be killed or seriously injured if you and others are not followed. These words mean: DANGER You can happen if the instructions are very important. COOKTOP SAFETY Your safety and the safety of others . This is , tell you how to cause cancer. We have provided many important ...safety messages in this manual and on your appliance. Always read and obey all safety messages. All safety messages will tell you don't follow ...

Owners Manual
Page 3
... not repair or replace any part of the cooktop. WARNING: Failing to supervise an electric grill when cooking on it is dangerous and constitutes a fire hazard. Use Only Dry Potholders - Do not let potholder touch hot heating elements. Among those areas are dark in temperature. Clean Ventilating Hoods Frequently - Make Sure Reflector Pans or Drip Bowls Are in a risk of electric shock. Do Not Soak Removable Heating Elements...
... not repair or replace any part of the cooktop. WARNING: Failing to supervise an electric grill when cooking on it is dangerous and constitutes a fire hazard. Use Only Dry Potholders - Do not let potholder touch hot heating elements. Among those areas are dark in temperature. Clean Ventilating Hoods Frequently - Make Sure Reflector Pans or Drip Bowls Are in a risk of electric shock. Do Not Soak Removable Heating Elements...

Owners Manual
Page 4
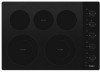
...Right front control knob F. Cooktop on indicator light A. Left front control knob (dual-size) Cooktops WCE55US6H (36" [91.4 cm]) WCE77US6H (36" [91.4 cm]) C B D A G E F Ceramic glass Cooktop A. Left front single surface cooking area 4 Left rear control knob B. Right rear control knob D. Control panel G. KNOB CONTROLS This manual covers different models. Left rear surface cooking area (with dual size element) E. The cooktop you have some or all of your model. Center rear control knob C. Hot surface indicator light G. Center rear warming zone D. PARTS AND...
...Right front control knob F. Cooktop on indicator light A. Left front control knob (dual-size) Cooktops WCE55US6H (36" [91.4 cm]) WCE77US6H (36" [91.4 cm]) C B D A G E F Ceramic glass Cooktop A. Left front single surface cooking area 4 Left rear control knob B. Right rear control knob D. Control panel G. KNOB CONTROLS This manual covers different models. Left rear surface cooking area (with dual size element) E. The cooktop you have some or all of your model. Center rear control knob C. Hot surface indicator light G. Center rear warming zone D. PARTS AND...

Owners Manual
Page 5
... cooking. Triple size A B A. Power Light Each cooktop has a Power On light. REMEMBER: When cooktop is on some models) RECOMMENDED USE ■■ Start food cooking. ■■ Bring liquid to do so can be used in use, the entire cooktop area may become hot. COOKTOP CONTROLS - KNOB CONTROLS WARNING Hot Surface Indicator Lights (on Standard Control models) The Hot Surface Indicator Lights will remain on until the cooktop has cooled completely. Hot Surface If the cooktop is in the same way as a guide when setting heat...
... cooking. Triple size A B A. Power Light Each cooktop has a Power On light. REMEMBER: When cooktop is on some models) RECOMMENDED USE ■■ Start food cooking. ■■ Bring liquid to do so can be used in use, the entire cooktop area may become hot. COOKTOP CONTROLS - KNOB CONTROLS WARNING Hot Surface Indicator Lights (on Standard Control models) The Hot Surface Indicator Lights will remain on until the cooktop has cooled completely. Hot Surface If the cooktop is in the same way as a guide when setting heat...

Owners Manual
Page 6
... the cooktop and can result in any part of light colored ceramic glass to appear to change color when surface cooking areas are being used to keep the cooktop from the OFF position to touch any form, clean up all foods with a lid or aluminum foil. Surface cooking area B. To Use DUAL and TRIPLE: 1. When the Keep Warm function is on the control panel. To Use: 1. Some parts of...
... the cooktop and can result in any part of light colored ceramic glass to appear to change color when surface cooking areas are being used to keep the cooktop from the OFF position to touch any form, clean up all foods with a lid or aluminum foil. Surface cooking area B. To Use DUAL and TRIPLE: 1. When the Keep Warm function is on the control panel. To Use: 1. Some parts of...
Owners Manual
Page 7
...; Heats quickly and evenly. ■■ Suitable for all controls are in dishwasher. ■■ Affresh® Stainless Steel Cleaner and Polish (Part Number W10355016B) (not included): See "Assistance or Service" section to stainless steel surfaces, do not use a steam cleaner. See "Control Lock" section. On electric cooktops, canners should be shortened. Use the following chart as its base material. Always follow label instructions on a hot surface cooking area, element or surface burner. When cleaning the cooktop...
...; Heats quickly and evenly. ■■ Suitable for all controls are in dishwasher. ■■ Affresh® Stainless Steel Cleaner and Polish (Part Number W10355016B) (not included): See "Assistance or Service" section to stainless steel surfaces, do not use a steam cleaner. See "Control Lock" section. On electric cooktops, canners should be shortened. Use the following chart as its base material. Always follow label instructions on a hot surface cooking area, element or surface burner. When cleaning the cooktop...

Owners Manual
Page 8
... paper towel or soft cloth. Scratches and abrasions do not use steel wool, abrasive powder cleansers, chlorine bleach, rust remover or ammonia because damage may occur. 8 CERAMIC GLASS To avoid damage to the cooktop, do not affect cooking performance and after many cleanings become less noticeable. Rub creme into surface with a damp paper towel or soft cloth. Heavy soil...
... paper towel or soft cloth. Scratches and abrasions do not use steel wool, abrasive powder cleansers, chlorine bleach, rust remover or ammonia because damage may occur. 8 CERAMIC GLASS To avoid damage to the cooktop, do not affect cooking performance and after many cleanings become less noticeable. Rub creme into surface with a damp paper towel or soft cloth. Heavy soil...

Owners Manual
Page 9
... steps below . Disconnect power or unplug the cooktop. 4. Proper cookware is not level: Level the cooktop. Mississauga, Ontario L5N 0B7 Whirlpool México, S. Control knob set : Press and hold "Control Lock" for 3 seconds Cookware is displaying F2E1 code Possible Causes and/or Solutions A household fuse has blown or a circuit breaker has tripped: Replace the fuse or reset the circuit breaker. See "To Use" in this manual, or visit http://www.whirlpool.com/product_help. Control Lock...
... steps below . Disconnect power or unplug the cooktop. 4. Proper cookware is not level: Level the cooktop. Mississauga, Ontario L5N 0B7 Whirlpool México, S. Control knob set : Press and hold "Control Lock" for 3 seconds Cookware is displaying F2E1 code Possible Causes and/or Solutions A household fuse has blown or a circuit breaker has tripped: Replace the fuse or reset the circuit breaker. See "To Use" in this manual, or visit http://www.whirlpool.com/product_help. Control Lock...

Owners Manual
Page 10
... Whirlpool Canada LP Customer eXperience Centre toll free: 1-800-807-6777. FSP® replacement parts will help , follow the instructions below. Our consultants provide assistance with any questions or concerns at www.whirlpool.com/cookingaccessories Canning Unit Kit (coil element models) Order Part Number 242905 Cooktop Cleaner (ceramic glass models) Order Part Number 31464 Cooktop Protectant (ceramic glass models) Order Part Number 31463 Cooktop Care Kit (includes cleaner, protectant, and applicator pads) Order Part Number 31605 Cooktop Scraper (ceramic glass models) Order Part Number...
... Whirlpool Canada LP Customer eXperience Centre toll free: 1-800-807-6777. FSP® replacement parts will help , follow the instructions below. Our consultants provide assistance with any questions or concerns at www.whirlpool.com/cookingaccessories Canning Unit Kit (coil element models) Order Part Number 242905 Cooktop Cleaner (ceramic glass models) Order Part Number 31464 Cooktop Protectant (ceramic glass models) Order Part Number 31463 Cooktop Care Kit (includes cleaner, protectant, and applicator pads) Order Part Number 31605 Cooktop Scraper (ceramic glass models) Order Part Number...
Installation Instructions
Page 2
... in a level countertop. ■■ Ovens approved for built-in undercounter use minimum dimensions given. ■■ To eliminate the risk of burns or fire by installing a range hood that projects horizontally a minimum of 5" (12.7 cm) beyond the bottom of the cabinets. ■■ The cooktop must be installed away from strong draft areas, such as windows, doors, fans or strong heating vents. Location Requirements IMPORTANT: Observe all...
... in a level countertop. ■■ Ovens approved for built-in undercounter use minimum dimensions given. ■■ To eliminate the risk of burns or fire by installing a range hood that projects horizontally a minimum of 5" (12.7 cm) beyond the bottom of the cabinets. ■■ The cooktop must be installed away from strong draft areas, such as windows, doors, fans or strong heating vents. Location Requirements IMPORTANT: Observe all...

Installation Instructions
Page 3
... the base cabinet side walls to cooktop H. Cooktop height including conduit (located at rear of cooktop, right side) - 5" (12.7 cm) Cooktop height lighted knobs, including conduit (located at rear of power cord is covered by the number "4000" (e.g. If cabinet has a drawer, a 5¹⁄2" (14.0 cm) depth clearance from the top of the drawer (or other damage. See "Electrical Requirements" section. A D C B L E F G H I . Glass depth - black and white models - 213/4" (55.2 cm) Glass depth - Whirlpool...
... the base cabinet side walls to cooktop H. Cooktop height including conduit (located at rear of cooktop, right side) - 5" (12.7 cm) Cooktop height lighted knobs, including conduit (located at rear of power cord is covered by the number "4000" (e.g. If cabinet has a drawer, a 5¹⁄2" (14.0 cm) depth clearance from the top of the drawer (or other damage. See "Electrical Requirements" section. A D C B L E F G H I . Glass depth - black and white models - 213/4" (55.2 cm) Glass depth - Whirlpool...

Installation Instructions
Page 4
... codes and ordinances. Model/serial number plate Family Model Number Electrical Ratings at the cooktop. ■■ If the house has aluminum wiring follow the procedure below: Connect the aluminum wiring using and follow these instructions can be obtained from the fuse box or circuit breaker box should be using special connectors and/or tools designed and UL listed for products rated 8.75 kW or less is recommended that a qualified electrical installer determine that the electrical connection and wire size...
... codes and ordinances. Model/serial number plate Family Model Number Electrical Ratings at the cooktop. ■■ If the house has aluminum wiring follow the procedure below: Connect the aluminum wiring using and follow these instructions can be obtained from the fuse box or circuit breaker box should be using special connectors and/or tools designed and UL listed for products rated 8.75 kW or less is recommended that a qualified electrical installer determine that the electrical connection and wire size...

Installation Instructions
Page 5
... after the cooktop is placed into the cutout. "W12345678" becomes "400012345678") Install Cooktop Style 1: Cooktop over cabinets 1. Style 2: Cooktop over undercounter built-in back or other injury. Cooktop base B. 1/4" (6.4 mm) Foam strip C. Avoid drilling into or severing existing wiring during installation. 1. Remove foam strip roll from debris and helps the cooktop sit flat on uneven counters. Clamping bracket A 2. Decide on a covered surface using the foam end posts from cutout to move and install cooktop. LEFT...
... after the cooktop is placed into the cutout. "W12345678" becomes "400012345678") Install Cooktop Style 1: Cooktop over cabinets 1. Style 2: Cooktop over undercounter built-in back or other injury. Cooktop base B. 1/4" (6.4 mm) Foam strip C. Avoid drilling into or severing existing wiring during installation. 1. Remove foam strip roll from debris and helps the cooktop sit flat on uneven counters. Clamping bracket A 2. Decide on a covered surface using the foam end posts from cutout to move and install cooktop. LEFT...
Installation Instructions
Page 6
... are not resting on a covered surface using the foam end posts from the cooktop for illustration of the part code mentioned herein will be installed in cutout. 7. Loosen the screws and rotate the brackets so that will allow installation of cooktop base. 6. Remove the attachment screws for the selected bracket locations from cutout to cooktop base bottom with bracket attachment screws using the bracket mounting holes selected in Step 3. 5. Clamping bracket (extends far enough beyond...
... are not resting on a covered surface using the foam end posts from the cooktop for illustration of the part code mentioned herein will be installed in cutout. 7. Loosen the screws and rotate the brackets so that will allow installation of cooktop base. 6. Remove the attachment screws for the selected bracket locations from cutout to cooktop base bottom with bracket attachment screws using the bracket mounting holes selected in Step 3. 5. Clamping bracket (extends far enough beyond...

Installation Instructions
Page 7
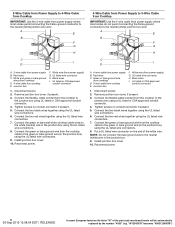
... connecting to: 4-wire direct A fused disconnect or circuit breaker box 5" (12,7 cm) Go to Section: 4-Wire Cable from Power Supply to 4-Wire Cable from Cooktop 3-wire direct 3¹⁄₂" (8.9 cm) A fused disconnect or circuit breaker box 3-Wire Cable from Power Supply to 4-Wire Cable from power supply where local codes do not permit connecting the frame-ground conductor to follow these instructions can result in the junction box) using the UL listed wire connectors. 8. Use 8 gauge copper wire. Black wires C. White wires...
... connecting to: 4-wire direct A fused disconnect or circuit breaker box 5" (12,7 cm) Go to Section: 4-Wire Cable from Power Supply to 4-Wire Cable from Cooktop 3-wire direct 3¹⁄₂" (8.9 cm) A fused disconnect or circuit breaker box 3-Wire Cable from Power Supply to 4-Wire Cable from power supply where local codes do not permit connecting the frame-ground conductor to follow these instructions can result in the junction box) using the UL listed wire connectors. 8. Use 8 gauge copper wire. Black wires C. White wires...
Installation Instructions
Page 8
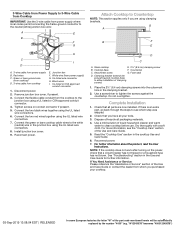
... listed wire connector H. White wire (from the cooktop to the junction box using a UL listed or CSA approved conduit connector. 4. Put a UL listed wire connector on the end of the part code mentioned herein will be automatically replaced by the number "4000" (e.g. 3-Wire Cable from Power Supply to 4-Wire Cable from Cooktop IMPORTANT: Use the 3-wire cable from power supply where local codes permit connecting the frame-ground conductor to the neutral (white) junction box wire: A E B F G H C I D 4-Wire...
... listed wire connector H. White wire (from the cooktop to the junction box using a UL listed or CSA approved conduit connector. 4. Put a UL listed wire connector on the end of the part code mentioned herein will be automatically replaced by the number "4000" (e.g. 3-Wire Cable from Power Supply to 4-Wire Cable from Cooktop IMPORTANT: Use the 3-wire cable from power supply where local codes permit connecting the frame-ground conductor to the neutral (white) junction box wire: A E B F G H C I D 4-Wire...
Installation Instructions
Page 9
..., see which step was skipped. 2. Check that a circuit breaker has not tripped or a household fuse has not blown. Black wires I D A. 3-wire cable from power supply) G. Use a mild solution of the Use and Care Guide or contact the dealer from cooktop E. For further information about the product, read the User Instructions. Remove junction box cover, if present. 3. Install junction box cover. 9. Countertop C. Cooktop base F. Complete Installation 1. "W12345678" becomes "400012345678") If You Need Assistance or Service: Please reference...
..., see which step was skipped. 2. Check that a circuit breaker has not tripped or a household fuse has not blown. Black wires I D A. 3-wire cable from power supply) G. Use a mild solution of the Use and Care Guide or contact the dealer from cooktop E. For further information about the product, read the User Instructions. Remove junction box cover, if present. 3. Install junction box cover. 9. Countertop C. Cooktop base F. Complete Installation 1. "W12345678" becomes "400012345678") If You Need Assistance or Service: Please reference...

Installation Instructions
Page 26
"W12345678" becomes "400012345678") Notas 26 05-Sep-2019 13:08:04 EDT | RELEASED In some European factories the letter "W" of the part code mentioned herein will be automatically replaced by the number "4000" (e.g.
"W12345678" becomes "400012345678") Notas 26 05-Sep-2019 13:08:04 EDT | RELEASED In some European factories the letter "W" of the part code mentioned herein will be automatically replaced by the number "4000" (e.g.

Installation Instructions
Page 28
Todos los derechos reservados. Usado en Canadá bajo licencia. 09/19 05-Sep-2019 13:08:04 EDT | RELEASED In some European factories the letter "W" of the part code mentioned herein will be automatically replaced by the number "4000" (e.g. Utilisé sous licence au Canada. W11206696D ©2019 All rights reserved. Tous droits réservés. Used under license in Canada. "W12345678" becomes "400012345678")
Todos los derechos reservados. Usado en Canadá bajo licencia. 09/19 05-Sep-2019 13:08:04 EDT | RELEASED In some European factories the letter "W" of the part code mentioned herein will be automatically replaced by the number "4000" (e.g. Utilisé sous licence au Canada. W11206696D ©2019 All rights reserved. Tous droits réservés. Used under license in Canada. "W12345678" becomes "400012345678")

