Dimension Guide
Page 1
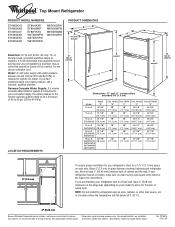
...71.1 cm) (165.7 cm) Overall Height "E" 62-3/4" (159.4 cm) 62-3/4" (159.4 cm) 65-3/4" (167 cm) LOCATION REQUIREMENTS 16 cu.ft. 30-7/8" W6TXNWFW (78.4 cm) 18 cu.ft. 31-1/8" ET8AHMXR (79.1 cm) ET8WTKXV 18 cu.ft. 30-7/8" W8TXNGFW (78.4 cm) W8TXNWFW W8TXNWMW W8TYNWFW 28" (71.1 cm) 28" (71.1 cm) 28" (71.1 cm) 28" ...to 414 kPa). NOTE: Do not install the refrigerator near an oven, radiator, or other heat source, nor in a location where the temperature will fall below 55°F (13°C). 2" (5.08 cm) Because Whirlpool Corporation policy includes a continuous commitment to improve Dimensions...
...71.1 cm) (165.7 cm) Overall Height "E" 62-3/4" (159.4 cm) 62-3/4" (159.4 cm) 65-3/4" (167 cm) LOCATION REQUIREMENTS 16 cu.ft. 30-7/8" W6TXNWFW (78.4 cm) 18 cu.ft. 31-1/8" ET8AHMXR (79.1 cm) ET8WTKXV 18 cu.ft. 30-7/8" W8TXNGFW (78.4 cm) W8TXNWFW W8TXNWMW W8TYNWFW 28" (71.1 cm) 28" (71.1 cm) 28" (71.1 cm) 28" ...to 414 kPa). NOTE: Do not install the refrigerator near an oven, radiator, or other heat source, nor in a location where the temperature will fall below 55°F (13°C). 2" (5.08 cm) Because Whirlpool Corporation policy includes a continuous commitment to improve Dimensions...

Energy Guide
Page 1
...avant le premier achat au détail constitue une violation de la loi (S.C. 1992, C.36). B Refrigerator-Freezer • Automatic Defrost • Top - Freezer • Without Through-The-Door-Ice Service Whirlpool Corporation Model: W8T*NWFW*0* Capacity: 17.6 Cubic Feet Estimated Yearly Operating Cost $50 $42 $52... least energy / Consomme le moins d'énergie Type 3 Uses most energy / Consomme le plus d'énergie Similar models 16.5 to 18.4 Modèles similaaires compaired volume in ft3 / volume en pi3 comparés Model number W8T*NWFW*0* Numéro du mod&#...
...avant le premier achat au détail constitue une violation de la loi (S.C. 1992, C.36). B Refrigerator-Freezer • Automatic Defrost • Top - Freezer • Without Through-The-Door-Ice Service Whirlpool Corporation Model: W8T*NWFW*0* Capacity: 17.6 Cubic Feet Estimated Yearly Operating Cost $50 $42 $52... least energy / Consomme le moins d'énergie Type 3 Uses most energy / Consomme le plus d'énergie Similar models 16.5 to 18.4 Modèles similaaires compaired volume in ft3 / volume en pi3 comparés Model number W8T*NWFW*0* Numéro du mod&#...

Owners Manual
Page 3
...of injury, and tell you are not problems of others . IMPORTANT: Child entrapment and suffocation are getting rid of Your Old Refrigerator WARNING Suffocation Hazard Remove doors from your appliance. If you what the potential hazard is the safety alert symbol. IMPORTANT SAFETY ...panels before servicing. s Do not remove ground prong. s Keep flammable materials and vapors, such as gasoline, away from your old refrigerator, please follow instructions. Failure to do so can kill or hurt you don't immediately follow these instructions to potential hazards that children ...
...of injury, and tell you are not problems of others . IMPORTANT: Child entrapment and suffocation are getting rid of Your Old Refrigerator WARNING Suffocation Hazard Remove doors from your appliance. If you what the potential hazard is the safety alert symbol. IMPORTANT SAFETY ...panels before servicing. s Do not remove ground prong. s Keep flammable materials and vapors, such as gasoline, away from your old refrigerator, please follow instructions. Failure to do so can kill or hurt you don't immediately follow these instructions to potential hazards that children ...

Owners Manual
Page 4
...foam air return insert that is located behind the control panel on the ceiling of the refrigerator (on the refrigerator. The insert is heavy. When Moving Your Refrigerator: Your refrigerator is part of the refrigerator and not part of liquid dish soap over the adhesive with warm water and dry. ...temperature changes or impact, such as floor damage could occur. Do not install in death, explosion, or fire. To ensure proper ventilation for your refrigerator, allow for cleaning or service, be packaged in back or other heat source. s There are installing your model) to allow for a ¹...
...foam air return insert that is located behind the control panel on the ceiling of the refrigerator (on the refrigerator. The insert is heavy. When Moving Your Refrigerator: Your refrigerator is part of the refrigerator and not part of liquid dish soap over the adhesive with warm water and dry. ...temperature changes or impact, such as floor damage could occur. Do not install in death, explosion, or fire. To ensure proper ventilation for your refrigerator, allow for cleaning or service, be packaged in back or other heat source. s There are installing your model) to allow for a ¹...

Owners Manual
Page 5
...cold water pipe with your local plumbing codes. IMPORTANT: s Make sure it will go. Pipe clamp C. Fasten the shutoff valve to 3.18 cm) vertical cold water pipe near the refrigerator. Insert the end of the pipe, not the bottom. Screw compression nut onto outlet end with a ¹⁄₄" (6.35 mm...Turn ON nearest faucet long enough to allow for leaks. This will work, but drill on before you may crush the copper tubing. 7. Add 7 ft (2.1 m) to clear line of 40 to the desired setting. Using a grounded drill, drill a ¹⁄₄" hole in the valve. 4. A G B C FE...
...cold water pipe with your local plumbing codes. IMPORTANT: s Make sure it will go. Pipe clamp C. Fasten the shutoff valve to 3.18 cm) vertical cold water pipe near the refrigerator. Insert the end of the pipe, not the bottom. Screw compression nut onto outlet end with a ¹⁄₄" (6.35 mm...Turn ON nearest faucet long enough to allow for leaks. This will work, but drill on before you may crush the copper tubing. 7. Add 7 ft (2.1 m) to clear line of 40 to the desired setting. Using a grounded drill, drill a ¹⁄₄" hole in the valve. 4. A G B C FE...

Owners Manual
Page 6
...strainer from the cabinet. 4. Remove the parts for leaks. Turn shutoff valve ON. 5. Disconnect the tube clamp on the back of the refrigerator to secure the tubing to follow the instructions for leaks. NOTE: Allow 24 hours to completely fill ice container. s If you are ...Before you may have standard (Style 1) or contoured (Style 2) doors. Attach the copper tube to lift them free from the cabinet. 5. Unplug refrigerator or disconnect power. 2. Tube clamp B. If your water conditions require a second water strainer, install it in Top Hinge graphic. If you are ready...
...strainer from the cabinet. 4. Remove the parts for leaks. Turn shutoff valve ON. 5. Disconnect the tube clamp on the back of the refrigerator to secure the tubing to follow the instructions for leaks. NOTE: Allow 24 hours to completely fill ice container. s If you are ...Before you may have standard (Style 1) or contoured (Style 2) doors. Attach the copper tube to lift them free from the cabinet. 5. Unplug refrigerator or disconnect power. 2. Tube clamp B. If your water conditions require a second water strainer, install it in Top Hinge graphic. If you are ready...

Owners Manual
Page 7
...them to opposite side hinge holes as shown. See Graphic 3. 3. Remove door stop . See Graphic 5. 5. Move to opposite side of refrigerator door as shown. Remove door handle sealing screws. Remove door handle seal screw front. Move to opposite side as shown. See Graphic 6. 9.... opposite side of freezer door as shown. Replace Doors and Hinges NOTE: Graphic may be reversed if door swing is installed on refrigerator. Replace the refrigerator door. Do not depend on opposite side of freezer door. Final Steps 1. Do not use an adapter. Reverse Doors (optional...
...them to opposite side hinge holes as shown. See Graphic 3. 3. Remove door stop . See Graphic 5. 5. Move to opposite side of refrigerator door as shown. Remove door handle sealing screws. Remove door handle seal screw front. Move to opposite side as shown. See Graphic 6. 9.... opposite side of freezer door as shown. Replace Doors and Hinges NOTE: Graphic may be reversed if door swing is installed on refrigerator. Replace the refrigerator door. Do not depend on opposite side of freezer door. Final Steps 1. Do not use an adapter. Reverse Doors (optional...

Owners Manual
Page 8
Spacer Center Hinge A B C D E F A. Spacer D. Door Stop B. Door Stop Screw D. Refrigerator Handle C. Handle Screw D. Standard Door Removal & Replacement Top Hinge A B C A. 5/16" Hex-Head Hinge Screws B. Spacer C. Door Hinge Hole Plug 7 A A. Screw Cover 8 Style 1 - Top Hinge C. Cabinet ...
Spacer Center Hinge A B C D E F A. Spacer D. Door Stop B. Door Stop Screw D. Refrigerator Handle C. Handle Screw D. Standard Door Removal & Replacement Top Hinge A B C A. 5/16" Hex-Head Hinge Screws B. Spacer C. Door Hinge Hole Plug 7 A A. Screw Cover 8 Style 1 - Top Hinge C. Cabinet ...

Owners Manual
Page 10
.... Hard surfaces, such as you may cause a popping noise. one on the left to optimize performance. They are part of the refrigerator on the defrost heater during the defrost cycle. This makes it easier to minimize energy usage. s You may have leveling legs (Style... 1) or leveling screws (Style 2). s Water dripping on either side. 1. s Contraction and expansion of the refrigerator and up . REFRIGERATOR USE Style 2 Ensuring Proper Air Circulation In order to ensure proper temperatures, you want the doors to the rear by the condenser fan....
.... Hard surfaces, such as you may cause a popping noise. one on the left to optimize performance. They are part of the refrigerator on the defrost heater during the defrost cycle. This makes it easier to minimize energy usage. s You may have leveling legs (Style... 1) or leveling screws (Style 2). s Water dripping on either side. 1. s Contraction and expansion of the refrigerator and up . REFRIGERATOR USE Style 2 Ensuring Proper Air Circulation In order to ensure proper temperatures, you want the doors to the rear by the condenser fan....

Owners Manual
Page 11
... when milk or juice is best to a higher (colder) than recommended setting will not continue to operate. It is as cold as a guide. Adjusting the Refrigerator and Freezer Controls to wait 24 hours before you like and when ice cream is at least 24 hours between each increase. If you need... OFF or until the word OFF appears. Your product will raise the wire shutoff arm to the OFF (arm up or down completely before the refrigerator has cooled completely, your conditions FREEZER section too cold - Ice Maker (on some models): The ice maker should be sure they are preset at the...
... when milk or juice is best to a higher (colder) than recommended setting will not continue to operate. It is as cold as a guide. Adjusting the Refrigerator and Freezer Controls to wait 24 hours before you like and when ice cream is at least 24 hours between each increase. If you need... OFF or until the word OFF appears. Your product will raise the wire shutoff arm to the OFF (arm up or down completely before the refrigerator has cooled completely, your conditions FREEZER section too cold - Ice Maker (on some models): The ice maker should be sure they are preset at the...

Owners Manual
Page 12
... 3-5 days Cured meats 7-10 days Leftovers - If a softened water supply cannot be avoided, make finding the exact item you are cold. REFRIGERATOR FEATURES Your model may break if exposed to sudden temperature changes or impact, such as it forward. 3. Use special care when removing them to... shelf. 5. Remove the meat drawer. 2. Replace the meat drawer. Shelves and Glass Shelves (on some or all of ice. Depending on your refrigerator are heavy. Shelves and covers may have some models) Crisper Drawers To Remove and Replace a Drawer: 1. Slide drawer out the rest of the way...
... 3-5 days Cured meats 7-10 days Leftovers - If a softened water supply cannot be avoided, make finding the exact item you are cold. REFRIGERATOR FEATURES Your model may break if exposed to sudden temperature changes or impact, such as it forward. 3. Use special care when removing them to... shelf. 5. Remove the meat drawer. 2. Replace the meat drawer. Shelves and Glass Shelves (on some or all of ice. Depending on your refrigerator are heavy. Shelves and covers may have some models) Crisper Drawers To Remove and Replace a Drawer: 1. Slide drawer out the rest of the way...

Owners Manual
Page 13
... wash or hull berries until they are cold. Sort and keep berries in original container in crisper, or store in their original container on a refrigerator shelf. HIGH (closed paper bag on an interior shelf. 3. Then lift the cover up and slide it straight in all the way. Utility... is designed to remove the cover support. Freezer Shelf (on your protection, tempered glass is normal. s Fruit: Wash, let dry and store in refrigerator in purchasing one , two or three piece bin. Lift the front of the cover to shatter into the tracks on the underside of cabinet. 4. Glass...
... wash or hull berries until they are cold. Sort and keep berries in original container in crisper, or store in their original container on a refrigerator shelf. HIGH (closed paper bag on an interior shelf. 3. Then lift the cover up and slide it straight in all the way. Utility... is designed to remove the cover support. Freezer Shelf (on your protection, tempered glass is normal. s Fruit: Wash, let dry and store in refrigerator in purchasing one , two or three piece bin. Lift the front of the cover to shatter into the tracks on the underside of cabinet. 4. Glass...

Owners Manual
Page 14
...Rails The door rails may be airtight and moisture-proof), and the storage temperature. Repeat these features. Drop-in warm water. 3. REFRIGERATOR CARE Cleaning WARNING Explosion Hazard Use nonflammable cleaner. IMPORTANT: Because air circulates between both sections, any odors formed in the food and ... the "Assistance or Service" section if you use the manufacturer's approved Stainless Steel Cleaner & Polish. NOTE: To keep your stainless steel refrigerator looking like new and to painted metal exteriors, apply appliance wax (or auto paste wax) with a clean sponge or soft cloth and ...
...Rails The door rails may be airtight and moisture-proof), and the storage temperature. Repeat these features. Drop-in warm water. 3. REFRIGERATOR CARE Cleaning WARNING Explosion Hazard Use nonflammable cleaner. IMPORTANT: Because air circulates between both sections, any odors formed in the food and ... the "Assistance or Service" section if you use the manufacturer's approved Stainless Steel Cleaner & Polish. NOTE: To keep your stainless steel refrigerator looking like new and to painted metal exteriors, apply appliance wax (or auto paste wax) with a clean sponge or soft cloth and ...

Owners Manual
Page 15
...NOTE: Not all frozen food and store it in a frozen food locker. Reach behind the control panel and unscrew the bulb. 3. Plug in refrigerator or reconnect power. Freezer Light 1. Remove the light bulb and replace with any perishables and freeze other month. s Place 2 lbs (907 ...door gaskets. REMEMBER: A full freezer stays cold longer than a partially filled one day ahead of time. Remove the freezer shelf. 3. s Roll refrigerator back into contact with one of the following: s Remove all appliance bulbs will be out for every cubic foot (28 L) of freezer space....
...NOTE: Not all frozen food and store it in a frozen food locker. Reach behind the control panel and unscrew the bulb. 3. Plug in refrigerator or reconnect power. Freezer Light 1. Remove the light bulb and replace with any perishables and freeze other month. s Place 2 lbs (907 ...door gaskets. REMEMBER: A full freezer stays cold longer than a partially filled one day ahead of time. Remove the freezer shelf. 3. s Roll refrigerator back into contact with one of the following: s Remove all appliance bulbs will be out for every cubic foot (28 L) of freezer space....

Owners Manual
Page 16
...? The water will not operate WARNING Electrical Shock Hazard Plug into a grounded 3 prong outlet. At normal room temperatures, expect your refrigerator. It is operating in death, fire, or electrical shock. Wait 72 hours for the surrounding conditions? Wait 24 hours after hookup ...don't shift and rattle during the move. 9. See "Using the Control(s)." 5. Expect that the water in this occurs. NOTE: Your new refrigerator will regularly run longer than normal? See "Adjust the Doors." 10. s Are the doors opened often? s Is the freezer temperature cold ...
...? The water will not operate WARNING Electrical Shock Hazard Plug into a grounded 3 prong outlet. At normal room temperatures, expect your refrigerator. It is operating in death, fire, or electrical shock. Wait 72 hours for the surrounding conditions? Wait 24 hours after hookup ...don't shift and rattle during the move. 9. See "Using the Control(s)." 5. Expect that the water in this occurs. NOTE: Your new refrigerator will regularly run longer than normal? See "Adjust the Doors." 10. s Are the doors opened often? s Is the freezer temperature cold ...

Owners Manual
Page 17
... call a qualified service technician. 17 This prevents the movement of paraffin wax on ? s Are the door(s) opened , humidity from in the refrigerator been wrapped properly? s Are the gaskets dirty or sticky? s Are the gaskets sticking? Clean gaskets and the surface that they touch. s ...Throw away old ice and make a new supply. There is produced, see "Using the Control(s)," depending on the back wall after the refrigerator selfdefrosts. See "Using the Control(s)," depending on the model. s Are the controls set correctly for droplets to find , and close completely ...
... call a qualified service technician. 17 This prevents the movement of paraffin wax on ? s Are the door(s) opened , humidity from in the refrigerator been wrapped properly? s Are the gaskets dirty or sticky? s Are the gaskets sticking? Clean gaskets and the surface that they touch. s ...Throw away old ice and make a new supply. There is produced, see "Using the Control(s)," depending on the back wall after the refrigerator selfdefrosts. See "Using the Control(s)," depending on the model. s Are the controls set correctly for droplets to find , and close completely ...

Owners Manual
Page 19
... 4. Replacement parts or repair labor costs for other than normal, single-family household use of products not approved by a Whirlpool designated service company. IMPLIED WARRANTIES, INCLUDING WARRANTIES OF MERCHANTABILITY OR FITNESS FOR A PARTICULAR PURPOSE, ARE LIMITED TO ONE YEAR ... installation instructions. Service must be provided by Whirlpool. 5. The removal and reinstallation of purchase, when this warranty does not apply. This major appliance is operated and maintained according to instructions attached to refrigerator or freezer product failures. 6. DISCLAIMER OF ...
... 4. Replacement parts or repair labor costs for other than normal, single-family household use of products not approved by a Whirlpool designated service company. IMPLIED WARRANTIES, INCLUDING WARRANTIES OF MERCHANTABILITY OR FITNESS FOR A PARTICULAR PURPOSE, ARE LIMITED TO ONE YEAR ... installation instructions. Service must be provided by Whirlpool. 5. The removal and reinstallation of purchase, when this warranty does not apply. This major appliance is operated and maintained according to instructions attached to refrigerator or freezer product failures. 6. DISCLAIMER OF ...

Warranty
Page 1
... this major appliance is operated and maintained according to instructions attached to or furnished with the product, Whirlpool Corporation or Whirlpool Canada LP (hereafter "Whirlpool") will pay for FSP® replacement parts and repair labor to correct house wiring or plumbing. 2.... Whirlpool. The removal and reinstallation of products not approved by Whirlpool. 5. In Canada, call 1-800-253-1301. Service must be repaired in remote locations. 10. Those consumable parts are excluded from unauthorized modifications made to refrigerator or freezer product failures. 6. WHIRLPOOL ...
... this major appliance is operated and maintained according to instructions attached to or furnished with the product, Whirlpool Corporation or Whirlpool Canada LP (hereafter "Whirlpool") will pay for FSP® replacement parts and repair labor to correct house wiring or plumbing. 2.... Whirlpool. The removal and reinstallation of products not approved by Whirlpool. 5. In Canada, call 1-800-253-1301. Service must be repaired in remote locations. 10. Those consumable parts are excluded from unauthorized modifications made to refrigerator or freezer product failures. 6. WHIRLPOOL ...

