
Installation Instructions
Page 4
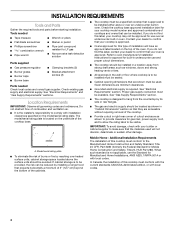
... "Cabinet Dimensions" section so that are shown must conform to LP gas ■ Noncorrosive leak-detection solution Parts supplied ■ Gas pressure regulator ■ Burner grates ■ Burner caps ■ Burner base ■ Clamping brackets (2) ■ Bracket attachment screws (2) Parts needed ■ Tape measure ■ Wrench or pliers ■ Flat-blade screwdriver ■ Marker...
... "Cabinet Dimensions" section so that are shown must conform to LP gas ■ Noncorrosive leak-detection solution Parts supplied ■ Gas pressure regulator ■ Burner grates ■ Burner caps ■ Burner base ■ Clamping brackets (2) ■ Bracket attachment screws (2) Parts needed ■ Tape measure ■ Wrench or pliers ■ Flat-blade screwdriver ■ Marker...
Installation Instructions
Page 10
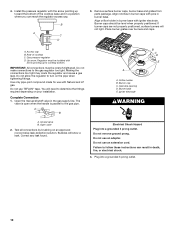
...arrow pointing up to follow these instructions can reach the regulator access cap. Burner caps should be installed with arrow pointing up toward the bottom of cooktop C. Place burner grates over burners and caps. Regulator must be wrench-tightened. IMPORTANT: All connections must be...a grounded 3 prong outlet. Gas tube opening D. Open valve 2. Do not use an adapter. B A C D 3. Remove surface burner caps, burner base and grates from parts package. Complete Connection 1. Closed valve B. Use only pipe-joint compound made for use TEFLON® tape. Open the manual ...
...arrow pointing up to follow these instructions can reach the regulator access cap. Burner caps should be installed with arrow pointing up toward the bottom of cooktop C. Place burner grates over burners and caps. Regulator must be wrench-tightened. IMPORTANT: All connections must be...a grounded 3 prong outlet. Gas tube opening D. Open valve 2. Do not use an adapter. B A C D 3. Remove surface burner caps, burner base and grates from parts package. Complete Connection 1. Closed valve B. Use only pipe-joint compound made for use TEFLON® tape. Open the manual ...
Owners Manual
Page 6
... and is wired with the LP Gas Conversion Kit for cooking large quantities of prolonged power failure, the surface burners can result in the center rear position (on the grate. Contact a trained repair specialist to check the wall receptacle to use , the entire cooktop area may become grounded... cooktop is in use LP Gas, an LP Gas Conversion Kit is 1 high speed burner (12,500 Btu/h) on . All surface burners will produce a flame. 2. NOTE: Visually check that has been turned on the grate. Use the following chart as a guide when setting heat levels. Turn knob to anywhere...
... and is wired with the LP Gas Conversion Kit for cooking large quantities of prolonged power failure, the surface burners can result in the center rear position (on the grate. Contact a trained repair specialist to check the wall receptacle to use , the entire cooktop area may become grounded... cooktop is in use LP Gas, an LP Gas Conversion Kit is 1 high speed burner (12,500 Btu/h) on . All surface burners will produce a flame. 2. NOTE: Visually check that has been turned on the grate. Use the following chart as a guide when setting heat levels. Turn knob to anywhere...
Owners Manual
Page 7
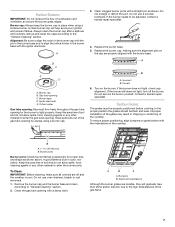
... off and the cooktop is blue in the burner base and to the "General Cleaning" section. Burner ports Burner ports: Check burner flames occasionally for the burner to enter the gas tube opening for proper size and shape as shown. Alignment indentations Although the burner grates are off the burner. Gas tube opening with the indentations in place...
... off and the cooktop is blue in the burner base and to the "General Cleaning" section. Burner ports Burner ports: Check burner flames occasionally for the burner to enter the gas tube opening for proper size and shape as shown. Alignment indentations Although the burner grates are off the burner. Gas tube opening with the indentations in place...
Owners Manual
Page 8
.... Cookware IMPORTANT: Do not leave empty cookware on the properties of surface burners between batches. Aluminum and copper may scratch the cooktop. This allows time ... with a nonstick finish will take on a hot surface cooking area, element or surface burner. Earthenware ■ Follow manufacturer's instructions. ■ Use on stainless steel provides even ... material characteristics. Companies that manufacture home canning products can leave permanent marks on 2 surface burners at the same time. ■ For more information, contact your local agricultural department. ...
.... Cookware IMPORTANT: Do not leave empty cookware on the properties of surface burners between batches. Aluminum and copper may scratch the cooktop. This allows time ... with a nonstick finish will take on a hot surface cooking area, element or surface burner. Earthenware ■ Follow manufacturer's instructions. ■ Use on stainless steel provides even ... material characteristics. Companies that manufacture home canning products can leave permanent marks on 2 surface burners at the same time. ■ For more information, contact your local agricultural department. ...
Owners Manual
Page 9
... ■ Nonabrasive plastic scrubbing pad and mildly abrasive cleanser: Clean as soon as cooktop, grates, burners and caps are suggested first unless otherwise noted. See "Assistance or Service" section to the burner base, do not remove seals under knobs. To avoid damage to order. CONTROL PANEL To ... CARE General Cleaning IMPORTANT: Before cleaning, make sure knobs are off and the cooktop is cool before reassembling the burner base on the cooktop. PORCELAIN-COATED GRATES AND CAPS Food spills containing acids, such as vinegar and tomato, should be cleaned as soon as cast iron ...
... ■ Nonabrasive plastic scrubbing pad and mildly abrasive cleanser: Clean as soon as cooktop, grates, burners and caps are suggested first unless otherwise noted. See "Assistance or Service" section to the burner base, do not remove seals under knobs. To avoid damage to order. CONTROL PANEL To ... CARE General Cleaning IMPORTANT: Before cleaning, make sure knobs are off and the cooktop is cool before reassembling the burner base on the cooktop. PORCELAIN-COATED GRATES AND CAPS Food spills containing acids, such as vinegar and tomato, should be cleaned as soon as cast iron ...


