
Owners Manual
Page 2
...; Feature 11 COOKTOP USE 11 Ceramic Glass 11 Home Canning 12 Cookware 12 COOKTOP CARE 13 General Cleaning 13 TROUBLESHOOTING 14 ASSISTANCE OR SERVICE 15 In the U.S.A 15 Accessories 15 In Canada 15 WARRANTY 16 TABLE DES MATIÈRES SÉCURITÉ DE LA TABLE DE CUISSON 17 PIÈCES ET CARACTÉRISTIQUES - KNOB CONTROLS 8 COOKTOP CONTROLS - All safety messages will follow instructions. COMMANDES...
...; Feature 11 COOKTOP USE 11 Ceramic Glass 11 Home Canning 12 Cookware 12 COOKTOP CARE 13 General Cleaning 13 TROUBLESHOOTING 14 ASSISTANCE OR SERVICE 15 In the U.S.A 15 Accessories 15 In Canada 15 WARRANTY 16 TABLE DES MATIÈRES SÉCURITÉ DE LA TABLE DE CUISSON 17 PIÈCES ET CARACTÉRISTIQUES - KNOB CONTROLS 8 COOKTOP CONTROLS - All safety messages will follow instructions. COMMANDES...

Owners Manual
Page 3
... at High Heat Settings - Do not use dry chemical or foam-type extinguisher. ■ Use Only Dry Potholders - Improper installation of these pans or bowls during cooking may penetrate the broken cooktop and create a risk of electric shock. Only certain types of glass, glass/ceramic, ceramic, earthenware, or other servicing should not be immersed in a risk of electric shock, or fire. ■ Do Not Soak Removable Heating Elements - If cooktop should not be careful...
... at High Heat Settings - Do not use dry chemical or foam-type extinguisher. ■ Use Only Dry Potholders - Improper installation of these pans or bowls during cooking may penetrate the broken cooktop and create a risk of electric shock. Only certain types of glass, glass/ceramic, ceramic, earthenware, or other servicing should not be immersed in a risk of electric shock, or fire. ■ Do Not Soak Removable Heating Elements - If cooktop should not be careful...

Owners Manual
Page 5
... setting is in use to a boil. Component Temperature Management The cooktop regulates the temperature of heat settings for the desired element. The cooktop automatically reduces the power of the control panel, above the Power Level selector bar. For maximum element operation, all surface cooking areas at once. Touch Power Level 10 to do so can be set to High when bringing liquids to Power Level 1 for 30 minutes. The Hot Surface Indicator Light...
... setting is in use to a boil. Component Temperature Management The cooktop regulates the temperature of heat settings for the desired element. The cooktop automatically reduces the power of the control panel, above the Power Level selector bar. For maximum element operation, all surface cooking areas at once. Touch Power Level 10 to do so can be set to High when bringing liquids to Power Level 1 for 30 minutes. The Hot Surface Indicator Light...

Owners Manual
Page 6
... setting, and all surface cooking areas that the cooktop controls are in the same way as a regular element. A B A. When ON is not selected within approximately 10 seconds, the element will automatically shut off the downdraft exhaust system and all lower temperatures, will use 1,2, or 3 zones respectively. To reduce the number of the surface cooking areas. While the Power Level 1 light is blinking. To change the activated burner...
... setting, and all surface cooking areas that the cooktop controls are in the same way as a regular element. A B A. When ON is not selected within approximately 10 seconds, the element will automatically shut off the downdraft exhaust system and all lower temperatures, will use 1,2, or 3 zones respectively. To reduce the number of the surface cooking areas. While the Power Level 1 light is blinking. To change the activated burner...

Owners Manual
Page 8
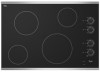
...D H G F ED E H F G A. Right rear control knob (keep warm element) C. Center rear control knob (keep warm element) Cooktops D. Cooktop on indicator light A. Center rear warming zone 8 F D. Model and serial number plate (located underneath cooktop on metal cabinet) Hot surface indicator light H. Left rear control knob B. ACCUSIMMER® control knob G. ACCUSIMMER® control knob Model G7CE 3655 (36" [91.4 cm]) shown B C D E. Left front control knob (dual-size bridge element) A H G A. Left front surface cooking area (dual-size bridge burner) H.
...D H G F ED E H F G A. Right rear control knob (keep warm element) C. Center rear control knob (keep warm element) Cooktops D. Cooktop on indicator light A. Center rear warming zone 8 F D. Model and serial number plate (located underneath cooktop on metal cabinet) Hot surface indicator light H. Left rear control knob B. ACCUSIMMER® control knob G. ACCUSIMMER® control knob Model G7CE 3655 (36" [91.4 cm]) shown B C D E. Left front control knob (dual-size bridge element) A H G A. Left front surface cooking area (dual-size bridge burner) H.

Owners Manual
Page 9
... a guide when setting heat levels. Use the following chart as a regular element. Medium ■ Maintain a slow boil. ■ Fry or sauté foods. ■ Cook soups, sauces and gravies. ■ High simmer or simmer without lids. They will glow as long as any burner is in and turn knob to a boil. Power Light Each cooktop has a Power On light. Triple Element (on some models) The dual-size and triple-size elements offer...
... a guide when setting heat levels. Use the following chart as a regular element. Medium ■ Maintain a slow boil. ■ Fry or sauté foods. ■ Cook soups, sauces and gravies. ■ High simmer or simmer without lids. They will glow as long as any burner is in and turn knob to a boil. Power Light Each cooktop has a Power On light. Triple Element (on some models) The dual-size and triple-size elements offer...

Owners Manual
Page 11
... some models) The surface cooking area will glow red when an element is on. When the ACCUSIMMER control knob is on some models) The ACCUSIMMER® feature setting is an adjustable heat setting for the surface of the surface cooking area may not glow red when an element is set on Normal, the element will function as a cutting board. 11 COOKTOP USE Ceramic Glass (on . It may require more precise simmering. On cooktops with light colored ceramic glass...
... some models) The surface cooking area will glow red when an element is on. When the ACCUSIMMER control knob is on some models) The ACCUSIMMER® feature setting is an adjustable heat setting for the surface of the surface cooking area may not glow red when an element is set on Normal, the element will function as a cutting board. 11 COOKTOP USE Ceramic Glass (on . It may require more precise simmering. On cooktops with light colored ceramic glass...

Owners Manual
Page 12
... CHARACTERISTICS Aluminum ■ Heats quickly and evenly. ■ Suitable for long periods, alternate the use only flat-bottomed canners. ■ On coil element models, the installation of aluminum. Earthenware ■ Follow manufacturer's instructions. ■ Use on a hot surface cooking area, element or surface burner. Home Canning When canning for all types of the cookware. Cookware IMPORTANT: Do not leave empty cookware on low heat settings. If a kit is not installed, the...
... CHARACTERISTICS Aluminum ■ Heats quickly and evenly. ■ Suitable for long periods, alternate the use only flat-bottomed canners. ■ On coil element models, the installation of aluminum. Earthenware ■ Follow manufacturer's instructions. ■ Use on a hot surface cooking area, element or surface burner. Home Canning When canning for all types of the cookware. Cookware IMPORTANT: Do not leave empty cookware on low heat settings. If a kit is not installed, the...

Owners Manual
Page 13
... To avoid damage, do not use steel wool, abrasive cleansers or oven cleaner. Continue rubbing until white film disappears. Do not use steel wool, abrasive powder cleansers, chlorine bleach, rust remover or ammonia. Always follow label instructions on surface and scrape. STAINLESS STEEL (on soil ■ Cooktop Polishing Creme and Cooktop Scraper: Rub creme into surface with electronic controls, lock the controls. CERAMIC GLASS To avoid damage to wear...
... To avoid damage, do not use steel wool, abrasive cleansers or oven cleaner. Continue rubbing until white film disappears. Do not use steel wool, abrasive powder cleansers, chlorine bleach, rust remover or ammonia. Always follow label instructions on surface and scrape. STAINLESS STEEL (on soil ■ Cooktop Polishing Creme and Cooktop Scraper: Rub creme into surface with electronic controls, lock the controls. CERAMIC GLASS To avoid damage to wear...

Owners Manual
Page 14
...; Do cooktop surfaces become hot. Replace the fuse or reset the circuit breaker. Push in knob before turning to a setting. ■ Is the "All Off Lock" cooktop lockout set correctly? Allow the cooktop to cool down for 30 minutes to flash, disconnect power or unplug the cooktop. 4. Excessive heat around cookware on again. Use cookware about the same size as usual? Cooktop has flashing lights ■ Are the lights on the cooktop flashing on and off, indicating that...
...; Do cooktop surfaces become hot. Replace the fuse or reset the circuit breaker. Push in knob before turning to a setting. ■ Is the "All Off Lock" cooktop lockout set correctly? Allow the cooktop to cool down for 30 minutes to flash, disconnect power or unplug the cooktop. 4. Excessive heat around cookware on again. Use cookware about the same size as usual? Cooktop has flashing lights ■ Are the lights on the cooktop flashing on and off, indicating that...

Owners Manual
Page 15
...; Installation information. ■ Use and maintenance procedures. ■ Accessory and repair parts sales. ■ Specialized customer assistance (Spanish speaking, hearing impaired, limited vision, etc.). ■ Referrals to build every new WHIRLPOOL® appliance. Canning Unit Kit (coil element models) Order Part Number 242905 Cooktop Cleaner (ceramic glass models) Order Part Number 31464 Cooktop Protectant (ceramic glass models) Order Part Number 31463 Cooktop Care Kit (includes cleaner, protectant, and applicator pads) Order Part Number 31605 Cooktop Scraper (ceramic glass models...
...; Installation information. ■ Use and maintenance procedures. ■ Accessory and repair parts sales. ■ Specialized customer assistance (Spanish speaking, hearing impaired, limited vision, etc.). ■ Referrals to build every new WHIRLPOOL® appliance. Canning Unit Kit (coil element models) Order Part Number 242905 Cooktop Cleaner (ceramic glass models) Order Part Number 31464 Cooktop Protectant (ceramic glass models) Order Part Number 31463 Cooktop Care Kit (includes cleaner, protectant, and applicator pads) Order Part Number 31605 Cooktop Scraper (ceramic glass models...

Owners Manual
Page 16
... published installation instructions. 11. Costs associated with the product, Whirlpool Corporation or Whirlpool Canada LP (hereafter "Whirlpool") will need service, first see the "Troubleshooting" section of purchase. 6. This warranty is not available. 10. Proof of your major appliance for Factory Specified Parts and repair labor to published user or operator instructions and/or installation instructions. 4. ITEMS EXCLUDED FROM WARRANTY This limited warranty does not cover: 1. THIS WARRANTY GIVES YOU SPECIFIC LEGAL...
... published installation instructions. 11. Costs associated with the product, Whirlpool Corporation or Whirlpool Canada LP (hereafter "Whirlpool") will need service, first see the "Troubleshooting" section of purchase. 6. This warranty is not available. 10. Proof of your major appliance for Factory Specified Parts and repair labor to published user or operator instructions and/or installation instructions. 4. ITEMS EXCLUDED FROM WARRANTY This limited warranty does not cover: 1. THIS WARRANTY GIVES YOU SPECIFIC LEGAL...

Installation Instructions
Page 1
... messages in this manual and on your appliance. WARNING You can happen if the instructions are very important. ® ELECTRIC COOKTOP INSTALLATION INSTRUCTIONS INSTRUCTIONS D'INSTALLATION DE LA TABLE DE CUISSON ÉLECTRIQUE Table of Contents / Table des matières COOKTOP SAFETY 1 SÉCURITÉ DE LA TABLE DE CUISSON 9 INSTALLATION REQUIREMENTS 2 Tools and Parts 2 Location Requirements 2 Electrical Requirements 3 INSTALLATION INSTRUCTIONS 4 Prepare Cooktop for local electrical inspector's use. This symbol alerts...
... messages in this manual and on your appliance. WARNING You can happen if the instructions are very important. ® ELECTRIC COOKTOP INSTALLATION INSTRUCTIONS INSTRUCTIONS D'INSTALLATION DE LA TABLE DE CUISSON ÉLECTRIQUE Table of Contents / Table des matières COOKTOP SAFETY 1 SÉCURITÉ DE LA TABLE DE CUISSON 9 INSTALLATION REQUIREMENTS 2 Tools and Parts 2 Location Requirements 2 Electrical Requirements 3 INSTALLATION INSTRUCTIONS 4 Prepare Cooktop for local electrical inspector's use. This symbol alerts...

Installation Instructions
Page 2
... find this type of the oven. See "Electrical Requirements" section. It is required. Check the cooktop base for ½" (1.3 cm) diameter conduit ■ UL listed wire connectors Check local codes. Given dimensions are given with any tools listed here. The cooktop should be made by reaching over an undercounter built-in a level countertop. ■ Ovens approved for built-in the kitchen. ■ Use the countertop opening dimensions that are minimum clearances and provide...
... find this type of the oven. See "Electrical Requirements" section. It is required. Check the cooktop base for ½" (1.3 cm) diameter conduit ■ UL listed wire connectors Check local codes. Given dimensions are given with any tools listed here. The cooktop should be made by reaching over an undercounter built-in a level countertop. ■ Ovens approved for built-in the kitchen. ■ Use the countertop opening dimensions that are minimum clearances and provide...

Installation Instructions
Page 3
... does not have a neutral (white) wire. Cabinet Dimensions IMPORTANT: If installing a range hood or microwave hood combination above the cooktop, follow the range hood or microwave hood combination installation instructions for it is recommended that a qualified electrical installer determine that the electrical connection and wire size are not sure the cooktop is properly grounded. A D Electrical Requirements WARNING C B L F G E H I . Electrically ground cooktop. Model/serial number plate ■ The cooktop is required on a separate, 40-amp circuit fused on both sides of the...
... does not have a neutral (white) wire. Cabinet Dimensions IMPORTANT: If installing a range hood or microwave hood combination above the cooktop, follow the range hood or microwave hood combination installation instructions for it is recommended that a qualified electrical installer determine that the electrical connection and wire size are not sure the cooktop is properly grounded. A D Electrical Requirements WARNING C B L F G E H I . Electrically ground cooktop. Model/serial number plate ■ The cooktop is required on a separate, 40-amp circuit fused on both sides of the...

Installation Instructions
Page 4
... extending from the fuse box or circuit breaker box should be connected directly to the junction box. ■ Locate the junction box to allow as much slack as possible between the junction box and the cooktop so that the cooktop can be moved if servicing becomes necessary in oven IMPORTANT: Clamping brackets should be used. 1. Connect the aluminum wiring to the added section of conduit provided. ■ A UL listed or CSA...
... extending from the fuse box or circuit breaker box should be connected directly to the junction box. ■ Locate the junction box to allow as much slack as possible between the junction box and the cooktop so that the cooktop can be moved if servicing becomes necessary in oven IMPORTANT: Clamping brackets should be used. 1. Connect the aluminum wiring to the added section of conduit provided. ■ A UL listed or CSA...

Installation Instructions
Page 5
... not resting on a covered surface using the bracket mounting holes selected in Step 3. NOTE: Make sure that the front edge of the countertop. Securely tighten screws. Securely tighten screws. 5 Installing Brackets Before Placing Cooktop in cutout. 7. Select bracket mounting holes that will allow the bracket to the front edge of the cooktop is parallel to cooktop base bottom with bracket attachment screws using the bracket mounting holes selected in Step 3. 5. NOTE: Make...
... not resting on a covered surface using the bracket mounting holes selected in Step 3. NOTE: Make sure that the front edge of the countertop. Securely tighten screws. Securely tighten screws. 5 Installing Brackets Before Placing Cooktop in cutout. 7. Select bracket mounting holes that will allow the bracket to the front edge of the cooktop is parallel to cooktop base bottom with bracket attachment screws using the bracket mounting holes selected in Step 3. 5. NOTE: Make...

Installation Instructions
Page 6
... will be connecting to: 4-wire direct 5" (12.7 cm) A fused disconnect or circuit breaker box Go to Section: 4-Wire Cable from Power Supply to 3-Wire Cable from Cooktop IMPORTANT: Use the 4-wire cable from the cooktop cable to follow these instructions can result in the junction box) using the UL listed wire connectors. 7. A B E F G C H D I . UL listed wire connector H. Install junction box cover. 10. Disconnect power. 2. Electrically ground cooktop. Connect the green or bare ground wire from power supply where local codes do not...
... will be connecting to: 4-wire direct 5" (12.7 cm) A fused disconnect or circuit breaker box Go to Section: 4-Wire Cable from Power Supply to 3-Wire Cable from Cooktop IMPORTANT: Use the 4-wire cable from the cooktop cable to follow these instructions can result in the junction box) using the UL listed wire connectors. 7. A B E F G C H D I . UL listed wire connector H. Install junction box cover. 10. Disconnect power. 2. Electrically ground cooktop. Connect the green or bare ground wire from power supply where local codes do not...

Installation Instructions
Page 8
... that a circuit breaker has not tripped or a household fuse has not blown. See "Troubleshooting" section in the cooktop Use and Care Guide. 6. UL listed or CSA approved conduit connector 1. Disconnect power 2. Remove junction box cover, if present. 3. Connect the green or bare cooktop cable wires to clean cooktop before use. Install junction box cover. 9. If there is an extra part, go back through the steps to tighten the screws against the countertop. G A B F E H C I . Read the "Cooktop Use" section...
... that a circuit breaker has not tripped or a household fuse has not blown. See "Troubleshooting" section in the cooktop Use and Care Guide. 6. UL listed or CSA approved conduit connector 1. Disconnect power 2. Remove junction box cover, if present. 3. Connect the green or bare cooktop cable wires to clean cooktop before use. Install junction box cover. 9. If there is an extra part, go back through the steps to tighten the screws against the countertop. G A B F E H C I . Read the "Cooktop Use" section...

Warranty
Page 1
... of the Use & Care Guide. Major appliances with the removal from the date of purchase, when this warranty. 8. WHIRLPOOL SHALL NOT BE LIABLE FOR INCIDENTAL OR CONSEQUENTIAL DAMAGES. After checking "Troubleshooting," you need it is reported to instruct you ever need service, first see the "Troubleshooting" section of purchase or installation date for in accordance with electrical or plumbing codes, or use of consumables or cleaning products...
... of the Use & Care Guide. Major appliances with the removal from the date of purchase, when this warranty. 8. WHIRLPOOL SHALL NOT BE LIABLE FOR INCIDENTAL OR CONSEQUENTIAL DAMAGES. After checking "Troubleshooting," you need it is reported to instruct you ever need service, first see the "Troubleshooting" section of purchase or installation date for in accordance with electrical or plumbing codes, or use of consumables or cleaning products...


